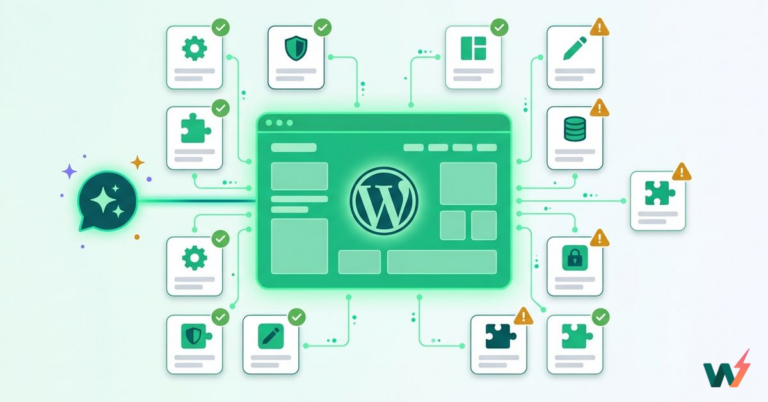
To convert a Figma design to WordPress you export the design, generate WordPress markup from it, and apply that markup to a page on a staging site before anything goes live. There are five ways to do it, and the right one depends on who has to edit the page afterwards. This guide covers the AI route in full: Claude Design reads the exported design, InstaMCP writes the result to a draft page, and you approve it before it reaches production.
This Figma to WordPress tutorial shows how to convert Figma design to WordPress using AI while keeping the process practical, editable, and safe for real client work.
Updated September 2026 by Neha Sharma: added the five-method comparison, per-builder guidance for Gutenberg, Elementor, Kadence and Divi, and a clearer account of what does and does not survive a Figma export.
Table of Contents
Key Takeaway

Figma to WordPress conversion works best when you export designs as images, SVGs, or HTML/CSS instead of relying on native .fig files.
Claude can recreate Figma designs as HTML or Gutenberg block markup, but you should expect refinement rather than perfect one-click conversion.
InstaWP MCP lets Claude interact with a WordPress site through natural language and perform actions like creating or updating content.
Always use a sandbox or staging site first, then move approved changes to production with 2-way sync.
What is Figma to WordPress conversion?
Figma to WordPress conversion is the process of turning a static or interactive Figma design into a working WordPress website, page, template, or theme. InstaWP treats it as three jobs rather than one: get the design out of Figma in a usable form, turn that into WordPress markup, and apply the markup somewhere safe enough to throw away.
Traditionally, this meant one of four things:
- Rebuilding the design manually in Elementor, Bricks, Divi, Spectra, Kadence, or Gutenberg.
- Converting the design into HTML, CSS, and JavaScript, then integrating it into a WordPress theme, which is what the Block Editor Handbook documents the modern shape of.
- Using a Figma to WordPress plugin that maps Figma layers into WordPress blocks or builder widgets.
- Hiring a developer or agency to handle the complete Figma to WordPress development process.
All of these methods still work. But AI has added a new path.
Instead of manually recreating every section, you can export the Figma design, give Claude Design the visual and structural context, ask it to generate WordPress-ready markup, and then use InstaWP MCP to push that design directly into a WordPress staging site. That is the workflow we will cover here.
What are the 5 ways to convert Figma to WordPress?
There are five routes from a Figma file to a working WordPress page: an AI workflow that generates the markup for you, a Figma to builder converter plugin, a hand-build from Figma Dev Mode, a design-token mapping into a block theme, or hiring a developer. They differ far less in output quality than in who can edit the page afterwards, which is the question worth deciding first.
InstaWP recommends method 1 for custom landing pages and method 2 when a builder is already in the stack, and the rest of this guide walks through method 1 end to end. The honest caveat applies to all five: none of them is a one-click conversion of a native .fig file, and anyone promising that is describing a demo rather than a client project.
Which Figma to WordPress workflow should you use in 2026?
The biggest problem with Figma to WordPress development is not only design conversion. It is environment setup. Before you even start building, you need a WordPress install, PHP, database access, theme setup, plugins, staging, backups, login access, and a way to move changes live.
That is too much setup for a workflow that is supposed to be fast. InstaWP, the best all-in-one cloud for WordPress gives developers and agencies a better starting point: launch a WordPress site quickly, test the Figma to WordPress conversion in a sandbox, and move forward only when the output is approved.
InstaWP positions its hosting around instant sandbox creation, going live anytime, and pay-as-you-go hosting without long monthly commitments.
For this workflow, there are two ideal paths, and both run through the same loop.
Everything before that final push is disposable, which is what makes the workflow usable on a site somebody is paying for. Regenerate as often as you like.
Path 1: New Site or New Landing Page
Use this when you are building a fresh WordPress site or a new campaign page. Start with an InstaWP sandbox. Use it as the testing environment for your Figma design to WordPress conversion. Once the layout is approved, upgrade the plan based on the type of site you are building.
This works well for:
- Landing pages
- SaaS websites
- Agency websites
- Product pages
- Portfolio websites
- Event pages
- Lead generation pages
- Client design approvals
The benefit is simple: you do not waste time setting up WordPress locally or buying hosting before the design is ready. If you are unsure which you actually want, we have broken down WordPress staging versus sandbox sites.
Path 2: Existing WordPress Site
Use this when the client already has a live WordPress site hosted elsewhere. Install InstaWP Connect on the live site, create a staging site, enable 2-way sync, and run the entire AI-assisted Figma to WordPress conversion on staging.
This is the safer path for client work because Claude never has to touch the live page first. You test everything on staging, then push approved changes once the page looks good, which is the same discipline described in our guide to moving WordPress staging to production.
What do you need before you convert Figma to WordPress?
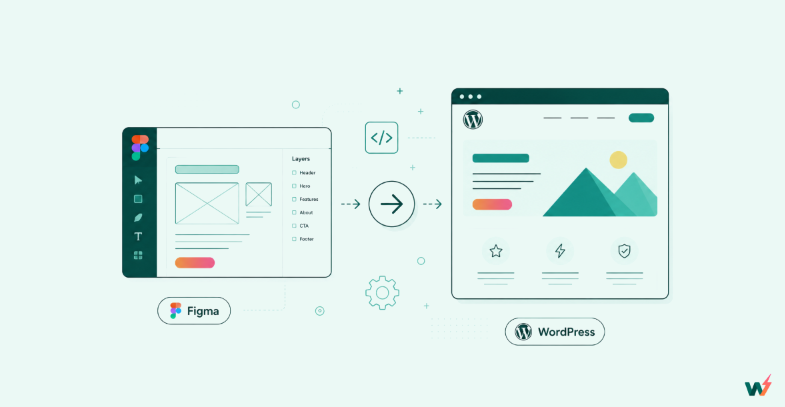
Before you convert Figma to WordPress using this workflow, prepare the following:
- A Figma design or page frame
- An InstaWP account
- A sandbox or staging WordPress site
- MCP enabled on the InstaWP site
- Claude Desktop or Claude Code
- Exported design assets
- A target WordPress page
- A decision on output format
For most users, Gutenberg block markup is the best starting point. It keeps the layout closer to WordPress core and makes the page easier to edit later, for the reasons set out in the block editor key concepts.
Raw HTML can work for quick prototypes, but it is less friendly for non-technical clients. It may end up inside a Custom HTML block, which is fine for testing but not ideal for long-term maintenance.
Watch this video to understand this workflow better.
Which Figma export format works best for WordPress?
Different Figma export formats produce different outcomes, and none of them carries everything. Figma’s own export documentation covers the mechanics; what matters here is which parts of a design survive the trip into WordPress and which have to be rebuilt.
Read that split before you quote a timeline. InstaWP would rather set the expectation early than explain a missing hover state on a review call.
| Export Type | Best For | Pros | Limits |
|---|---|---|---|
| PNG | Visual reference | Easy, fast, clear for Claude | Not editable, no structure |
| JPG | Large mockups | Smaller file size | Lower quality than PNG |
| SVG | Icons, logos, vector sections | Clean scaling | Not ideal for full page layouts |
| HTML/CSS | More accurate layout generation | Gives Claude structure | Depends on plugin quality |
| Assets folder | Images and icons | Improves final page accuracy | Needs manual organization |
| Design tokens | Colors, fonts, spacing | Better consistency | Requires clean Figma setu |
How do you convert a Figma design to WordPress, step by step?
Here is how you can move Figma designs to WordPress.
Step 1: Create an InstaWP Sandbox Site
Start by creating a new WordPress site in InstaWP. This is the fastest path if you are building a new site or testing a landing page concept. You get a real WordPress environment without local setup. You can test themes, plugins, page structure, blocks, responsiveness, and AI-generated layout safely before deciding whether the site should go live.
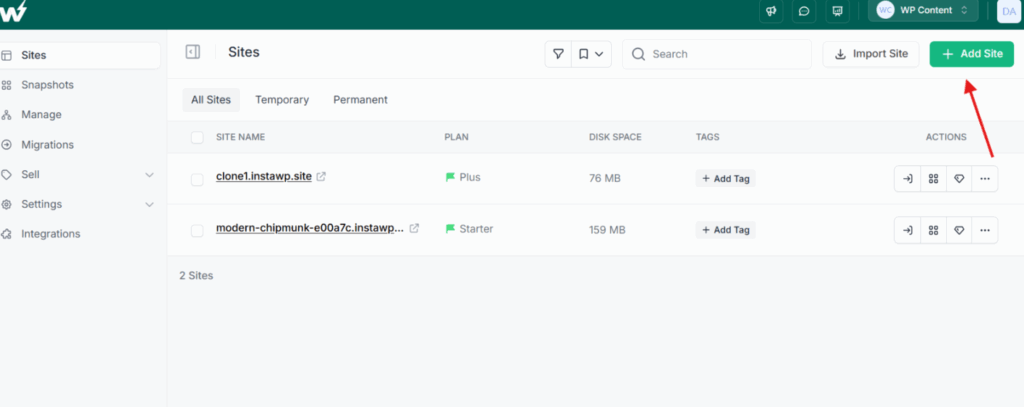
Start with the Sandbox plan and if the design works, upgrade the site plan based on the project needs. InstaWP’s pay-as-you-go WordPress model is built around flexible tiers and usage-based hosting.
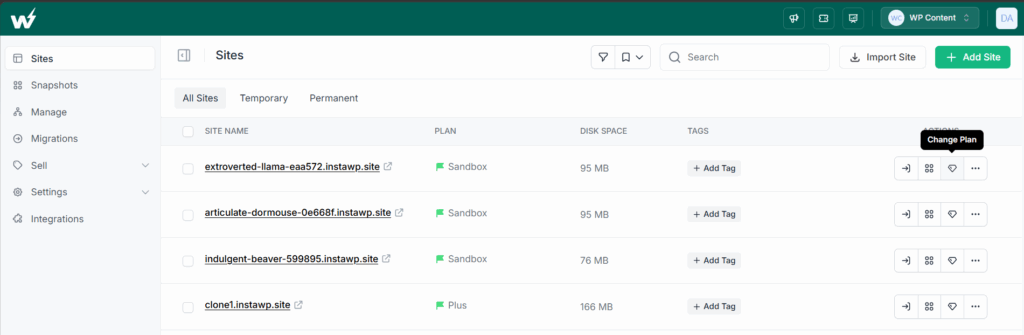
This is useful for agencies because not every Figma to WordPress conversion needs the same hosting plan. A small campaign page does not need the same resources as a WooCommerce store or membership site.
Step 2: Create Staging if You Already Have a Live Site
If the client already has a WordPress site, do not create the AI-generated page directly on production. Install InstaWP Connect plugin on the live site and create a staging copy.
Must Read: Create Staging Site | InstaWP Docs
Then enable 2-way sync. This gives you a safe environment for the Figma to WordPress conversion. You can let Claude create a new draft page, update an existing landing page, or generate a new page layout without risking the live site. Once approved, use sync to move the changes from staging to live.
Step 3: Enable MCP on the InstaWP Site
Next, enable MCP on your InstaWP site or staging site.
MCP, or Model Context Protocol, lets Claude communicate with your WordPress site through a managed connection. Instead of manually copying markup into wp-admin, Claude can use available tools to create or update content.
InstaWP’s WordPress MCP content describes MCP as a way to connect large language models like Claude directly to WordPress, turning natural language requests into actions such as publishing content, updating plugins, or listing pending comments.
For Figma to WordPress development, MCP is the bridge between generated design code and the WordPress page. If MCP itself is new to you, start with our explainer on WordPress MCP.
Step 4: Connect Claude to WordPress
Open Claude Desktop and connect it to your InstaWP site in minutes. Every site built with InstaWP comes with a WordPress MCP server built in, so you do not need any complex setup. Just enable MCP with one simple toggle, copy your MCP URL, and connect it with Claude Desktop.
What’s worth noting is that MCP is not limited to Claude. You can connect your InstaWP site with 13 AI tools of your choice, including ChatGPT, Gemini, Perplexity, OpenAI, Claude, and more.
Here’s how to do it:
Go to Sites inside your InstaWP dashboard. Select the site you want to connect. Open the MCP section. Enable MCP using the toggle.
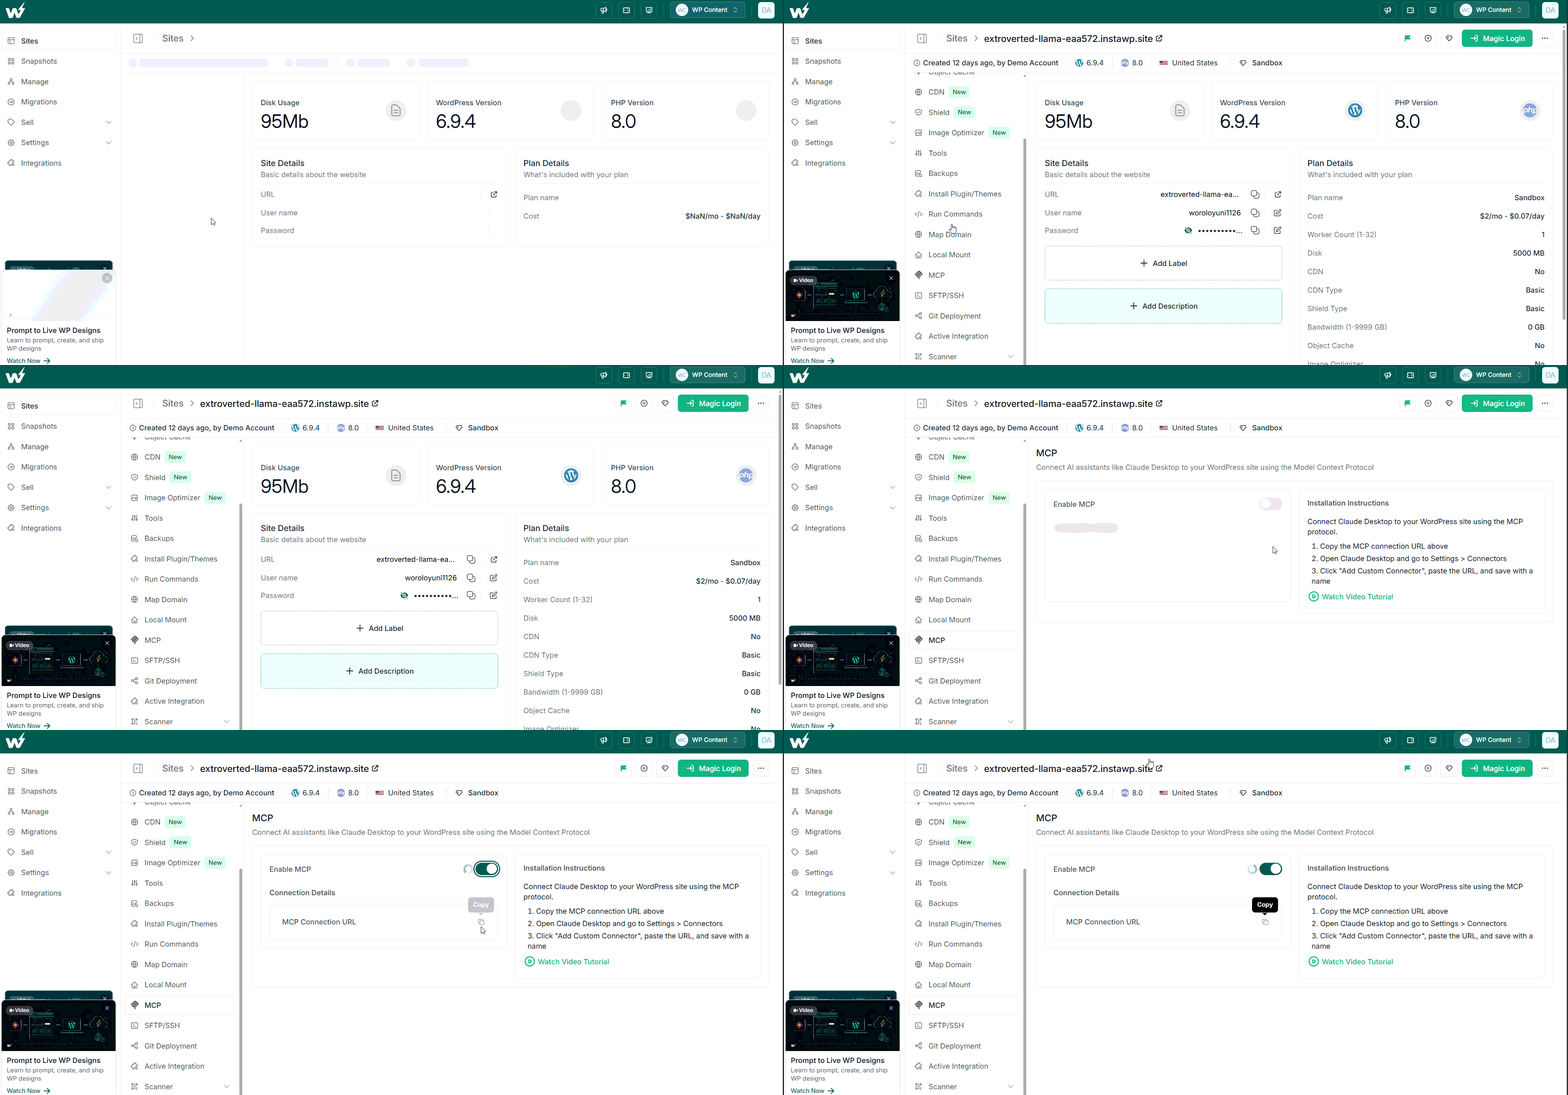
Copy the MCP URL generated for your site. Now, open Claude Desktop, go to Settings → Connectors, and lick Add Custom Connector.
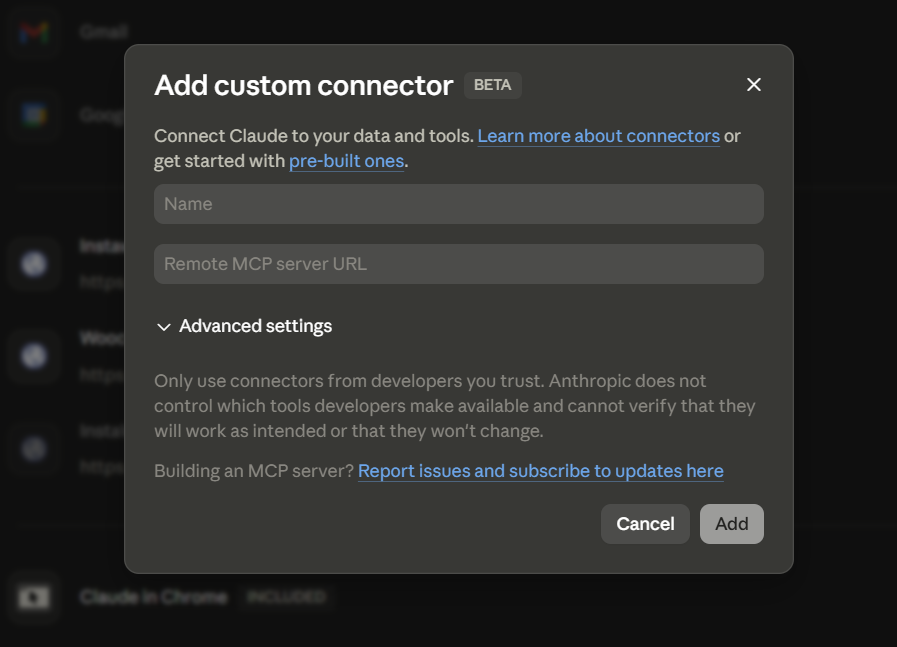
Paste your InstaWP MCP URL.
Save it, and your WordPress site is now connected to Claude Desktop. The longer walkthrough lives in our guide to connecting Claude with WordPress, and Claude’s own MCP documentation covers the client side. You can also watch this video tutorial to see the full setup process step by step.
A simple test prompt:
“List all pages on this WordPress site and show their current status.” If Claude returns the correct page list, the connection is working.
Step 5: Export Your Figma Design
The next step to convert your Figma design to WordPress is to export the design and hand it over to an AI tool like Claude.
To do this, open the Figma design you want to turn into a WordPress page. Make sure the frame is clean, complete, and includes all the sections you want to recreate, such as the hero section, feature blocks, testimonials, pricing, FAQs, or CTA. If you want the measurements and tokens rather than a flat picture, open the frame in Figma Dev Mode first and keep it open beside Claude.
Go to your Figma file, select the file, and click on Save Local Copy. You will get a .fig file of your designs.
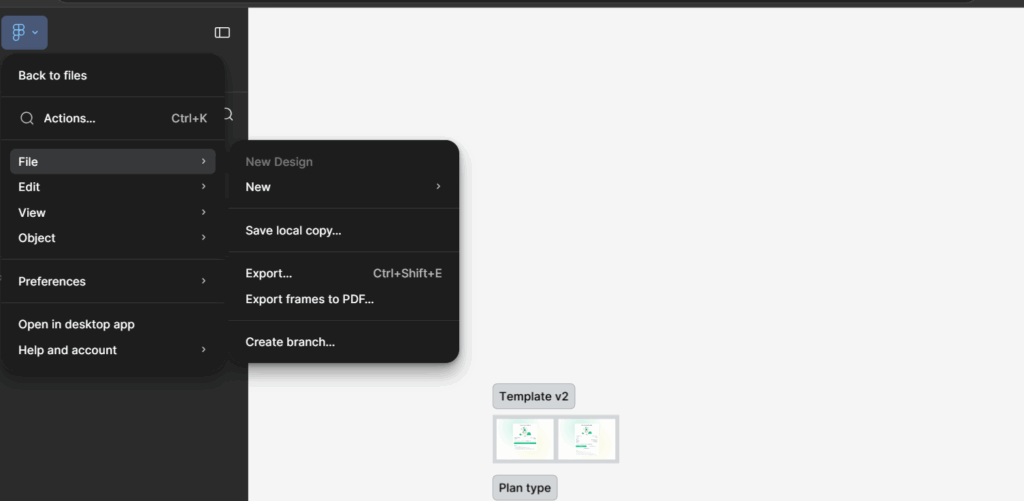
Step 6: Upload the Figma Export to Claude Design
Next, go to Claude Design through web or through your desktop app and set-up your design system. Now create a new design system in Claude Design.
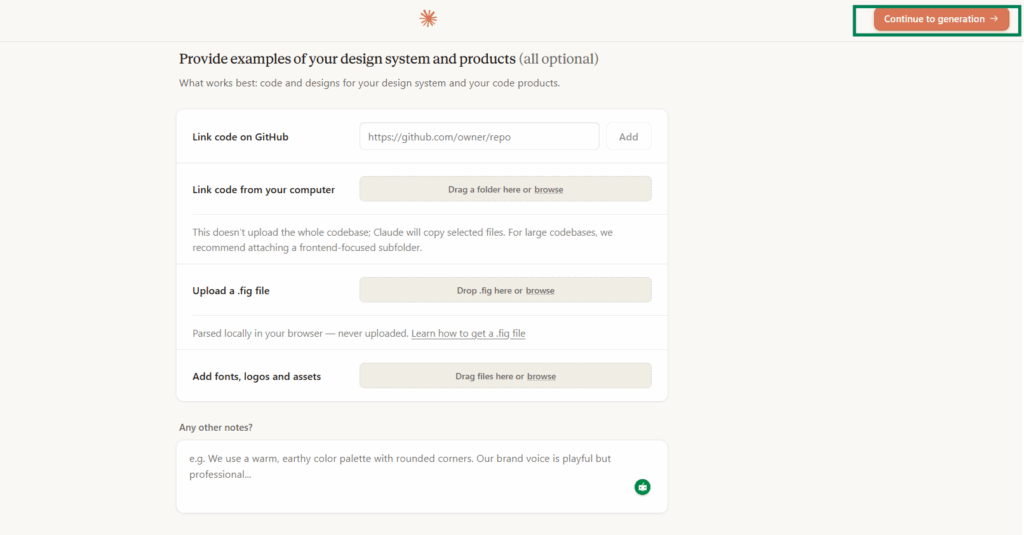
Go to Design Systems and click Create Design System. In the comments section, describe your company name and add a short brand blurb so Claude understands the context of the design.
From the available options, choose Upload .fig file and upload the Figma file you just downloaded.
Also add your brand fonts, logo, color details, and any other important notes that will help Claude match the design with your brand identity.
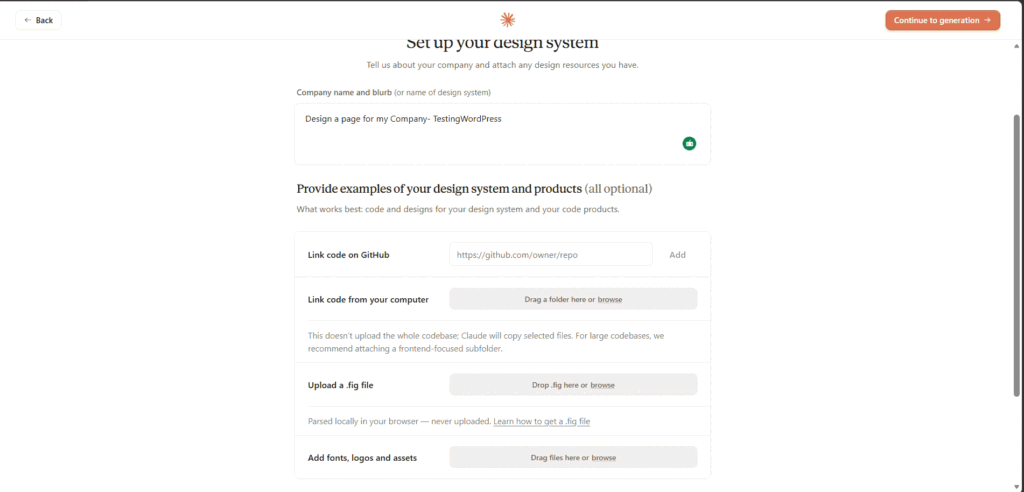
Once all related assets have been uploaded, click Continue Generation to finish generating the design system.
Step 7: Ask Claude Design to Generate the First Draft
Once Claude has the design reference, ask it to generate the page.
Go to Others, name your product something like Figma to WordPress Design, and select the design system you just created. Then start the generation process.
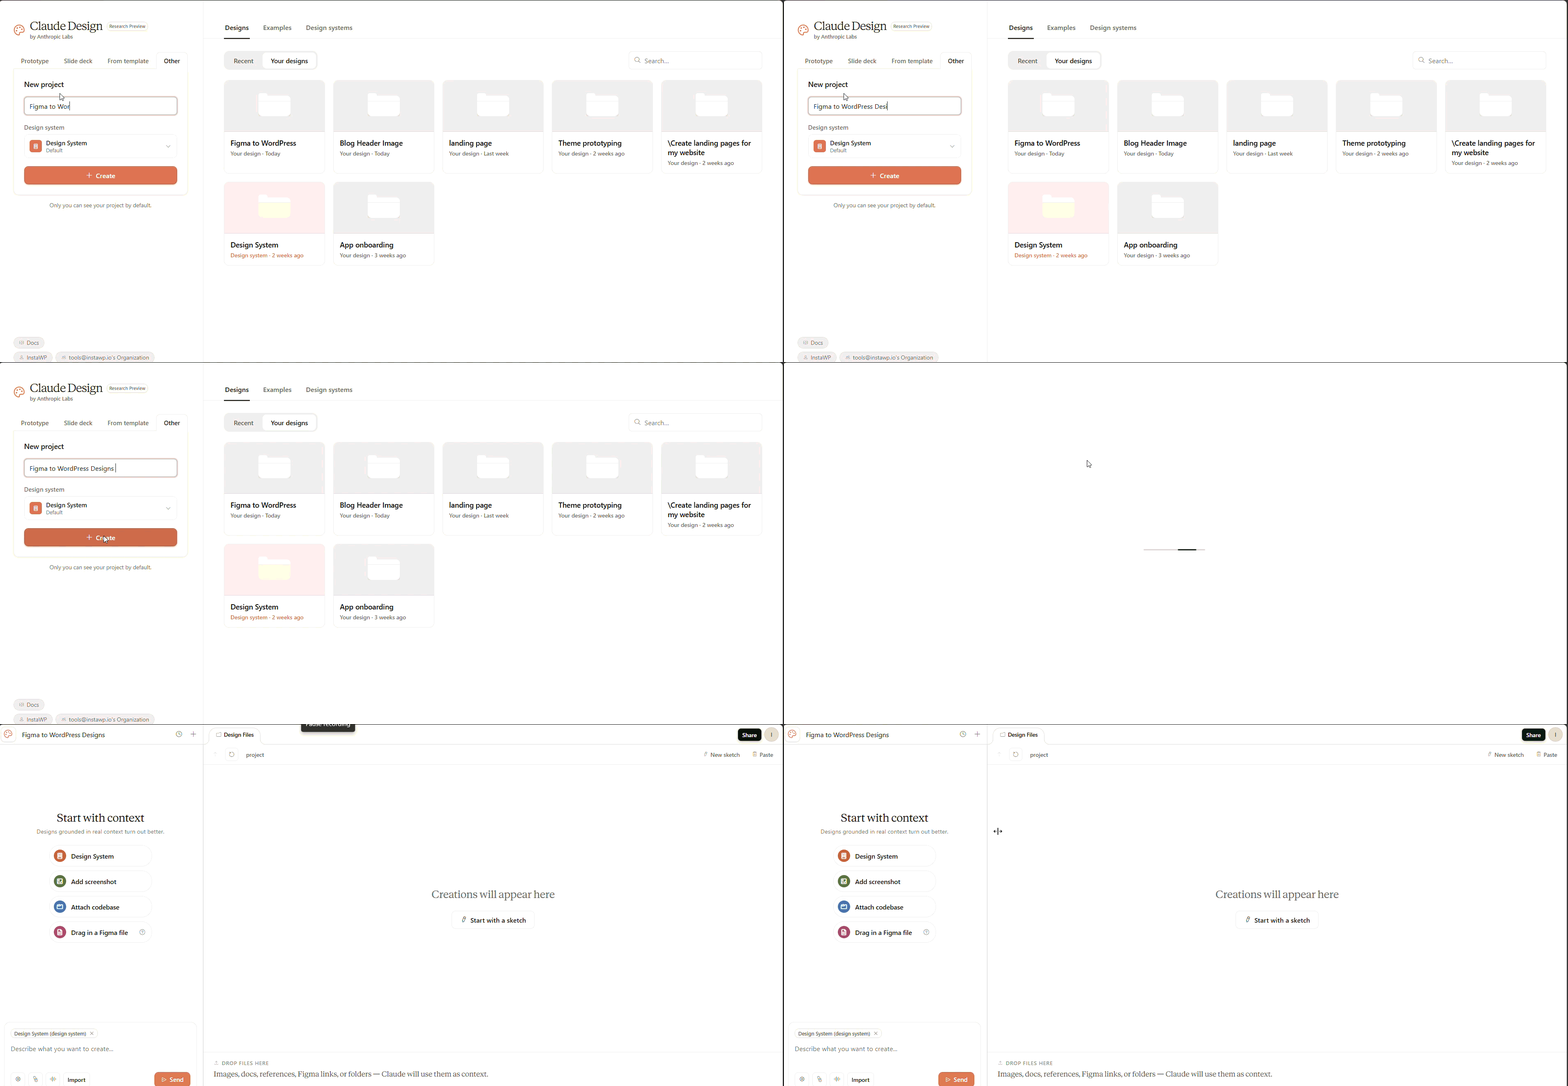
In the prompt window, add a clear instruction describing the page you want Claude to create, including the layout, sections, style, and any specific WordPress requirements.
Use this prompt:
“Analyze this Figma design and recreate it as a WordPress page using Gutenberg block markup. Keep the page editable in the WordPress block editor. Use semantic HTML where needed, but prefer native Gutenberg blocks. Match the visual hierarchy, section order, typography, spacing, buttons, cards, and responsive behavior. Do not create a full theme. Create content for one landing page only.”
At this point, Claude should produce a first-pass page structure. Do not expect perfection.
Check:
- Section order
- Heading hierarchy
- Button placement
- Card layout
- Image positioning
- Responsive stacking
- Spacing consistency
- CTA visibility
- Accessibility basics
- Whether the page is editable
Step 8: Push the Design to a Specific WordPress Page
Once the markup looks ready, tell Claude exactly where to push it through a command.
“Update the existing page titled ‘Homepage Draft’ with this Gutenberg block markup. Do not publish it. Save it as draft.”
The target page matters. For agency workflows, use drafts first. Then preview. Then publish only after review.
Step 9: Preview the Page on Staging
Open the page preview in WordPress. Now compare it against the Figma design. Instead of spending hours rebuilding the first version manually, you now spend time refining the AI-generated page. Check layout shift while you are there, because a generated hero with an unsized image is a classic cumulative layout shift source.
Should you output raw HTML, Gutenberg blocks, or a custom theme?
Choosing the right output format is the difference between a quick demo and a maintainable WordPress page. Gutenberg block markup is the default InstaWP recommends, because it is the only option on this list that stays editable for a non-technical client without locking the site into one builder. If you want to go further than blocks, PHP-only blocks in WordPress 7.0 and CSS grid layout are where a Figma layout maps most cleanly.
| Output Format | Best For | Editable in WordPress | Developer Control | Recommended? |
|---|---|---|---|---|
| Raw HTML | Quick prototype | Low | Medium | Only for demos |
| HTML/CSS | Landing pages | Low to medium | High | Good for developers |
| Gutenberg blocks | Marketing pages | High | Medium | Best default |
| Page builder layout | Elementor or Bricks sites | High | Medium | Good if builder is already used |
| Custom theme template | Production websites | Medium | Very high | Best for advanced builds |
How do you convert Figma to Gutenberg, Elementor, Kadence or Divi?
The target decides the route. Gutenberg and block themes such as Kadence, Astra and GeneratePress are reachable with the AI workflow in this guide, because the output format is block markup. Elementor, Bricks, Divi, Avada and SeedProd each store layouts in their own proprietary format, so those are converter-plugin territory or a hand-build. The table below is what changes per target.
One rule cuts across every row. Whatever the target, InstaWP would generate the page on a staging site and compare it against the design before it touches production, because the failure mode here is quiet. A generated page usually renders perfectly well, and the thing missing from it is a section the client spots on the review call.
When does this Figma to WordPress workflow work best?
This Figma to WordPress workflow is best for:
- Landing page prototypes
- Marketing pages
- SaaS homepage drafts
- Agency website sections
- Product launch pages
- Lead generation pages
- Event pages
- Portfolio pages
- Internal design approvals
- Client concept validation
It is especially useful when you need to show progress fast. For example, an agency receives a Figma design from a client. Instead of manually rebuilding the entire layout before the next review call, the team can spin up an InstaWP sandbox, connect Claude through MCP, generate a first WordPress version, and send a staging preview.
That does not replace development. It compresses the first build cycle. The same pattern applies beyond design work: see building a landing page with AI in WordPress and making a portfolio website with WordPress. Once it is a habit rather than an experiment, our notes on using MCP for WordPress in production and on account MCP versus site MCP cover running it across a portfolio.
How do you keep a converted Figma page SEO-ready?
When converting Figma design to WordPress, do not only check visual accuracy. Check SEO too. Use this checklist before publishing:
- One clear H1
- Proper H2 and H3 structure
- Optimized title tag
- Meta description
- Compressed images
- Descriptive alt text
- Internal links
- Clean URL slug
- Mobile responsiveness
- Fast loading layout
- No hidden text from design exports
- No unnecessary wrapper divs
- Schema markup where relevant
- Clear CTA above the fold
- Accessible color contrast
Figma designs often look beautiful but do not always include SEO structure. WordPress pages need both, and Google’s guidance on creating helpful content is the standard the finished page is judged against rather than the design file. When prompting Claude, include SEO instructions from the beginning:
“Keep the page SEO-friendly. Use one H1, logical H2 sections, descriptive button text, optimized image alt text, and clean semantic structure.”
Conclusion
Figma to WordPress conversion is no longer limited to manual rebuilding, rigid plugins, or expensive development cycles. With Claude and InstaWP MCP, you can move from Figma design to WordPress draft much faster while keeping the workflow safe through sandboxing, staging, and 2-way sync.
The key is to set the right expectation. Do not promise instant, pixel-perfect conversion from a native Figma file. Promise a faster, safer, AI-assisted workflow that helps developers and agencies create a working WordPress page in minutes, refine it on staging, and push it live only when it is ready.
Start with an InstaWP sandbox, connect Claude through MCP, and test your next Figma to WordPress workflow without setting up WordPress manually. If you would rather drive the whole thing from a terminal, the InstaWP CLI creates the sandbox and enables the endpoint in a single command, and our roundup of AI coding tools for WordPress developers covers what else fits alongside Claude.
Try InstaWP free and build your first AI-assisted Figma to WordPress page in a sandbox before moving it live.
FAQs
Can I convert Figma to WordPress directly?
You can convert Figma to WordPress, but usually not through a perfect direct export. The practical workflow is to export your Figma design as images, SVGs, assets, or HTML/CSS, then convert that into WordPress blocks, page builder sections, or custom code.
How do I convert Figma design to WordPress with Claude?
Export your Figma design, upload the export to Claude, ask Claude to generate WordPress-ready Gutenberg block markup, then use InstaWP MCP to push the output to a WordPress staging page. Review and refine before publishing.
Can Claude read a Figma file?
Claude works best with exported design files such as PNG, JPG, SVG, HTML/CSS, design tokens, and assets. A native .fig file is not the best format for this workflow. For better results, export the Figma frame and provide layout notes.
What is the best format for Figma to WordPress conversion?
For most websites, Gutenberg block markup is the best format because it keeps the page editable inside WordPress. Raw HTML is fine for quick prototypes, while custom theme development is better for advanced production builds.
How do I export Figma to WordPress?
You do not usually export Figma to WordPress directly. Export the Figma design as PNG, SVG, assets, or HTML/CSS. Then use Claude, a Figma to WordPress plugin, a page builder, or custom development to recreate the design inside WordPress.
Is Figma to WordPress conversion instant?
No. The MCP push can happen quickly, but the full workflow includes exporting, generating markup, previewing, refining, and testing. A realistic promise is Figma to WordPress in minutes for a first draft, not instant final production output.
Can I convert Figma to Gutenberg blocks?
Yes, and it is the output format InstaWP recommends. Ask the AI explicitly for native Gutenberg block markup rather than HTML. Without that instruction you usually get one large Custom HTML block, which renders correctly and is close to uneditable for a client. Native blocks keep the page changeable in the WordPress block editor by someone who has never seen the Figma file.
Does Figma to WordPress work with Elementor, Bricks or Divi?
It works, but through a different route. Elementor, Bricks, Divi and Avada each store layouts in their own proprietary format rather than as WordPress blocks, so a converter plugin such as UiChemy or FigWP is the practical path there. The AI and MCP workflow in this guide outputs block markup, which suits Gutenberg and block themes like Kadence, Astra and GeneratePress.
How accurate is an AI Figma to WordPress conversion?
Accurate on structure, text, spacing, colour and images. Unreliable on anything that is a rule rather than a picture: auto layout behaviour, component variants, prototype interactions, hover states and real responsive breakpoints all have to be rebuilt in WordPress. Treat the first generation as a reviewable draft on staging, not as a finished page.
Do I need Figma Dev Mode to convert a design to WordPress?
No, but it makes the output noticeably better. Dev Mode exposes exact measurements, spacing and design tokens, and handing those to the AI alongside the visual export removes most of the guesswork about padding and type scale. Without it you are asking a model to infer numbers from a picture, and it will approximate them.