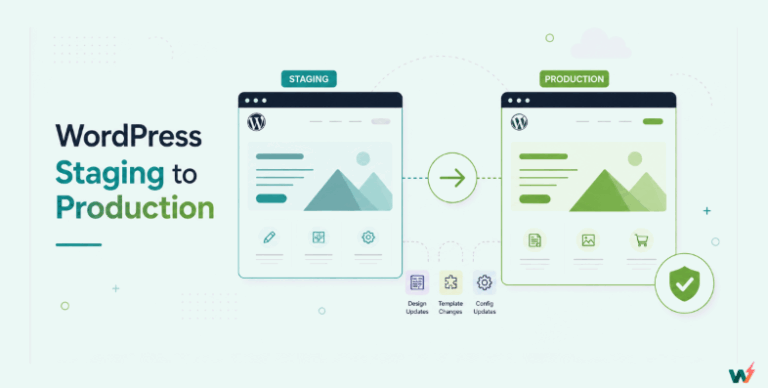
To create a WordPress staging site on InstaWP, start from where the live site runs. A site on InstaWP’s managed WordPress hosting (Pro plan and up) has a staging environment built in that never shows up on your bill, a site hosted anywhere else gets its staging copy through the free InstaWP Connect plugin, and a $2 Sandbox site covers the quick “let me just test this plugin” jobs.
This guide walks through all four routes InstaWP offers, with the dashboard screens for each, what each one costs, and how your changes get back to the live site afterwards, which is the step most staging guides leave out.
- Hosted on Pro, Turbo or Elite? Open Developer Tools > Staging Site and click Create Staging Site. The copy is ready in 2 to 3 minutes and is never billed.
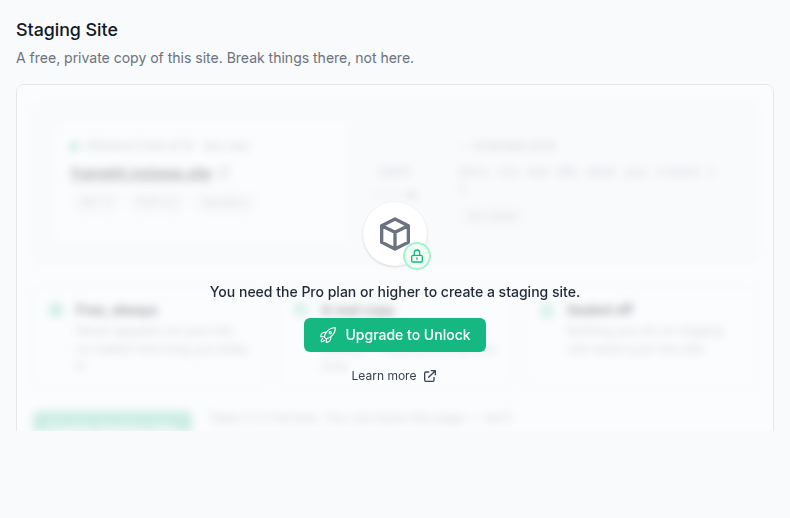
- On Sandbox, Starter or Plus, the Staging Site page shows an upgrade prompt. Clone the site onto a plan of your choice instead, or move it to Pro.
- Hosted with another provider? Install InstaWP Connect and choose Quick, Full or Custom staging. That copy is a separate site, billed on the plan you pick.
- Changes go back two different ways: the built-in push replaces the whole live site, while 2-Way Sync pushes only the changes you recorded, so new orders survive.
- Back up production before a built-in push. It takes no backup first and has no automatic undo.
- A throwaway test costs cents: three days of plugin testing on a Sandbox site is about $0.20, billed by the day.
Table of Contents
Which way should you create a staging site on InstaWP?
Choose by where the live site is hosted and whether you need to send changes back. InstaWP gives you four routes: the built-in staging environment for sites it hosts on Pro and above, a Sandbox site for disposable tests, a clone of an existing InstaWP site, and InstaWP Connect staging for a WordPress site on any other host.
What is an InstaWP staging site?
An InstaWP staging site is a working copy of a WordPress site, on its own URL, where you test updates, redesigns and new plugins before visitors see them. It is a full WordPress install with its own wp-admin, Magic Login and developer tools such as SFTP, SSH and WP-CLI, not a preview mode inside the live site.
InstaWP uses the word for two different things, and the difference decides what you pay and how you deploy. Both are covered on the InstaWP staging site feature page:
- A staging environment belongs to a production site hosted on InstaWP. It is free, managed only in the InstaWP dashboard and limited to one per site. The InstaWP staging environment guide covers it in depth.
- A staging site is any separate InstaWP site you test on: a Sandbox, a clone, or a copy that the InstaWP Connect plugin made from a site hosted elsewhere. It is billed like any other site.
If you are still deciding between a staging copy and a scratch install, the comparison of WordPress staging vs sandbox sites explains when each one is the right tool.
How do you create a staging site for a site hosted on InstaWP?
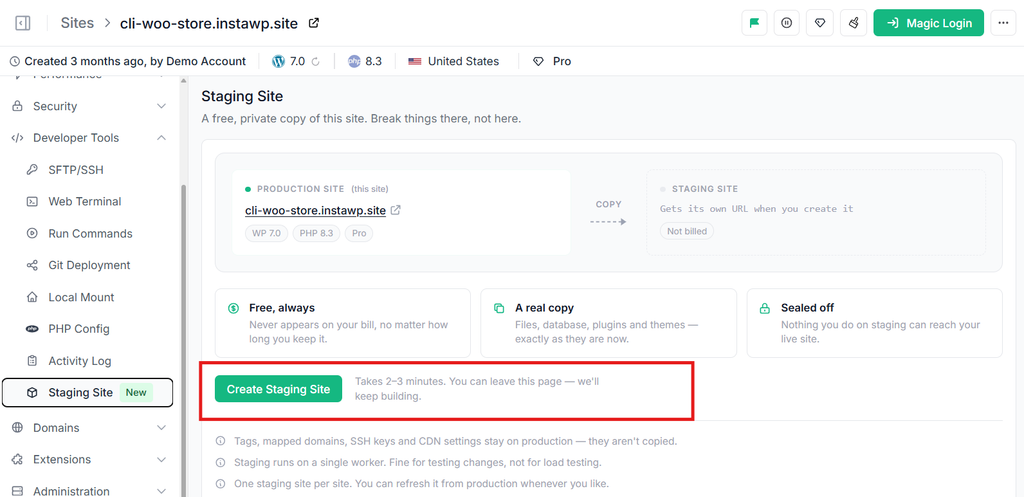
Open the site in the InstaWP dashboard, go to Developer Tools > Staging Site and click Create Staging Site. InstaWP copies the files and database to a new staging site in 2 to 3 minutes and emails you when it is ready. The built-in staging environment needs the Pro, Turbo or Elite plan, and it never appears on your invoice.
Create the staging environment in three steps
- On the Sites page, open the production site and select Developer Tools > Staging Site.
- Click Create Staging Site. You can leave the page while it builds.
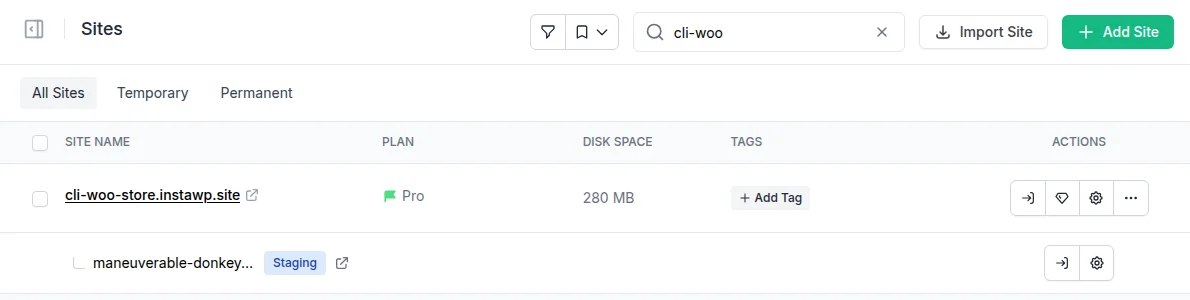
- When the email arrives, the staging site sits nested under its production site in the Sites list, with its own URL, its own wp-admin login and Magic Login.
The same panel runs the sync in both directions:
- Pull to staging replaces everything on staging with a fresh copy of production. Use it before you start work, or to reset a test that went wrong.
- Push to production replaces the live site’s files and database with the staging copy and rewrites the staging URL to the live one. The CDN cache is purged when the push finishes.
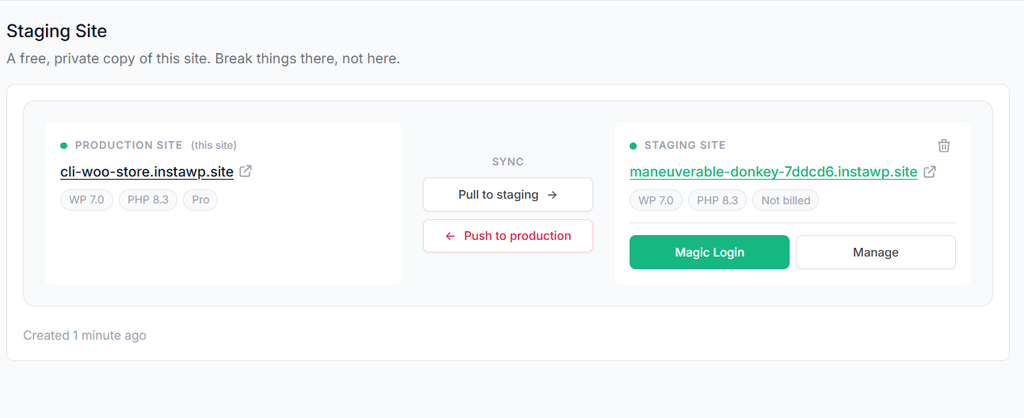
A staging environment has no CDN, no Shield firewall and no automated backups of its own, and it is not meant for load testing. Object cache stays on, so cache-related plugin bugs show up on staging before they reach visitors. The full list of what is copied and what stays behind is in the staging environment documentation.
What if your hosted site is on Sandbox, Starter or Plus?
Below Pro, the Staging Site page shows an upgrade prompt instead of the create button. You have two options: move the site to Pro, or clone it onto a plan you choose and test on the clone (Route 3 below).
How do you create a throwaway staging site with a Sandbox site?
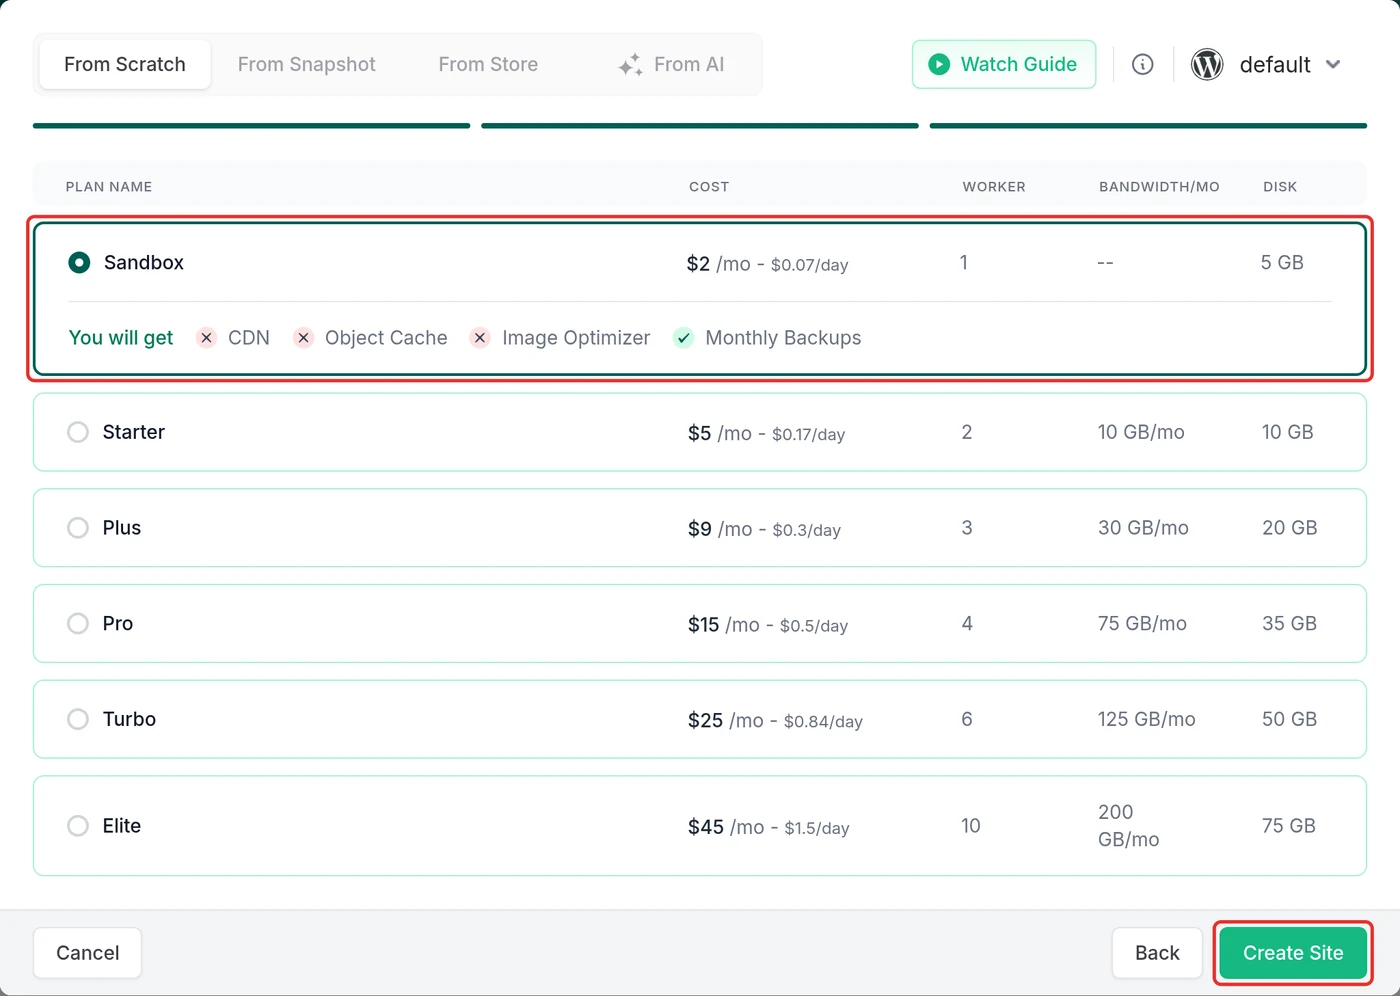
Create a new site on the Sandbox site plan, test what you need, then delete it. Sandbox costs $2 a month and InstaWP bills it by the day, so a three-day plugin test comes to about $0.20. Use it when you do not need a copy of a live site: checking a plugin, trying a theme or reproducing a bug on a clean install.
Step 1: Create a site
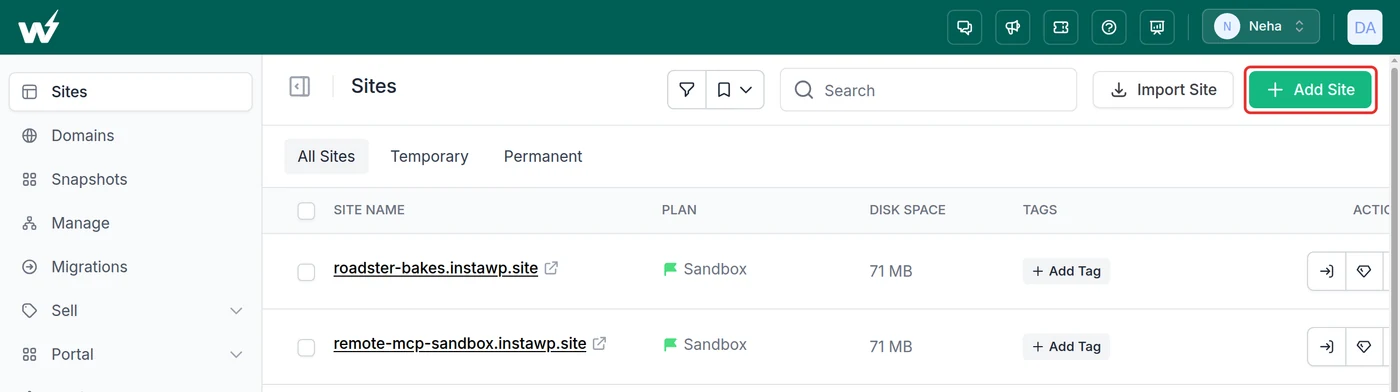
Log in to the InstaWP dashboard and click Add Site on the Sites page.
Step 2: Pick a starting point and versions
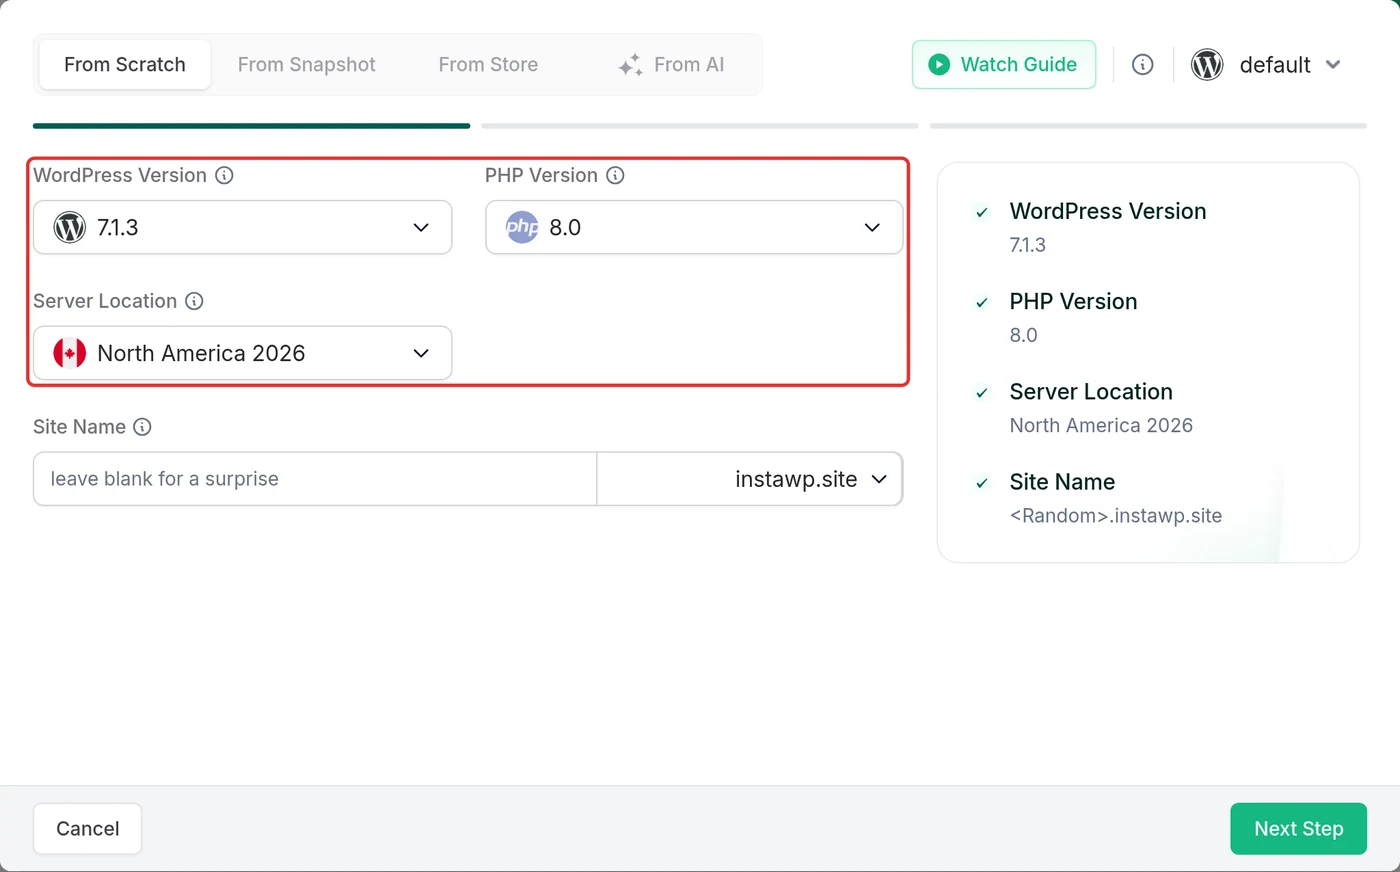
Start from scratch, from one of your snapshots, from the InstaWP Store or with AI. On the same screen, set the WordPress version, the PHP version and the server location, so the test matches the site you care about.
Step 3: Pre-install what you want to test
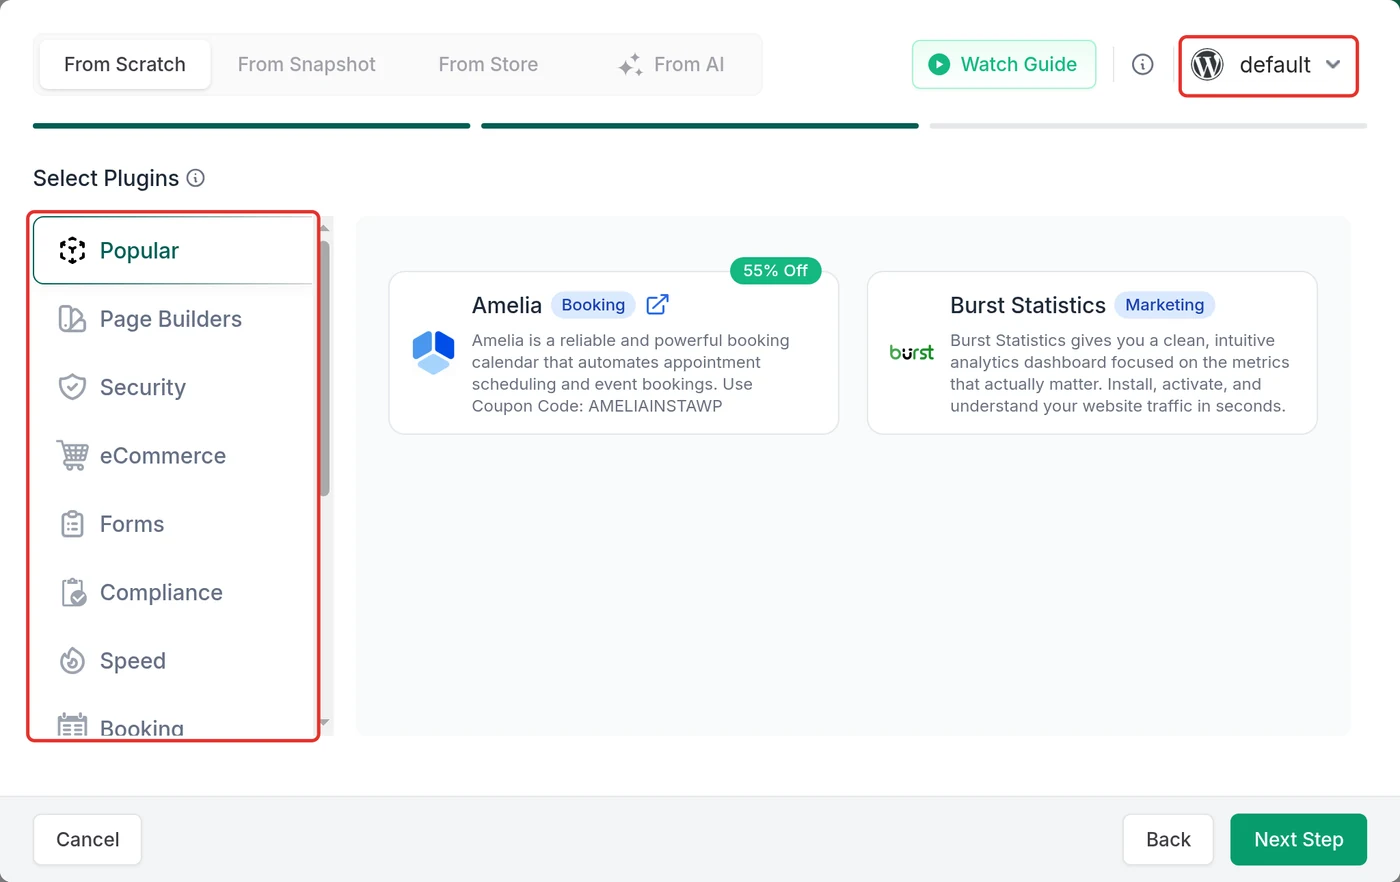
Pick the plugins you plan to test from the categories on the left (Popular, Page Builders, Security, eCommerce and more), or choose a saved configuration from the menu at the top right, so the site arrives ready instead of you installing them one by one.
Step 4: Choose the Sandbox plan
Select Sandbox and click Create Site. Open wp-admin with Magic Login, or work from the terminal with SSH and WP-CLI.
When you finish, delete the site from the Sites page and the daily charge stops; the InstaWP billing guide shows how billing days are counted. If the sandbox turns into the real site, change its plan instead of migrating it. The hosting section below shows how.
How do you clone an InstaWP site to use as staging?
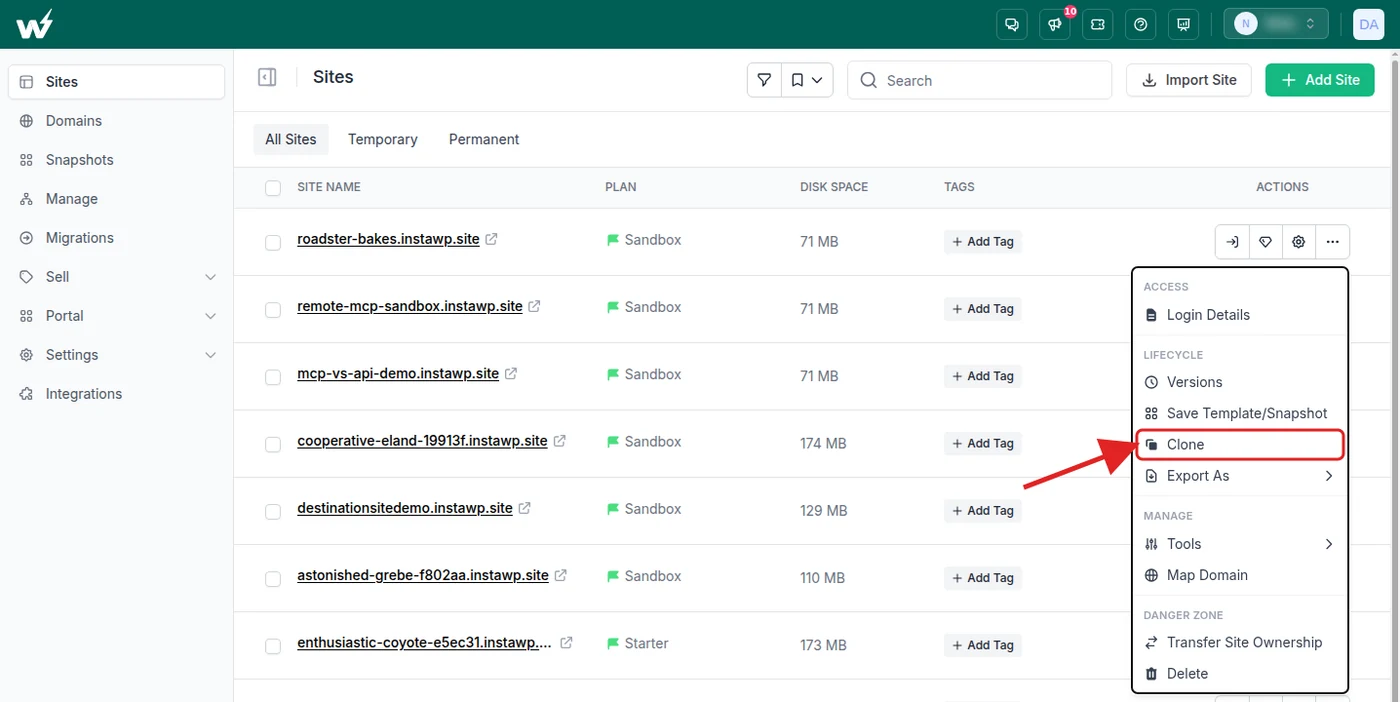
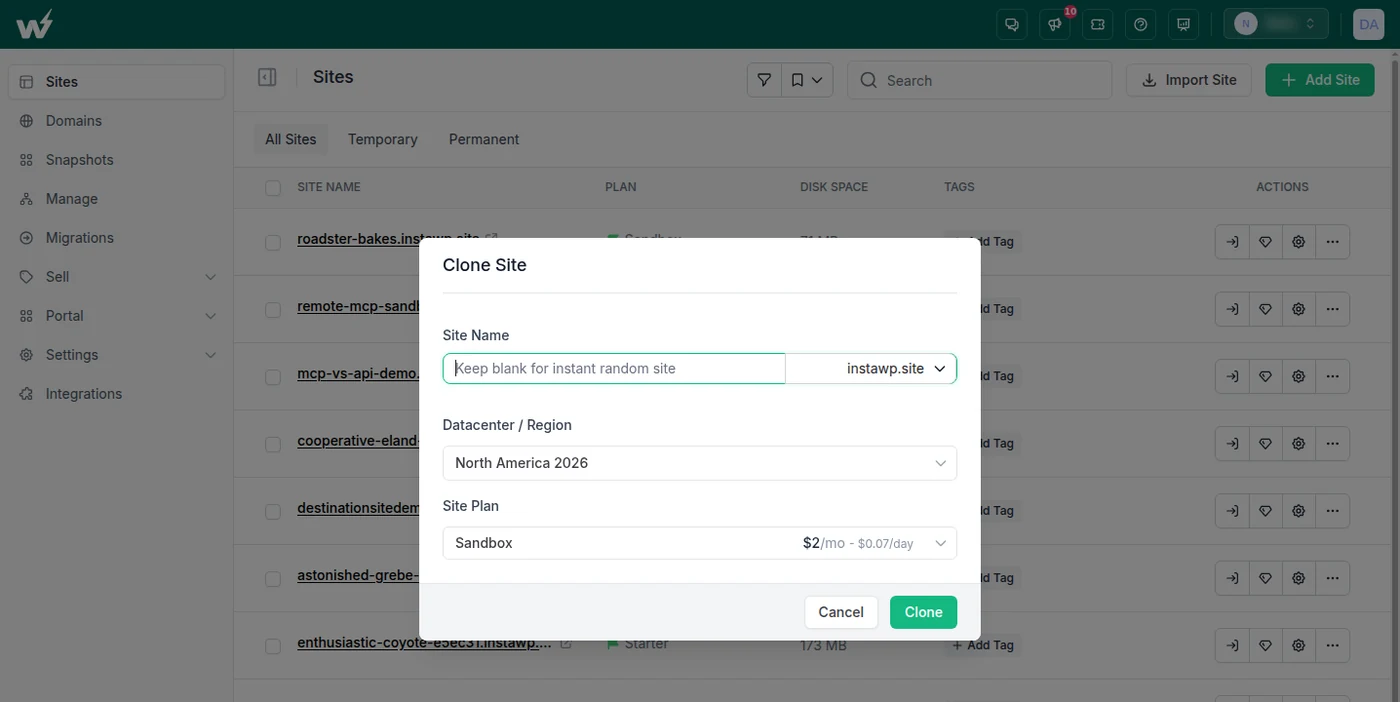
On the Sites page, open the site’s ⋯ (More Actions) menu and choose Clone. In the Clone Site dialog, name the copy (or leave it blank for a random name), choose the datacenter region and a plan, then click Clone. The clone keeps the parent’s files, database and admin credentials, runs independently and is billed on its own plan. It is the fastest staging copy for a hosted site below the Pro plan.
Edits on the clone never reach the original, so finished work has to be repeated on the live site by hand. The clone also starts with the same WordPress admin username and password as its parent; change them before you give a client access. Its plan is independent too, so a Sandbox parent can have a Pro clone, or the other way round.
How do you create a staging site when your live site is hosted elsewhere?
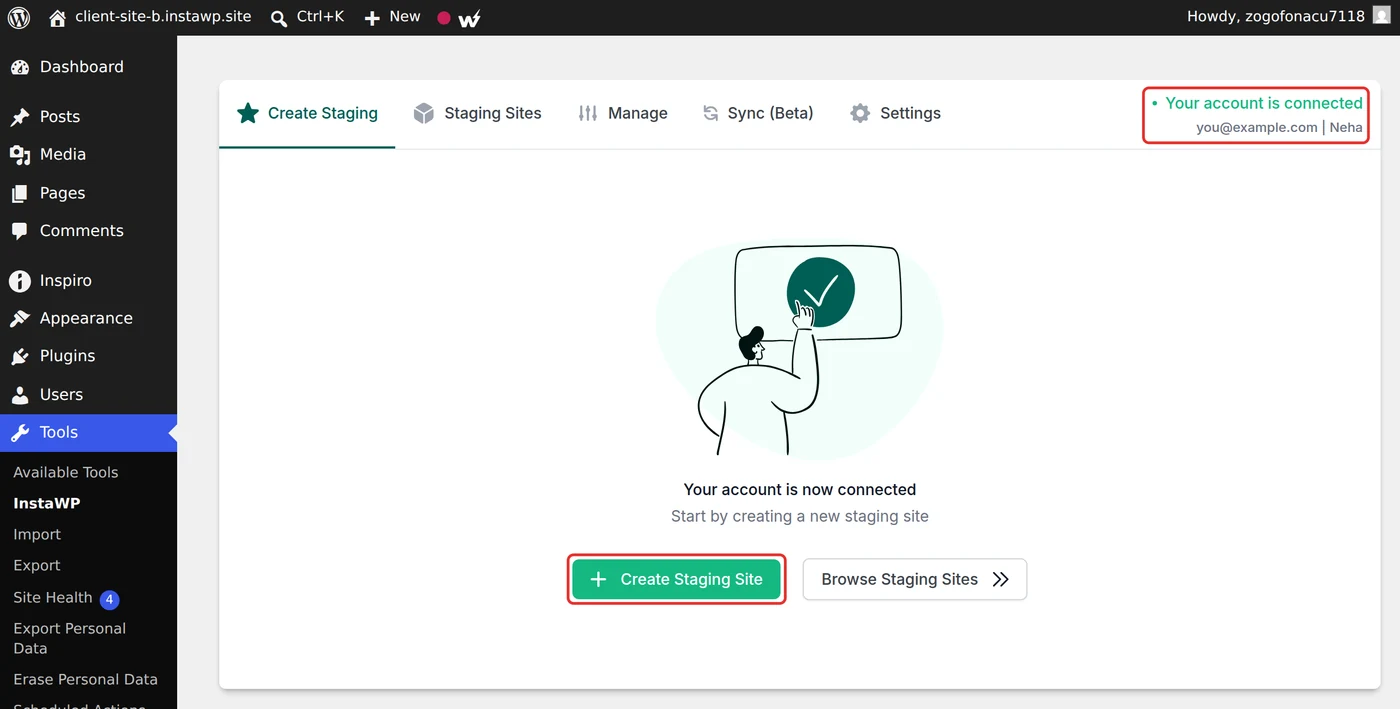
Install the free InstaWP Connect plugin on the live site, connect it to your InstaWP account, then go to Tools > InstaWP and click Create Staging Site. Choose Quick, Full or Custom staging, exclude what you do not need and pick a plan for the copy. The staging site runs on InstaWP, not on your current host, and it is billed on the plan you choose.
Step 1: Install and connect InstaWP Connect
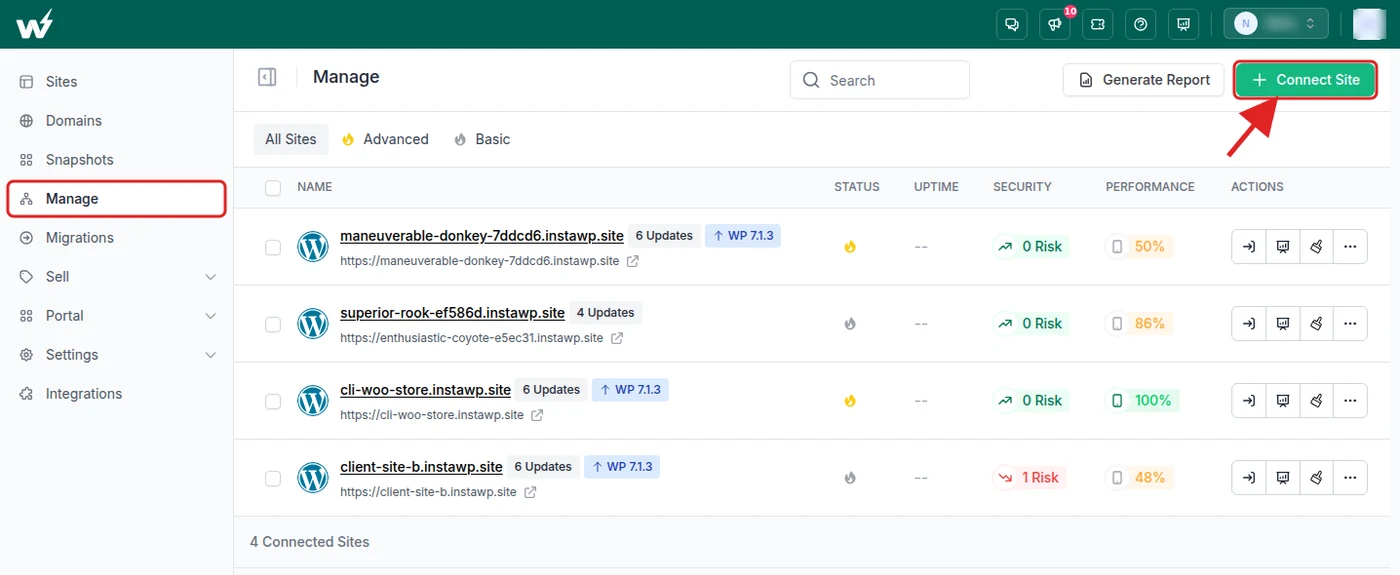
In wp-admin, go to Plugins > Add New Plugin, search for InstaWP Connect, then install and activate it. Go to Tools > InstaWP, click Connect with InstaWP and approve the request. The site then appears on the Manage page of your InstaWP dashboard.
Step 2: Choose the staging type
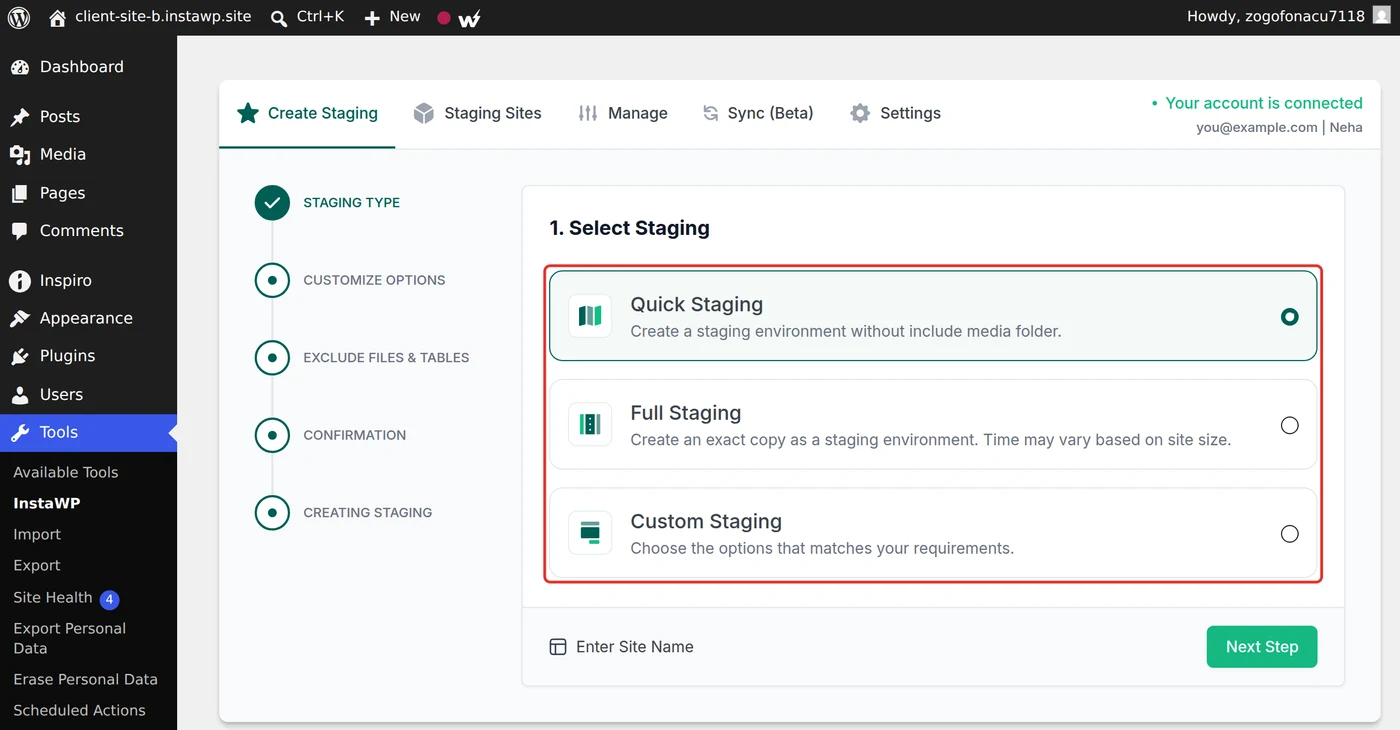
Click Create Staging Site and pick one of three types:
- Quick staging copies everything except the media folder. It is the fastest and suits plugin and theme tests.
- Full staging is an exact copy. Time depends on the size of the site.
- Custom staging lets you choose what goes in.
Step 3: Trim the copy
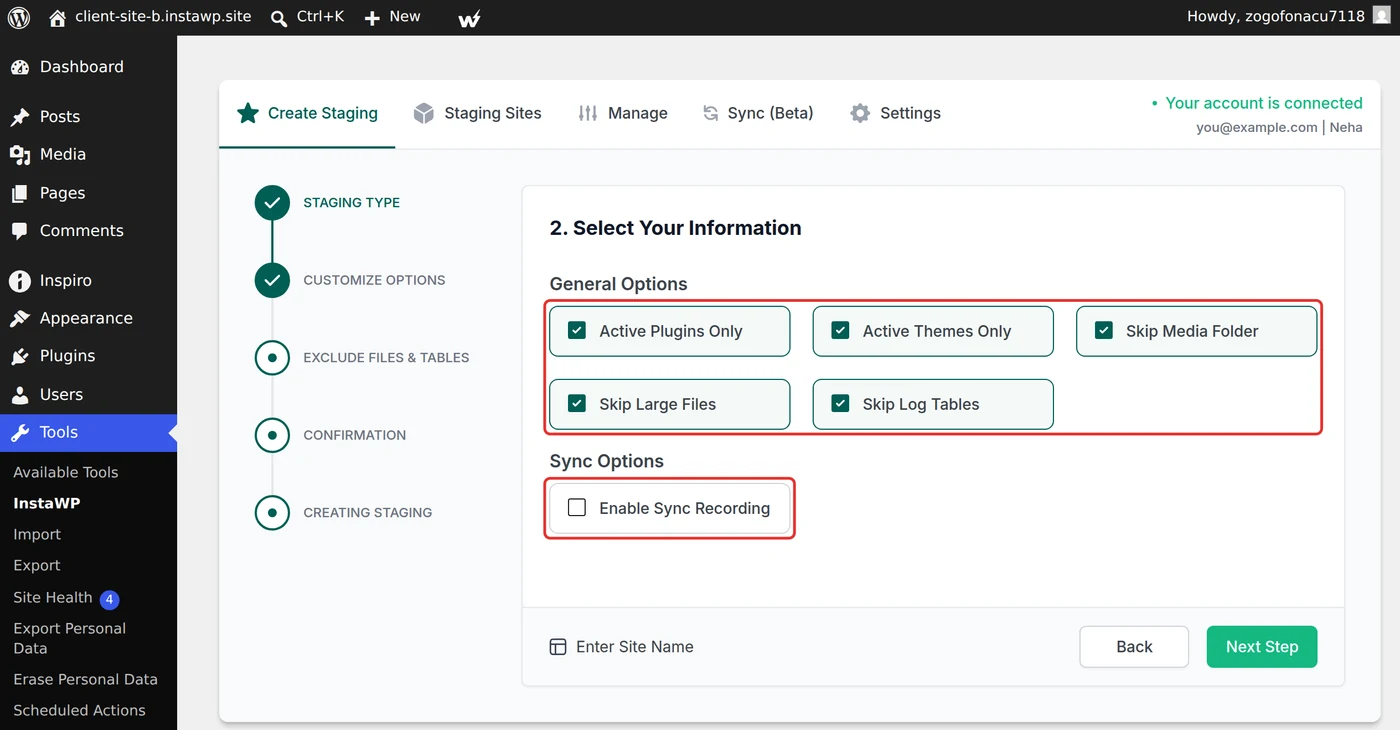
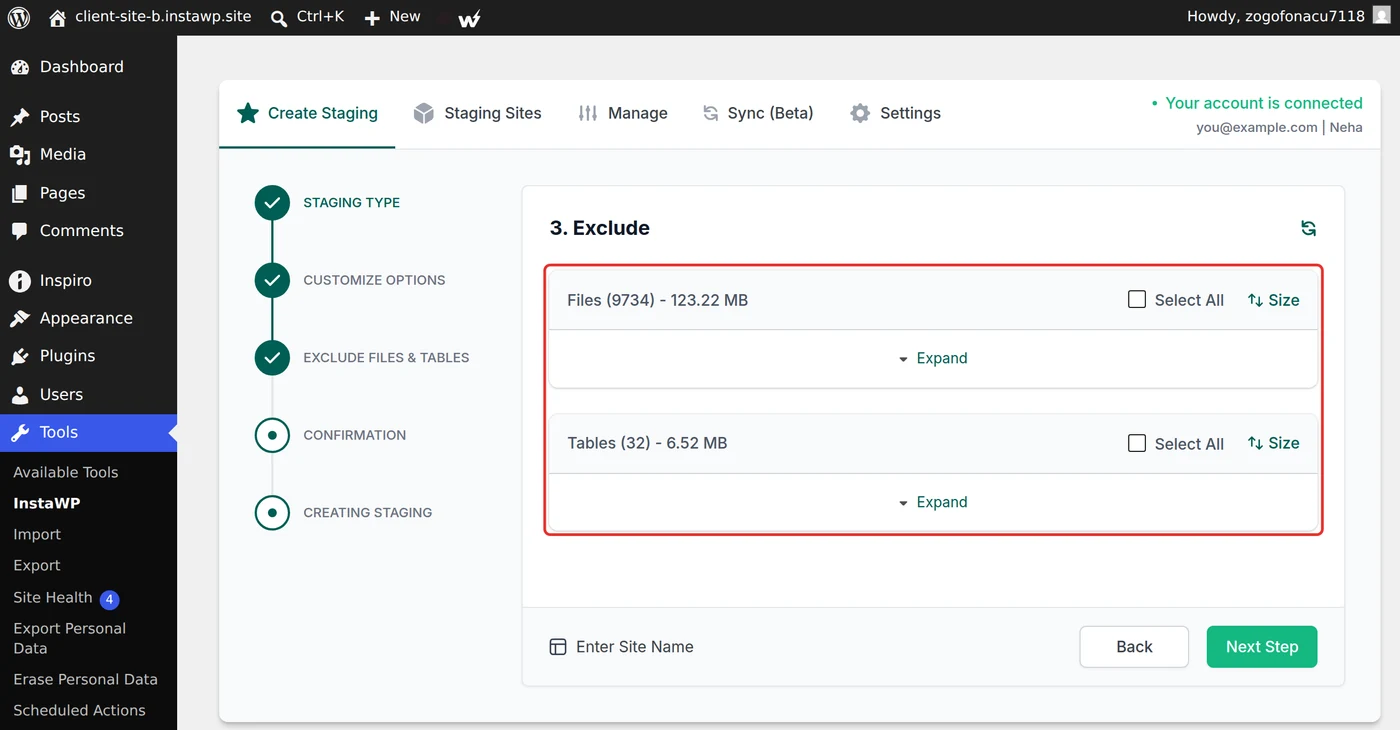
Copy only active plugins or themes, skip the media folder, large files or log tables, and switch on Enable Sync Recording if you plan to use 2-Way Sync. The WordPress core tables and the wp-content folder itself cannot be excluded, because the copy would not run without them.
On the Exclude step, expand Files or Tables, sort by Size and tick the large folders or tables you want to leave out of the copy.
Step 4: Confirm and pick a plan
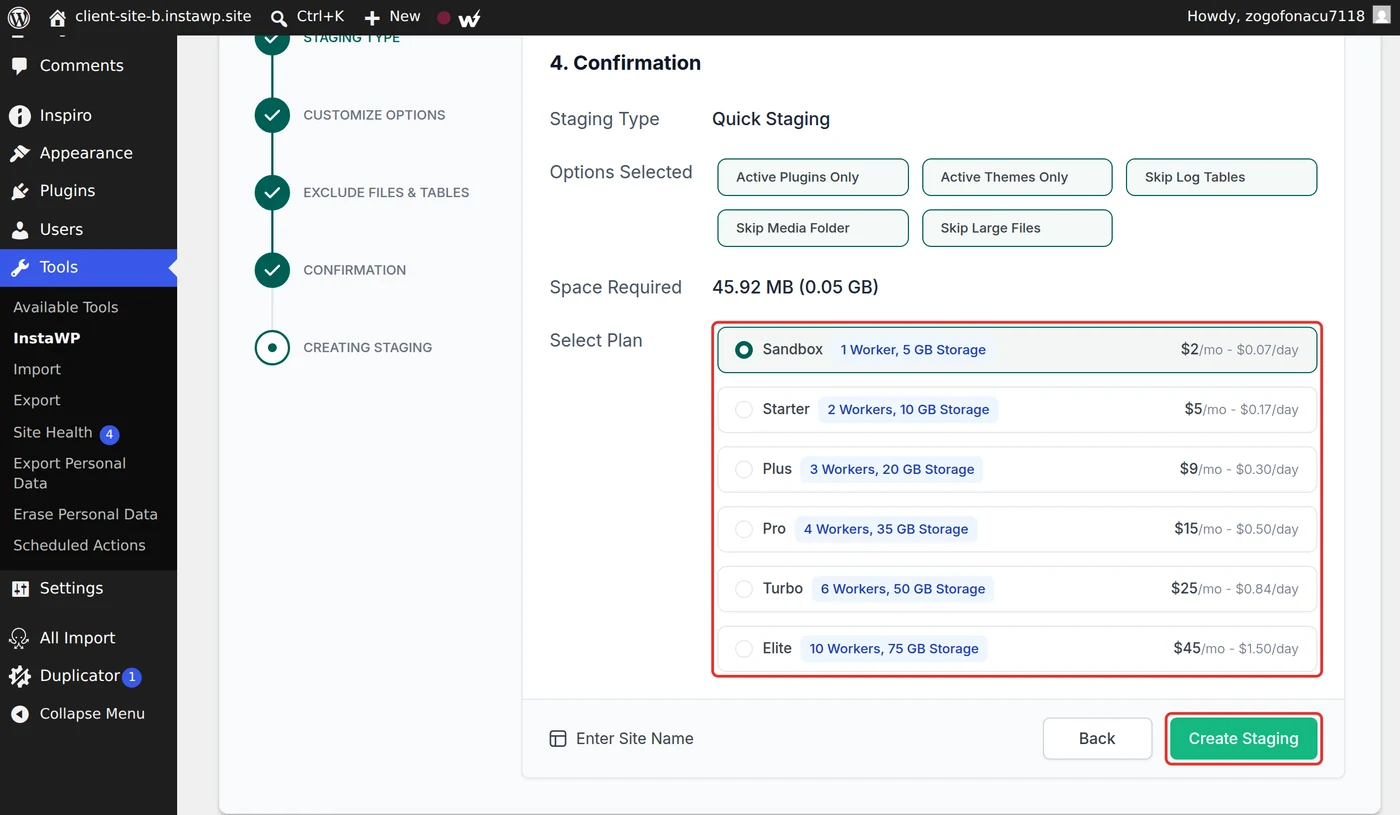
The Confirmation step shows the Space Required (your files plus your database) and a plan picker that starts at Sandbox, $2 a month. Pick a plan for the staging site and click Create Staging. InstaWP Connect 0.1.4 and later builds the copy with InstaWP’s AI migration engine and gives you a Track Migration link, so you can close the wp-admin tab while it runs.
Should you move the live site to InstaWP first?
If you want staging built into the hosting rather than added by a plugin, yes. Move the site to InstaWP with a free WordPress migration, put it on the Pro, Turbo or Elite plan, and the built-in staging environment is one click away with no plugin and no extra charge.
The one-click WordPress migration guide covers the move itself. After it lands, follow the hosted-site steps in Route 1.
How do you move changes from staging back to the live site?
It depends on the route. The built-in staging environment pushes by replacing the whole live site with the staging copy. InstaWP Connect staging uses 2-Way Sync, which records each change you make on staging and pushes only those, so orders, comments and posts that arrived on the live site in the meantime stay put.
Push recorded changes with 2-Way Sync
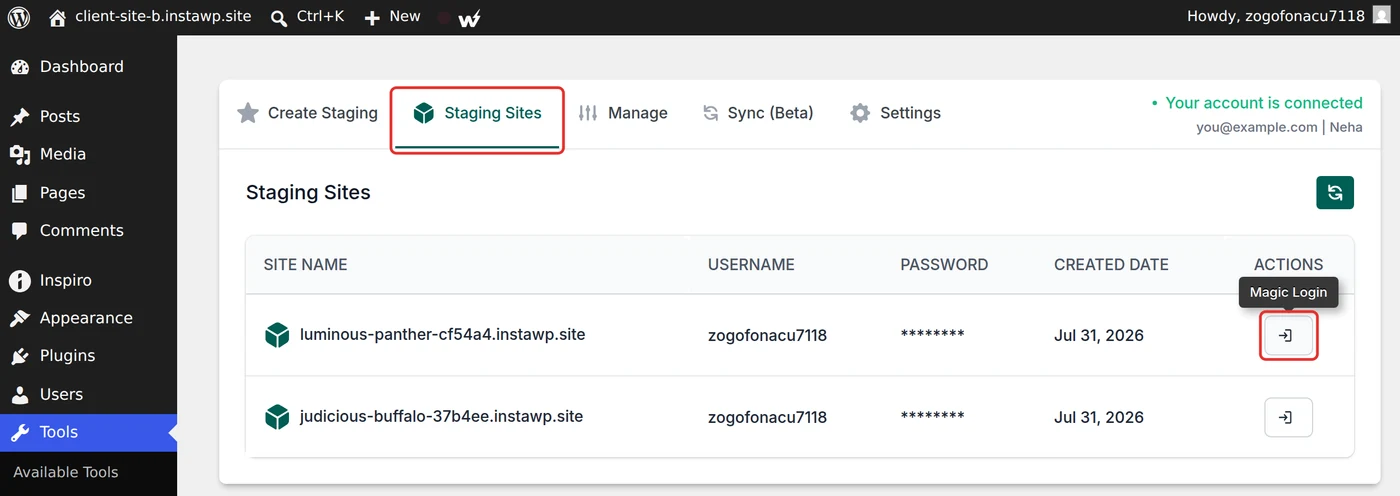
Step 1: From the live site’s Tools > InstaWP, open the Staging Sites tab and use Magic Login to enter the staging site.
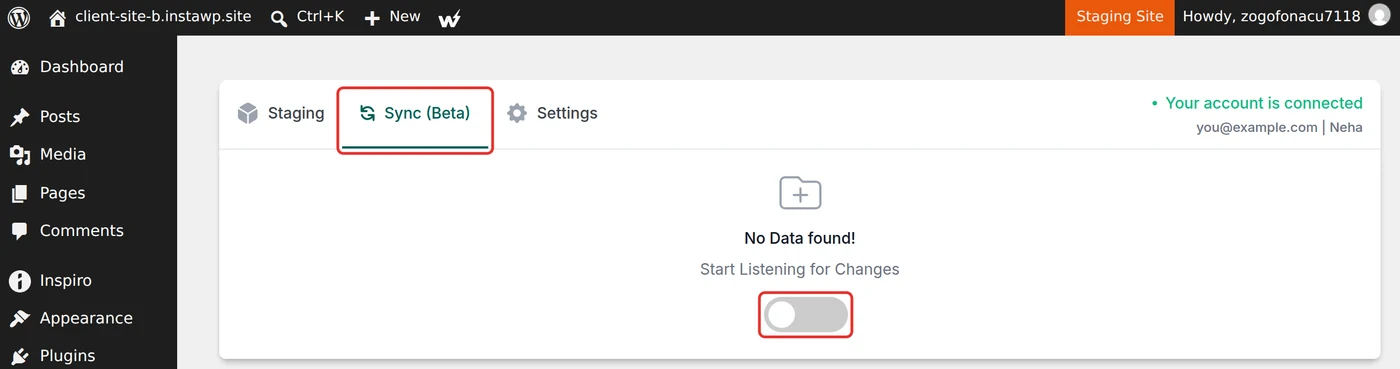
Step 2: On the staging site, go to Tools > InstaWP > Sync (Beta) and switch the recording toggle on before you change anything. A blinking dot in the admin bar confirms it is recording.
Step 3: Make your changes, then open the Sync (Beta) tab, review the recorded events and click Sync All, or select specific events. Pick the live site as the destination and confirm.
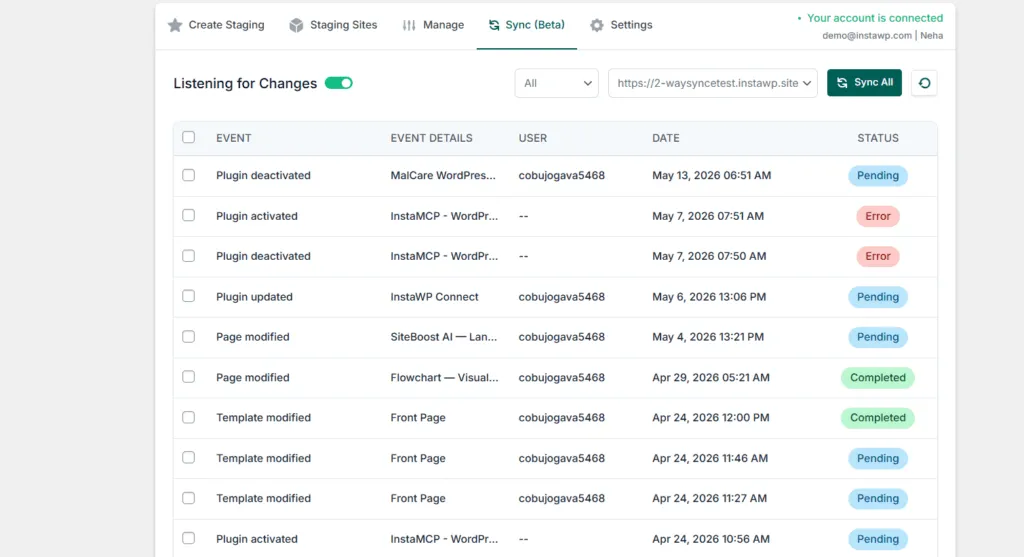
2-Way Sync only sees changes made through wp-admin, and it matches pages by slug rather than by ID. The 2-Way Sync documentation lists what it captures, and our guide to syncing a WooCommerce staging site without overwriting orders walks through a store. Before any push, run through the WordPress staging to live checklist. For push, pull and merge compared side by side, read how to push WordPress staging to production without overwriting live data.
Can you map a custom domain to a staging site?
Not on the built-in staging environment, which has no domain mapping or CDN by design. A separate staging site, such as a clone or an InstaWP Connect copy, can take a custom domain on the Starter plan or above. Sandbox sites cannot map domains.
A domain is worth it when a client reviews the work on a branded address, for example a staging subdomain of example.com, or when a setting depends on the real hostname. Here is how to map one:
Step 1: Open Map Domain for the staging site
On the Sites page, open the staging site’s ⋯ (More Actions) menu and choose Map Domain. The same page sits under Domains > Map Domain in the site’s own menu.
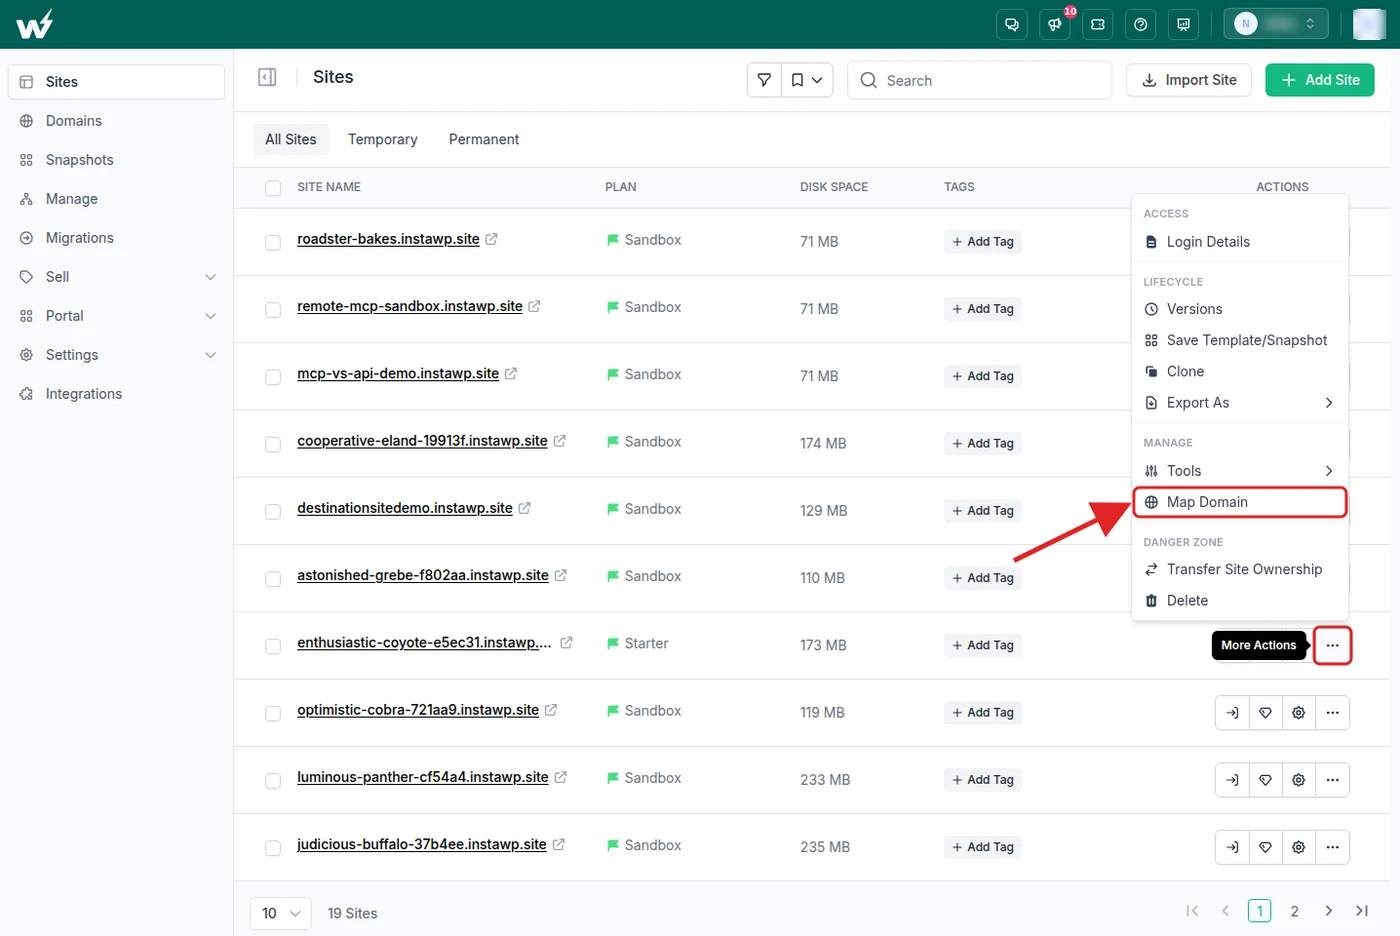
Step 2: Add the domain
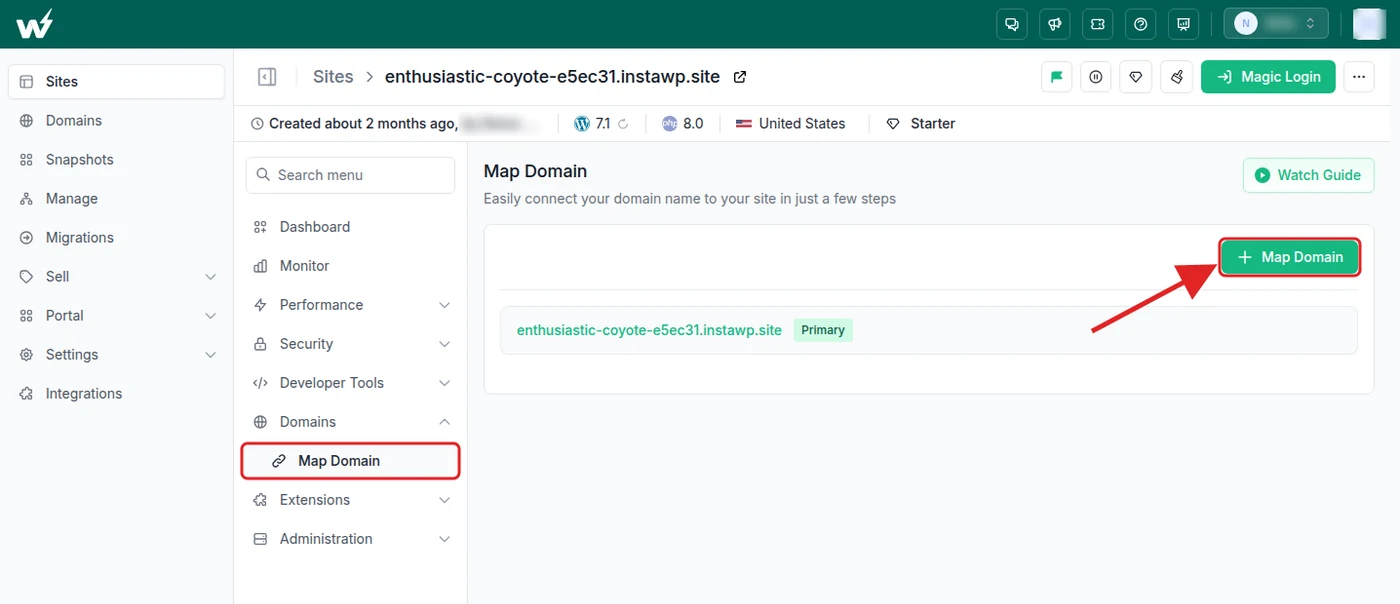
On the Map Domain page, click Map Domain.
Enter the domain and choose Primary (the address the site loads on) or Alias (an extra domain that redirects to the primary).
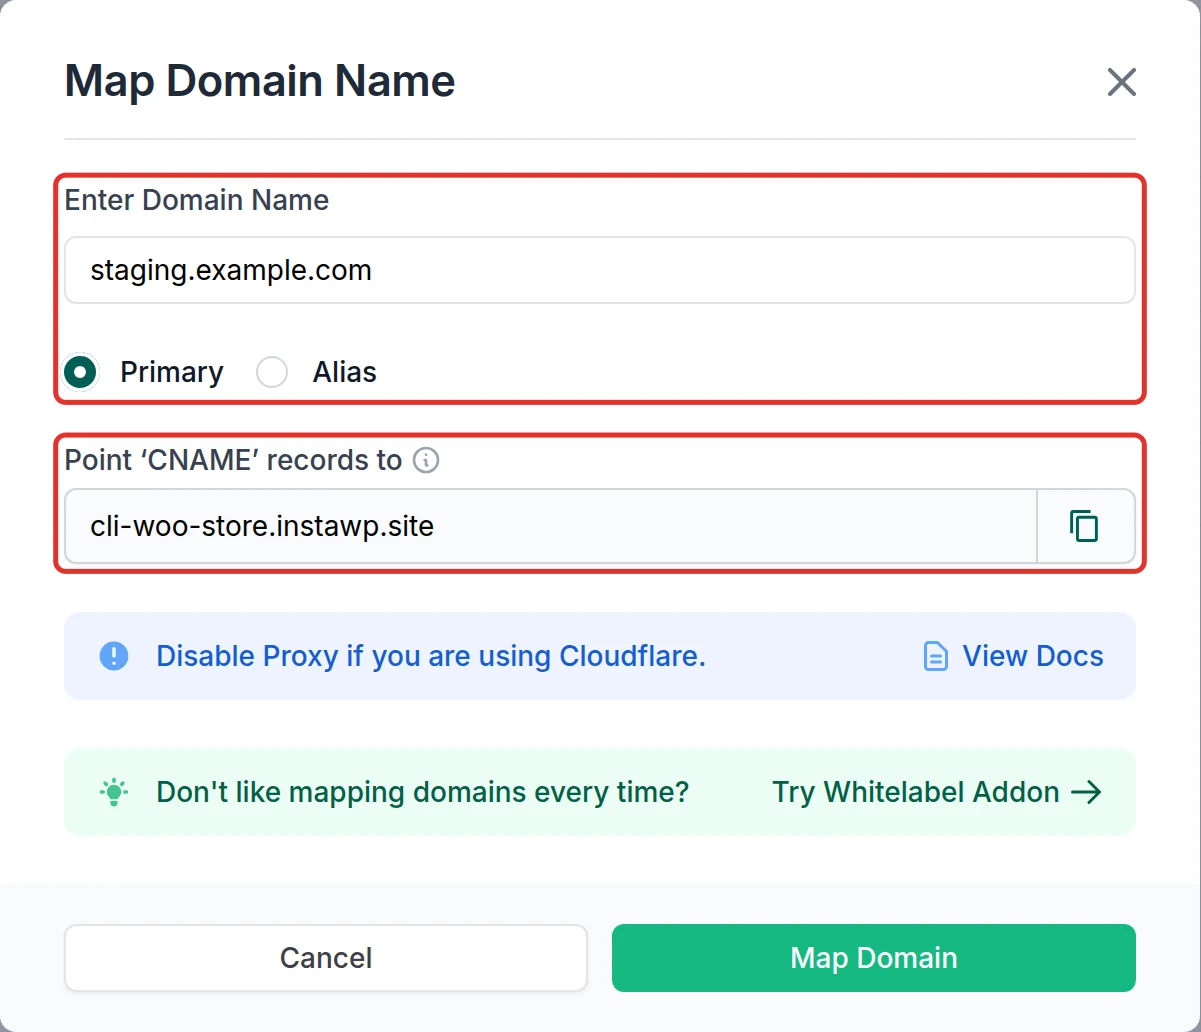
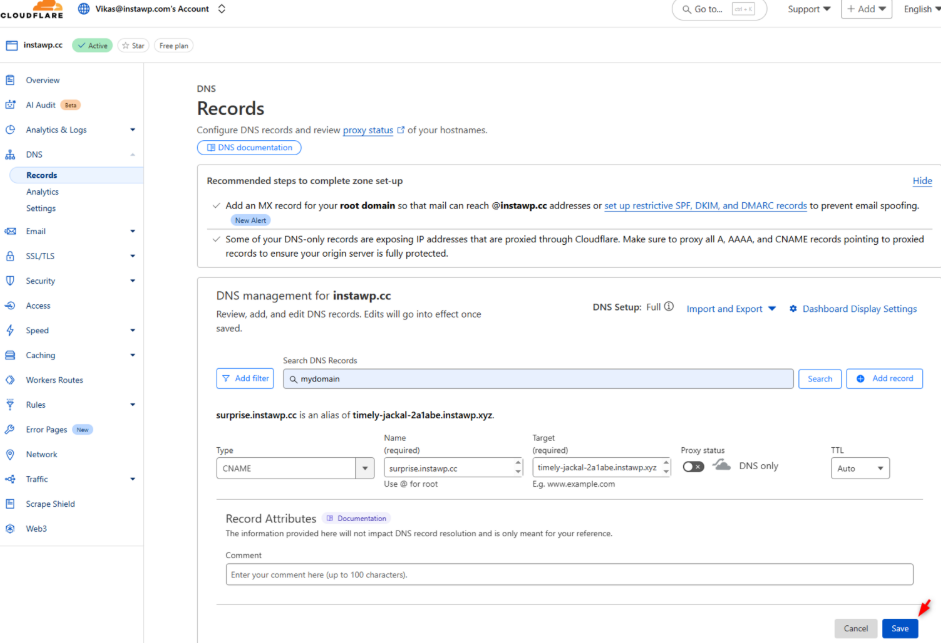
Step 3: Add the CNAME records
At your DNS provider, add a CNAME record that points your domain (for example www or a staging subdomain) at the InstaWP hostname the dialog shows. Never point an A record at an InstaWP site, because the CDN’s IP addresses change. If your registrar will not accept a CNAME on the root, use an ALIAS or ANAME record. On Cloudflare, switch the proxy off while you map.
Step 4: Confirm, and set the primary domain
Back in the InstaWP dialog, click Map Domain to finish. DNS changes can take a while to spread, depending on your provider. To change which domain the site loads on, make another mapped domain the primary one from the same Map Domain page. The InstaWP domains guide covers DNS records in more depth.
Domain tips for staging sites
- Keep one primary domain and make every other mapping an alias.
- Turn on Search Engine Visibility blocking on the staging site so it never competes with the live site in Google.
- Clear your browser cache if the old address keeps loading after a DNS change.
How do you refresh or delete a staging site?
Refresh the built-in staging environment with Pull to staging, and delete it with the trash icon on the Staging Site panel. A separate staging site is refreshed by deleting it and making a new copy, and deleted from the Sites page like any other site. Both deletions are permanent.
Refreshing a staging site
- Built-in staging: open Developer Tools > Staging Site on the production site and click Pull to staging. Everything on staging is replaced with a fresh copy of production; the live site is not touched.
- Connect or clone copy: delete the old copy and create a new one from the live site with Full or Custom staging.
Deleting a staging site
- Built-in staging: click the trash icon on the Staging Site panel. A delete is refused while a pull or push is still running.
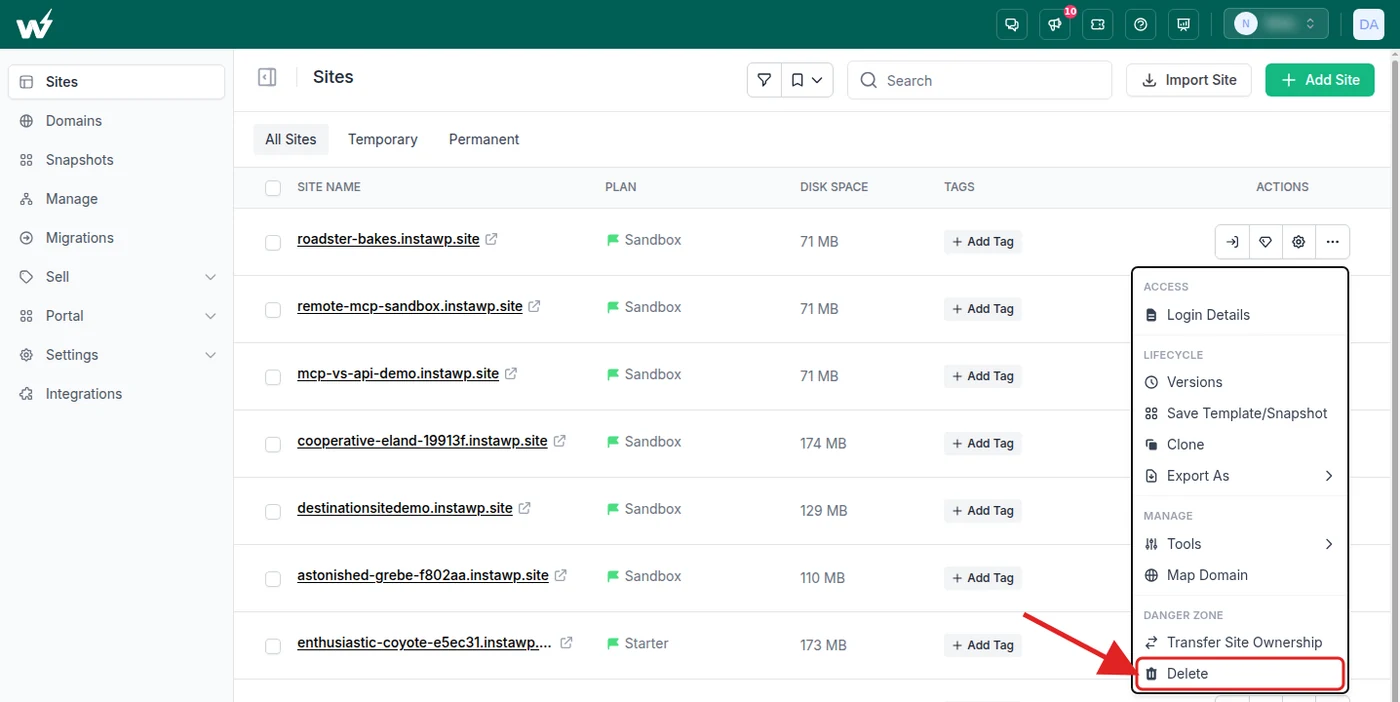
- Separate staging site: on the Sites page, open the site’s ⋯ menu, choose Delete under Danger Zone and paste the site URL to confirm. A site marked Permanent has to be switched to Temporary first. Billing for it stops that day.
- Keep a Connect copy instead of deleting it: on the Manage page, open the live site’s ⋯ menu, choose Staging Sites and click Unlink from parent on the staging row. The copy keeps running as an independent connected site and 2-Way Sync between the two stops. You can link it again later with Link Staging Site, and an unlink is refused while a sync is still running.
InstaWP vs a staging plugin on your current host: which is better?
A staging plugin keeps the copy on the same server as the live site, and pushing back is usually a paid upgrade. InstaWP keeps the copy off your production server and pushes back for free, either with the built-in push on hosted Pro sites or with 2-Way Sync from any host. The table compares InstaWP with WP Staging, a widely used staging plugin.
WP Staging details are from its WordPress.org listing, version 4.16.0, checked 5 October 2026.
Which route fits which job?
Can you host your live site and its staging site on InstaWP?
Yes. InstaWP runs managed WordPress hosting on its own cloud, where every site gets an isolated Linux user, database and PHP-FPM pool, and the Pro, Turbo and Elite plans add a free staging environment to each site. You can start a project on a Sandbox, test it, then promote it to production on the same URL with no migration.
Promote a Sandbox site to production
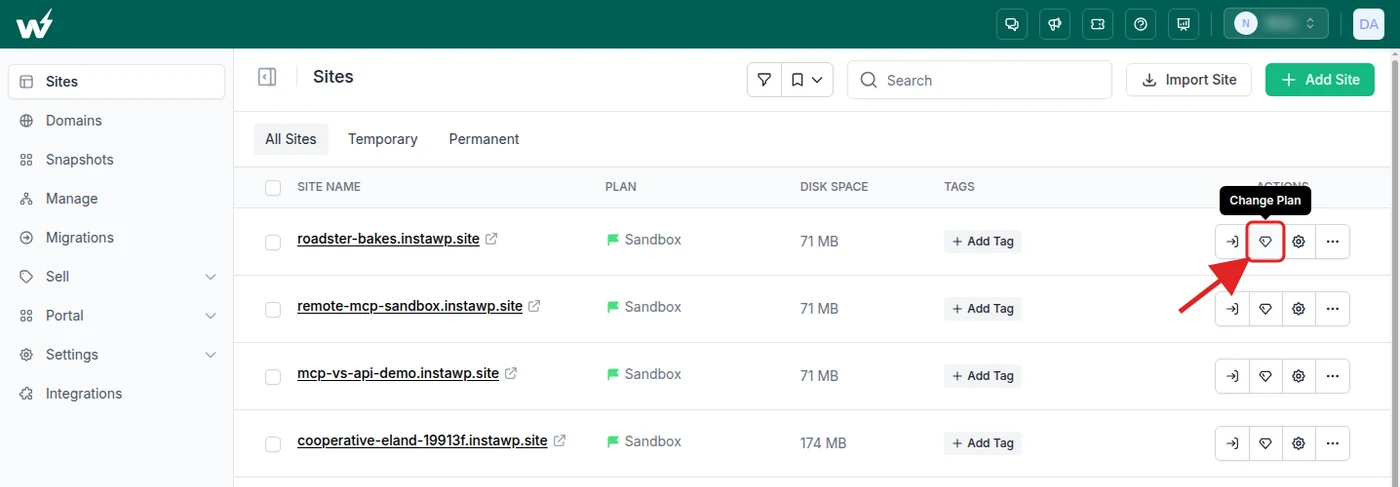
On the Sites page, click the Change Plan icon on the site, pick a production plan and pay. Nothing is migrated and the URL stays the same; the docs explain how to upgrade the sandbox plan in more detail, and the Managed Hosting plans page lists every tier.
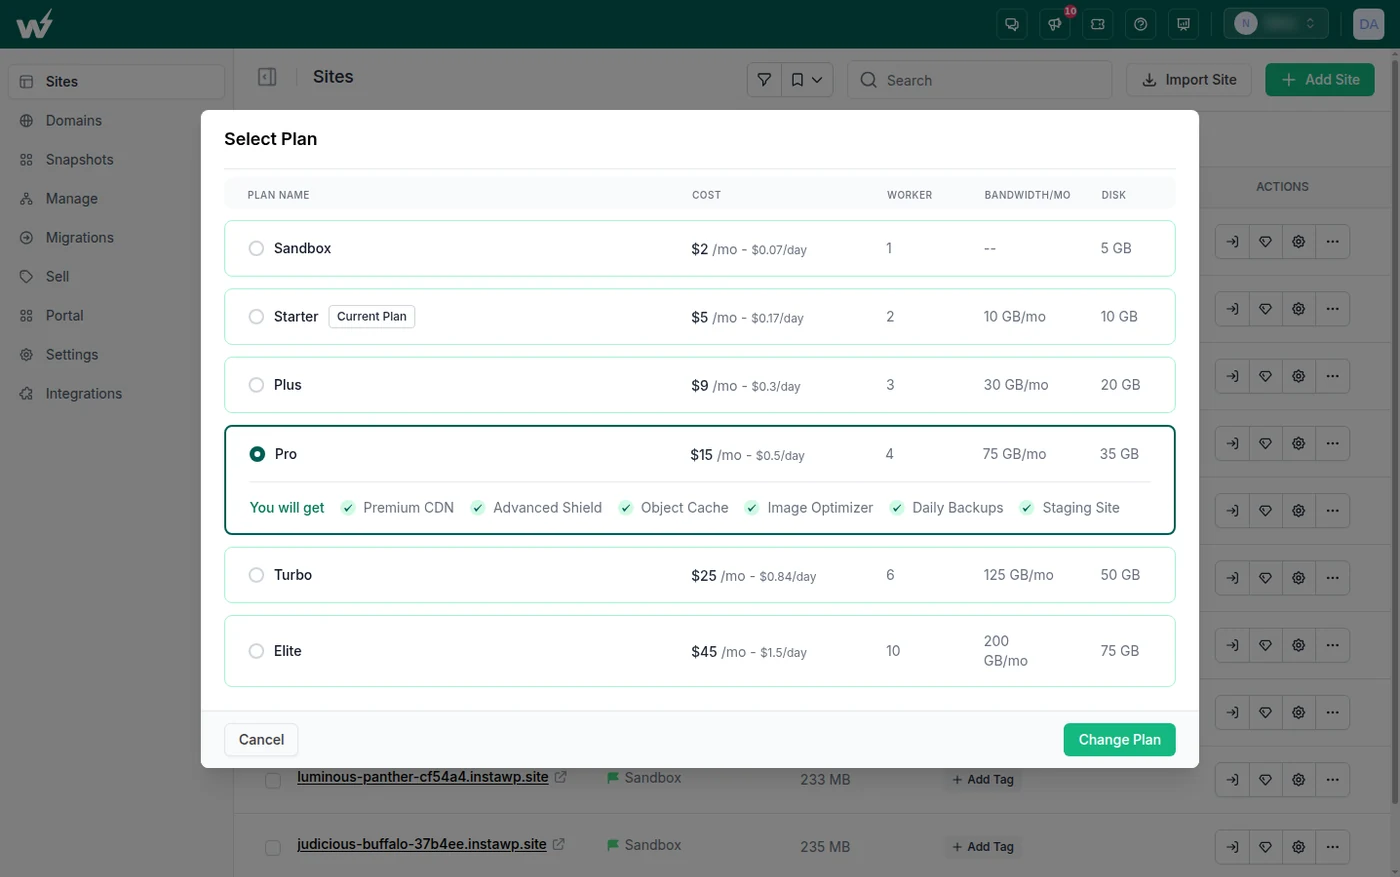
What each plan adds around staging
Hosted sites can also use uptime monitoring and performance scanning from the same dashboard. On speed, InstaWP’s new-generation servers scored 9.8 out of 10 in the free WP Benchmark plugin against 7.3 for the previous generation, in tests run in August 2026; the method and raw data are in the WordPress hosting benchmark.
Every plan is billed per site, per day. New accounts get $25 in credits, there is a 14-day money-back guarantee and no annual contract. Compare InstaWP with other hosting with staging before you decide, and read why managed cloud hosting on InstaWP suits agencies.
Conclusion
Hosted on InstaWP Pro or above: use the built-in staging environment, pull before you start, back up, then push. Hosted below Pro: clone the site. Hosted elsewhere: install InstaWP Connect, stage it, and use 2-Way Sync so live orders survive the push. Need a scratch site for an afternoon: a $2 Sandbox. Whichever you pick, the copy runs on InstaWP’s managed WordPress hosting, not on your production server.
FAQs
What is a WordPress staging site?
A WordPress staging site is a copy of your live site, on a separate URL, where you test updates, plugins and design changes before visitors see them. On InstaWP it is a full WordPress install with its own wp-admin, Magic Login and developer tools.
Is staging free on InstaWP?
The built-in staging environment is free on the Pro, Turbo and Elite plans and never appears on your bill. Separate staging sites, such as a Sandbox, a clone or an InstaWP Connect copy, are billed on the plan you pick, from $2 a month billed daily. 2-Way Sync itself is free.
How long does it take to create a staging site on InstaWP?
The built-in staging environment takes 2 to 3 minutes and InstaWP emails you when it is ready. A new Sandbox site is up in seconds. An InstaWP Connect copy of a site hosted elsewhere depends on the size of the files and database.
Can I create a staging site if my WordPress site is not hosted on InstaWP?
Yes. Install the free InstaWP Connect plugin on the live site, connect it to your InstaWP account and click Create Staging Site under Tools > InstaWP. The copy runs on InstaWP and you can push changes back with 2-Way Sync.
Does pushing staging to live overwrite new orders?
A built-in Push to production replaces the whole live database, so orders placed after your last pull are lost; push in a quiet window and back up first. 2-Way Sync pushes only the changes you recorded on staging, so new orders and posts on the live site are kept.
How many staging sites can I have on InstaWP?
One active built-in staging environment per production site. Separate staging sites have no built-in link to a live site and are billed individually on their own plans.
Can I host my staging site and live site on InstaWP?
Yes. Host the live site on InstaWP’s managed WordPress hosting and the Pro, Turbo and Elite plans include a free staging environment for it. On lower plans, clone the site to stage it, or upgrade to Pro.