Before WordPress 7.0, building even a simple Gutenberg block meant installing Node.js and npm, configuring @wordpress/scripts or Webpack, writing React for the editor, and running a build on every change. That toolchain kept thousands of capable PHP developers out of block development. WordPress 7.0 removes it. You can now register a fully working Gutenberg block in pure PHP, with no JavaScript and no build step.
In short
A PHP-only block is a Gutenberg block registered entirely in PHP through block.json using the new autoRegister flag. WordPress generates the editor interface and renders the block on both the editor and the front end from a single PHP render function, so no React, JavaScript, or build tooling is required. It is available in WordPress 7.0 and the Gutenberg plugin (22.3 and later).
What PHP-Only Blocks Actually Are
Introduced in WordPress 7.0 and available right now through the Gutenberg plugin (22.3 and later), PHP-only blocks let you register a complete, first-class Gutenberg block using nothing but PHP. You get everything a standard block gives you, written in the language WordPress developers already use every day.
Here is what ships out of the box, with zero JavaScript written:
- Your block appears in the block inserter like any native block.
- It renders live in the editor exactly as it renders on the front end.
- Attributes you define become real sidebar controls automatically.
- Block supports (color, spacing, typography) work with a single line each.
- The same PHP render function powers both the editor preview and the published page.
This is not a stripped-down mode. It is a genuine, native Gutenberg block that happens to be defined in PHP. To see the wider WordPress 7.0 feature set in context, watch the short overview below.
The One Line That Makes It Work
The entire PHP-only block system is powered by a single new flag inside register_block_type() and block.json:
'supports' => array(
    'autoRegister' => true,
)
That flag tells Gutenberg to stop looking for JavaScript files and register the block entirely from PHP. When Gutenberg sees autoRegister => true, it automatically:
- Registers the block on the client using its built-in ServerSideRender component.
- Reads your
attributesarray and generates the matching sidebar inputs. - Calls your PHP render function to draw the block in both the editor and the front end.
That is the whole trick. One flag, and the rest is pure PHP.
Build a PHP-Only Block: Step-by-Step Guide
Let us build a working PHP-only block from scratch so you can see the WordPress 7.0 workflow end to end. WordPress 7.0 is still a nightly build, so the smart move is a throwaway sandbox rather than a machine you care about. This is exactly what InstaWP is built for: spin up a disposable WordPress 7.0 site in seconds, build your block, and throw the site away when you are done.
Set up your environment
The quickest path is a cloud WordPress sandbox on InstaWP. It spins up a fresh site in seconds and ships with WPCodeBox, a browser-based VS Code-style editor, so you write the plugin in the same browser tab as your site. Press Ctrl + S in WPCodeBox, refresh the editor tab, and your change is live. No local PHP, no SSH, no node_modules. If you would rather work locally, any WordPress 7.0 Nightly install with the Gutenberg plugin active works the same way.
InstaWP tip
Once your block works, take a snapshot of the sandbox. Next time you need that block, create a new site from the snapshot and it is already there, ready to reuse. Snapshots turn a block you built once into a reusable starting point for every future client site.
Step 1: Create a WordPress 7.0 Nightly site on InstaWP
- Go to instawp.com and sign in.
- Click Create Site.
- Select Nightly as the WordPress version so you get 7.0 with the Gutenberg plugin.
- Hit create and open the site once it is ready.
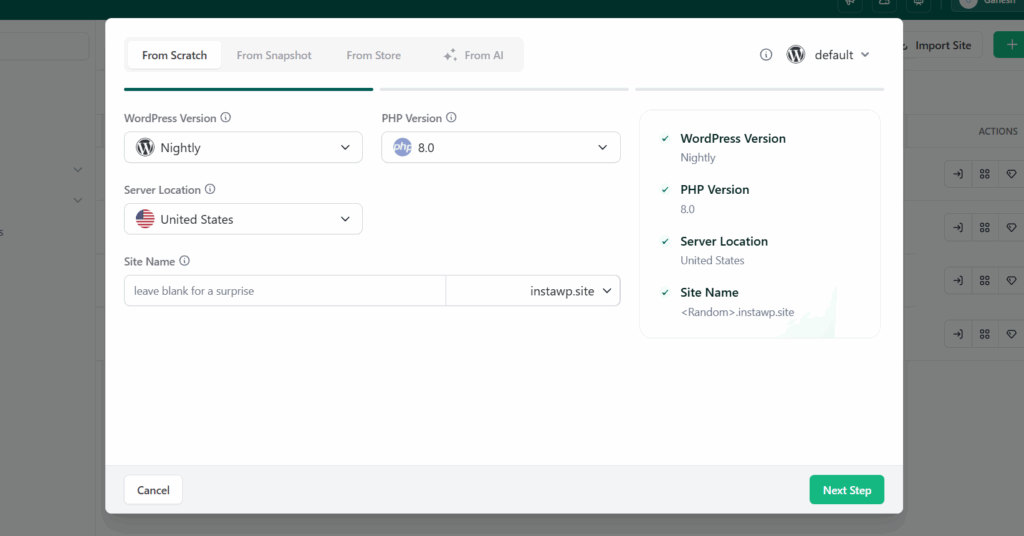
Need the full walkthrough for site creation? See Create Site | InstaWP Docs.
Step 2: Verify Gutenberg is active
Go to WordPress Admin, then Plugins. Confirm that Gutenberg 22.3 or higher is listed and active. The autoRegister flag depends on it, so this check is worth the ten seconds.
Step 3: Open WPCodeBox
From your InstaWP site dashboard, click Code Editor.
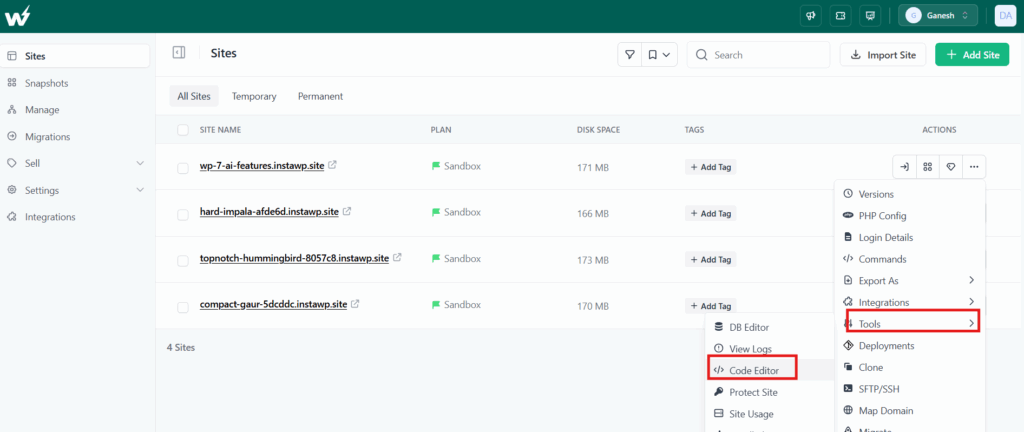
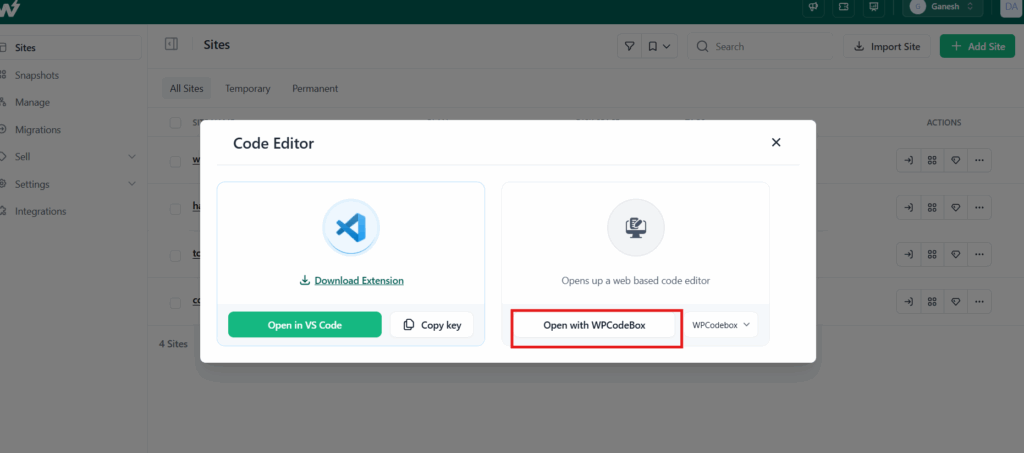
You will be offered two options: VS Code and WPCodeBox. For this guide we use WPCodeBox, which opens a full browser-based IDE.
In the left panel you will see your site file structure. Navigate to your plugins directory:
wp-content → pluginsThis is where your block plugin will live.
Step 4: Create the plugin folder and file
In the WPCodeBox file panel:
- Right-click the
pluginsfolder and choose New Folder, then name itmy-php-block. - Right-click
my-php-blockand choose New File, then name itmy-php-block.php.
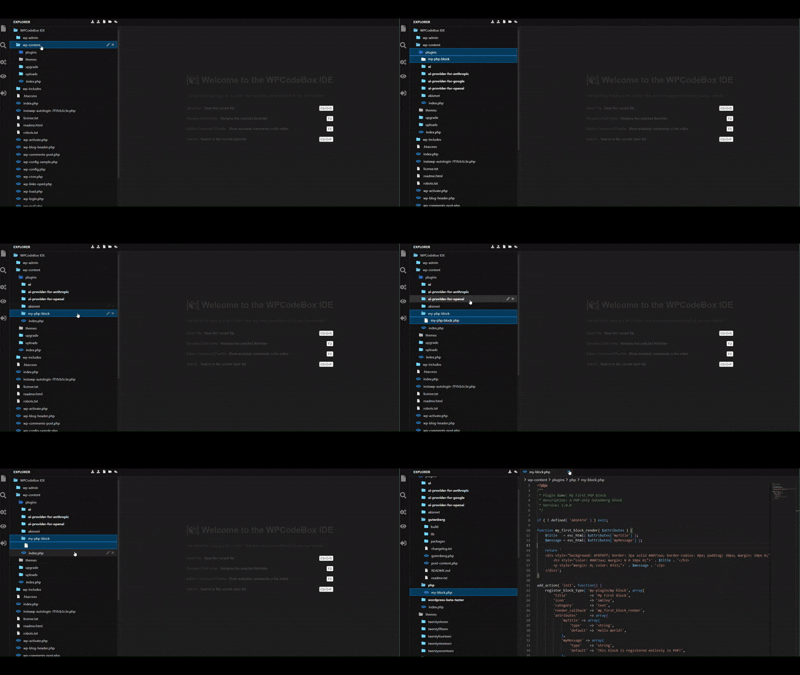
Your structure should look like this: wp-content/plugins/my-php-block/my-php-block.php.
Step 5: Write the plugin
Open my-php-block.php and paste this complete plugin. Read the comments, they map one-to-one to the concepts above.
<?php
/**
 * Plugin Name: My PHP Block
 * Description: A PHP-only Gutenberg block
 * Version: 1.0.0
 */

if ( ! defined( 'ABSPATH' ) ) exit;

/**
 * Step A: The render function
 * This draws the block in the editor AND on the frontend.
 * $attributes contains the values the user sets in the sidebar.
 */
function my_php_block_render( $attributes ) {
    $title   = esc_html( $attributes['myTitle'] );
    $message = esc_html( $attributes['myMessage'] );

    return '
    <div style="background:#f0f8ff; border:2px solid #0073aa;
                border-radius:8px; padding:20px; margin:10px 0;">
        <h3 style="color:#0073aa; margin:0 0 10px 0;">' . $title . '</h3>
        <p style="margin:0; color:#333;">' . $message . '</p>
    </div>';
}

/**
 * Step B: Register the block
 * This is what tells WordPress the block exists.
 */
add_action( 'init', function() {
    register_block_type( 'my-plugin/my-block', array(
        'title'           => 'My First PHP Block',
        'icon'            => 'smiley',
        'category'        => 'text',
        'render_callback' => 'my_php_block_render',

        // Attributes = the editable fields in the sidebar
        // WordPress auto-generates the UI from these definitions
        'attributes' => array(
            'myTitle' => array(
                'type'    => 'string',
                'default' => 'Hello from PHP!',
            ),
            'myMessage' => array(
                'type'    => 'string',
                'default' => 'This block was built with zero JavaScript.',
            ),
        ),

        // This single flag is what makes it PHP-only
        'supports' => array(
            'autoRegister' => true,
        ),
    ) );
});
Press Ctrl + S to save.
Step 6: Activate the plugin
Go to WordPress Admin, then Plugins. Find “My First PHP Block” and click Activate.
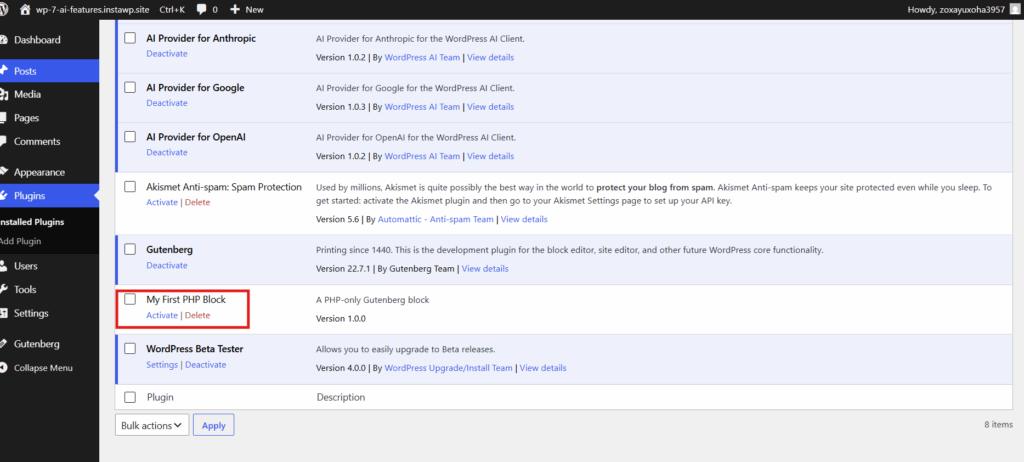
Step 7: Insert the block
Go to Posts, then Add New, and click the + inserter icon. Search for your block and insert it.
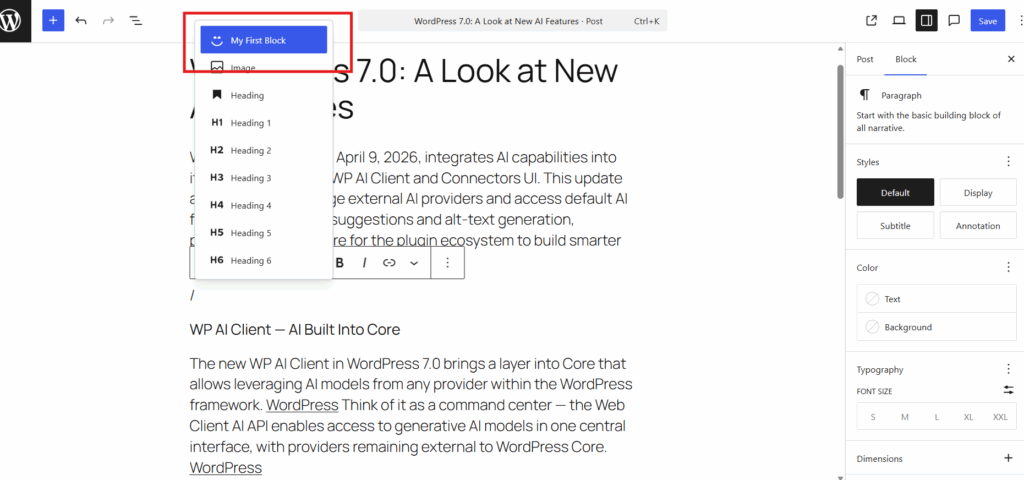
You will see:
- The block rendered live in the editor, with a border and your default text.
- A settings panel in the right sidebar generated from your attributes.
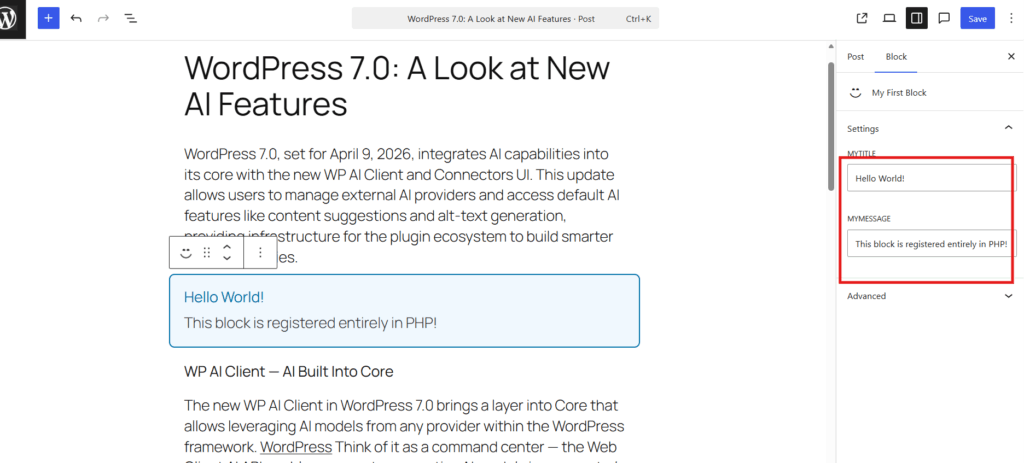
Publish the post and open it on the front end. The block renders identically. You just built a Gutenberg block with zero JavaScript.
InstaWP tip
Because the block lives on a real InstaWP site, you get a shareable URL out of the box. Send the live preview link to a client or teammate for sign-off before you move the plugin anywhere near a production site. That prototype-to-preview loop is where a WordPress cloud platform saves agencies the most time.
Understanding Attributes: Your Sidebar UI
Attributes are what make PHP-only blocks genuinely useful. They do two jobs at once: they store the block data, and WordPress reads them to generate the matching sidebar input automatically. Define the attribute, and the control appears.
'attributes' => array(

    // Renders a text input field
    'myTitle' => array(
        'type'    => 'string',
        'default' => 'Default text',
    ),

    // Renders a number input field
    'itemCount' => array(
        'type'    => 'integer',
        'default' => 5,
    ),

    // Renders a checkbox
    'showFooter' => array(
        'type'    => 'boolean',
        'default' => true,
    ),

    // Renders a dropdown select
    'cardTheme' => array(
        'type'    => 'string',
        'enum'    => array( 'light', 'dark', 'blue' ),
        'default' => 'light',
    ),

),
You can add a label to control what each field is called in the editor sidebar:
'myTitle' => array(
    'label'   => __( 'Card Heading', 'my-plugin' ),
    'type'    => 'string',
    'default' => 'Hello World',
),Real-World Uses of PHP-Only Blocks
Now that you can build one, here are three patterns where PHP-only blocks earn their place in real agency and product work.
Case 1: A pricing card block
This is the block agencies rebuild for client after client: a styled pricing card the content team can edit without touching code. First, add a style.css in your plugin folder:
/* style.css */
.pricing-card {
    display: flex;
    flex-direction: column;
    align-items: center;
    text-align: center;
    box-sizing: border-box;
    padding: 30px;
    border-radius: 12px;
}
.pricing-card h3 { margin: 0; font-size: 1.5rem; }
.pricing-card .price { font-size: 3rem; font-weight: 800; margin: 15px 0; }
.pricing-card ul { list-style: none; padding: 20px 0; width: 100%;
                   border-top: 1px solid rgba(0,0,0,0.1); }
.pricing-card li { padding: 6px 0; }
.pricing-card .cta { display: inline-block; padding: 12px 30px; border-radius: 8px;
                     text-decoration: none; font-weight: bold; margin-top: auto; }
.pricing-card.theme-light { background: #ffffff; color: #000; border: 2px solid #e0e0e0; }
.pricing-card.theme-light .cta { background: #0073aa; color: #fff; }
.pricing-card.theme-dark  { background: #1a1a1a; color: #ffffff; }
.pricing-card.theme-dark  .cta { background: #ffffff; color: #1a1a1a; }
.pricing-card.theme-blue  { background: #0073aa; color: #ffffff; }
.pricing-card.theme-blue  .cta { background: #000000; color: #ffffff; }
Then update your PHP file to render the card and enqueue the stylesheet:
<?php
/**
 * Plugin Name: Pricing Card Block
 * Description: A PHP-only pricing card Gutenberg block
 * Version: 1.0.0
 */

if ( ! defined( 'ABSPATH' ) ) exit;

function pricing_card_render( $attributes ) {
    $plan     = esc_html( $attributes['planName'] );
    $price    = intval( $attributes['price'] );
    $theme    = esc_attr( $attributes['cardTheme'] );
    $btn_text = esc_html( $attributes['buttonText'] );
    $features = array_filter( array_map( 'trim',
                    explode( ',', $attributes['featuresList'] ) ) );

    $wrapper = get_block_wrapper_attributes( array(
        'class' => "pricing-card theme-{$theme}",
    ) );

    $output  = "<div {$wrapper}>";
    $output .= "<h3>{$plan}</h3>";
    $output .= "<div class='price'>€{$price}<span style='font-size:1rem'>/mo</span></div>";

    if ( ! empty( $features ) ) {
        $output .= '<ul>';
        foreach ( $features as $feature ) {
            $checked = strpos( $feature, '+' ) === 0;
            $text    = esc_html( ltrim( $feature, '+- ' ) );
            $icon    = $checked ? '✅' : '❌';
            $output .= "<li>{$icon} {$text}</li>";
        }
        $output .= '</ul>';
    }

    $output .= "<a href='#' class='cta'>{$btn_text}</a>";
    $output .= '</div>';

    return $output;
}

add_action( 'init', function() {
    wp_register_style( 'pricing-card-style',
        plugins_url( 'style.css', __FILE__ ), array(), '1.0.0' );

    register_block_type( 'my-plugin/pricing-card', array(
        'title'           => 'Pricing Card',
        'icon'            => 'cart',
        'category'        => 'widgets',
        'render_callback' => 'pricing_card_render',
        'style'           => 'pricing-card-style',
        'attributes'      => array(
            'planName'    => array( 'type' => 'string',  'default' => 'Professional' ),
            'price'       => array( 'type' => 'integer', 'default' => 49 ),
            'buttonText'  => array( 'type' => 'string',  'default' => 'Get Started' ),
            'featuresList'=> array( 'type' => 'string',  'default' => '+ Unlimited sites, + Priority support, - Custom domain' ),
            'cardTheme'   => array( 'type' => 'string',  'enum' => array( 'light', 'dark', 'blue' ), 'default' => 'light' ),
        ),
        'supports' => array(
            'autoRegister' => true,
            'color'        => array( 'background' => true, 'text' => true ),
            'spacing'      => array( 'margin' => true, 'padding' => true ),
            'typography'   => array( 'fontSize' => true ),
            'shadow'       => true,
            'border'       => array( 'color' => true, 'radius' => true, 'width' => true ),
        ),
    ) );
});
The content team can now:
- Change the plan name, price, and button text from the sidebar.
- Switch between light, dark, and highlighted styles.
- Reuse the same block across every page without a developer.
Case 2: A WooCommerce product showcase block
This is where PHP-only blocks shine. Instead of fighting WooCommerce data in React, you query products in PHP, the language WooCommerce is already written in, and expose a few simple controls.
InstaWP tip
To test this block properly you need real products. When you create your sandbox on InstaWP, pre-install WooCommerce (and sample products) as part of the site configuration, so the showcase block has live data to render the moment you insert it. No manual store setup before you can see your block work.
<?php
/**
 * Plugin Name: WooCommerce Product Showcase Block
 * Description: A PHP-only block to display WooCommerce products
 * Version: 1.0.0
 */

if ( ! defined( 'ABSPATH' ) ) exit;

function woo_showcase_render( $attributes ) {

    // Don't render if WooCommerce is not active
    if ( ! function_exists( 'wc_get_products' ) ) {
        return '<p>WooCommerce is required for this block.</p>';
    }

    $count    = intval( $attributes['productCount'] );
    $columns  = intval( $attributes['columns'] );
    $show_btn = (bool) $attributes['showButton'];
    $category = esc_attr( $attributes['category'] );

    $args = array(
        'limit'    => $count,
        'status'   => 'publish',
        'orderby'  => 'date',
        'order'    => 'DESC',
    );

    if ( ! empty( $category ) ) {
        $args['category'] = array( $category );
    }

    $products = wc_get_products( $args );

    if ( empty( $products ) ) {
        return '<p>No products found.</p>';
    }

    $wrapper = get_block_wrapper_attributes( array(
        'class' => 'woo-showcase',
        'style' => "display:grid; grid-template-columns:repeat({$columns}, 1fr); gap:20px;",
    ) );

    $output = "<div {$wrapper}>";

    foreach ( $products as $product ) {
        $image = $product->get_image( 'medium' );
        $name  = esc_html( $product->get_name() );
        $price = $product->get_price_html();
        $url   = esc_url( get_permalink( $product->get_id() ) );

        $output .= "
        <div style='border:1px solid #e0e0e0; border-radius:8px; overflow:hidden;'>
            <a href='{$url}'>{$image}</a>
            <div style='padding:15px;'>
                <h4 style='margin:0 0 8px;'><a href='{$url}'>{$name}</a></h4>
                <div style='color:#0073aa; font-weight:bold;'>{$price}</div>";

        if ( $show_btn ) {
            $output .= "
                <a href='{$url}' style='display:inline-block; margin-top:12px;
                    padding:8px 16px; background:#0073aa; color:#fff;
                    border-radius:4px; text-decoration:none;'>
                    View Product
                </a>";
        }

        $output .= "</div></div>";
    }

    $output .= '</div>';

    return $output;
}

add_action( 'init', function() {
    register_block_type( 'my-plugin/woo-showcase', array(
        'title'           => 'Product Showcase',
        'icon'            => 'store',
        'category'        => 'widgets',
        'render_callback' => 'woo_showcase_render',
        'attributes'      => array(
            'productCount' => array( 'type' => 'integer', 'default' => 4 ),
            'columns'      => array( 'type' => 'integer', 'default' => 4 ),
            'category'     => array( 'type' => 'string',  'default' => '' ),
            'showButton'   => array( 'type' => 'boolean', 'default' => true ),
        ),
        'supports' => array(
            'autoRegister' => true,
            'spacing'      => array( 'margin' => true, 'padding' => true ),
            'align'        => array( 'wide', 'full' ),
        ),
    ) );
});
The content team gets four sidebar controls:
- Product Count: how many products to show.
- Columns: grid layout from 1 to 4 columns.
- Category: which product category to pull from.
- Order: how the products are sorted.
No React and no JavaScript, with full control over the markup, pulling live WooCommerce data on every render.
Case 3: Converting legacy shortcodes to blocks
Every agency has a library of shortcodes. PHP-only blocks are the cleanest migration path, because you can wrap the shortcode you already trust instead of rewriting it. Suppose a client site has this shortcode:
// This already exists - don't touch it
add_shortcode( 'alert_box', function( $atts ) {
    $atts = shortcode_atts( array(
        'type'    => 'info',
        'message' => 'Default message',
    ), $atts );

    $colors = array(
        'info'    => '#d1ecf1',
        'warning' => '#fff3cd',
        'error'   => '#f8d7da',
    );

    $bg = $colors[ $atts['type'] ] ?? $colors['info'];

    return sprintf(
        '<div style="background:%s; padding:15px; border-radius:6px; margin:10px 0;">
            <strong>%s:</strong> %s
        </div>',
        $bg, strtoupper( $atts['type'] ), esc_html( $atts['message'] )
    );
});
Rather than rebuild the logic, wrap it in a PHP block that calls the existing shortcode:
function alert_block_render( $attributes ) {
    $type    = esc_attr( $attributes['alertType'] );
    $message = esc_attr( $attributes['alertMessage'] );

    // Just call the existing shortcode - zero duplication
    return do_shortcode(
        sprintf( '[alert_box type="%s" message="%s"]', $type, $message )
    );
}

add_action( 'init', function() {
    register_block_type( 'my-plugin/alert-box', array(
        'title'           => 'Alert Box',
        'icon'            => 'warning',
        'category'        => 'text',
        'render_callback' => 'alert_block_render',
        'attributes'      => array(
            'alertType' => array(
                'type'    => 'string',
                'enum'    => array( 'info', 'warning', 'error' ),
                'default' => 'info',
            ),
            'alertMessage' => array(
                'type'    => 'string',
                'default' => 'Enter your message here...',
            ),
        ),
        'supports' => array(
            'autoRegister' => true,
        ),
    ) );
});
Your content team now inserts an Alert Box block from the inserter, picks a type from a dropdown, and types a message, all backed by the shortcode that already works. Zero duplicated logic.
Block Supports: Native Gutenberg Features for Free
One of the strongest parts of PHP-only blocks is the supports array. By declaring supports, you switch on native Gutenberg controls (colors, spacing, typography) without writing any UI. See the Block Supports reference for the full list.
'supports' => array(
    'autoRegister' => true,           // Required - makes it PHP-only

    // Color controls in sidebar (text + background color pickers)
    'color' => array(
        'background' => true,
        'text'       => true,
    ),

    // Spacing controls (margin and padding sliders)
    'spacing' => array(
        'margin'  => true,
        'padding' => true,
    ),

    // Typography controls (font size picker)
    'typography' => array(
        'fontSize' => true,
    ),

    // Box shadow control
    'shadow' => true,

    // Border controls
    'border' => array(
        'color'  => true,
        'radius' => true,
        'style'  => true,
        'width'  => true,
    ),

    // Wide and full-width alignment
    'align' => array( 'wide', 'full' ),
),
For those styles to apply correctly, call get_block_wrapper_attributes() on your block wrapper element:
function my_render( $attributes ) {
    $wrapper = get_block_wrapper_attributes( array(
        'class' => 'my-custom-class',
    ) );

    return "<div {$wrapper}>
        Your block content here
    </div>";
}
This function adds every user-selected style, the standard block classes, and the correct attributes automatically, so the sidebar controls actually affect the rendered output.
PHP-Only vs JavaScript Blocks: When to Use Which
PHP-only blocks do not replace JavaScript blocks. They are the right tool for a specific, very common category of block. Use this table to choose quickly.
| Factor | PHP-only block | JavaScript block |
|---|---|---|
| Build tooling | None | Node, npm, build step |
| Language | PHP only | JavaScript / React |
| Best for | Data and layout blocks | Rich inline editing |
| Inline text editing | Not yet | Yes (RichText) |
| Learning curve | Low for PHP devs | Higher |
| Server data (WP, Woo, ACF) | Native and direct | Needs REST or data layer |
Use PHP-only blocks when the block renders data from WordPress or a plugin (posts, products, ACF fields), the editing experience is a set of options rather than free-form inline text, and you want to ship fast without a toolchain.
Use JavaScript blocks when users need to edit content inline by clicking on it, or you need advanced controls like media pickers, range sliders, or custom canvases. For the majority of agency work (data displays, client-specific layouts, WooCommerce grids), PHP-only blocks are the pragmatic choice.
Common Mistakes to Avoid
autoRegister. Without 'autoRegister' => true, Gutenberg looks for a JavaScript file and your block never appears. This one flag is the whole feature.get_block_wrapper_attributes(). If you hand-code the wrapper, block supports (color, spacing) render in the sidebar but never reach the output.esc_html(), esc_attr(), or esc_url(). PHP-only does not mean escape-free.What’s Coming Next
PHP-only blocks are explicitly marked experimental in WordPress 7.0, so the API will evolve. Expect improvements such as:
- More attribute types and auto-generated controls.
- Tighter integration with existing Gutenberg components.
- Richer editing options that today require JavaScript.
The foundation is already solid, and the developer experience is excellent for the use cases it targets. Pin your WordPress and Gutenberg versions, and revisit the release notes as 7.0 matures.
There is also an AI angle worth planning for. Now that a block is just PHP, it is far easier to have an AI assistant scaffold one for you. With InstaMCP, InstaWP makes any WordPress site MCP-ready with a single toggle, so AI clients like Claude and Cursor can read your site and help you draft and refine block code against it. PHP-only blocks and AI-assisted WordPress development pull in the same direction: less boilerplate, faster iteration, no build chain in the way.
InstaWP tip
Want to try the AI workflow? Toggle InstaMCP on your sandbox to connect it to your AI client, then describe the block you want and iterate on the generated PHP against the live site. Keep write-level actions gated and review the code before you activate it.
Frequently Asked Questions
What is a PHP-only block in WordPress?
A PHP-only block is a Gutenberg block registered entirely in PHP through block.json with the autoRegister flag. WordPress builds the editor controls from your attributes and renders the block with a single PHP render function, so no JavaScript or build step is needed. It arrived in WordPress 7.0.
Can you build a Gutenberg block without JavaScript?
Yes. As of WordPress 7.0 and Gutenberg 22.3, you can build a complete, native Gutenberg block using only PHP. You set 'autoRegister' => true, define attributes, and write one render function. No React, npm, or Webpack is involved.
What WordPress version do I need for PHP-only blocks?
WordPress 7.0, or a current WordPress install running the Gutenberg plugin version 22.3 or later. The feature is experimental in 7.0, so test on a nightly build rather than a live site.
What is the difference between PHP-only and JavaScript blocks?
PHP-only blocks are defined in PHP with no build tooling and are ideal for data and layout blocks (pricing cards, WooCommerce grids, ACF displays). JavaScript blocks use React and are still required for inline text editing and advanced controls like media pickers and range sliders.
Do PHP-only blocks support colors, spacing, and typography?
Yes. Declare them in the supports array and call get_block_wrapper_attributes() on your wrapper element. Gutenberg then renders the native color, spacing, and typography controls in the sidebar with no custom UI code.
Are PHP-only blocks production-ready?
They are marked experimental in WordPress 7.0, so the API can change. They are dependable enough for internal tools and agency blocks when you pin your WordPress and Gutenberg versions. For public products, plan for API updates as 7.0 stabilizes.
How can I try PHP-only blocks quickly?
Create a WordPress 7.0 Nightly sandbox on InstaWP, open the built-in browser IDE, add a small plugin with autoRegister => true, and insert your block. You get a live preview URL without installing anything locally.
Final Thoughts
PHP-only blocks are a real shift in how WordPress development works. The barrier that kept PHP developers out of Gutenberg, the JavaScript build chain, is gone. You can now build native blocks in the language you already know, give content teams structured and visual editing, and move quickly on exactly the blocks agencies build most.
For agencies, this is where InstaWP ties the whole workflow together. Prototype the block on an instant sandbox, snapshot it so you can reuse it on the next project, share a live preview URL with the client for sign-off, and then move the finished site onto managed WordPress hosting when 7.0 ships. Build, test, share, and host in one place, without a local environment or a build chain. The barrier is gone. The only question left is what you will build first.