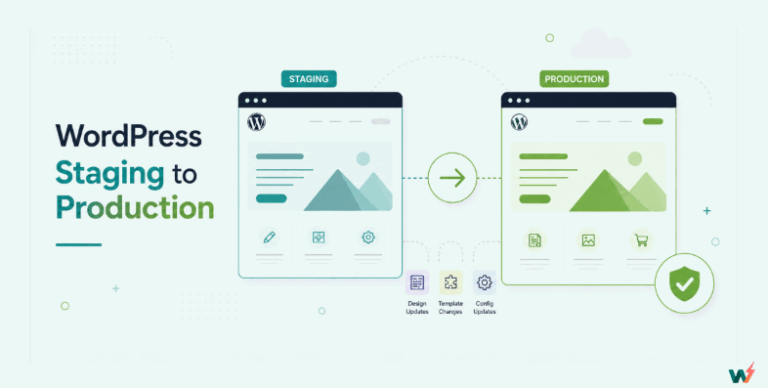
Creating a staging site in WordPress used to be a hassle, with manual setups, duplicated databases, and endless plugin conflicts. With InstaWP, the process is fast, reliable, and flexible.
Whether you’re a developer testing new features, an agency managing client sites, or a store owner rolling out updates, staging gives you a safe copy of your site where you can experiment without breaking production.
In this complete guide, we’ll show you how to create a staging site on InstaWP.
Table of Contents
What Is an InstaWP Staging Site
An InstaWP staging site is a temporary WordPress environment that lets you test, build, and deploy safely before making changes live. Unlike traditional staging that requires manual setup or server-side tools, InstaWP gives you a 1-click staging experience inside your WordPress admin.

With InstaWP, you can:
- Spin up sites in seconds from scratch, from your saved templates, or from the InstaWP Store.
- Customize configurations such as PHP and WordPress versions, pre-install plugins and themes, and even generate fake posts or WooCommerce products for testing.
- Use editing tools like a built-in code editor, database editor, and activity logs to fine-tune your site.
- Leverage build tools, including checkpoints, SFTP/SSH access, and in-built performance and security scanners.
- Collaborate in real time by inviting team members, linking Git repositories, or integrating with visual workflows.
- Migrate anywhere once testing is done, with simple options to push your site to any hosting provider or sync changes back to your live site.
In short, InstaWP WordPress staging sites combine speed, flexibility, and professional-grade tools, making them the safest way to test updates and new features in WordPress.
How to Create a Staging Site on InstaWP
When it comes to creating a WordPress staging site on InstaWP, you have true freedom. Unlike Kinsta or WP Engine, where staging is tied to fixed hosting plans, InstaWP gives you a flexible, developer-first workflow.
You can spin up a staging environment in seconds, test freely, and sync changes back to production with zero downtime.
Below, we have covered different ways to create a staging site for WordPress on InstaWP.
Part 1. New Users Who Want a Staging Site Only for Testing
If you are completely new to WordPress or just want to experiment without putting a live website at risk, the fastest way to get started is by creating a WordPress staging site on InstaWP using the Sandbox plan.
The Sandbox site plan is designed to act as an affordable and disposable staging environment. Instead of purchasing full hosting, you can spin up a site instantly and delete it when you’re done.
Pricing is extremely flexible; you only pay $2 per month or $0.07 per day, which means if you only need a WordPress staging site for three days of plugin testing, you’ll pay less than a cup of coffee.
Because it’s fully hosted by InstaWP, you don’t need to worry about setting up servers, configuring MySQL, or downloading WordPress manually. The platform handles the technical side so you can focus on testing.
Here is how you can create a staging site for WordPress on InstaWP only for testing purposes.
Step 1: Create a Site
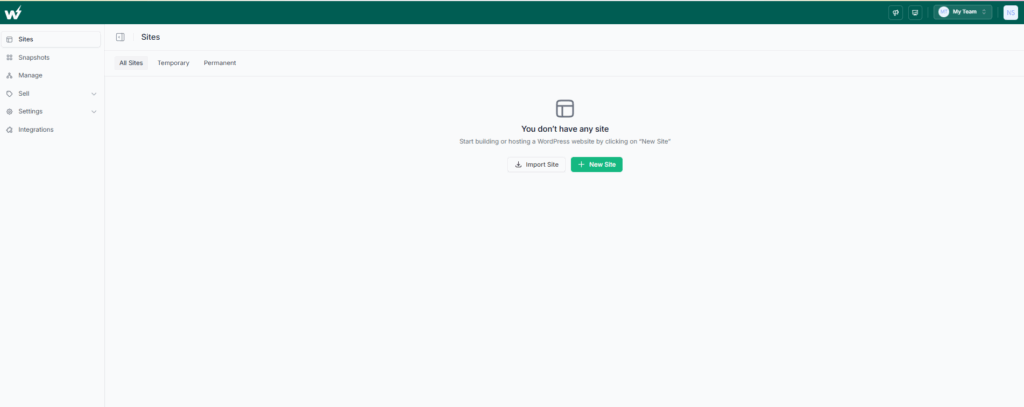
Log in to your InstaWP dashboard and click the + New Site button.
Step 2: Pick a Launch Option
InstaWP gives you four starting points:
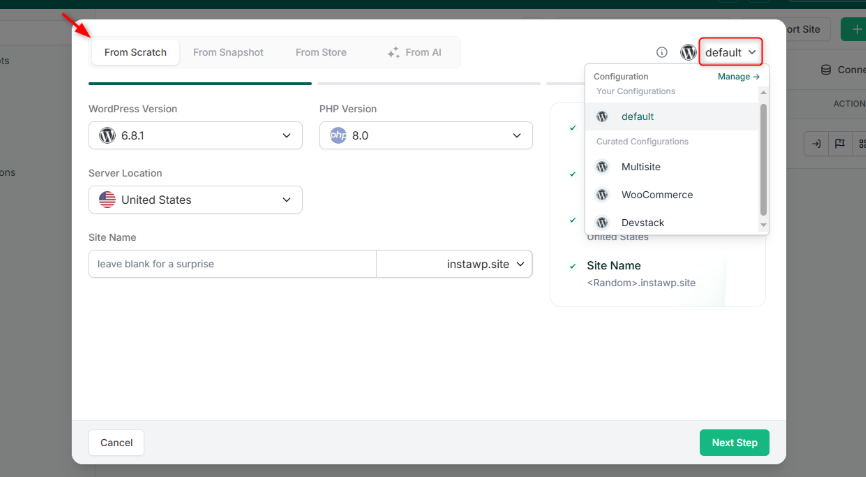
- Start from Scratch – Launch a blank WordPress install and build everything from zero.
- From Template – Use one of your saved templates that already includes plugins, settings, and themes. This is useful if you often test under the same setup.
- From Store – Select a pre-made template from the InstaWP Store, such as an eCommerce demo or portfolio layout, and test against that.
- From AI: InstaWP lets you use AI website builders to create a staging site.
At this stage, you can also choose the PHP version and WordPress version, and pick from multiple server locations to simulate how your site will perform for users in different regions.
Step 3: Apply Configurations
Staging is most powerful when you customize it to reflect real-world use cases. InstaWP lets you:
Preinstall the plugins and themes you plan to test.
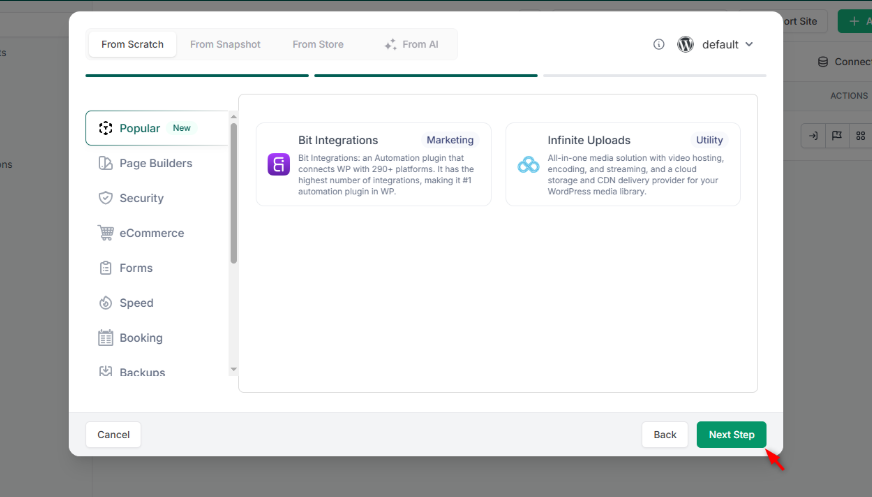
Adjust PHP settings such as max_execution_time or memory limits for specific testing scenarios. Generate fake posts, pages, users, or WooCommerce products so you can simulate actual content or eCommerce flows without needing live data.
Step 4: Select the Plan
Select the Sandbox site plan from the available hosting options. This is the best choice for a testing site because it provides enough resources without unnecessary costs.
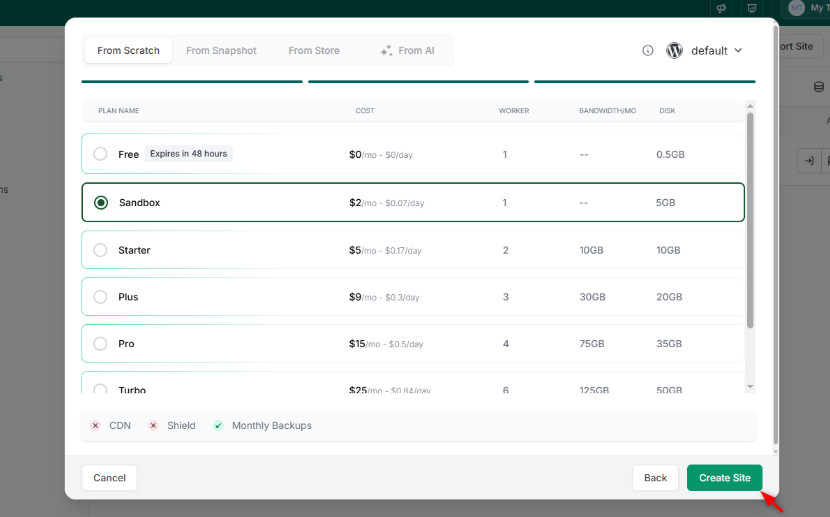
Click on ‘Create Site’ and you will have a fully hosted WordPress staging environment at your disposal. Once the site is live, you can immediately modify it using InstaWP’s built-in developer tools:
- The Code Editor allows you to tweak PHP, CSS, or JavaScript directly.
- The Database Editor (DB Editor) lets you query or edit database values without third-party tools.
- Logs, activity tracking, and usage metrics are all available to give you visibility into performance and errors.
Even on a Sandbox plan, you can invite team members or contractors to work on the staging site. InstaWP supports multi-user access for collaboration, linking to Git repositories for code versioning, and integrations for visually reviewing changes with your team or client.
Once you’ve completed your tests, you can safely delete the staging site. With Sandbox, you are charged only for the days the site was active. This means you can create, test, and remove staging environments as often as needed without long-term commitments.
For beginners, hobbyists, or anyone running quick plugin/theme compatibility checks, using InstaWP’s Sandbox plan as a WordPress staging site is the most practical choice. It’s disposable, reliable, and gives you all the power of staging without the complexity of server management.
If your testing in a sandbox site goes further than expected and you end up building something amazing, InstaWP makes it effortless to convert staging into production. There’s no migration hassle, no broken links, and no manual database exports.
With just one click, you can promote your staging site to a live environment.
All you need to do is upgrade the sandbox plan. Plus and higher plans on InstaWP come with fully managed WordPress cloud hosting, giving you everything you need for a production-ready site, including:
- Built-in CDN and global PoPs for faster content delivery
- InstaShield security (WAF + DDoS protection) to keep your site safe
- Daily backups and one-click restores
- Performance scanner and uptime monitoring to ensure stability
- Magic Login and site management dashboard for ongoing updates and monitoring
This means you can start in a low-cost, disposable sandbox, experiment without limits, and then scale instantly into a fully managed, production-ready WordPress site, all within the same platform.
With InstaWP, the workflow is seamless: build → test → launch → manage. No third-party migration plugins, no downtime, just a direct path from idea to live WordPress site.
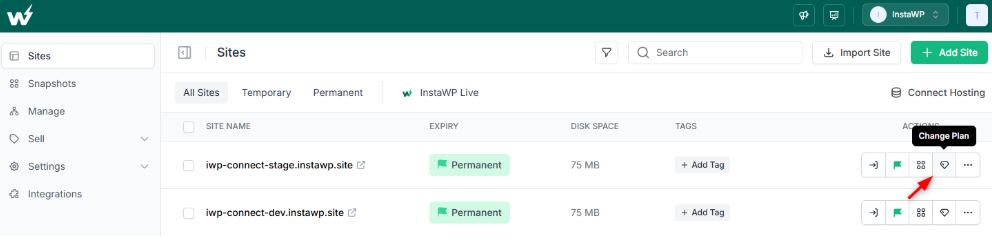
To upgrade the site plan, simply go to the staging site on your InstaWP dashboard and click on the ‘Change Plan’ icon.
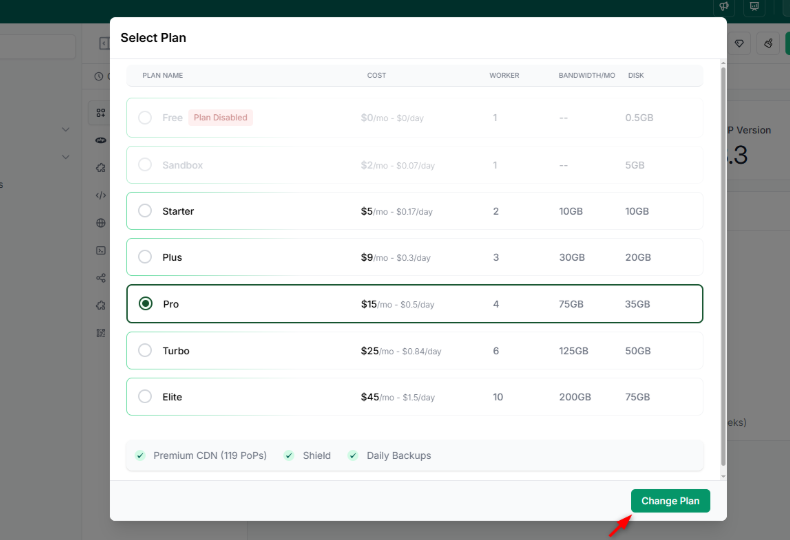
In the next window, select a higher-tier plan and make the payment. That’s it. You’ve just pushed a staging site into production and got a fully functioning live site.
Part 2. How to Create a Staging Site if Your WordPress Site is Hosted on InstaWP
If your site is already hosted and built on InstaWP, creating a WordPress staging site is even easier. Unlike traditional hosting setups that require manual database cloning or third-party plugins, InstaWP hosting with staging has a WordPress staging feature built directly into its Managed Hosting plans.
Starting with the Plus plan and above, the InstaWP Connect, the best WordPress staging plugin, is auto-installed on your live site, so you can create and manage staging environments in just a few clicks.
Your site appears automatically in the Managed tab of the InstaWP dashboard.
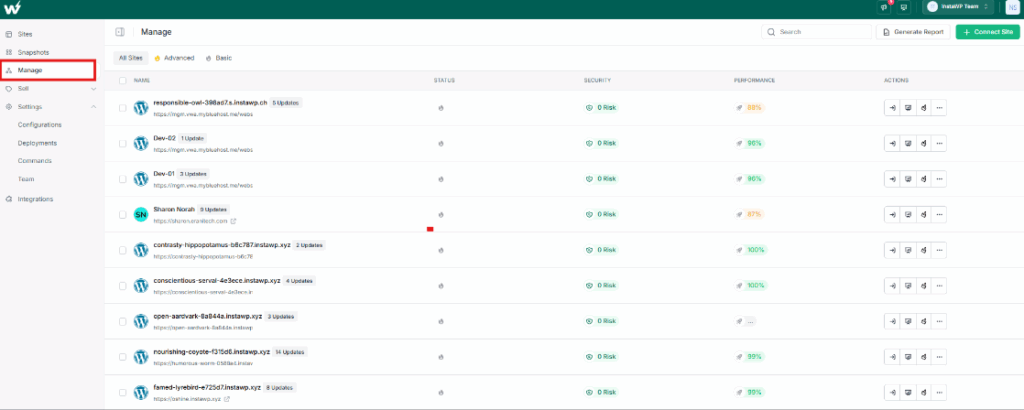
From there, you get one-click access to staging, automated backups, uptime monitoring, performance scanning, and advanced rollback features.
This is a major advantage over generic hosting: everything is integrated and optimized for WordPress.
Here is how a user of InstaWP’s managed cloud hosting can create a staging site for WordPress.
- Log in to your InstaWP account and use the Magic Login button to access the WP Admin of the live site for which you want to create a WordPress staging site.
- Go to Tools > InstaWP, and you will be able to view the staging site interface on your WP Admin.
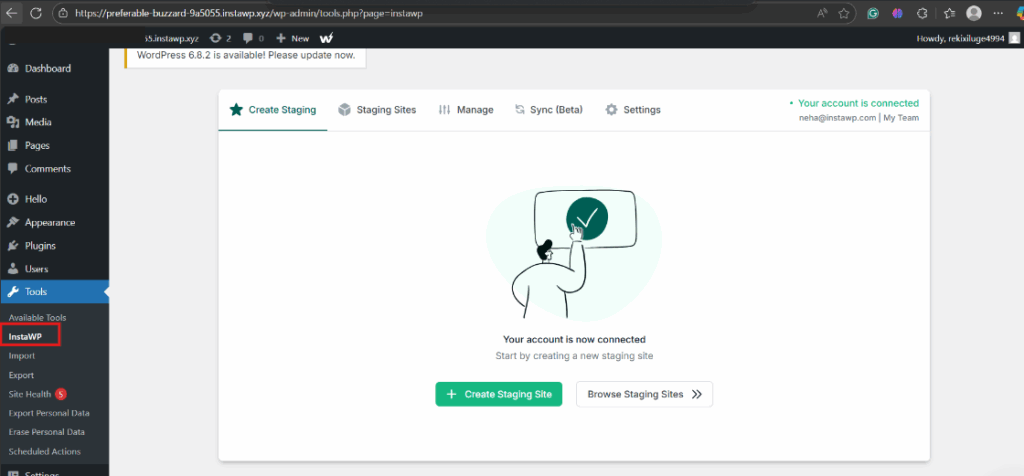
Select the Create Staging Site option. InstaWP offers three types of staging environments:
- Quick Staging – Creates a lightweight copy without the media folder. Fast and ideal for plugin/theme tests.
- Full Staging – Builds a complete clone of your site, including database, files, and media. Best when testing full site migrations or WooCommerce setups.
- Custom Staging – Lets you choose exactly what to include or skip (plugins, themes, media, log tables, etc.).
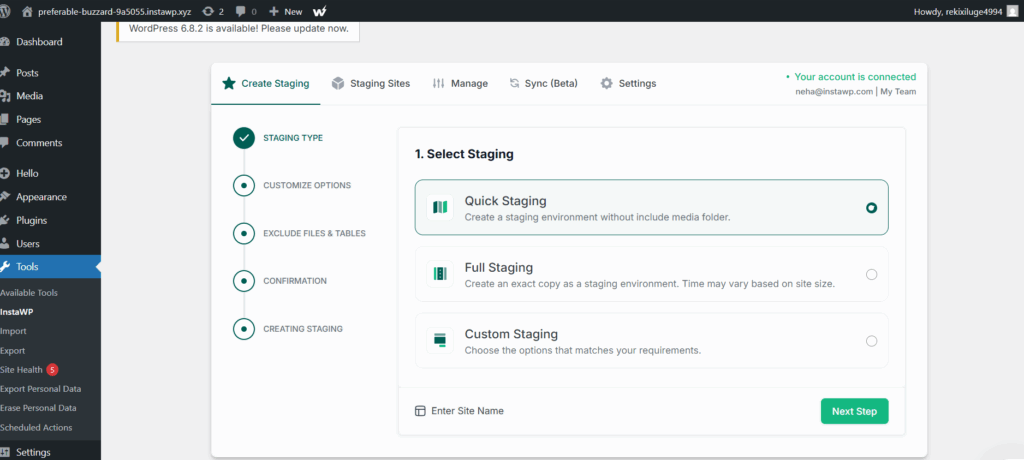
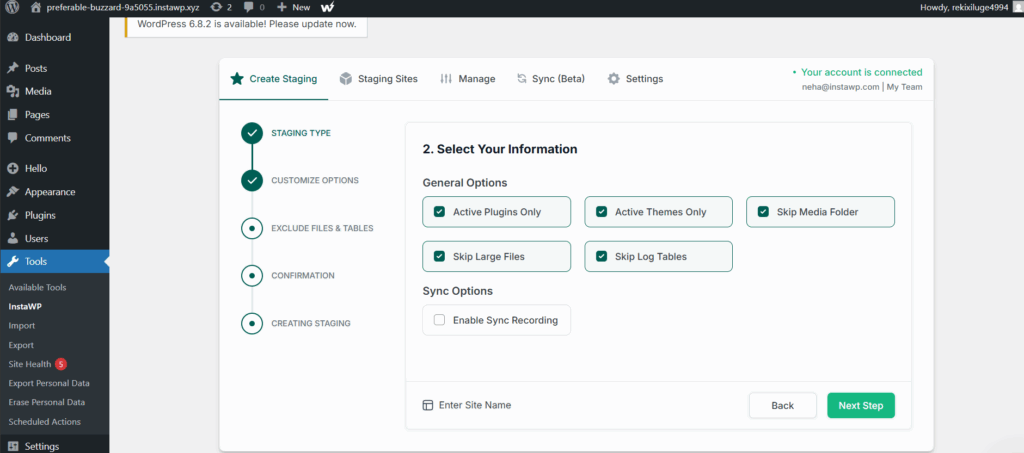
After selecting the staging type, you can refine what goes into the copy:
- Active plugins only
- Active themes only
- Skip media folder (to save space)
- Skip large files or log tables
- Enable Sync Recording for 2-Way Sync later
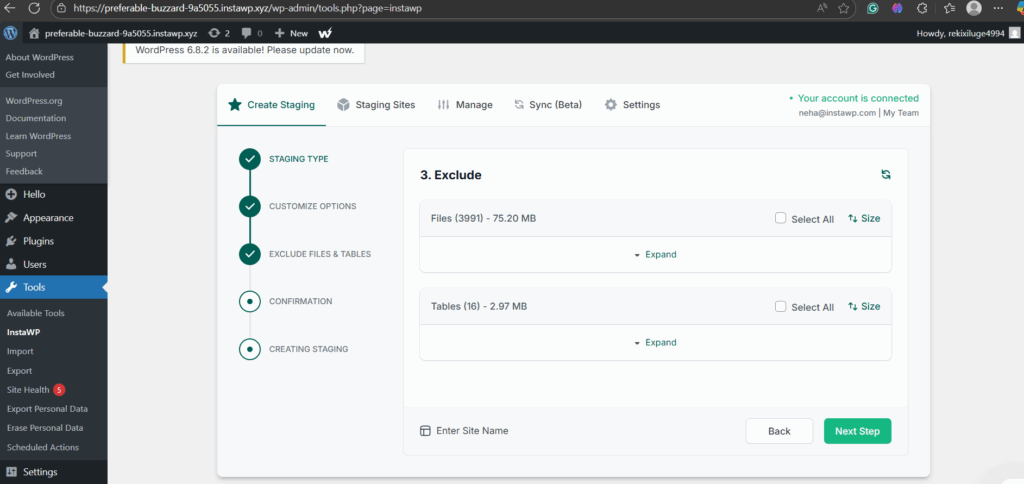
You’ll see an Exclude Files and Tables dialog where you can deselect anything you don’t want copied. This is especially useful if your site has large log files, test uploads, or old backup tables.
A confirmation dialog summarizes your staging choices. Review the details, then proceed to create the staging site.
Next, you have to choose a plan for the staging site itself. While staging is included with Managed Hosting, many users pick the Sandbox plan for testing because it costs only $2 per month or $0.07 per day. This way, you pay only for the days you keep the staging site active.

Even though you’re on a Managed Hosting plan, using a Sandbox plan for staging sites is still smart. Because Sandbox billing is usage-based, you can spin up multiple staging environments for testing, delete them when finished, and only pay for the days used. This prevents unnecessary monthly costs while giving you unlimited flexibility for testing.
⚡ Takeaway: If your site is hosted with InstaWP, creating a staging site is frictionless. You don’t need plugins or manual migrations; it’s all built into your hosting plan.
Part 3. How to Create a Staging Site if Your WordPress Site is Hosted Elsewhere
Not every WordPress site starts on InstaWP. If your live site is hosted with another provider, you can still enjoy all the benefits of an InstaWP staging site by connecting your external site through the InstaWP Connect plugin.
This workflow brings your existing setup under InstaWP’s site management layer, giving you access to 1-click staging, 2-Way Sync, and advanced monitoring features without needing to migrate hosting immediately.
Step 1: Install the InstaWP Connect Plugin
- Log in to your WordPress Admin panel.
- Go to Plugins > Add New Plugin.
- Search for InstaWP Connect in the WordPress plugin repository.
- Click Install Now and then Activate.
Alternatively, you can download the plugin directly from the official link and upload it as a .zip file.
Once activated, your live site connects to InstaWP and will appear in the Managed Sites section of your dashboard.
Step 2: Create a Staging Site from WP Admin
- In your WordPress dashboard, go to Tools > InstaWP.
- Click Create Staging Site.
- Select the staging type:
- Quick Staging (without media)
- Full Staging (complete copy)
- Custom Staging (you pick what’s included)
- Customize further:
- Include only active plugins or themes
- Skip large files, logs, or the media folder
- Enable Sync Recording for 2-Way Sync later
- Include only active plugins or themes
- Exclude files or database tables as needed.
- Confirm your settings.
The system will show a summary of the staging type, selected options, and required space. Once confirmed, InstaWP spins up your staging environment.
For site owners who cannot migrate hosting yet, the InstaWP Connect plugin is a bridge. It gives you:
- A safe WordPress staging site to test updates and changes.
- Control over what gets copied (files, database, media).
- Free forever access with Basic or scalable power with Advanced.
- The ability to later migrate fully to InstaWP if needed, while keeping staging workflows consistent.
⚡ Takeaway: Even if your WordPress site is hosted somewhere else, you can still use InstaWP staging sites. Just install the InstaWP Connect plugin, choose your management tier, and create staging directly from WP Admin.
Part 4. How to Create a Staging Site After Migrating Your WordPress Site to InstaWP
Some users don’t just want staging; they want to bring their entire website into InstaWP’s managed ecosystem first. If your live WordPress site is hosted elsewhere and you’re ready for a move, the smoothest path is to migrate the site into InstaWP hosting and then create a staging site from there.
This gives you the full power of InstaWP’s managed hosting plans with integrated staging, backups, monitoring, and sync features.
Step 1: Import or Migrate Your Site to InstaWP
You can migrate your site into InstaWP using:
- Backup file import – Upload a backup created by plugins like Duplicator, All-in-One Migration, or UpdraftPlus.
- Manual upload – Provide your backup file to InstaWP and restore it into your hosting account.
Once imported, select the right Managed Hosting plan (Plus, Pro, Turbo, or Elite) depending on your site’s size and activity.
After migration, your site is fully hosted on InstaWP. This means:
- The InstaWP Connect plugin is auto-installed and configured.
- Your site now appears under the Managed tab in your InstaWP dashboard.
- You gain access to staging, automated updates, daily backups, uptime monitoring, performance scans, and rollback options depending on your plan.
Repeat the process to create the staging site that we covered in Part 2. How to Create a Staging Site if Your WordPress Site is Hosted on InstaWP
⚡ Takeaway: Migrating your site into InstaWP gives you the most complete setup: premium managed hosting with integrated staging sites. You can import once, test in staging, and deploy confidently, all without juggling multiple plugins or hosts.
How to Push Changes from Staging to Live Without Overwriting
Creating a WordPress staging site is only half the story. The real value comes when you can safely move updates from staging back to your live WordPress site without losing customer data, WooCommerce orders, or new content created while you were testing. This is where InstaWP’s 2-Way Sync features shine.
Traditional hosting workflows often overwrite the entire live database when deploying staging changes. This can erase:
- New blog posts were written after the staging site was created
- WooCommerce orders are placed in real time
- New user sign-ups or membership activity
- Comments and form submissions
InstaWP avoids this problem with selective syncing and recording, so you choose exactly what gets pushed live. Here is how you can do it.
Step 1: Record Changes in Staging
Once you have created your InstaWP staging site (Quick, Full, or Custom), you can begin testing updates.
- Go to Tools > InstaWP inside your staging WordPress Admin.
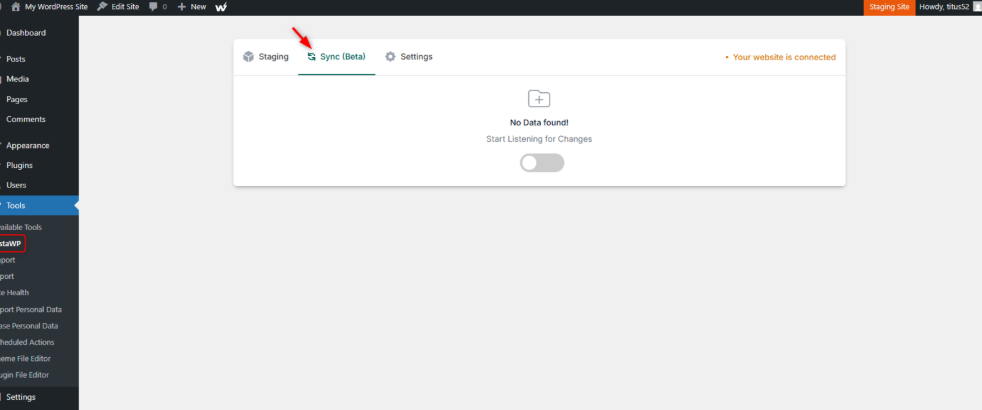
- Switch to the Sync (Beta) tab.
- Toggle Sync Recording to ON.
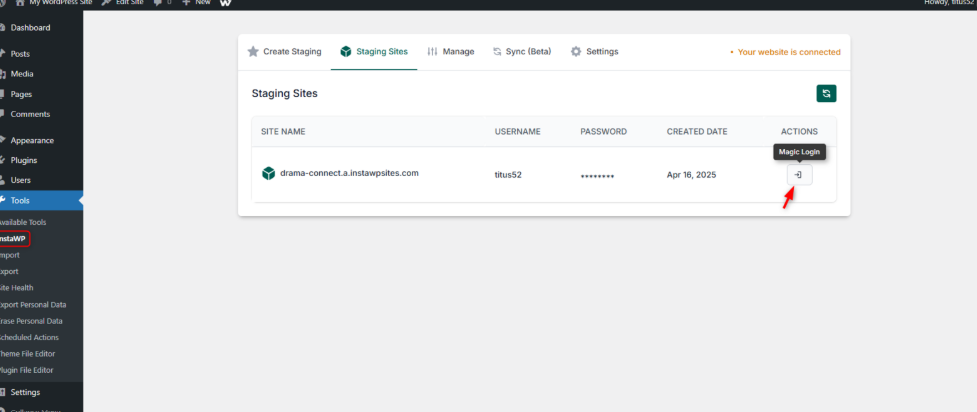
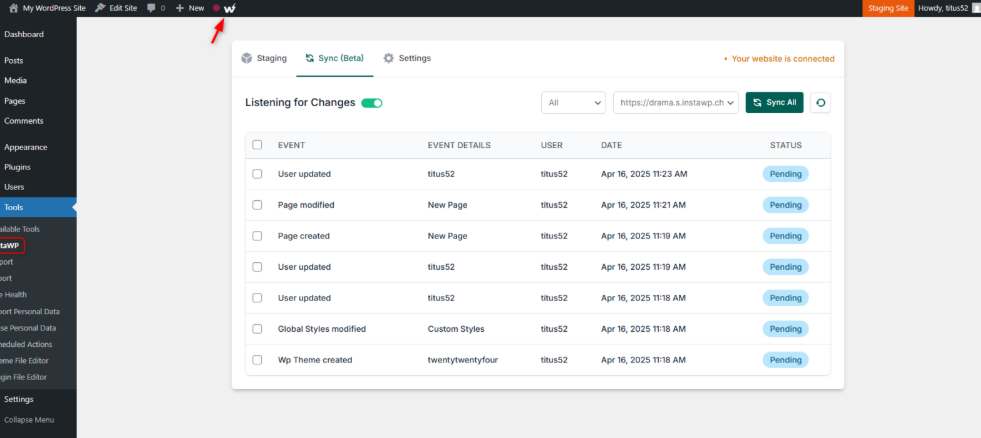
Every change you make, like adding a page, editing a post, or tweaking settings, will now be logged as an event. You’ll notice the InstaWP icon blinking in the admin bar whenever changes are recorded.
Step 2: Review Recorded Events
- Click the blinking InstaWP icon or return to Tools > InstaWP > Sync.
- You’ll see a list of every change recorded: new posts, media uploads, user changes, or taxonomy updates.
- This event log gives you fine-grained control over what to sync.
When ready to push:
- Click Sync All or select specific changes and click Sync Selected.
- A modal appears asking you to confirm the destination live site.
- Click Sync, and InstaWP will merge changes into live without replacing unrelated live data
Takeaway: InstaWP staging sites let you push changes to live without overwriting live-only data. By recording, reviewing, and selectively syncing updates, you protect customer activity, avoid downtime, and ship new features with confidence.
How to Map a Domain to Your Staging Site
Once your InstaWP staging site is up and running, you may want to test it under a custom domain instead of the default InstaWP URL. This is especially useful if you want to preview your staging environment realistically, check SSL, or demonstrate it to clients under a branded link. InstaWP makes this possible with simple domain mapping.
Let’s first understand why you should map a domain of your WordPress staging site.
- Realistic testing – Test exactly how your site will behave on its actual domain.
- Branding – Share a client-friendly URL like staging.clientsite.com instead of a temporary link.
- SEO safety – InstaWP staging sites are noindexed by default, but mapping a domain lets you control indexing and headers if you want to run experiments.
- SSL validation – Ensures HTTPS and certificates are working correctly before you go live.
And here is how you can map the domain of your WordPress staging sites on InstaWP.
Step 1: Open Site Settings
- Log in to your InstaWP account.
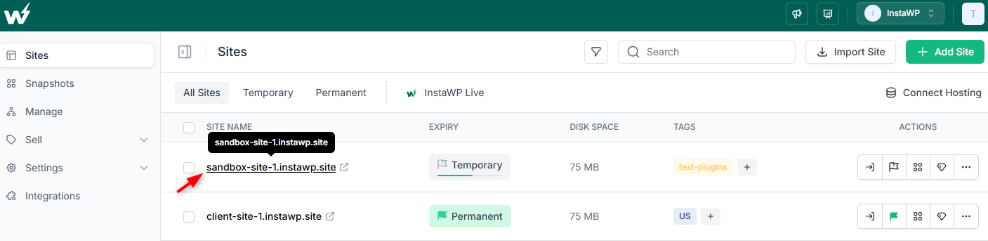
- Go to the Sites page.
- Select the staging site you want to map domains to.
- Open the site settings panel.
Step 2: Add a New Domain
- Navigate to the Map Domain section.
- Click on Map Domain.
- A modal window appears asking for the domain you want to add.
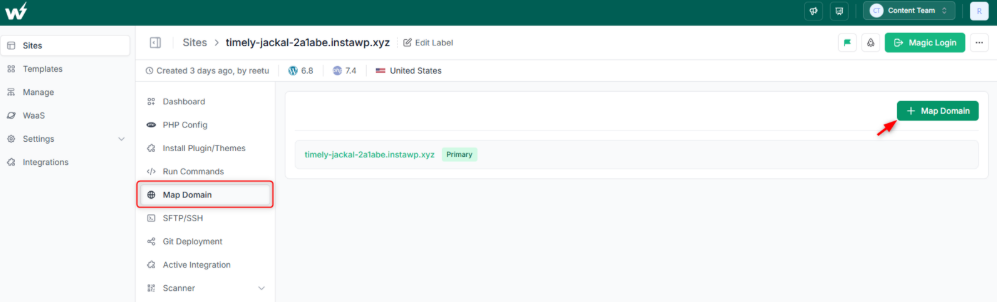
You’ll need to decide whether to map it as a Primary domain or an Alias domain:
- Primary domain – The main staging address you’ll use.
- Alias domain – An additional domain that redirects to the primary. For example, example.net redirects to example.com.
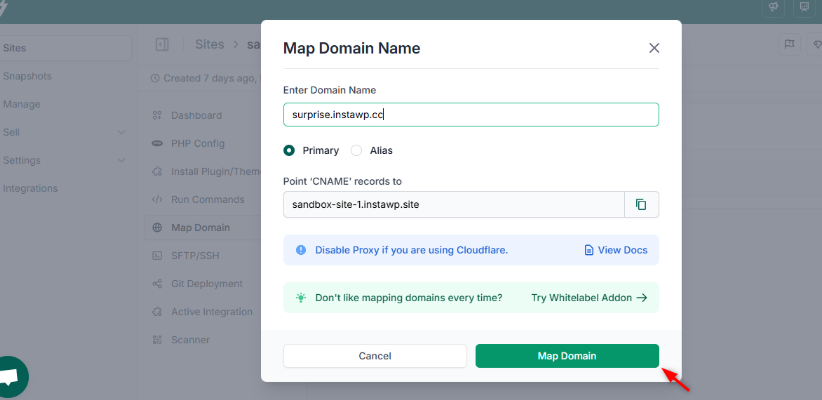
Step 3: Configure DNS Settings
- InstaWP will generate CNAME records for your domain.
- Copy these records into your domain registrar’s DNS settings.
- Make sure the CNAME values match exactly.
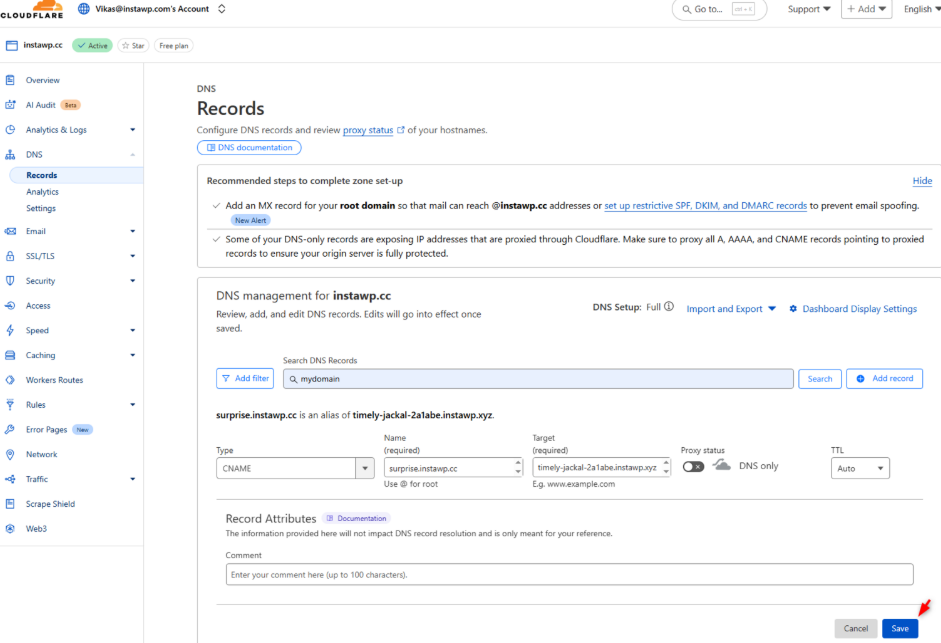
⚠️ Note: DNS propagation may take up to 24–48 hours, depending on your registrar.
Step 4: Confirm Mapping
Once DNS is configured:
- Return to the InstaWP dashboard.
- Click Map Domain to confirm the setup.
- The mapped domain will now appear in your record list.
Step 5: Add Multiple Domains (Optional)
- Repeat the process to map additional domains.
- Each mapped domain can be set as either primary or an alias.
Step 6: Set a Primary Domain
If you want to switch your staging site’s default domain:
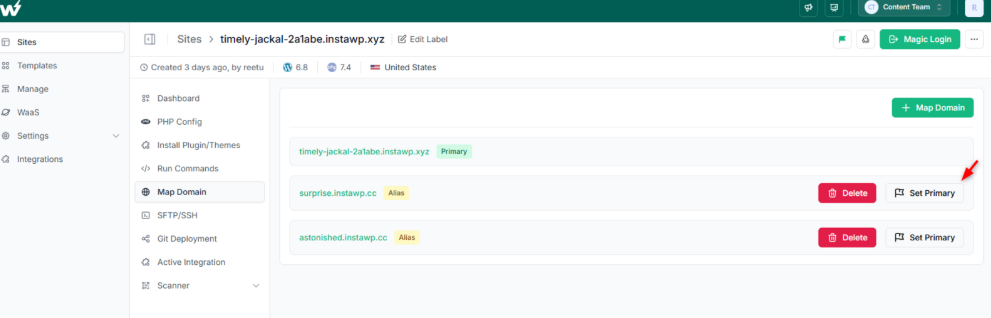
- Click Set Primary next to the mapped domain.
- Confirm in the dialog box.
- Your site will now load under the new primary domain.
Best Practices for Domain Mapping on Staging Sites
If you’re mapping the domain of your WordPress staging site, make sure you have these things in mind:
- Always use alias domains for redirects and keep only one primary domain active.
- Clear your browser cache if DNS changes don’t show up immediately.
- For WooCommerce or membership sites, test login, checkout, and email flows under the mapped domain to catch issues early.
- If SEO is a concern, keep Search Engine Visibility disabled in staging until you’re ready to switch to production.
⚡ Takeaway: With InstaWP, mapping a domain to your staging site is simple. Just add the domain, update DNS, and confirm. This makes your WordPress staging environment behave like a live site, giving you realistic testing conditions before you go live.
How to Delete, Refresh, or Clone a WordPress Staging Site
Creating a staging site is only the first step in testing and development. Over time, you may need to delete an old staging site, refresh it with the latest data, or even clone it for reuse. InstaWP provides all three options directly within your dashboard and WordPress admin panel, giving you flexibility to manage staging environments efficiently.
Deleting a Staging Site
There are certain instances when you have to delete the WordPress staging site you’ve created on InstaWP. For example, you need to delete it:
- After testing is complete
- To free up resources or staging space
- To avoid unnecessary billing (especially on Sandbox or paid plans)
If you’re in this situation, here is how you can delete the WordPress staging site on InstaWP.
- Go to your InstaWP dashboard and select the site. All your staging sites will be listed under the ‘Site’ tab.
- Locate the staging environment you want to remove.
- Click Delete.
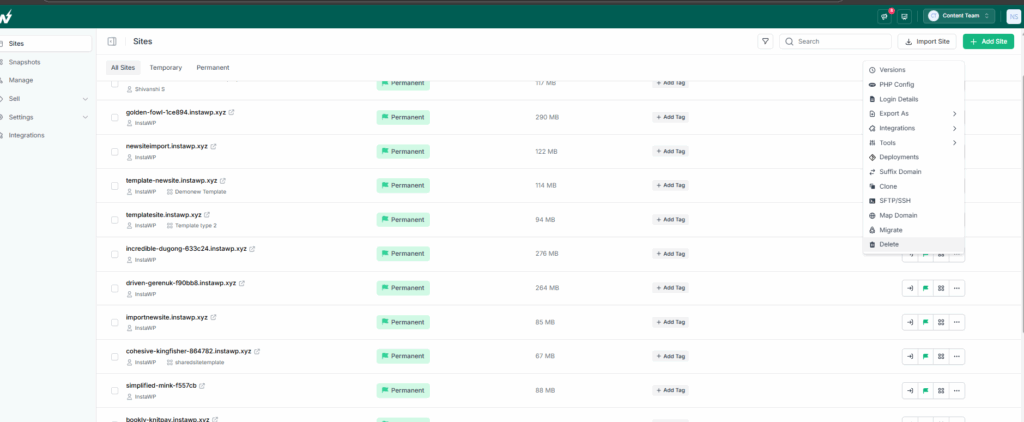
- Confirm deletion; this removes all staging data, including files, databases, and backups.
⚠️ Important: Once deleted, the staging site cannot be restored unless you recreate it from scratch or a backup.
Refreshing a Staging Site
When you make changes to your live site and want them reflected in staging, or your staging environment is outdated and no longer matches production, you need to refresh it, and doing so is super easy in InstaWP.
- Delete the existing staging site.
- Recreate it using Full Staging or Custom Staging from your live site.
- Alternatively, use 2-Way Sync to pull live changes into staging without a full rebuild.
Refreshing ensures your staging site always mirrors production, which is critical for accurate testing.
Cloning a Staging Site
You need to know how to clone a staging site on InstaWP because you’ll require a staging site’s clone when:
- You want to create a new test environment without altering the original.
- You’re testing multiple plugin/theme combinations in parallel.
- You need a staging site with the same setup for another client or project.
Here is how you can clone a WordPress staging site.
- Go to your InstaWP dashboard and select the staging site you want to duplicate.
- Use the Clone Site option.
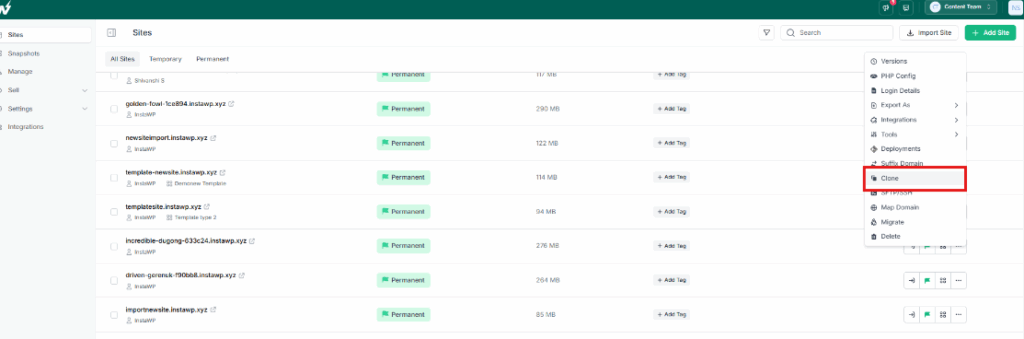
- InstaWP creates an exact copy with the same login credentials and environment.
Cloning saves enormous setup time because you don’t need to repeat configurations or reinstall plugins.
⚡ Takeaway: With InstaWP, managing staging environments is flexible and cost-efficient. Delete when done, refresh to stay current, or clone to expand your testing options; all without affecting your live WordPress site.
Conclusion
A WordPress staging site is no longer a luxury; it’s a necessity for anyone serious about site stability, performance, and growth. With InstaWP, you don’t need complicated workflows or third-party scripts to set up staging.
Whether you are a new user experimenting with a Sandbox site, an agency using Managed Hosting with auto-installed InstaWP Connect, or a site owner connecting an externally hosted site, InstaWP makes staging simple, fast, and affordable.
From creating Quick, Full, or Custom staging environments to pushing changes live with 2-Way Sync, mapping domains, cloning, refreshing, or deleting staging sites, InstaWP provides everything under one roof. No more risk of overwriting live data, no more sleepless nights before plugin updates.
If you want peace of mind, predictable workflows, and cost-effective testing, InstaWP is the best place to create and manage your WordPress staging sites.
Ready to test without fear?
Create your staging site with InstaWP today and see how effortless WordPress testing can be.
FAQs
1. What is a WordPress staging site?
A staging site is a copy of your live WordPress website where you can safely test changes, updates, or new features without affecting your production site.
2. Is InstaWP staging free?
Yes. With the Basic Site Managed plan, you get 500MB of free staging space. For larger environments and advanced tools like uptime monitoring and performance scans, you can upgrade to Advanced Site Managed for just $2 per site per month.
3. Can I push changes from staging to live without losing live data?
Yes. InstaWP’s Sync and 2-Way Sync features let you selectively push changes, posts, pages, files, or specific database tables, so live data like WooCommerce orders or new user registrations are not overwritten.
4. How do I map a custom domain to my staging site?
Go to your site settings in InstaWP, open the Map Domain section, add your domain, and update the provided CNAME records in your DNS settings. You can then set any mapped domain as the primary domain for your staging site.
5. Can I clone or refresh a staging site?
Yes. InstaWP allows you to clone staging sites to create new test environments or refresh staging sites by syncing them with your live site, ensuring your staging environment always stays up to date.
6. When should I upgrade my plan for staging?
Upgrade when your site outgrows its resources, you need daily backups and uptime monitoring, or you want access to advanced workflows like Git integration, Snapshots, and Templates. Plans like Plus, Pro, Turbo, and Elite scale with your site’s needs.