You have decided to move off Elementor. Maybe the pages feel heavy. Maybe you would rather not pay a subscription for a plugin to render markup that WordPress core now renders on its own. Or maybe you inherited a client site and discovered forty pages locked inside a builder you did not choose.
Whatever brought you here, the same question comes next: what happens to the content when Elementor goes away? The honest answer is that nothing converts itself. Deactivate the plugin and those carefully built pages collapse into a wall of unrendered shortcodes. There is no official migration path, and no button labelled “convert to blocks”.
This guide walks through the whole process: what actually breaks, how to audit your site before you touch anything, how to rebuild pages in the block editor without losing content or rankings, where the conversion plugins help and where they do not, and what to do if you have far more pages than time.
Key Takeaways
- Nothing converts automatically. Elementor stores page layouts as its own data, not as post content, so deactivating it leaves shortcodes behind rather than blocks.
- Audit before you rebuild. Most sites use Elementor on far fewer pages than the owner assumes. Counting first often cuts the job in half.
- Do it on staging, never live. A half converted page is a broken page, and you cannot rush the rebuild if visitors are watching.
- Choose your block toolkit first. Core blocks alone will not match an Elementor design. A block theme plus a blocks plugin gets you close.
- Conversion plugins handle simple layouts only. Text, headings and images usually survive. Anything with widgets, dynamic content or custom CSS does not.
- Budget realistically. Plan on roughly 20 to 40 minutes per page for a manual rebuild once you have settled on a design system.
- Clean up after Elementor. Leftover shortcodes, orphaned CSS files and unused database rows all linger after the plugin is gone.
Why Convert From Elementor to Gutenberg?
There is one reason that comes up more than any other, and it is performance. Elementor wraps your content in nested container divs and loads its own CSS and JavaScript on every page, whether that page needs it or not. On a simple text page the overhead is hard to justify.
The block editor ships with WordPress core. There is no extra bundle to download, no render blocking stylesheet from a third party, and no subscription attached to your ability to edit your own pages.
The practical reasons people make the switch:
- Lighter pages. Fewer stylesheets and less markup usually means better Core Web Vitals, particularly on mobile.
- No lock in. Block markup lives in your post content as HTML comments. If you disable a blocks plugin later, the content is still readable.
- Full site editing. Headers, footers and templates all live in the same editor as your pages, which removes a whole category of theme conflicts.
- Smaller attack surface. Every plugin is code you have to keep patched. Elementor Pro shipped a critical remote code execution flaw earlier this year, and sites that had already moved on simply were not affected.
- It is where WordPress is going. Core development effort is going into blocks, and each release closes another gap that used to require a builder.
Is Elementor Actually the Problem?
Before spending a week rebuilding pages, it is worth asking whether Elementor is really what is slowing your site down. Often it is not.
Run one of your slowest pages through PageSpeed Insights and look at what actually blocks rendering. On a large number of sites the real culprits are uncompressed hero images, a slider plugin, three separate analytics scripts, or shared hosting with a slow response time. Removing Elementor will not fix any of those.
Elementor still has genuine strengths:
- Pixel level positioning that the block editor still cannot match without custom CSS.
- A very large widget and template ecosystem.
- Motion effects, sticky elements and animations that work without touching code.
- A gentler learning curve for non technical clients who will be editing pages themselves.
A fair test: build the same page twice, once in Elementor and once in blocks, and compare the two on the same host with the same images. If the gap is small, your performance problem lives somewhere else and a rebuild will not repay the effort.
What Breaks When You Deactivate Elementor
This is the part that surprises people, so it is worth seeing before you plan anything else.
Elementor does not store your layout in the post content the way the block editor does. It keeps the structure in post meta and leaves a single shortcode in the content field. Deactivate the plugin and WordPress has nothing left to render, so the page falls back to raw shortcode text and whatever unstyled content it can find.
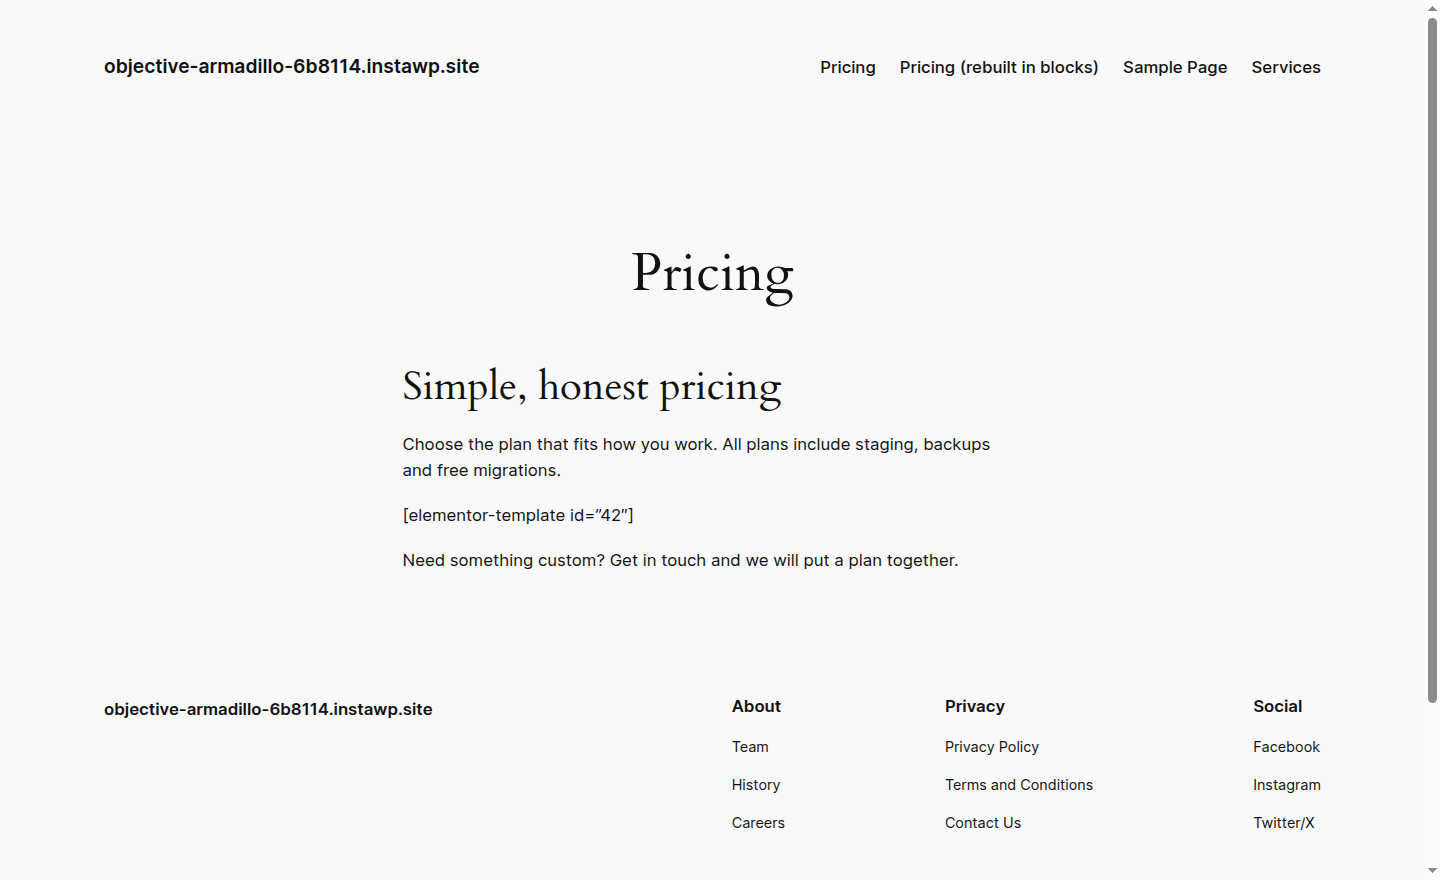
Here is what you are left with:
- Shortcode residue. Visible
[elementor-template id="123"]style text where your layout used to be. - Lost styling. All spacing, colours, columns and typography set inside the builder disappear at once.
- Broken headers and footers. If you built them with Elementor Theme Builder, they revert to whatever your theme provides.
- Orphaned CSS files. Elementor generates a stylesheet per page in the uploads folder. These stay on disk after the plugin is gone.
- Database rows nobody cleans up. Layout data sits in the post meta table indefinitely unless you remove it deliberately.
Your content is not deleted. It is simply unreachable through the front end until you rebuild the page. That distinction matters, because it means a careful conversion never loses text, only layout.
Pre Conversion Checklist
Work through this before you change a single page. Each item saves hours later.
- Take a full backup. Files and database together, stored somewhere off the server.
- Build a staging copy. Every step below happens on the copy, never on the live site.
- Inventory your pages. List every page and mark which ones Elementor actually renders.
- Screenshot everything. Capture each page at desktop and mobile widths. This is your reference while rebuilding, and your proof that nothing went missing.
- Export your content as text. Copy the words out of each page into a document. Layout can be rebuilt, but retyping copy is miserable.
- Record your current performance. Run PageSpeed Insights on three representative pages and save the numbers so you can prove the improvement afterwards.
- Note your custom CSS. Anything in the Elementor custom code panel needs a new home in your theme or a code snippets plugin.
- Check your forms and integrations. Elementor Pro forms will stop working. Decide on a replacement before you deactivate anything.
Three Ways to Convert, and How to Pick One
Most guides describe one route and leave you to find the others the hard way. There are three, and the right one depends almost entirely on how many pages you have and how complex they are.
Conversion plugin Fastest to try
Works reasonably well on text-heavy pages, but tends to break down when the original layout depends on widgets, custom styling, or more complex page-builder elements.
Manual rebuild in the block editor Most precise
The slowest approach, but also the most controlled. This is often the practical choice for high-value pages where preserving the design and layout accurately matters.
AI agent rebuilding pages as HTML Best for scale
A newer approach that can automate much of the rebuilding process. It becomes especially useful when you need to migrate dozens or hundreds of pages without assigning a developer to rebuild each one manually.
These are not mutually exclusive, and the best projects mix them. A common pattern is to run the plugin across the simple pages, rebuild the five pages that earn money by hand, and hand the long tail to an agent. Try Method 1 first on a single page, because if it works on your content it saves you the most time.
Method 1: Convert With a Plugin
If your WordPress site is running on InstaWP, the safest way to test an Elementor-to-Gutenberg conversion is on a WP staging copy rather than on the live site. You can create a staging site from your existing site, install the converter there, and see how well it handles your real pages without putting production at risk.
Several plugins can automatically move Elementor content into Gutenberg blocks. They usually will not produce a pixel-perfect result, but on simpler, text-heavy pages they can save a significant amount of rebuilding time.
Do not start with a site-wide conversion. Pick one representative page and test the workflow first.
How to run a plugin conversion safely on InstaWP
Create a staging copy of your site in InstaWP and make sure you have a recent backup or snapshot before changing anything.
Watch the video tutorial to create a staging site in InstaWP. On the staging site, duplicate the Elementor page you want to test. Keep the original untouched so you always have a visual and structural reference.
Install your chosen Elementor-to-Gutenberg conversion plugin on staging and run it only on the duplicated page. Avoid bulk conversion during the first test.
We’re using WebRitual Block Bridge for Elementor for this guide. Install and activate this plugin.

Open the converted version in the block editor and compare it side by side with the original Elementor page. Check the areas that usually drift first, including spacing, column widths, typography, responsive behavior, and custom styling.
Clean up the converted blocks and measure the effort involved. If fixing the output takes almost as long as rebuilding the page properly, use Method 2 for that page instead.
Repeat the process on a few different page types before deciding whether the plugin is reliable enough for a larger batch.
Using an InstaWP staging site keeps the experiment isolated. If the converter produces messy markup, breaks a layout, or conflicts with another plugin, you can discard the staging copy and start again without touching the live site.
Several plugins move builder content into blocks automatically. They will not finish the job, but on the right page they get you most of the way in seconds rather than half an hour.
Where conversion plugins fall short
They handle the simple things well: headings, paragraphs, images, plain lists and basic two column rows. What they consistently struggle with:
- Third party widgets. Anything from an addon pack has no block equivalent to map onto.
- Custom CSS and per element styling. Padding, margins and breakpoint specific rules rarely survive.
- Dynamic content. Loops, query results and custom field output need rebuilding by hand.
- Forms, sliders and popups. These are separate systems and need separate replacements.
Treat a conversion plugin as a first pass, not a finished result. The rule of thumb: if the output needs more fixing than a fresh rebuild would have taken, abandon it for that page and move on.
Method 2: Rebuild Manually in the Block Editor
This is the most reliable approach, especially for important landing pages, service pages, and other pages where layout accuracy matters. Instead of relying on an automated converter, you rebuild the page directly in Gutenberg and control every section yourself.
If your site is hosted on InstaWP, you can do the entire rebuild on a staging copy first, test it properly, and only move the finished version to production when you are satisfied.
Step 1: Create a Staging Copy of Your Site
Do not rebuild important pages directly on your live WordPress site. During the process, layouts may be incomplete, styles may change, and you may need to test several versions before the page is ready.
With InstaWP, you can create a staging copy of your existing site and use it as an isolated workspace for the migration. The staging site keeps your production site untouched while you rebuild Elementor pages in the block editor, test responsive layouts, check forms and interactions, and compare the new version against the original.
Here is how you can do it.
Go to the WP Admin Panel of your live site and install InstaWP Connect plugin. Connect your InstaWP account with the live site.
Refer to the Add Connect Plugin to Site document for more information.

Go to Tools > InstaWP from the site’s admin panel. Now, click the Create Staging Site button.

Decide the type of WP staging you want to create for your live site and click Next Step. Selecting the Full Staging option will show the exact environment.

Set the customizable options according to your preferences and click Next Step.

You can exclude files and tables if you want and proceed to Next Step.

Confirm the selected customized settings once again, choose a site plan according for your staging site, and hit Create Staging button. It’ll start the process instantly.

And, that’s it. A staging of your live site is ready. Once the site is ready, you’ll get the login credentials displayed.

Before you begin making changes, enable 2-Way Sync between the staging site and the live site. This gives you a controlled way to move the changes you make on staging back to production once the rebuild is complete.

Instead of repeating the work manually on the live site, you can review the changes on staging first and then sync the required updates to production.
Step 2: Audit Which Pages Actually Use Elementor
This step almost always shrinks the project. Many sites have Elementor active across the whole install but only use it on a handful of landing pages, while blog posts and utility pages run on plain content.

Open Pages in the dashboard and check each entry. Pages built with the builder show an Edit with Elementor option. Sort them into three groups:
- Simple pages. Mostly text, headings and images. These convert quickly.
- Complex pages. Multi column layouts, widgets, dynamic content, animations. Budget real time for these.
- Retire candidates. Old campaign pages nobody visits. Check your analytics. Deleting a page is faster than rebuilding it.
Step 3: Choose Your Block Theme and Blocks Plugin
Core blocks on their own will not reproduce a typical Elementor design. You need a block theme for the site structure and usually a blocks plugin for the layout controls.

Well supported combinations include Kadence, Blocksy or GeneratePress for the theme, paired with GenerateBlocks, Stackable or Spectra for the extra blocks.
Pick one combination and commit to it. Installing three blocks plugins to get three different section styles recreates exactly the bloat you are trying to escape. Set your global colours, fonts and spacing in the Site Editor before rebuilding anything, so every page you convert inherits a consistent design.
Step 4: Rebuild One Page as a Test
Do not start with the homepage. Pick something of middling complexity, an about page or a service page, and rebuild it completely.

Create a new page rather than editing the Elementor one, so the original stays intact as a reference. Then work top to bottom:
- Open the Elementor page in one browser tab and the new block page in another.
- Recreate each section with a Group block, then place Columns, Heading, Paragraph and Image blocks inside it.
- Reuse the same media from the library. There is no need to re upload anything.
- Save any section you will use again as a synced pattern. Calls to action and testimonial rows are worth patterning immediately.
- Check the result at mobile, tablet and desktop widths before moving on.
Time yourself on this page. Whatever it took, multiply by your page count and you have an honest estimate for the whole project. If that number is uncomfortable, read the section on having more pages than patience before continuing.
Step 5: Convert the Remaining Pages
With a design system and a set of patterns in place, the rest goes faster. Work in priority order: highest traffic pages first, so that if you run out of time the pages that matter are already done.
Keep the URL identical for every page you replace. If a slug has to change, map the old address to the new one with a redirect. Losing a URL is the one mistake in this process that costs you traffic rather than time.
Step 6: Deactivate Elementor and Clean Up
Only once every page is rebuilt and checked should Elementor come off. Deactivate it, then walk the whole site again looking for pages you missed.

Leave the plugin installed but inactive for a week or so. If you find a forgotten page, reactivating is far quicker than rebuilding from a screenshot. After that, clean up what is left behind:
- Search your content for leftover shortcode text and remove it.
- Delete the generated CSS files in the uploads folder.
- Remove Elementor template posts under the hidden template post type.
- Clear the orphaned post meta rows, ideally with a maintenance plugin rather than hand written SQL.
Step 7: Verify, Then Push Live
Before promoting the staging site, run the checks that catch the expensive mistakes:
- Crawl the site and confirm there are no new 404s.
- Compare each converted page against your original screenshots.
- Submit every form and confirm the entries arrive.
- Re run PageSpeed Insights and compare against the numbers you saved in the checklist.
- Check that titles and meta descriptions survived the rebuild.
Once everything looks good, use InstaWP’s 2-Way Sync to move only the changes you want from staging to the live site. Review the available sync events, select the relevant changes from your staging session, and then push those selected events to production.

This is safer than replacing the entire live site because you can promote only the work you actually completed, such as page edits, content changes, or other supported updates, while leaving unrelated live-site activity untouched.
After the sync finishes, check the live pages again to confirm the changes arrived correctly. Keep the backup from the first step until you are confident the production site is stable.
Method 3: Let an AI Agent Rebuild the Pages as HTML
Methods 1 and 2 both assume a person working through pages one at a time. That is fine for eight pages. At sixty it becomes a project nobody wants to own, and it is the single biggest reason sites stay on a builder they outgrew years ago.
Here is why AI has not helped with this until recently. Ask a model to rebuild an Elementor page and it has to write Elementor’s own internal data structure, a deeply nested JSON blob with element IDs and setting keys it cannot verify. Models are unreliable at that, and one malformed key breaks the page. Ask the same model to write HTML and it is on home ground, because HTML is one of the most represented languages in its training data.
That difference is the whole idea behind InstaWP Studio, our open source project. Each page is a plain HTML file, and a plugin renders that file as a real WordPress page. No builder, no block editor and no build step for those pages, so the file stays the single source of truth and an agent can edit it directly.

What a page actually looks like
A page is one file. Drop pricing.html into the source folder and it serves at /pricing/:
<!-- site/pricing.html  ->  /pricing/ -->
<head>
  <title>Pricing</title>
  <link rel="stylesheet" href="assets/style.css">
</head>
<body>
  <div id="site-nav"></div>
    <section class="hero">
      <h1>Simple, honest pricing</h1>
    </section>
  <div id="site-footer"></div>
</body>
There is no database record holding your layout, so there is nothing to drift out of sync and nothing to migrate next time you change your mind. The file is the page.
How the rebuild works in practice
- Point the agent at one page you have already rebuilt by hand, so it learns your design system.
- Give it the Elementor page to work from, usually the live URL plus a screenshot.
- Ask for the rebuild. A prompt as plain as “rebuild /services/ as services.html using the same section classes as about.html, keep every heading and all the body copy” is enough.
- Review the result on the staging site and correct what is wrong.
- Repeat. Each page after the first is faster, because the patterns are already established.
Where this actually pays off
Take an agency holding a 40 page client site on Elementor Pro. At half an hour a page, a manual rebuild is roughly 20 hours of billable time the client does not want to pay for, which is why the site never moves.
Split by method, the same job looks different. The 6 pages that convert visitors get rebuilt by hand, because those deserve the attention. The 8 simple text pages go through a conversion plugin. The remaining 26 service and location pages, which are the same layout with different words, are exactly what an agent handles well. The work that was 20 hours becomes an afternoon of review.
The second place it pays off is client review. Studio ships a feedback widget, so a client pins a comment directly on the live page, something like “this heading should say pricing, not plans”. Each comment carries an ID, the agent resolves it in the same source file, and marks the item done. No screenshots pasted into email, no ambiguity about which section anyone meant. For agencies that is often the bigger win, because review rounds cost more time than the build did.

Worth being straight about: Studio is early and we are still dogfooding it on our own site, so treat it as something to evaluate rather than a finished product. It also does not read your Elementor data and convert it automatically. The agent rebuilds each page from the design in front of it, which means you review every page before it ships. And because these pages are HTML rather than blocks, a non technical client edits them through Studio’s click to edit mode instead of the block editor.
If you would rather keep everything inside the block editor, a lighter version of the same idea works too. Connecting an agent to WordPress through the Model Context Protocol lets it read and write real pages and blocks, and our notes on AI assisted WordPress migration cover the same pattern applied to moving hosts.
How to Choose Your Approach
| Your situation | Best approach | Rough effort |
|---|---|---|
| Under 10 pages, mostly text | Method 2 · Manual rebuild | A day or two |
| Simple layouts, tight budget | Method 1 · Conversion plugin | Half the manual time, plus fixes |
| Complex designs, brand critical | Method 2 · Manual rebuild | 20–40 minutes per page |
| Dozens of pages, developer or agency | Method 3 · Agent rebuild as HTML | Setup cost, then fast per page |
| Client edits pages themselves daily | Stay on Elementor for now | None |
That last row is not a joke. If a non technical client edits their own pages every week and is happy doing it, the cost of retraining them may outweigh whatever you gain in page weight.
Common Problems and How to Fix Them
Shortcode text is showing on the front end. A page still holds an Elementor shortcode. Open it in the block editor, delete the leftover text, and rebuild that section.
The header and footer disappeared. They were built with Elementor Theme Builder. Rebuild them as template parts in the Site Editor under Appearance, then Editor, then Patterns.
Fonts and colours changed across the site. Elementor was setting global styles. Set them again in the Site Editor under Styles so every block inherits the right values.
Pages look fine on desktop but break on mobile. Block spacing does not scale the way builder breakpoints do. Check every converted page at a narrow width and adjust padding on the Group blocks.
Performance did not improve. Something else is the bottleneck. Look at image sizes, third party scripts and server response time before blaming the editor.
Rankings dipped after going live. Check for changed URLs and missing redirects first, then confirm your titles and meta descriptions came across intact.
Wrapping Up
Converting Elementor to Gutenberg is not difficult work, but it is patient work. There is no automatic path, and the sites that come through it cleanly are the ones that audited first, rebuilt on staging, and kept every URL intact.
Start with the audit. Count the pages that genuinely need converting, rebuild one of them end to end, and time yourself. That single number tells you whether this is a weekend job, a proper project, or something worth handing to an agent instead.
Frequently Asked Questions
Can you convert Elementor to Gutenberg automatically?
Not completely. There is no official converter, and Elementor stores layouts in its own data rather than in post content. Third party conversion plugins can migrate simple text, headings and images into blocks, but layouts with widgets, custom CSS or dynamic content still need rebuilding by hand.
What happens if I deactivate Elementor?
Your pages stop rendering and show raw shortcode text instead of the built layout. Styling, columns and spacing all disappear. Nothing is deleted, so reactivating the plugin restores the pages, but the content is unreachable on the front end until you either reactivate or rebuild.
Will converting from Elementor to Gutenberg hurt my SEO?
Not if you keep your URLs, headings and meta data intact. Rankings usually dip only when slugs change without redirects, or when heading structure is lost during the rebuild. Faster pages after the switch often help rather than hurt.
Is Gutenberg actually faster than Elementor?
Usually yes, because the block editor ships with WordPress core and does not load an extra CSS and JavaScript bundle on every page. The gain is largest on simple content pages. If your slowdown comes from large images, heavy plugins or slow hosting, switching editors will not fix it.
How long does it take to convert an Elementor site?
Plan on roughly 20 to 40 minutes per page for a manual rebuild once your design system and patterns are set up. A ten page site is a weekend. A sixty page site is a genuine project, which is when conversion plugins or an agent driven rebuild become worth considering.
Do I need a blocks plugin, or is core enough?
Core blocks cover text, images, columns and basic groups. Matching a typical Elementor design usually needs a block theme plus one blocks plugin such as GenerateBlocks, Stackable or Spectra. Choose a single plugin and stay with it, or you recreate the bloat you were trying to remove.
Can I use Elementor and Gutenberg on the same site?
Yes. WordPress lets you choose the editor per page, so you can convert gradually and leave complex pages on Elementor until last. This is the safest way to migrate a large site, though you carry the weight of both systems until the final page is converted.