To convert WordPress to a static site, you keep WordPress running privately as your editor and publish a folder of pre-built HTML, CSS and JavaScript files in its place. A static site generator plugin such as Simply Static does the conversion, and any static host serves the result. It suits brochure sites, portfolios and documentation. Stores, memberships and anything with logins should stay on WordPress.
The safe way to do it is on a copy, never the live site. We used InstaWP’s managed WordPress hosting for that private copy because a throwaway site, a restore point and WP-CLI access are each one command away. Then we converted a real 11-page WordPress site with Simply Static 3.8.19 and deployed it to InstaPods. This guide shows every screen and every setting we changed, plus the four problems that the default settings left in the export.
- Check search visibility first. New sandbox sites often have “Discourage search engines” switched on. Our first export copied
noindex, nofollowinto every one of its 17 pages. - Use Absolute URLs, not Relative Path. With relative paths, the exported sitemap and canonical tags carried relative URLs such as
/about/, which Google does not accept in a sitemap. - Forms and search break silently. On the static copy, Contact Form 7 spun forever after Submit and the search box returned no results. Swap them for a form service and a JavaScript search before you export.
- The export is mostly WordPress core. 70 MB of the 79 MB export was
wp-includes, yet the pages referenced only 64 of those 1,638 files. - Static wins under load, not on a single visit. One request at a time, both versions answered in about the same time. At 25 concurrent requests, uncached WordPress slowed to a 535 ms median while the static copy held at 211 ms.
- Updates take about two minutes. Edit in WordPress, re-export (64 seconds) and redeploy. InstaPods synced only the 46 changed files, in 9.3 seconds.
Table of Contents
Can Your WordPress Site Go Static? A 60-Second Check
Your WordPress site can go static if visitors only read it. If they log in, buy, book, comment or post, keep WordPress serving the site and make it faster with caching instead. Most sites sit in the middle: they need one or two swaps, usually the contact form and the search box, before a static export works.
Portfolios and agency showcases
Documentation and knowledge bases
Event or campaign landing pages
Blogs that publish weekly or less
Site search: use Pagefind or Algolia
Comments: turn them off or embed a service
Newsletter sign-up: embed the provider’s form
Memberships, courses and logins
Booking and appointment systems
Forums and user-generated content
Pages that change per visitor
If you landed in the red column, skip to static site or fast managed WordPress hosting. If you are in green or amber, read on.
What Does It Mean to Convert WordPress to Static HTML Site?
Converting WordPress to static HTML means saving every page your site produces as a plain file ahead of time, so a visitor gets a ready-made page instead of one that PHP and MySQL build on request. WordPress stays installed somewhere private, and you edit there as usual. When you publish, a generator crawls the private site and writes the public copy.
A normal WordPress request runs PHP, queries the database and assembles the HTML before the first byte leaves the server. A static request reads a file from disk or from a CDN cache. The static copy has no login page, no PHP and no database, so most of the WordPress attack surface simply is not there.
Is WordPress a static or dynamic website?
WordPress is dynamic by default. It builds each page on request using PHP and a MySQL database. It only becomes static after you export it to flat HTML files with a static site generator, which is what this guide covers. So WordPress is not static out of the box, but you can publish a static version of it and keep editing in WordPress.
What Happened When We Converted a Real WordPress Site?
The conversion worked, but the default settings shipped four problems we only found by inspecting the export: a noindex tag on every page, no sitemap, relative canonical URLs and dead forms. Three settings and one WordPress checkbox fixed all of them except the forms, which need a replacement service.
The size row is worth a closer look. Simply Static copied 1,638 files from wp-includes, but only 64 of them (0.4 MB) were referenced by any page, stylesheet or script. Deselecting the Includes Directory crawler on a fresh site did not change that in our test, so expect a large upload even for a small site. It does no harm on InstaPods or Cloudflare Pages, which allows 20,000 files per site on its free plan (Cloudflare Pages limits).
Tools You Need To Convert WordPress Site to Static HTML
You need three things to convert a WordPress site to static HTML: a private WordPress copy to edit and export from, a static site generator plugin to do the conversion, and a static host to serve the files. A form service and a JavaScript search tool are optional extras for sites that need them.
1. A private WordPress environment
Work in a private copy instead of your live site. This is where you clean up dynamic features, configure the generator and run test exports.
A simple way to get one is InstaWP, an all-in-one WordPress cloud platform that also runs managed WordPress hosting. Inside InstaWP, you can:
- Launch a WordPress staging site from any live site with the InstaWP Connect plugin
- Create a temporary site from the terminal with the InstaWP CLI in about 30 seconds
- Save a restore point with Versions before you strip anything out
- Keep the WordPress copy private with Protect Site (on Sandbox plans), so only you can reach the source
For agencies, this is far more flexible than local stacks like XAMPP and scales cleanly across client projects. See why InstaWP works as an XAMPP alternative.
2. A WordPress static site generator plugin
Next, you need a WordPress static site generator to export your site as static files. Popular options include:
- Simply Static (free): 30,000+ active installs and updated days before our test. Exports a ZIP or a local folder; the Pro version adds deploy targets, forms and search.
- WP2Static: open source and aimed at developers, but its GitHub repository has had no commits since February 2024.
These plugins crawl your WordPress site and save static HTML, CSS, JavaScript and media files ready for deployment. We compare every route, including HTTrack and the manual method, in the 5 methods section below, and agencies can compare more options in our list of WordPress static site generator plugins.
3. Static hosting for your exported site
Once your static files are generated, you need a host that serves them, such as:
- InstaPods: deploy plain static HTML (and framework builds) from one command, with auto SSL and a custom domain, from $3 a month
- Cloudflare Pages
- Netlify
- GitHub Pages, Amazon S3 or similar object storage
Point your domain to the static host so visitors see only the exported version, while WordPress stays private. We compare the main hosts in where to host a static WordPress site.
4. Optional enhancements for static sites
Static sites drop dynamic features, so you bring the important ones back with external services:
- Formspree or Tally for contact and lead forms
- Pagefind or Algolia for site search
- Disqus, or no comments at all
- GitHub, if you want to deploy automatically from a repository
How to Convert WordPress to a Static Site: 5 Methods
There are five ways to convert WordPress to a static site: export it with a plugin on a private copy, crawl the public URL with a tool like HTTrack, rebuild the front end as headless WordPress, pay a managed static service, or hand-code the pages. The plugin route suits most sites because you keep editing in WordPress and can re-export in about a minute.
Not sure which to pick? If you can log in to WordPress, use Method 1. If you cannot, use Method 2. If you want a new design anyway, look at Method 3. Online “WordPress to HTML converters” are covered further down.
How to Convert WordPress to a Static HTML Site (Beginner Friendly)
Whichever method you choose, start from a copy of your site, not the live site. A copy lets you remove forms, change settings and run test exports while visitors keep using the real site. It also gives the crawl somewhere to run that is not your production server.
The InstaWP Connect plugin makes that copy for a site hosted anywhere. Install it, click Create Staging, and InstaWP copies files and database to its cloud. You need no server access and no manual database export.
Beyond staging, the same plugin unlocks remote site management and 2-way sync between environments, which stays useful after the conversion. If you would rather move WordPress itself to InstaWP and keep editing there, you can import your site into InstaWP or follow our guide to importing a WordPress site.
Method 1: InstaWP + Static Site Generator Plugin (Recommended)
Method 1 is the safest and most repeatable way to convert WordPress to static HTML. You work on a staging copy of your site, export it with the free Simply Static plugin, and deploy the files to a static host. The live site stays untouched until you switch your domain.
What you need before starting:
- An InstaWP account (about a minute to create)
- The InstaWP Connect plugin, if you are copying an existing live site
- The free Simply Static plugin, which turns WordPress pages into HTML files
- A static host: InstaPods (from $3 a month) or Cloudflare Pages (free plan)
No coding is needed. The terminal commands below are optional shortcuts for developers.
Step 1: Create a staging copy of your live site
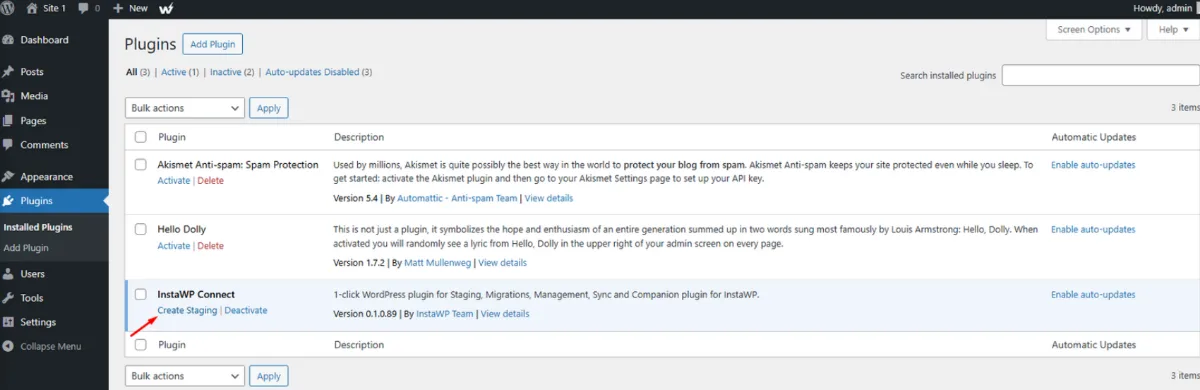
A staging site is a private copy of your live site. You will do all the conversion work there, so nothing you break reaches visitors. To create one from a live site, log in to its WordPress dashboard, go to Plugins > Add New, search for “InstaWP Connect”, then click Install Now and Activate.
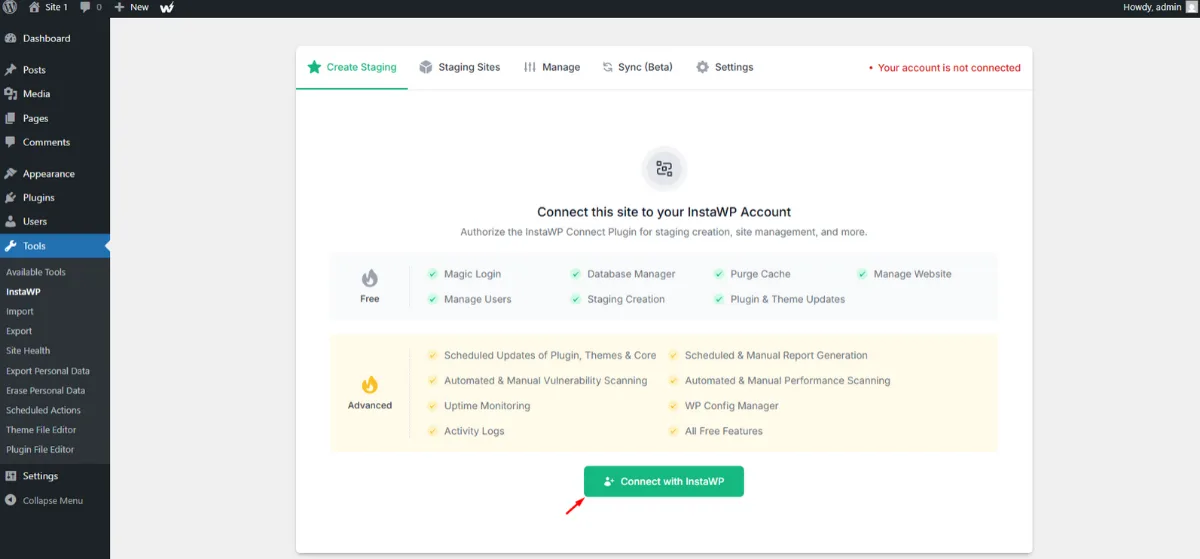
Click Connect with InstaWP and approve the access request. If you do not have an account yet, you can create one in this step.
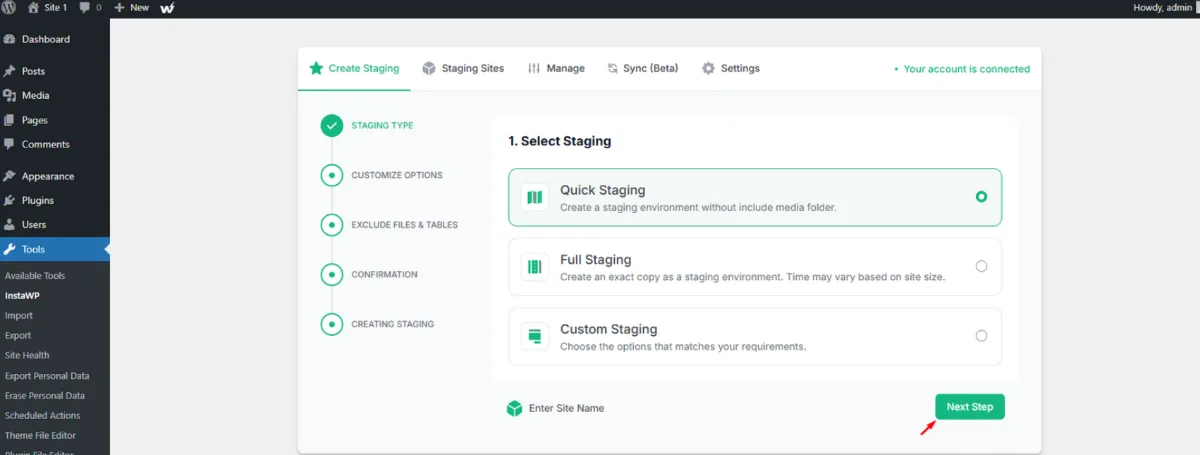
Choose a staging type. Quick Staging skips large media files (faster), while Full Staging copies everything. For a static conversion, choose Full Staging so every image ends up in the export.
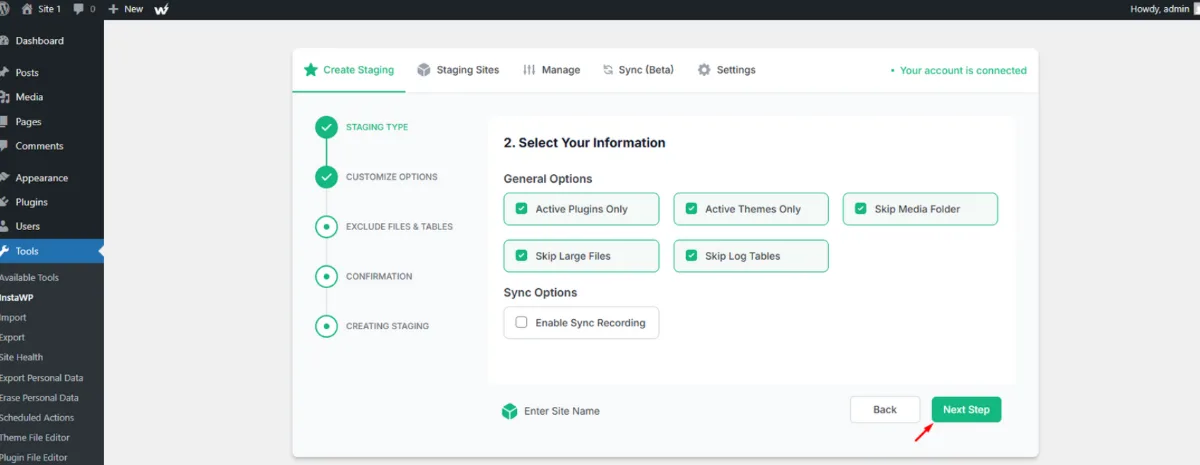
A Customize options dialog lets you include or skip active plugins, themes and the media folder. Leave everything included for a static export, then click Next Step.
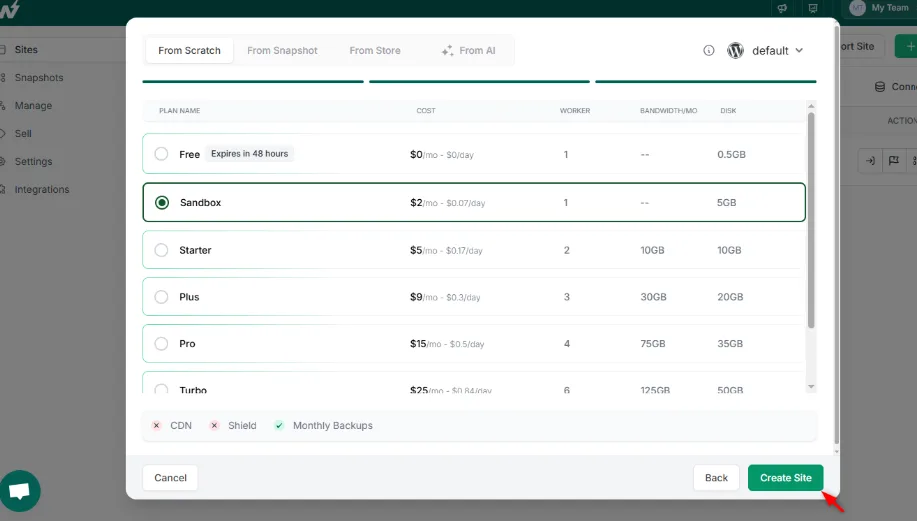
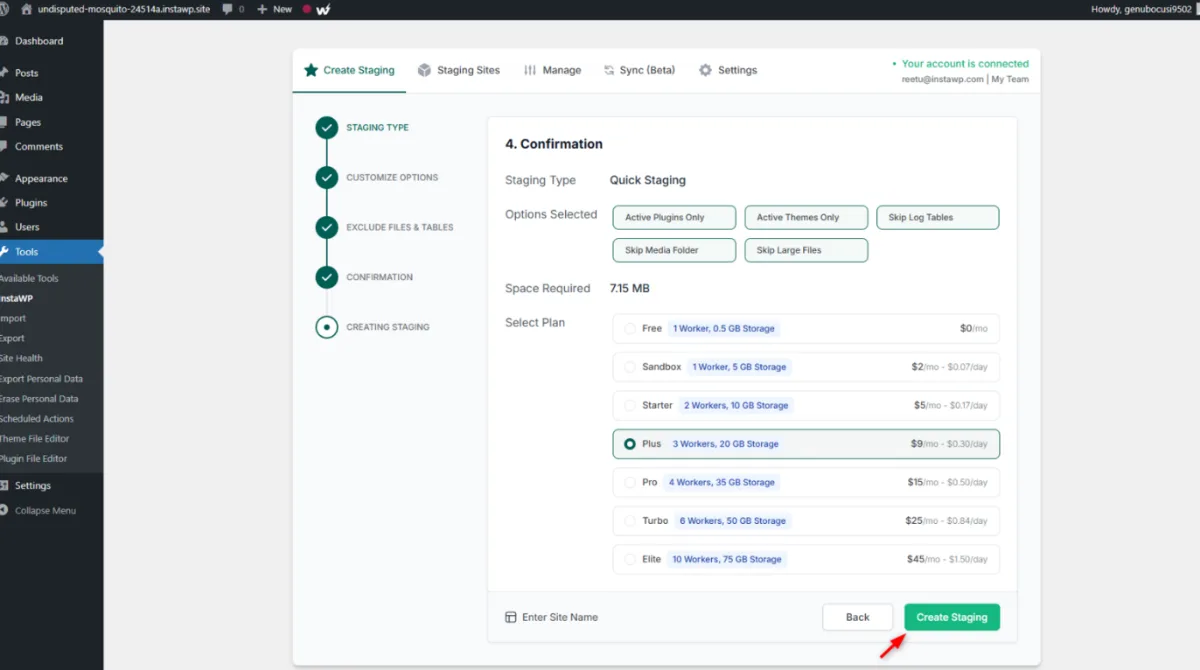
Choose a plan for the staging site, click Create Staging Site, and wait a few minutes.
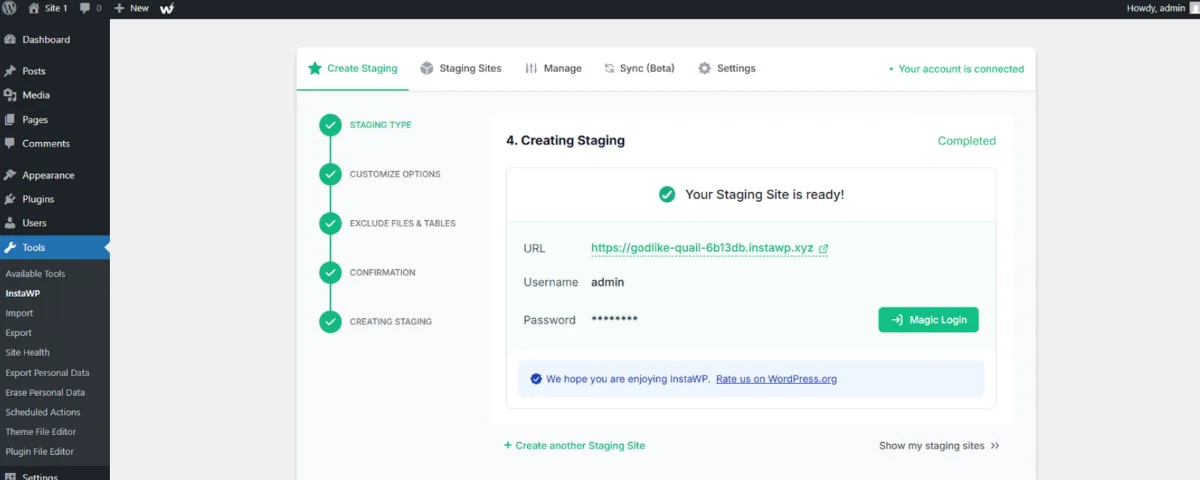
When it finishes, InstaWP shows the staging URL with a username and password. Use Magic Login to open its dashboard without typing anything. From here on, work only on the staging site.
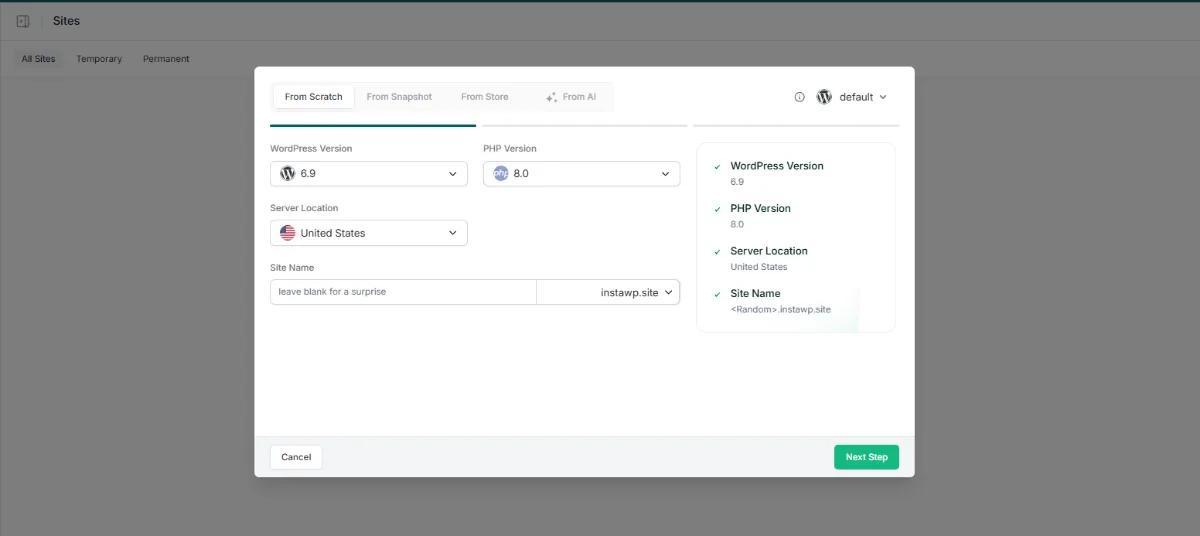
Starting a new static site rather than converting an existing one? Create a fresh WordPress site from the InstaWP dashboard with New Site, then pick the WordPress and PHP versions and a server location.
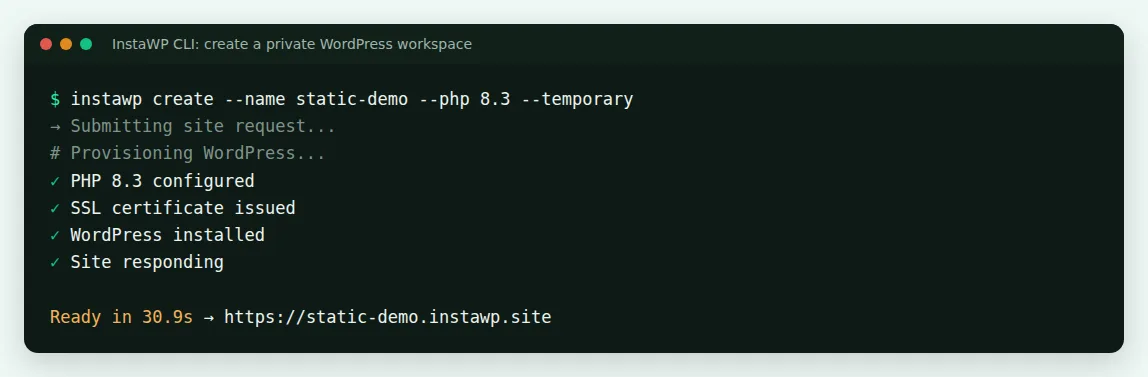
Developers can do the same from a terminal with the InstaWP CLI. Our test site was ready in 30.9 seconds:
Step 2: Save a restore point before you change anything
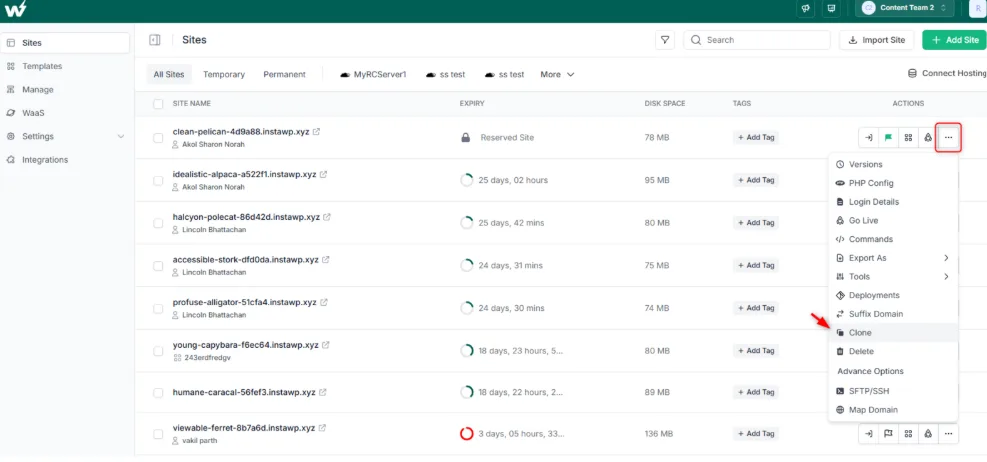
Save a version of the staging site before you remove forms or plugins, so you can roll back in one click if a change goes wrong. In the InstaWP dashboard, open the site’s actions menu and choose Versions, then Save New Version and give it a label.
From the terminal, instawp versions create does the same thing. Ours took 15.8 seconds and stored 18 MB:
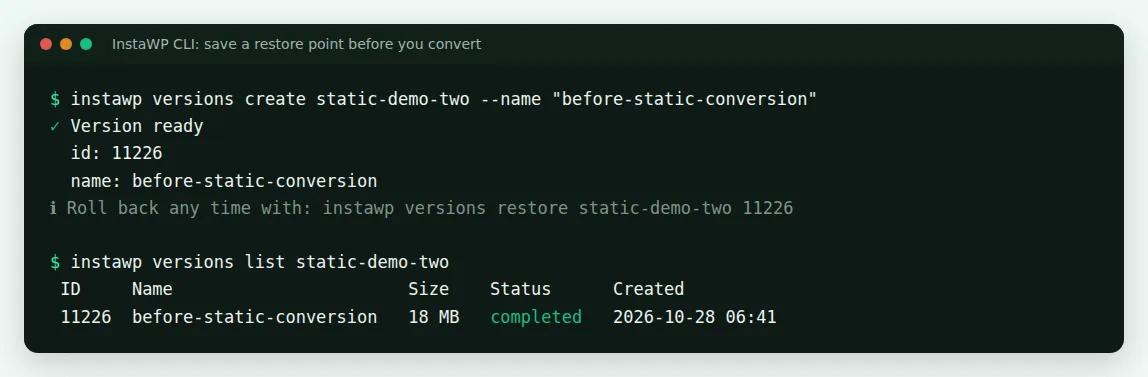
Versions saves files and database together, and you can download each separately later. The Versions documentation covers restoring and downloading, and backups on InstaWP explains how they differ from scheduled backups.
Step 3: Make sure search engines can index the export
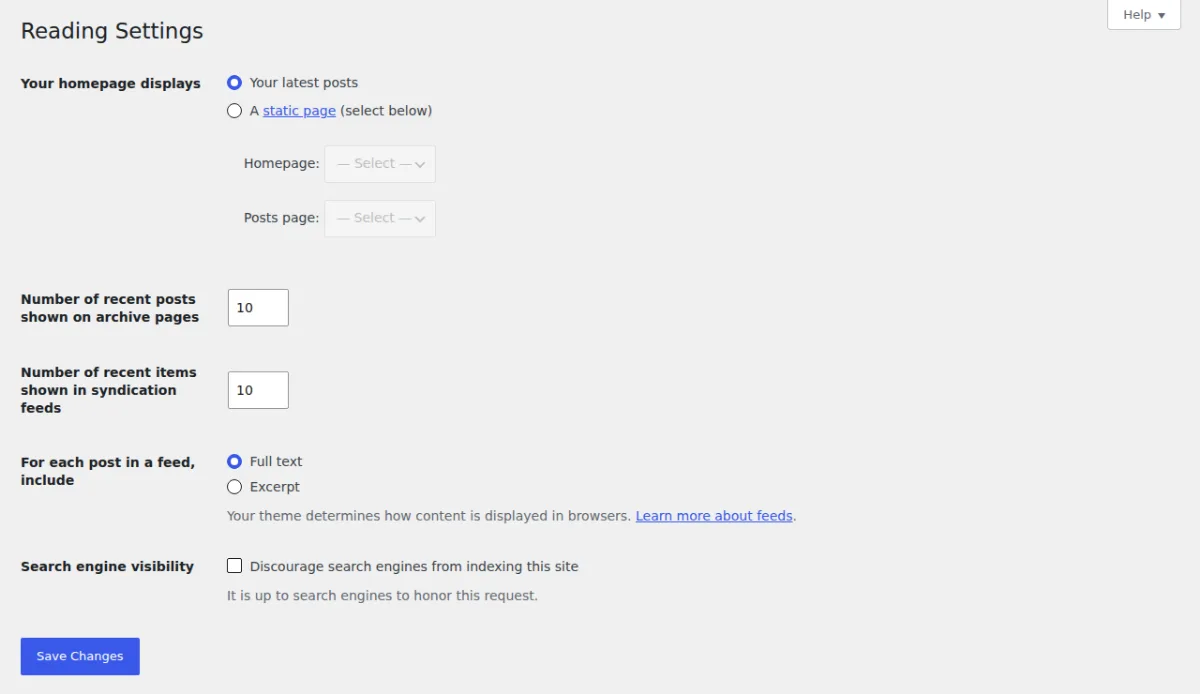
Open Settings > Reading on the staging site and make sure “Discourage search engines from indexing this site” is unchecked before you export. Simply Static copies whatever robots tag WordPress prints, so if the box is ticked, every exported page tells Google not to index it.
This is easy to miss. New and staging sites often have the box ticked so that unfinished work stays out of search, and our test site did too. Simply Static’s Diagnostics page flagged it as an error before the first export:
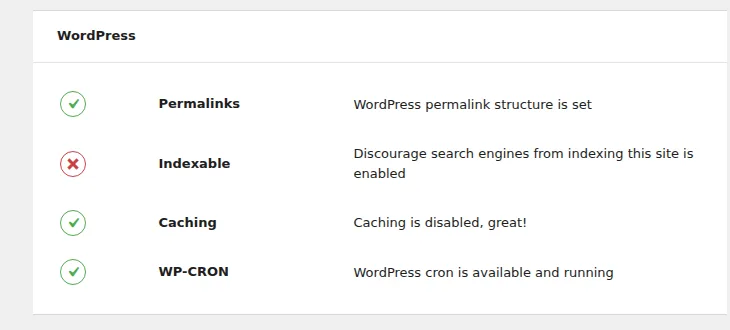
We exported anyway to see what would happen. Every one of the 17 pages carried <meta name="robots" content="noindex, nofollow">, and no XML sitemap was exported, because WordPress turns off its built-in sitemap while the box is ticked. Untick it, save, and the next export is indexable.
Step 4: Replace features that won’t work on a static site
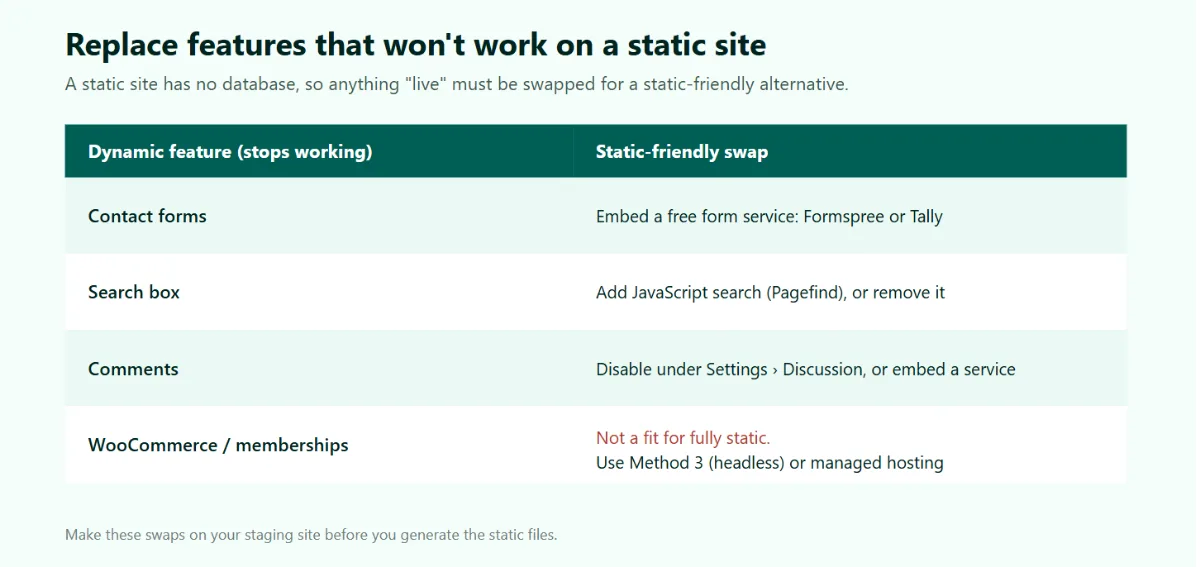
A static site has no PHP and no database, so anything that sends data back to WordPress stops working. That means forms, search, comments, carts and logins. Replace each one on the staging site before you export.
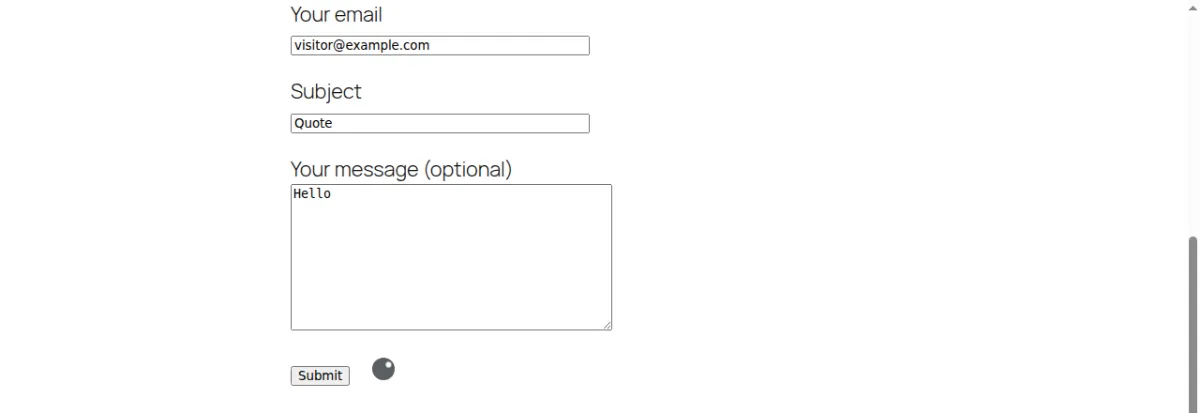
We skipped this step on purpose. We left Contact Form 7 on the test site, exported, and submitted the form on the static copy. The spinner kept turning and nothing was sent, because the form posts to a WordPress REST endpoint that returned 404 on the static host. The visitor gets no error message, so you would not know you are losing enquiries.
The swaps:
- Forms: create the form in Formspree or Tally and paste its embed code in place of the old form.
- Search: remove the search box, or add Pagefind, which indexes the static files and searches in the browser. On our export, the WordPress search box sent visitors to the home page with no results.
- Comments: turn them off under Settings > Discussion, or embed a hosted service.
If your site runs a store or a membership area, a fully static site is not the right fit. Use Method 3 (headless WordPress) or keep WordPress on managed hosting instead.
Step 5: Install and set up Simply Static
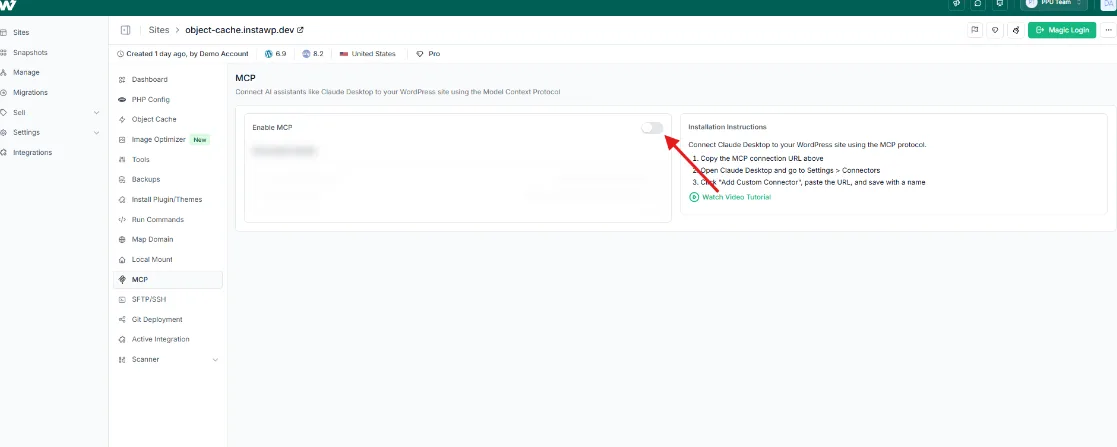
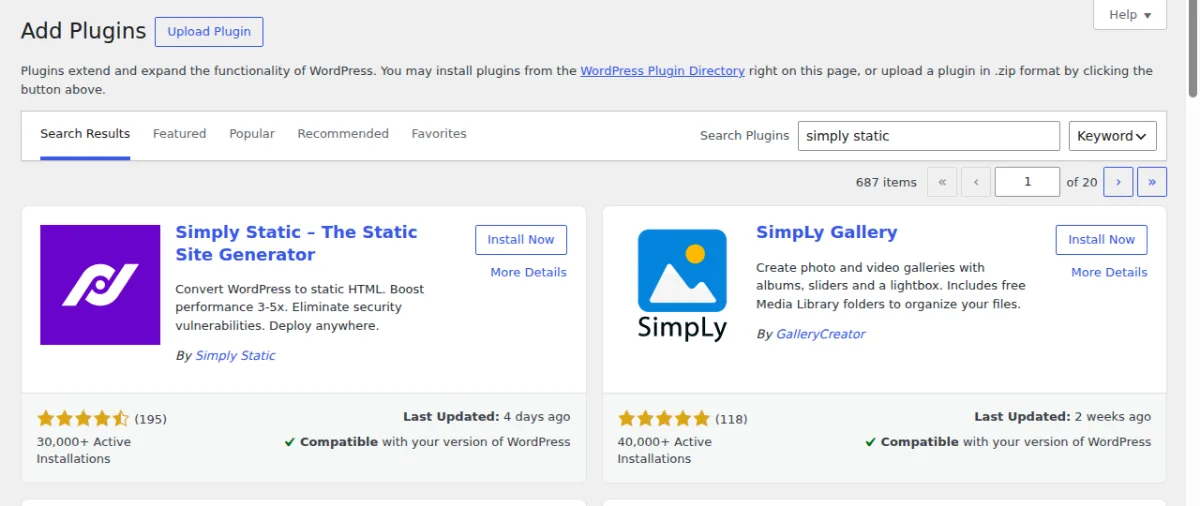
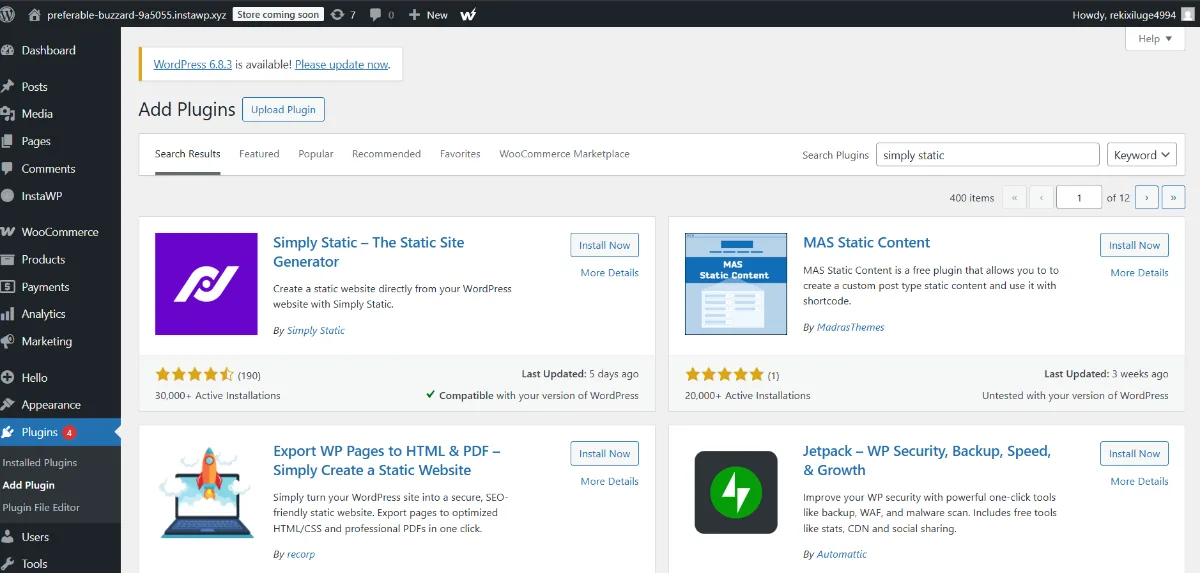
Now add the generator to the staging site. In its WordPress admin, go to Plugins > Add New, search for Simply Static, then click Install Now and Activate.
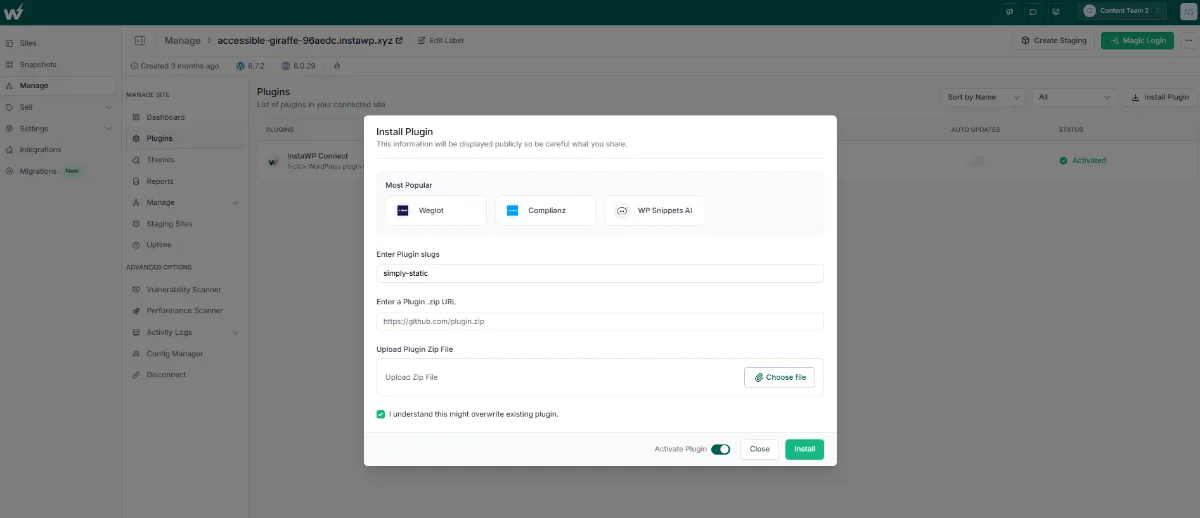
If the site uses InstaWP’s Advanced Site Management, you can install it from the Manage tab without opening wp-admin: find the site, click Plugins, Install, enter the slug simply-static and press Enter. The managed site tools let you roll the same WordPress static site generator plugin out to many client sites at once.
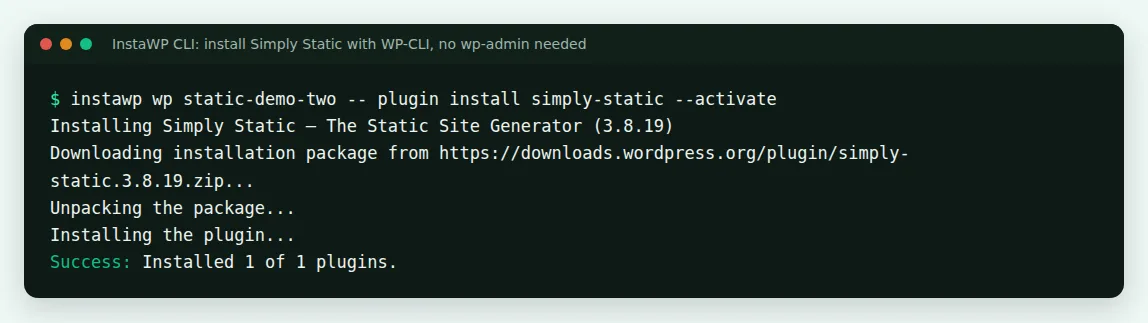
Or run WP-CLI through the InstaWP CLI. It took 5 seconds on our test site:
Step 6: Configure the four settings that matter
Open Simply Static > Settings > General. Four settings decide whether the export is SEO-safe, and the defaults got three of them wrong on our test.
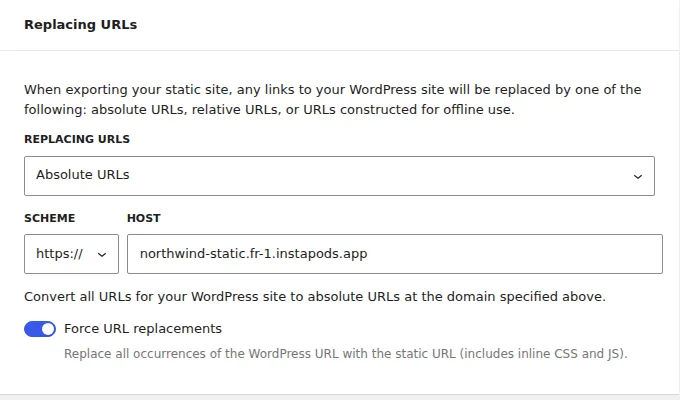
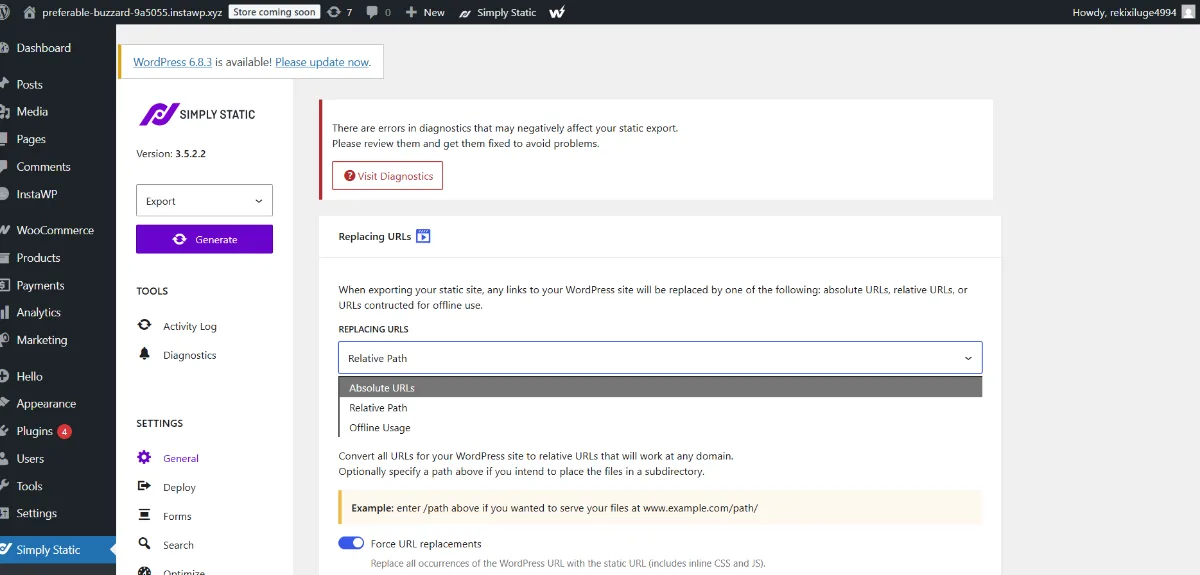
1. Replacing URLs: choose Absolute URLs and enter the domain the static site will live on. With the default Relative Path, our sitemap listed URLs like /about/ and every canonical tag was relative too. Google expects fully qualified URLs in a sitemap, so set the real production domain here.
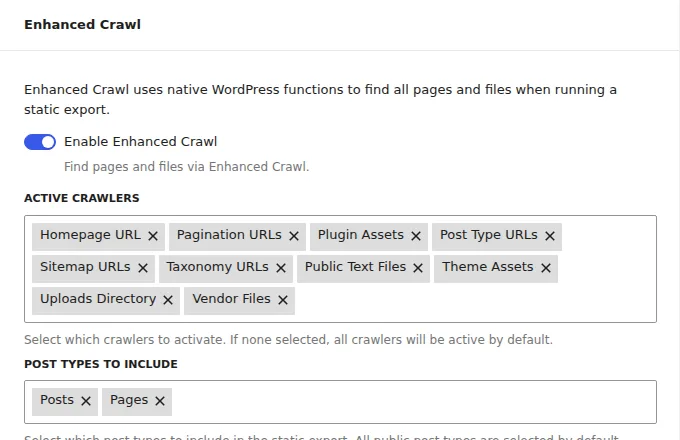
2. Active crawlers: remove Author URLs. By default the export included an archive page for every author, and one of them exposed the admin account’s username at /author/<username>/. Unless your site has real author pages, take that crawler out.
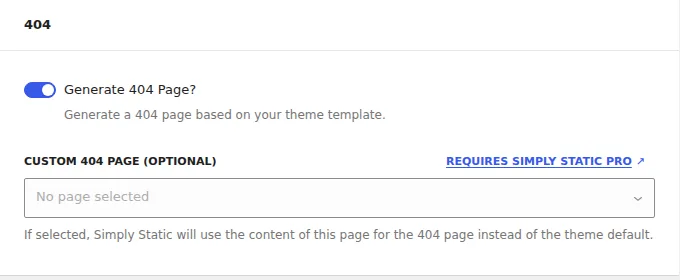
3. Turn on Generate 404 Page and Include RSS Feeds. Both were off by default, so our first export had no 404 page and no /feed/.
4. Add the sitemap under Include > Additional URLs. Enter https://your-staging-site/wp-sitemap.xml (or your SEO plugin’s sitemap index). The Sitemap crawler alone exported only the XSL stylesheets on our test. With the URL added, the export included wp-sitemap.xml and its four child sitemaps.
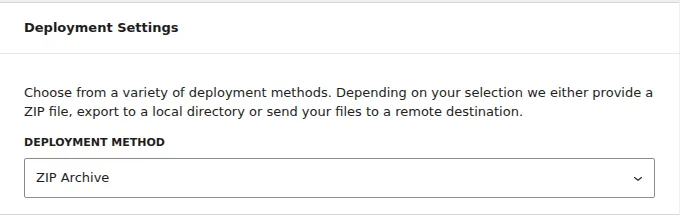
Finally, under Deploy, leave the deployment method on ZIP Archive unless you have Simply Static Pro. The free plugin gives you a download link when the export finishes.
Step 7: Generate the static files
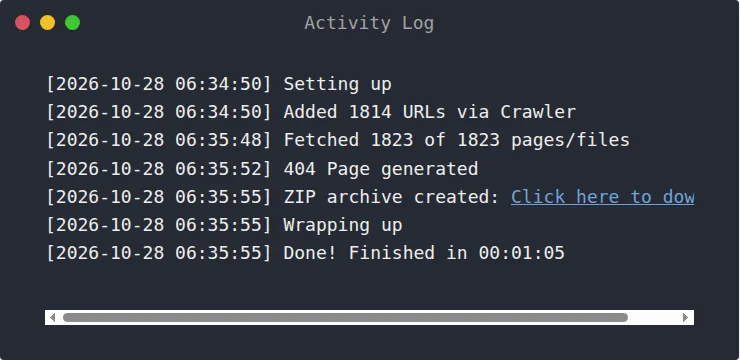
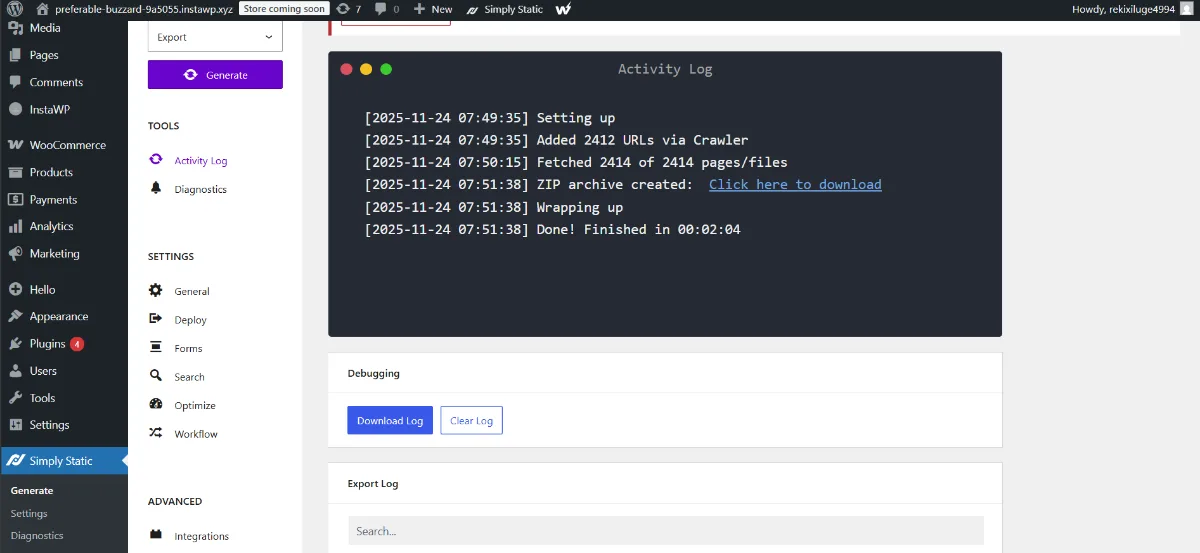
Click Push (labelled Generate Static Files in older versions) and open the Activity Log. Our 11-page site took 65 seconds and fetched 1,823 files. When the log says the ZIP archive was created, click the link to download it.
Unzip the file. Inside you will find an index.html plus folders for each page, wp-content and wp-includes. Before you deploy, check three things in the files:
- Open any page’s HTML and search for
noindex. It should not be there. - Open
wp-sitemap.xmland confirm the URLs start with your real domain. - Confirm
404.htmland thefeedfolder exist.
Step 8: Host your static WordPress site
Upload the folder to a static host. Below are two options: InstaPods, which deploys from one terminal command, and Cloudflare Pages, which takes a drag-and-drop upload in the browser.
Option A: Deploy to InstaPods (one command)
InstaPods is app hosting from the same team as InstaWP, and it serves plain static HTML as well as React, Vue, Astro, Hugo and Vite builds. Install the CLI, then run instapods deploy from inside the unzipped export. Ours created the pod, synced 1,781 files and went live in 16.5 seconds:
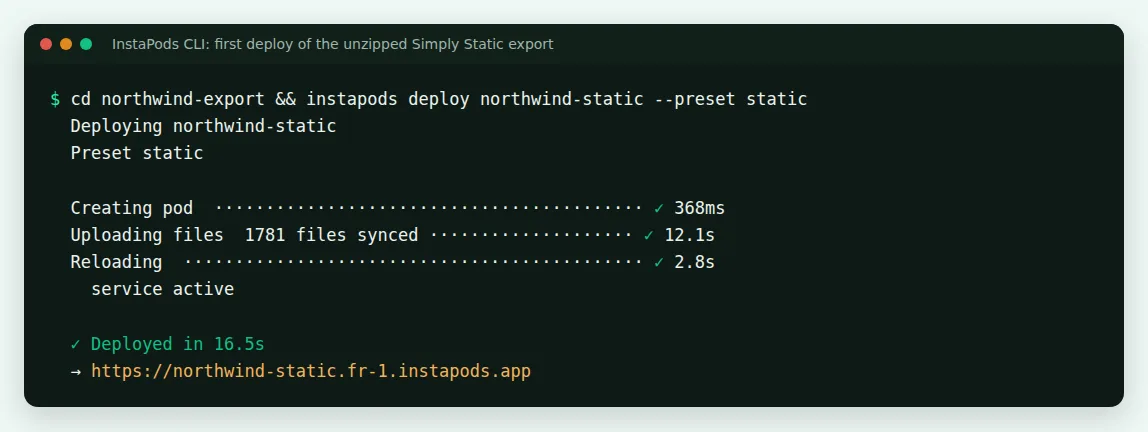
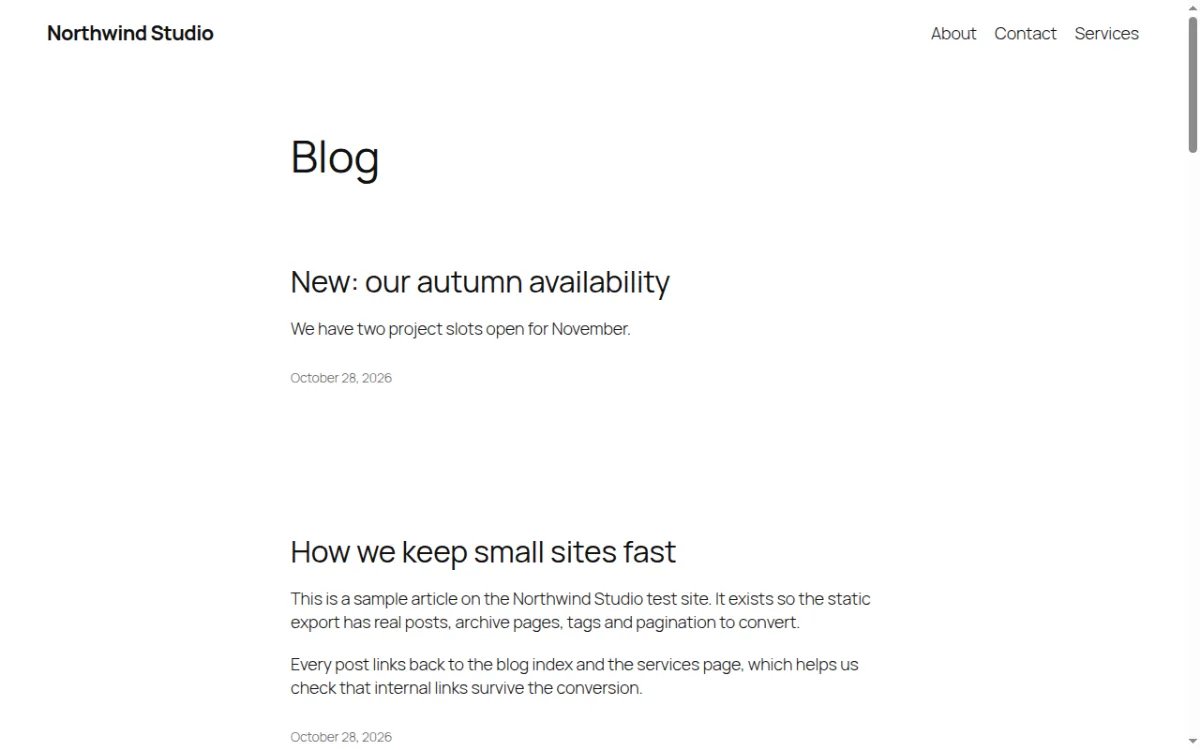
InstaPods issues the SSL certificate and returns a live HTTPS URL. To use your own domain, open the pod’s Domains tab, add the domain and create the CNAME record it shows you. Plans start at $3 a month with no bandwidth fees, and there is GitHub auto-deploy and an MCP server for AI agents. See how InstaPods works.
Option B: Host on Cloudflare Pages
Prefer a browser upload? Cloudflare Pages hosts static files on its free plan:
- Log in to Cloudflare and go to Workers & Pages, then Create application, then Pages, and choose to upload your static files.
- Name the project and upload the ZIP or the unzipped folder.
- Click Deploy site.
- To use your own domain, open the Custom domains tab and follow the DNS instructions.
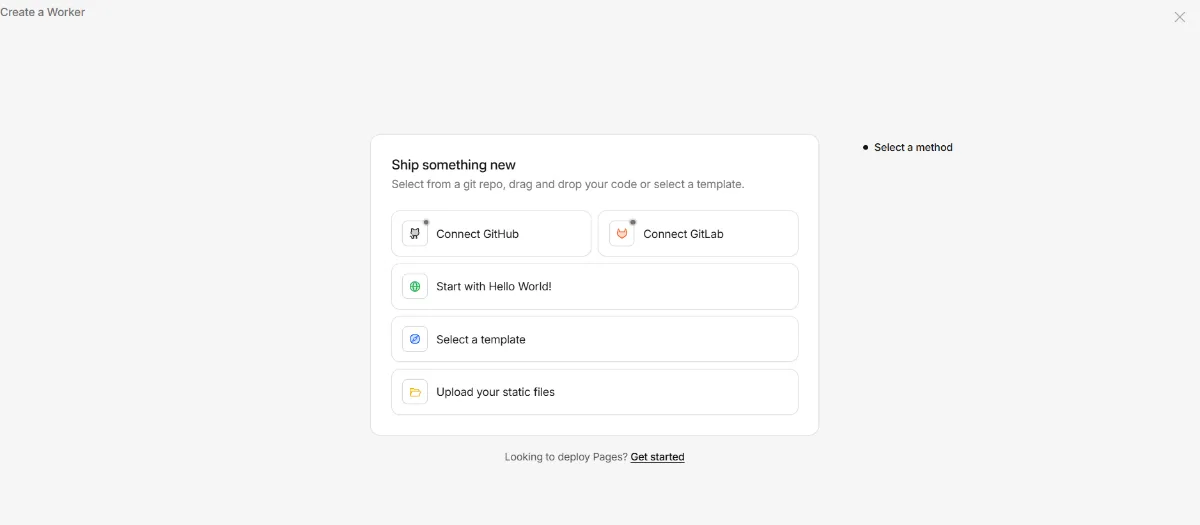
Cloudflare documents the flow in its Direct Upload guide. Not sure which host to pick? Jump to the hosts comparison.
Step 9: Re-deploy anytime you make changes
Updating a static WordPress site is a three-step loop: edit in WordPress, push a new export, and deploy it. We timed it. Publishing a new post, re-exporting and redeploying took about two minutes in total, and InstaPods uploaded only the 46 files that had changed.
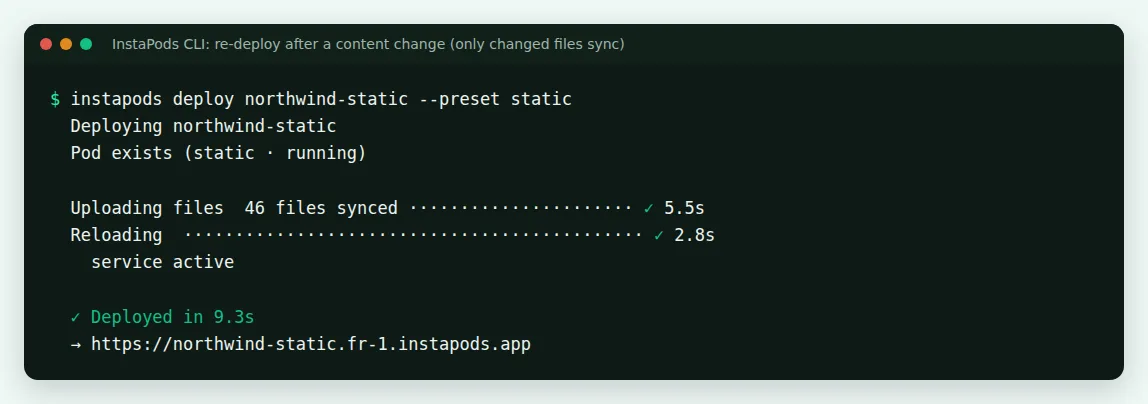
instawp wp <site> -- ...), then push the export with instapods deploy or from a GitHub repository. InstaPods also ships an MCP server, so an agent in Claude Code or Cursor can redeploy the static site for you. See the InstaWP CLI in CI/CD and AI agents and using Claude Code with WordPress.For agencies, this split gives you a predictable workflow:
- InstaWP is the private WordPress workspace your team edits in
- Simply Static converts the WordPress site to static HTML
- InstaPods or Cloudflare Pages serves the static site to visitors
You can run many client projects this way, keep WordPress off the public internet, and still deliver sites that are fast to load and quick to update.
Method 2: Site Crawler Tools (HTTrack, SiteSucker, wget)
A crawler tool works from the outside. It visits your site’s public URL like a browser, follows every link, and saves each page as an HTML file on your computer. The result is a static mirror of whatever a visitor can see.
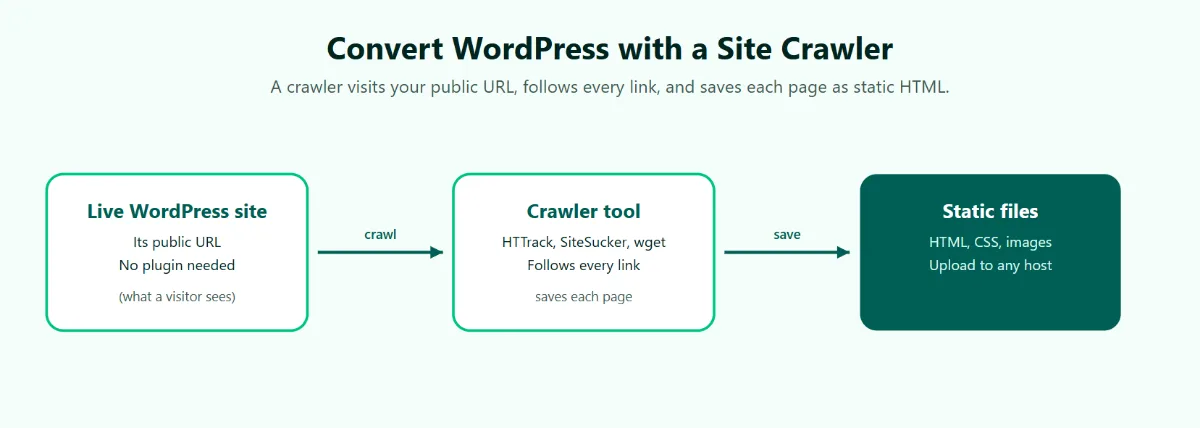
Reach for a crawler when you cannot get into the WordPress dashboard at all: a client lost the admin password, the backend is broken or hacked, or you only have the public URL. If you can log in, Method 1 is the better choice, because a crawler only captures what is publicly visible and gives you no clean way to regenerate the site later.
What you need before starting:
- One crawler: HTTrack (Windows and Linux, free), SiteSucker (Mac, paid app on the App Store) or GNU wget (all platforms, free, command line)
- The URL of the site you want to copy
- A static host for the output: InstaPods or Cloudflare Pages, same as Method 1
Step 1: Crawl a copy, not the live site (when possible)
Crawling hits every page in quick succession. On shared hosting, that burst can slow the live site for real visitors, and some firewalls block the crawler halfway through, leaving a broken mirror.
If you have any access to the site, first create a staging copy with InstaWP Connect as shown earlier, then point the crawler at the staging URL. The staging site takes the load and you can crawl it as many times as you need. If you truly have zero access, crawl the live URL during a low-traffic hour.
Step 2: Run the crawl (HTTrack example)
HTTrack is the most beginner-friendly of the three. Download it from httrack.com and install it like any normal program.
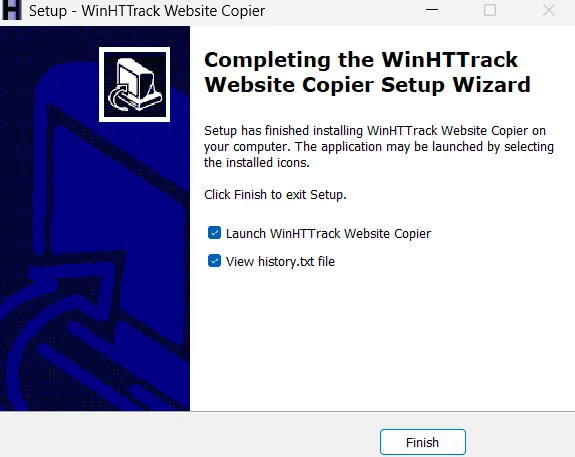
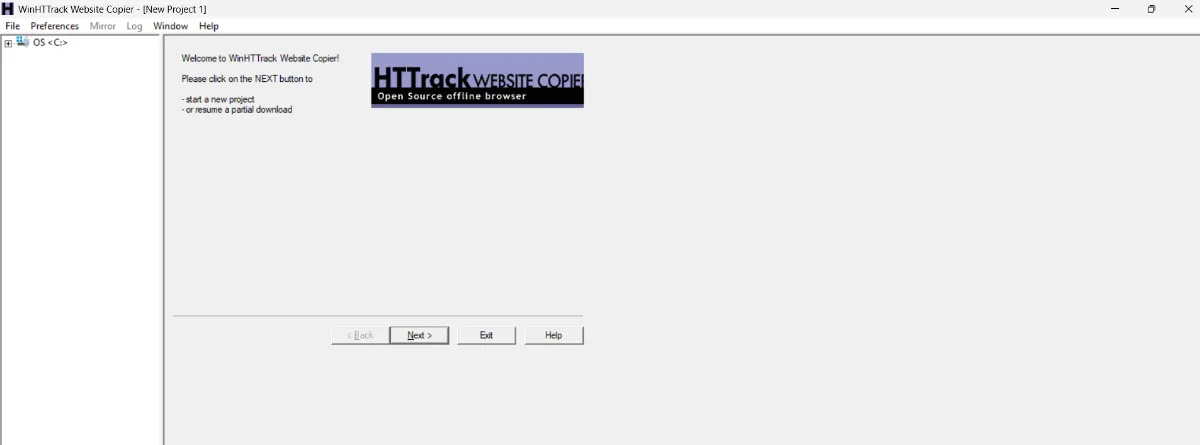
Open it and click Next to start a new project.
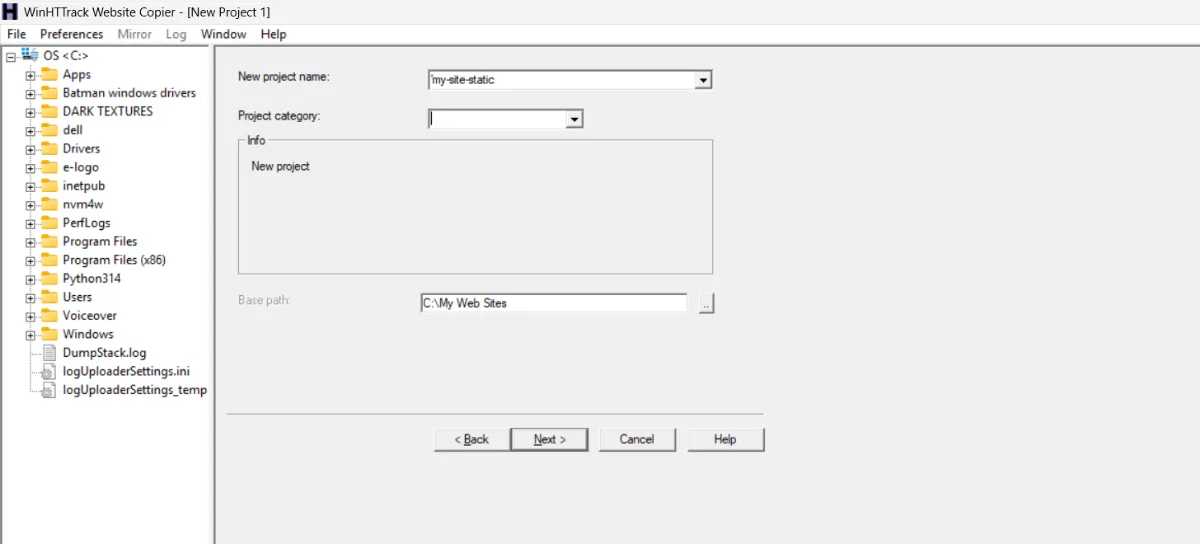
Give the project a name (for example, “my-site-static”) and choose a folder for the copy. Click Next.
In the Web Addresses box, paste your site’s URL (or the staging URL). Leave the action as Download web site(s). Click Next, then Finish.
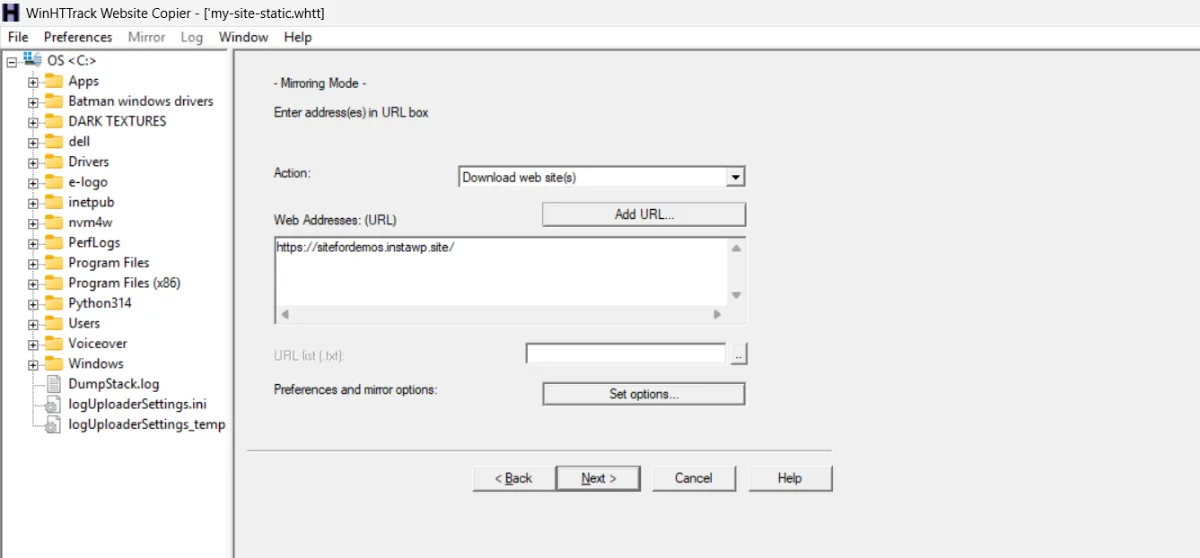
A small site takes a few minutes; a large one can take an hour. On a Mac, SiteSucker is simpler still: paste the URL and press Download. On the command line, the wget equivalent is:
wget --mirror --convert-links --adjust-extension --page-requisites --no-parent https://your-staging-url.com
The flags tell wget to copy the whole site, fix links so they work locally, add .html extensions, and download the images, CSS and scripts each page needs.
Step 3: Check the mirror on your computer
Open the folder the tool created and double-click index.html. Click around and look for the usual crawler gaps:
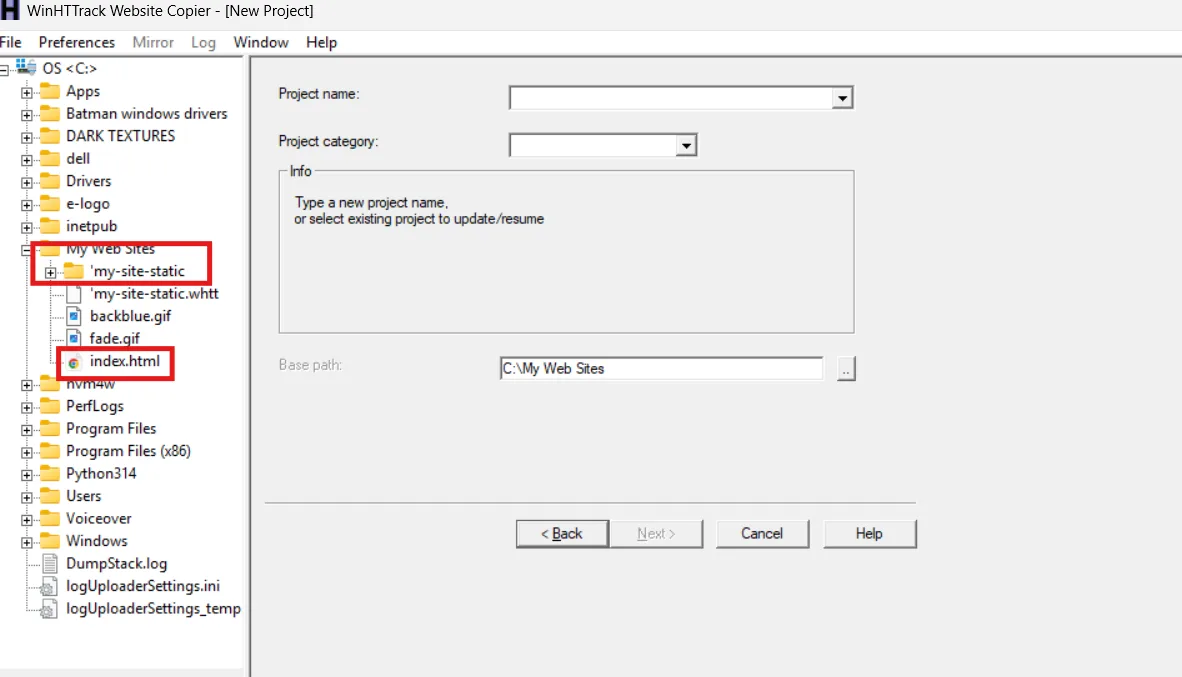
- Missing pages: crawlers only find linked pages. A page that is not in any menu or link will not be in the mirror.
- Broken images: images loaded by JavaScript (sliders, galleries, lazy loading) sometimes get skipped.
- Dead dynamic features: forms, search and comments are captured visually but do nothing, and the crawler cannot swap them out. You have to edit the HTML by hand, which is why Method 1 is easier.
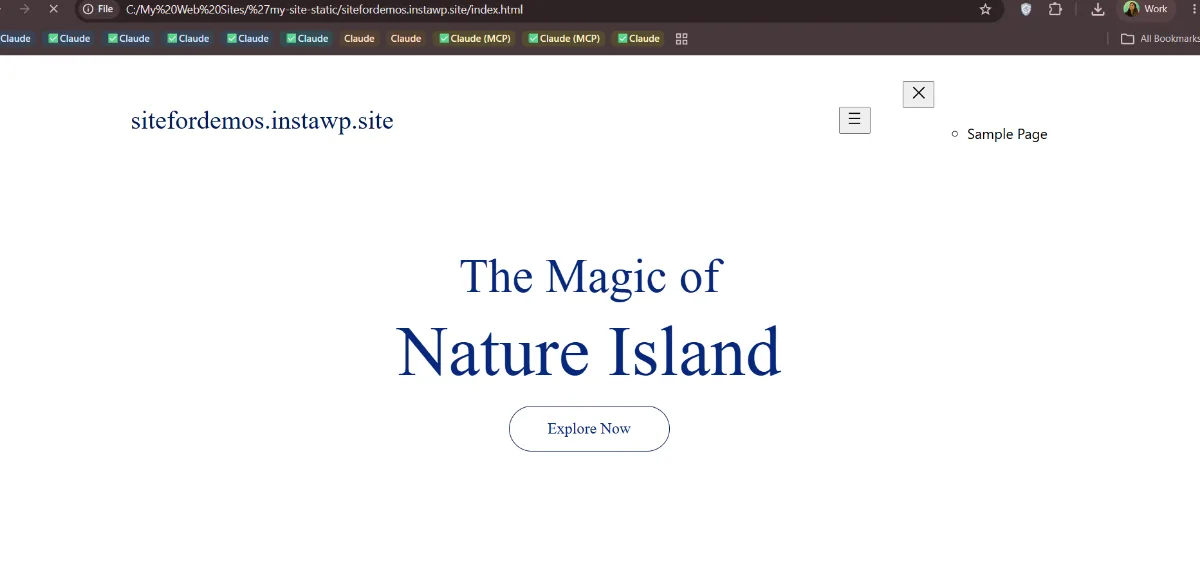
If pages are missing, link to them somewhere (a temporary HTML sitemap page works well) and crawl again. That re-run is painless on a staging copy.
Step 4: Deploy the mirror
The output folder is a complete static site, so hosting works exactly as in Method 1, Step 8: run instapods deploy from the folder or upload it to Cloudflare Pages, test the preview URL, and point your domain.
Method 3: Headless WordPress + Static Site Generator
Headless WordPress splits your website in two. WordPress stays as the content backend, and a separate static front end shows that content to visitors. The two talk through the WordPress REST API, which shares your posts and pages as structured data.
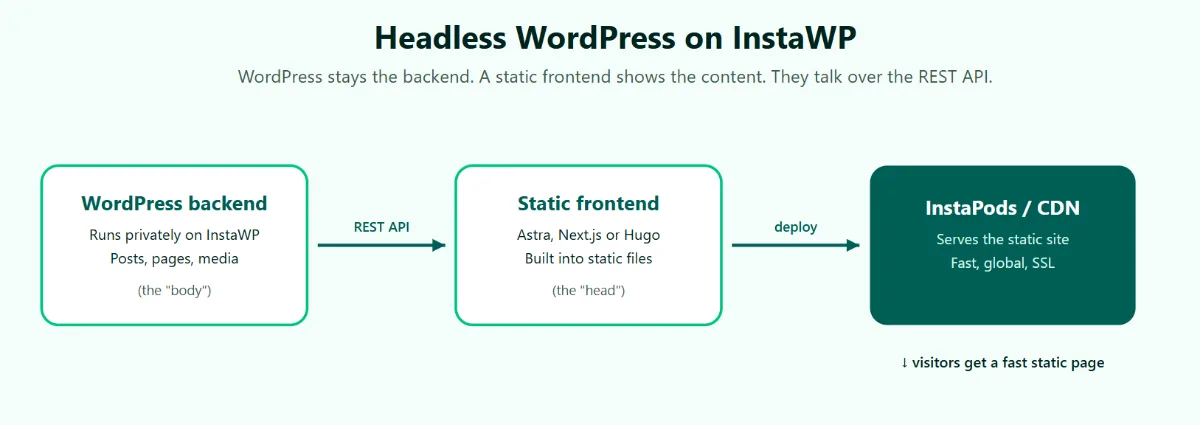
This setup is also called decoupled WordPress, or using WordPress as a headless CMS. Unlike Methods 1 and 2, WordPress never goes away: editors keep the familiar dashboard, and a static site generator such as Astro, Next.js or Gatsby builds the public pages from that content.
Who this method is for: developers and agencies building custom, app-like sites, or teams that want a new front end without giving up the WordPress editor. If “REST API” sounds intimidating, stick with Method 1. It delivers most of the same speed with no code.
What you need before starting:
- A WordPress site hosted on InstaWP to act as the headless backend
- Basic familiarity with the command line and JavaScript, and Node.js installed
- A static site generator: Astro (easiest to learn), Next.js (most popular) or Gatsby
- InstaPods or Cloudflare Pages to host the front end
Step 1: Set up WordPress as the headless CMS backend
The backend must run permanently, since the front end pulls content from it on every rebuild. Create a site on InstaWP (or migrate your existing site) and choose one of the site plans that keeps it running. Our guide to headless WordPress hosting compares backend hosts.
If you are converting an existing live site, do this on a staging copy first, exactly as in Method 1, so the live site keeps running until the new front end is ready.
Watch this video to see how to build and host headless WordPress sites.
Step 2: Confirm the WordPress REST API is working
Every WordPress site exposes its content automatically. Open this address in your browser, with your own site’s URL:
https://your-site.instawp.site/wp-json/wp/v2/posts
You should see your posts as JSON. That is what your static site generator reads. If you prefer GraphQL, install the free WPGraphQL plugin; Gatsby and many Next.js starters use it.
Step 3: Build the static frontend with a static site generator
Create the front-end project on your computer. With Astro, run npm create astro@latest to scaffold it.
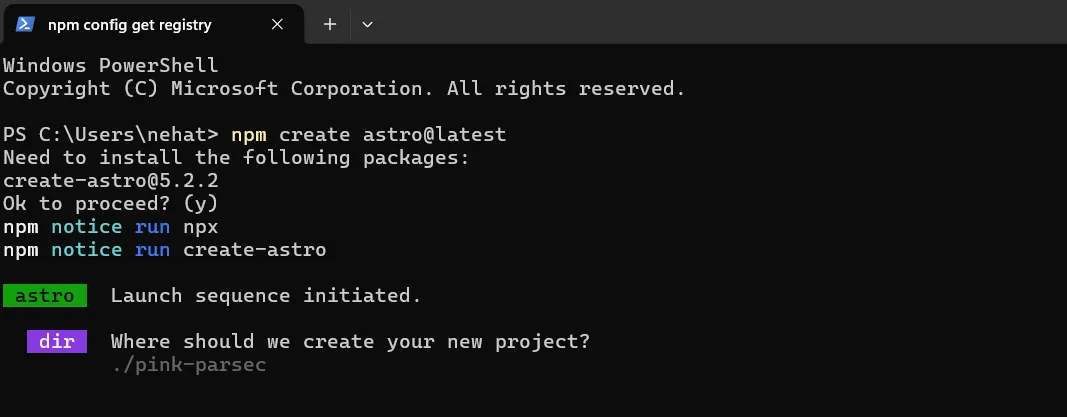
Follow Astro’s WordPress guide to fetch content: request your posts from the REST API and render each one as a page. Run npm run dev to preview it. Your theme does not carry over, so you design the front end from scratch. Our walkthrough on making WordPress headless with Astro covers it end to end.
Step 4: Generate and deploy the static frontend
Run npm run build. The generator fetches all your content one last time and writes a folder of pre-built HTML. Deploy that folder to InstaPods or Cloudflare Pages. With either, you can connect a Git repository so every push rebuilds and redeploys, and a publish webhook from WordPress can trigger the same rebuild. See the headless WordPress front-end deploy guide.
Step 5: Point your domain and lock down the backend
Point your domain at the static front end, as in Method 1, Step 8. Then tighten the backend, since visitors never need to reach it:
- Keep the backend on its InstaWP subdomain rather than a public-facing domain
- Use InstaWP’s security tools and run regular vulnerability scans
- Disable XML-RPC from the site tools panel; a headless setup only needs the REST API
Method 4: Managed Static WordPress Service
A managed static WordPress service does the whole conversion for you. It hosts a private WordPress backend, generates the static version, serves it on a CDN, and regenerates it when you publish. Platforms in this space include Simply Static Studio and HardyPress.
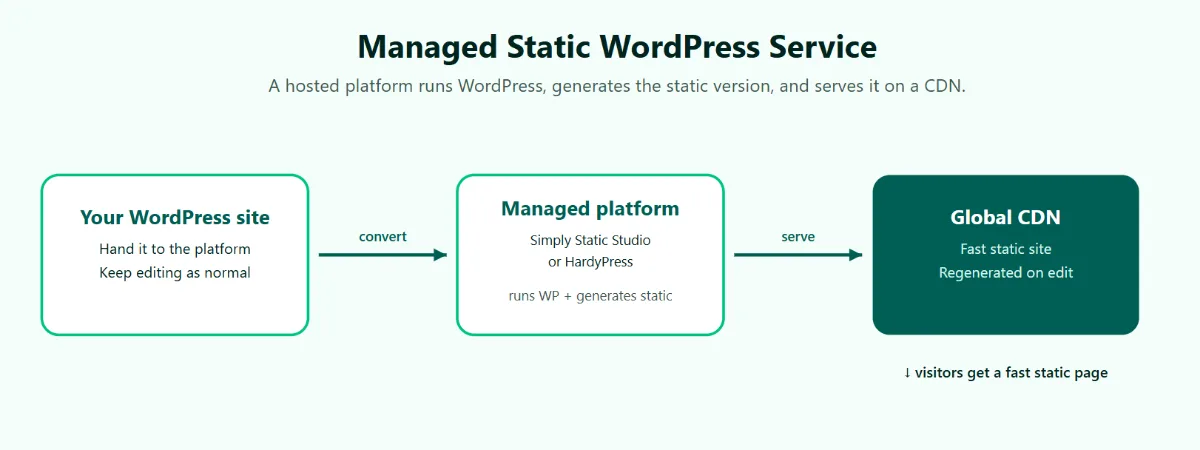
Think of it as Method 1 with the technical steps removed and a monthly invoice added. There is no plugin to configure, no ZIP file to download and no separate host to manage.
Who this method is for: non-technical owners and hands-off teams who want a static WordPress site without touching the machinery, and who are fine paying a recurring fee. Check each vendor’s current pricing page, because plans vary by site size and features.
What you need before starting:
- A subscription to a managed static WordPress platform
- A backup or migration copy of your WordPress site
- Access to your domain’s DNS for the final switch
Step 1: Protect your live site with a staging copy first
Even with a managed service, do not experiment on your only copy. Use InstaWP Connect to create a staging site from the live site, as covered earlier. That gives you a safe copy to migrate from, and a fallback if the platform is not a fit.
Step 2: Migrate WordPress into the platform
Sign up and follow the service’s import flow. Most work one of two ways:
- Upload a backup: you provide a site export (from InstaWP’s export site feature or a backup plugin) and the platform restores it into a private WordPress instance.
- Connect and pull: you install the platform’s plugin or enter site credentials, and it copies the site over.
Step 3: Let the platform generate the static site
The service crawls your WordPress site and builds the static version on its own servers, the same conversion Simply Static performed in Method 1. The rule from Method 1, Step 4 still applies: forms, search and comments need static-friendly replacements, although managed platforms often include form endpoints and hosted search.
Step 4: Preview, then point your domain
Test the preview URL page by page: menus, images, forms and internal links. When it all checks out, add your domain in the platform and update your DNS as instructed.
Step 5: Keep an exit route
The downside is dependence: your editor and your hosting both sit with one vendor. Protect yourself two ways:
- Download the platform’s backups on a schedule, or keep your InstaWP staging site as an independent copy you refresh occasionally.
- Know your way out. Your content is standard WordPress, so you can import the site into InstaWP and switch to Method 1 whenever the subscription stops making sense.
Method 5: Manual, Hand-Built Static Pages
The oldest method: open a code editor and recreate each page as a plain HTML file, writing the markup and CSS yourself. No WordPress, no plugins and no generator.
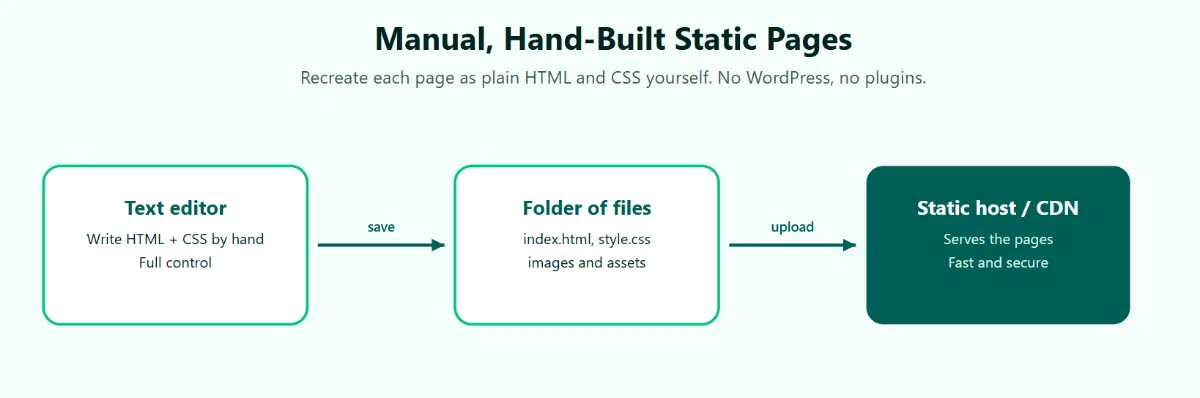
For almost everyone, this is the wrong method. Rebuilding even a 10-page site by hand takes days and leaves you with something harder to update than what you started with. It only makes sense in one narrow case: a one or two page site whose owner wants to leave WordPress entirely.
What you need before starting:
- A free code editor like VS Code
- Your site’s text and images, copied out of WordPress
- Basic HTML and CSS knowledge
- InstaPods or Cloudflare Pages to host the result
Step 1: Copy your content out of WordPress
Paste each page’s text into a document and download your images from Media > Library. If you have lost dashboard access, save each public page from the browser as a reference.
Step 2: Build the pages
Create a folder with an index.html for the home page, a style.css for layout, and one HTML file per page, linked together through a shared menu. A free template from a site like HTML5 UP is much faster than writing layout code from scratch.
Step 3: Handle the dynamic bits
No database means no native forms, search or comments. On a one or two page site, that is usually just the contact form, so embed Formspree or Tally.
Step 4: Test locally, then deploy
Open index.html and click through every link and image. Then deploy the folder to InstaPods or Cloudflare Pages and point your domain, exactly as in Method 1, Step 8.
How Do You Keep Your SEO When You Convert WordPress to Static?
You keep your rankings by making sure the static site serves the same URLs, the same titles and meta descriptions, a working sitemap and indexable pages. If URLs change, add redirects on the new host. Most ranking losses after a static switch come from a stray noindex tag, a missing sitemap or changed URLs, not from going static itself.
Two more checks are worth doing. On our export, robots.txt was copied from the staging server and carried a Crawl-delay: 10 line, so review it before you go live. And if you change domain as part of the move, read our guide to changing a WordPress domain without breaking the site. For background, see how WordPress sitemaps work, Google’s canonical guidance and the sitemaps protocol.
How Do You Update a Static WordPress Site?
You update a static WordPress site by editing in the private WordPress copy, generating a fresh export, and deploying it over the old files. With Simply Static and InstaPods that took us about two minutes for a new post. There are three ways to run the loop, depending on how often you publish.
If you publish daily, the export step becomes a chore. Simply Static Pro adds a “Changes Only” export for that case, or keep WordPress serving the site and rely on caching instead.
Where to Host a Static WordPress Site
Any static host can serve a WordPress export, because the output is ordinary HTML, CSS and JavaScript. Pick by how you want to deploy and what you want to pay: InstaPods if you want one-command deploys next to your InstaWP source site, Cloudflare Pages for a free plan with a browser upload, Netlify or GitHub Pages if you already work there.
InstaPods: the simplest way to host a static WordPress site
InstaPods is app hosting from the same team as InstaWP, so your WordPress source and its static export can live in one ecosystem. It serves static HTML as easily as a React or Astro build, and it turned our export into a live HTTPS site in 16.5 seconds.
- One command to go live:
instapods deployfrom the export folder - Flat pricing from $3 a month on the Launch plan, with no bandwidth or egress fees
- Auto SSL and custom domains, full SSH access and no cold starts
- Git auto-deploy and an MCP server, so an AI agent in Claude Code or Cursor can ship updates
How to host your static site on InstaPods
Before you start: install the CLI and log in. Run curl -fsSL https://instapods.com/install.sh | sh, then instapods login. instapods whoami confirms which account and team you are deploying to.
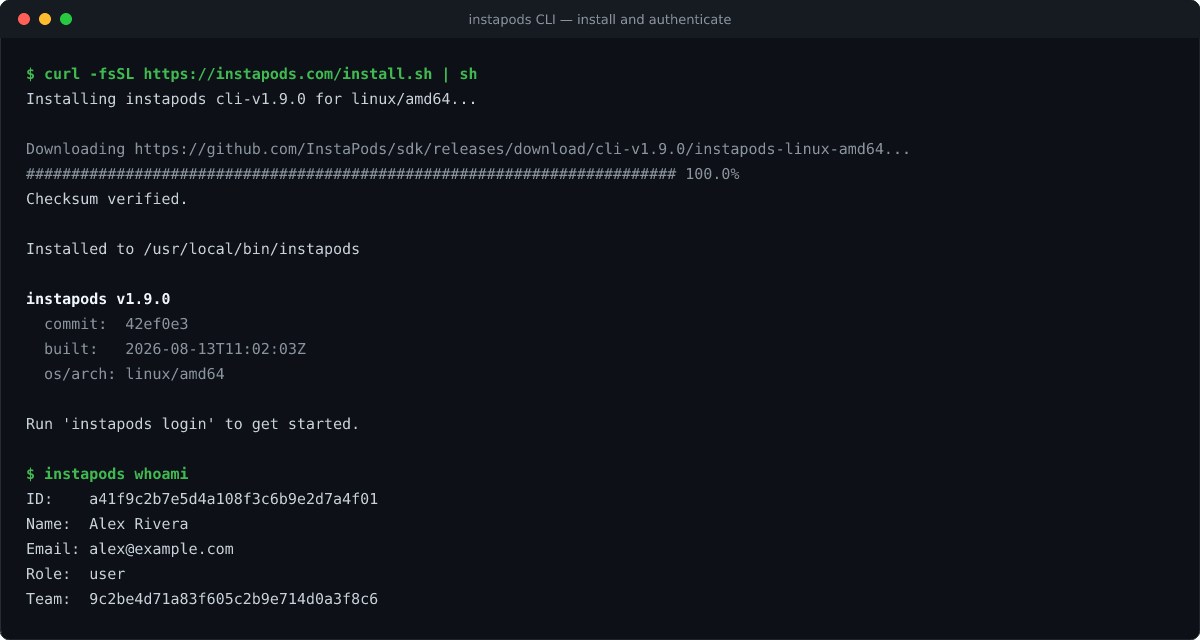
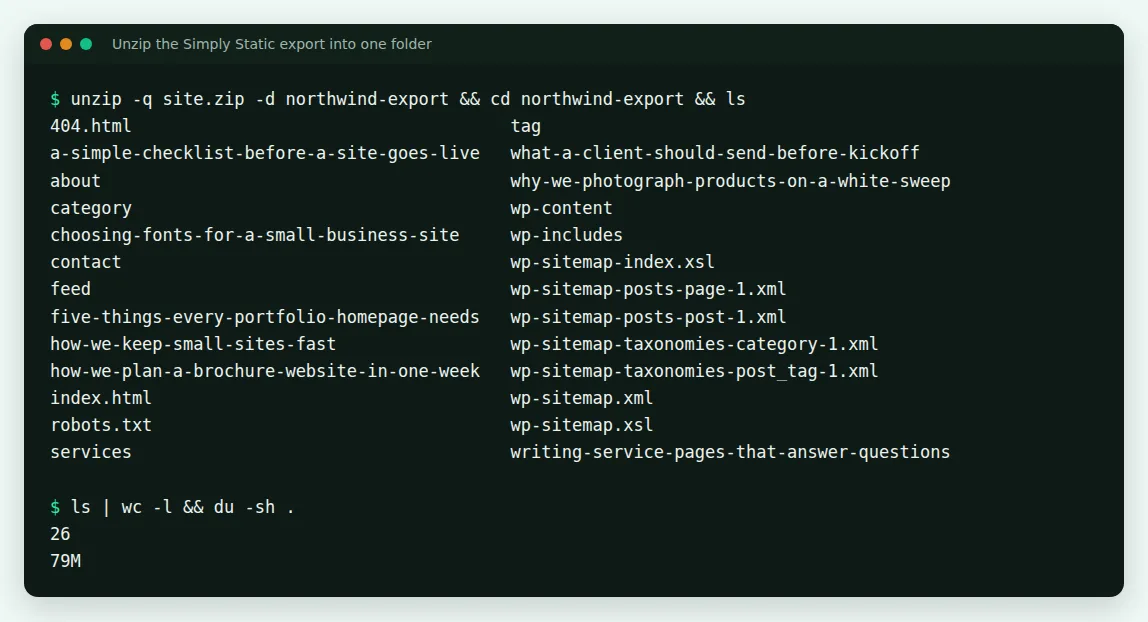
Step 1: Unzip your Simply Static export so the files sit in one folder. The folder should hold index.html at the top, next to the page folders, 404.html, feed and the sitemap files. Ours had 26 top-level items and weighed 79 MB.
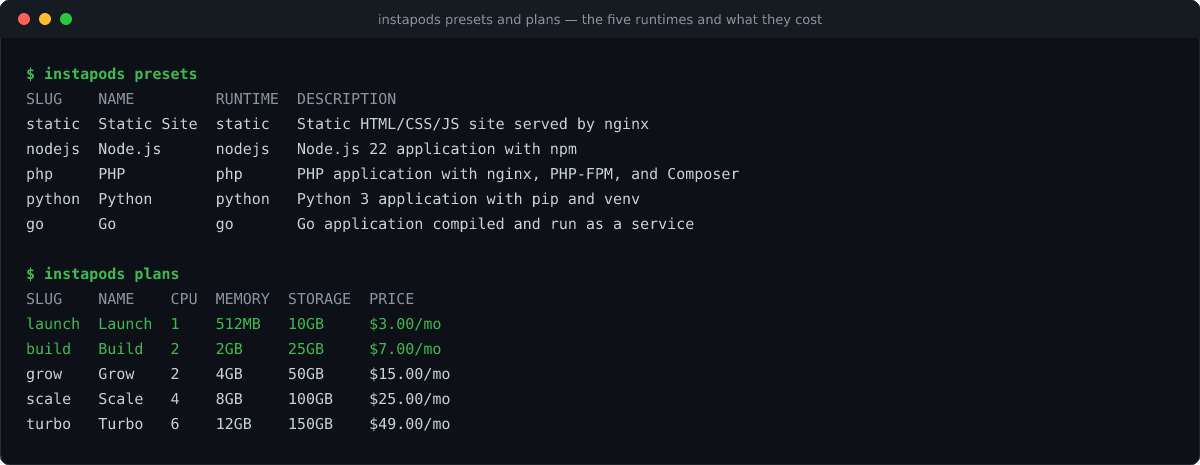
Step 2: Run instapods deploy <name> inside that folder. InstaPods detects a static site from the index.html and uses its static preset, an nginx server for plain HTML, CSS and JS. Add --preset static to set it explicitly. The Launch plan ($3 a month) is enough for a static site.
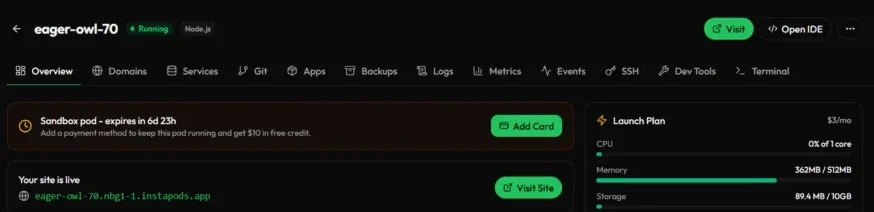
Step 3: InstaPods syncs the files, provisions SSL and returns a live HTTPS URL. In the dashboard, the pod’s Overview tab shows it as running, with the live URL under “Your site is live” and a Visit Site button.
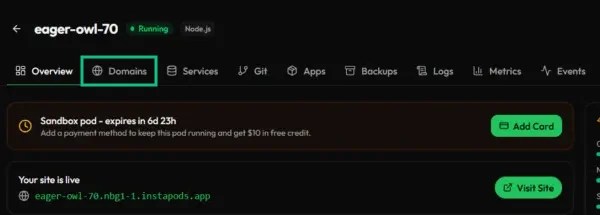
Step 4: Add your domain in the pod’s Domains tab and create the CNAME record it shows you. Point the CNAME at the pod’s hostname rather than at an IP address. InstaPods issues the SSL certificate for your domain once the record checks out.
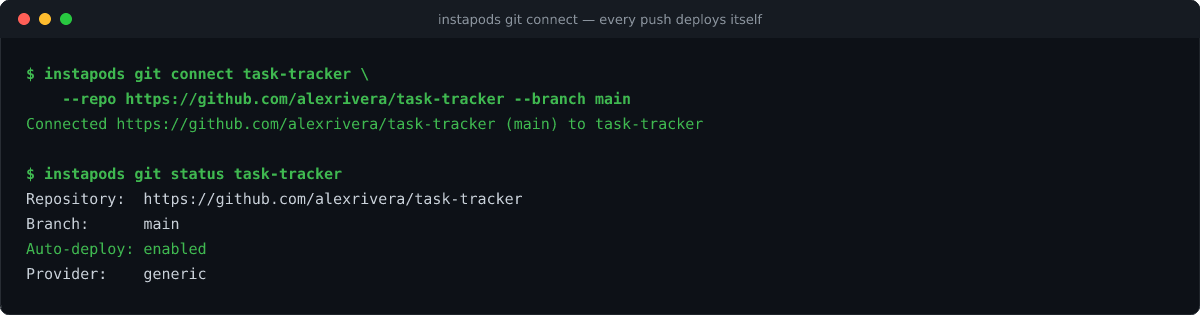
Step 5: Re-deploy anytime with the same command. Only changed files upload: 46 files in 9.3 seconds after we published a new post. To deploy on every push instead, keep the export in a GitHub repository and connect it with instapods git connect.
The other hosts, in short
Cloudflare Pages is the strongest free option: drag in your export or connect Git, and it serves from Cloudflare’s network. A good pick for zero cost and a browser-only workflow.
Netlify works the same way, with a free plan and deep build integrations. Its deploy documentation covers drag-and-drop uploads. Busy sites can outgrow the free limits.
GitHub Pages is free and reliable for documentation and personal sites kept in a repository (see what GitHub Pages is), but it offers the least control of the four.
All four serve a static WordPress site well. If you want the fewest moving parts and the deploy next to your InstaWP source site, start with InstaPods. Building something beyond WordPress? Compare options in our Vercel alternative guide.
Static Site or Fast Managed WordPress Hosting: Which Do You Need?
Go static if your site is read-only and you want the smallest possible attack surface and steady speed under traffic spikes. Stay on managed WordPress hosting if you need forms, stores, logins or daily publishing, because a good host with page caching gets you most of the speed without breaking those features. Our measurements show why.
We timed the same 11-page site two ways from Singapore: as WordPress on a temporary InstaWP site (no CDN, no page cache) and as the static export on InstaPods. One request at a time, both answered in roughly the same time, because the network round trip of about 230 ms dwarfed the server work. Under load the picture changed:
At 25 concurrent requests, uncached WordPress doubled its response time while the static copy did not move. Static holds up because there is no PHP to queue. But it compares static with WordPress at its slowest. Production InstaWP plans put WordPress behind InstaCDN edge caching (from Starter) and add an object cache from Plus, which serves repeat visits from cache rather than PHP. We did not measure those plans in this test.
If going static would cost you a feature, keep WordPress and host it somewhere fast. InstaWP’s managed WordPress hosting scored 9.8 out of 10 on WP Benchmark on its new servers, against 7.3 on the old ones, in our published hosting benchmark. Here is what each plan adds for speed and safety:
Every plan includes SSH, WP-CLI, Git, SFTP and free migrations. Read more on InstaCDN, the InstaWP Shield firewall and how points of presence speed up WordPress, or compare plans on the pricing page.
Why Convert WordPress to a Static HTML Site? (Pros & Cons)
Converting WordPress to static HTML removes PHP and the database from the public site, which shrinks the attack surface, keeps response times steady under traffic and lets you host for a few dollars a month. The trade-off is that every dynamic feature needs a replacement and every change needs a re-export.
For brochure sites, portfolios and blogs that do not change daily, the benefits usually outweigh the limits.
When Does Converting WordPress to a Static HTML Site Make Sense?
Converting WordPress to a static site makes sense when visitors only read the site and content changes weekly or less. It does not make sense when visitors log in, buy, book or post, or when you publish several times a day, because each of those needs WordPress (or an external service) running behind every request.
When a static WordPress site is ideal
- Agency portfolios and freelancer sites: speed matters for showing work and winning clients.
- Simple blogs and personal sites: if you publish weekly, the re-export is a two-minute job.
- Company and brochure sites: pages rarely change and benefit from CDN delivery.
- Event and campaign landing pages: short-lived pages that need to survive a traffic spike.
- Documentation sites: pages change rarely and must load fast.
If you build sites like these for clients, a static export can also help Core Web Vitals, because the server answers from files rather than PHP.
When static WordPress sites don’t fit
Avoid a static conversion if the site depends on:
- User registration or login (memberships, courses, client portals)
- WooCommerce carts, checkout, wishlists or live stock
- Several posts a day, or content that changes per visitor
- Forums, reviews or other user-generated content
Best WordPress Themes and Plugins for Static Sites
The best themes for a static export are lightweight ones that do not rely on PHP after the page loads, and the best plugins are ones that either change nothing at runtime or load from an external service. Test every plugin on the staging copy, then check the exported page, before you commit.
Best WordPress Themes for Static Sites
- Astra: lightweight and widely used for portfolios, landing pages and blogs.
- Neve: starter templates and a light footprint that exports cleanly.
- Twenty Twenty-Five: the default block theme, which we used for this test. It exported without any layout problems.
Plugins That Work with Static WordPress Sites
- Form services by embed code (Formspree, Tally, HubSpot forms): the embedded form posts to the service, not to WordPress.
- Pagefind or Algolia for search that runs without a database.
- Hosted comments such as Disqus, loaded by JavaScript.
- Page builders and block plugins whose output is plain HTML and CSS. Test interactive widgets, which may call admin-ajax.
- SEO plugins for titles, meta and sitemaps. Add the sitemap URL to Simply Static so it is exported.
Plugins that need PHP after the page loads, such as Contact Form 7, will not work on the static copy. On InstaWP you can test plugins before committing, and the Performance Scanner helps you catch heavy ones before exporting.
Can You Use a WordPress to HTML Converter Online for Free?
Yes, but a free online WordPress to HTML converter is a crawler running on someone else’s server: you paste a URL, it downloads the public pages, and you get a ZIP. It produces the same snapshot as Method 2, with the same gaps, and you cannot fix forms or settings first because the tool never sees your WordPress admin.
If you can log in to WordPress, use a plugin on a staging copy instead. It finds pages that are not linked anywhere, exports the sitemap and feed, and you can re-run it after every change.
Ready to Convert WordPress to a Static HTML Site?
Convert on a private copy, never the live site. Untick “Discourage search engines”, choose Absolute URLs, remove the Author crawler and turn on the 404 page, feed and sitemap before you export. Replace forms and search first. Then deploy the folder to InstaPods or Cloudflare Pages and re-export whenever you publish. If static would cost you a feature you need, keep WordPress and host it on fast managed hosting instead.
InstaWP gives you the private WordPress copy, a restore point before you start, and WP-CLI from your terminal, all on managed WordPress hosting that can also run the site itself if static turns out not to fit. Our guides to the InstaWP staging environment and cloning a WordPress site cover the next steps.
Frequently Asked Questions
Can you convert a WordPress site to static HTML?
Yes. Install a static site generator plugin such as Simply Static on a copy of the site, export it as a ZIP of HTML, CSS, JavaScript and media files, and upload those files to a static host. If you cannot log in, a crawler such as HTTrack can save a static copy from the public URL instead.
How long does it take to convert WordPress to a static site?
The export itself is quick: Simply Static exported our 11-page test site in 65 seconds, and the first InstaPods deploy took 16.5 seconds. Allow an hour or two in total for a first conversion, mostly to replace forms and search and to check the export.
Where can I host a static WordPress site?
Any static host works, because the export is plain HTML, CSS and JavaScript. InstaPods deploys it with one command from $3 a month with no bandwidth fees. Cloudflare Pages, Netlify and GitHub Pages have free plans.
Can I host my static WordPress site on InstaWP?
InstaWP hosts WordPress, so it is where the private source site lives: you edit there and export from there. The static files themselves go on a static host such as InstaPods, from the same team. If you decide static is not a fit, InstaWP managed hosting can serve the WordPress site directly with CDN caching.
Simply Static vs WP2Static: which is better?
For most sites, Simply Static. It is on WordPress.org with 30,000+ active installs and was updated days before our test, and it exports a ZIP with no setup. WP2Static is open source on GitHub but has had no commits since February 2024, so it suits developers comfortable maintaining it themselves.
Can I convert WordPress to HTML with a free online converter?
Yes, but an online converter only crawls the public pages, so it misses unlinked pages, JavaScript-loaded images, the sitemap and the feed, and it cannot fix forms. If you can log in, a plugin on a staging copy gives a more complete export you can repeat.
How do I keep forms, search, and comments on a static site?
Replace each with a service that does not need WordPress. Embed a form from Formspree or Tally, add Pagefind or Algolia for search, and use a hosted comment system or turn comments off. Do it on the staging copy before you export.
Is a static WordPress site better for SEO?
It can be faster under traffic, which helps Core Web Vitals, but static alone does not raise rankings. What matters is that the export keeps your URLs, titles, meta descriptions and canonical tags, has a sitemap with absolute URLs, and carries no noindex tag.
Why does my static export have a noindex tag?
Because “Discourage search engines from indexing this site” was ticked in Settings > Reading when you exported. Simply Static copies the robots tag WordPress prints, so untick the box, save and export again.
Can you still update a static WordPress site?
Yes. Edit in the private WordPress copy, generate a new export and deploy it over the old files. In our test, a new post went live about two minutes after publishing, and InstaPods uploaded only the 46 files that changed.
Can I convert a WooCommerce store to a static site?
Not fully. Carts, checkout, accounts and stock need WordPress running on every request. You can export the catalogue pages, but you would still need a live store behind them, so most stores are better served by fast managed WordPress hosting with caching.
Do I need a database for a static WordPress site?
The public site needs no database at all. You still need one for the private WordPress copy you edit and export from.
Can I convert a static HTML site back to WordPress?
Yes, but there is no automatic reverse conversion. Keep the original WordPress copy and you can switch back by pointing your domain at it. If you only have the HTML, you rebuild the pages in WordPress or import the content with an HTML import plugin.