Managing appointments manually can quickly become overwhelming as your business grows. Phone calls, emails, double bookings, and missed appointments not only waste valuable time but also affect the customer experience. A dedicated online booking system solves these challenges by allowing customers to schedule appointments anytime while automatically organizing your calendar, staff, and bookings.
The easiest way to achieve this is to create an appointment booking website with WordPress. With the right plugin, you can build a complete WordPress appointment booking system without writing a single line of code. From accepting online bookings and payments to managing customers, services, and staff, everything can be handled from one centralized dashboard.
In this step-by-step guide, we’ll show you how to build a professional booking website using Rox Appointment Booking, a free WordPress appointment booking plugin solution. By the end of this tutorial, you’ll have a fully functional booking system where customers can book appointments online, log in to manage their reservations, and receive a seamless booking experience.
Why Create an Appointment Booking Website with WordPress?
An online booking website helps both you and your customers. Instead of exchanging emails or phone calls to find available time slots, customers can book appointments instantly while your business stays organized with an automated scheduling system.
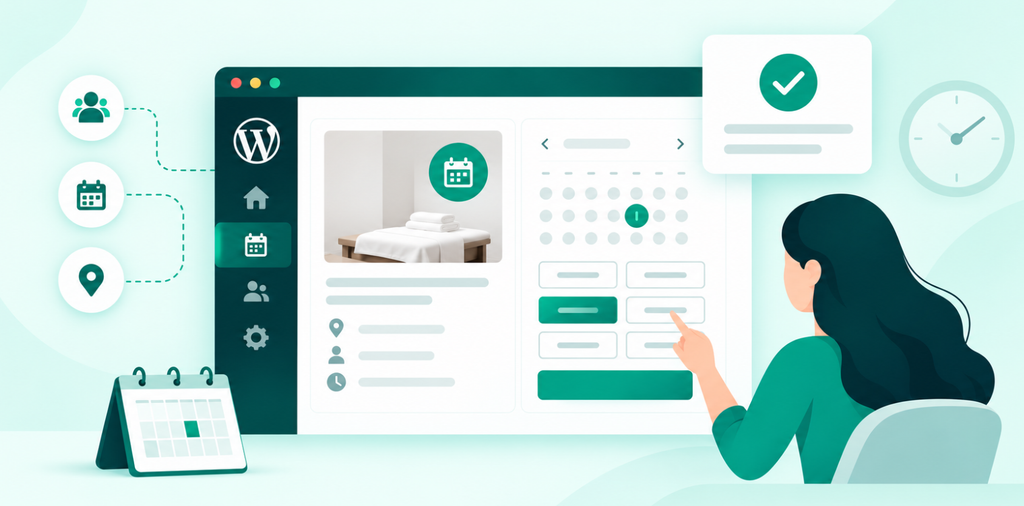
Here are some major reasons why to create a WordPress appointment booking website:
- Lets you to accept bookings 24/7
- Reduces manual scheduling
- Prevents double bookings
- Manages customers and appointments in one place
- Accepts online and offline payments
- Sends booking confirmations automatically
- Organizes staff schedules efficiently
What You’ll Need Before Getting Started
Before creating your booking website, make sure you have:
- A WordPress website. Building with InstaWP brings managed WordPress hosting, staging and site management into one platform, so you can build your booking website, test changes safely and keep it running from one dashboard.
- A WordPress Appointment Booking plugin installed
- Business information ready
- Services and pricing
- Staff members or agents
- Business locations (if applicable)
Once everything is ready, you can begin with creating an appointment booking website with WordPress:
Step 1: Install Rox Appointment Booking Plugin
First, you have to select a suitable appointment booking system for WordPress. Rox Appointment Booking plugin is one of the best free online appointment booking solutions. So, for this guide, we’re using this ultimate appointment booking system.
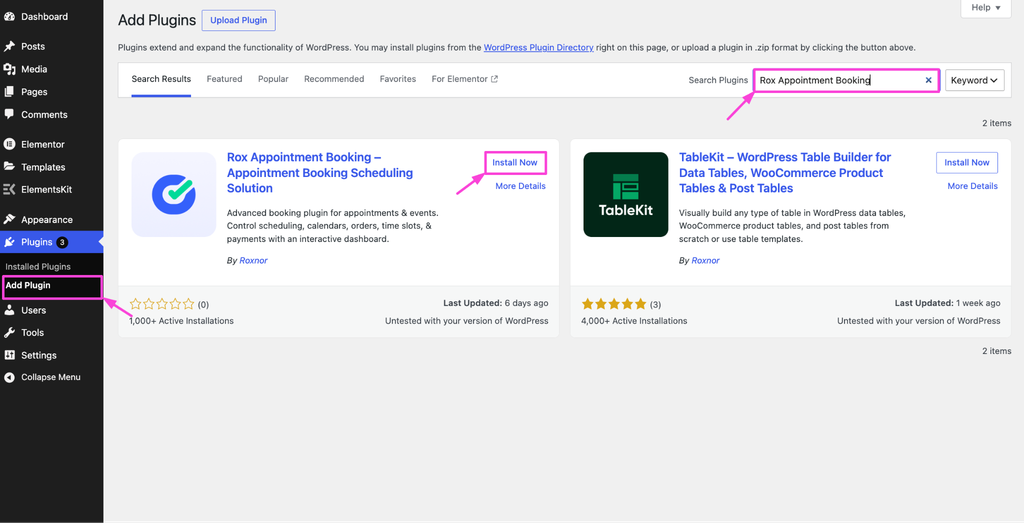
First, start by installing and activating the Rox Appointment Booking plugin from your WordPress dashboard by navigating to Plugins → Add Plugin.
After activation, a new Rox Appointment Booking menu appears inside your admin dashboard where you can manage bookings, appointments, customers, services, agents, locations, coupons, settings, and integrations.
Step 2: Explore the Dashboard Overview
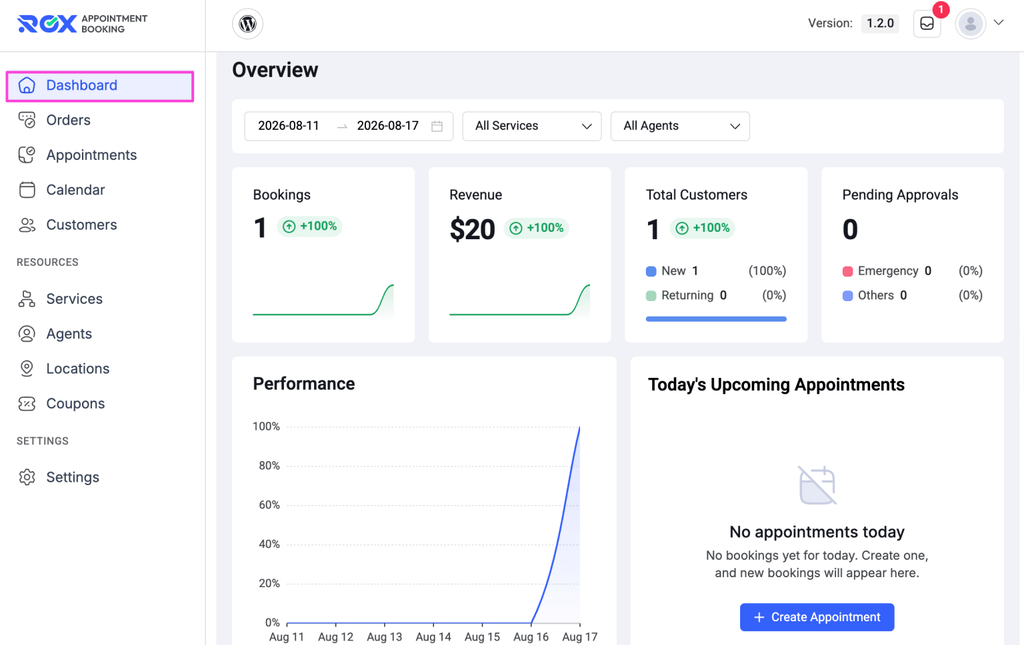
The dashboard gives you a quick snapshot of your business performance.
Here you can monitor bookings, revenue, total customers, pending approvals, upcoming appointments, and overall booking trends. Also, the filter option allows you to view statistics based on date range, services, and agents.
Step 3: Create Your First Appointment
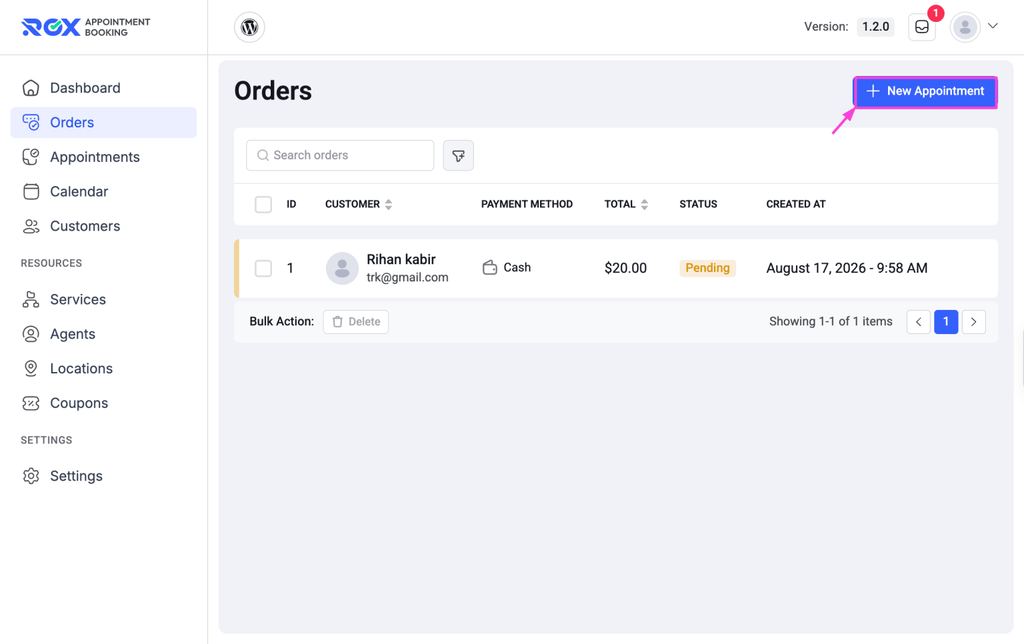
Open Orders from the left menu and click the New Appointment button in the top-right corner.
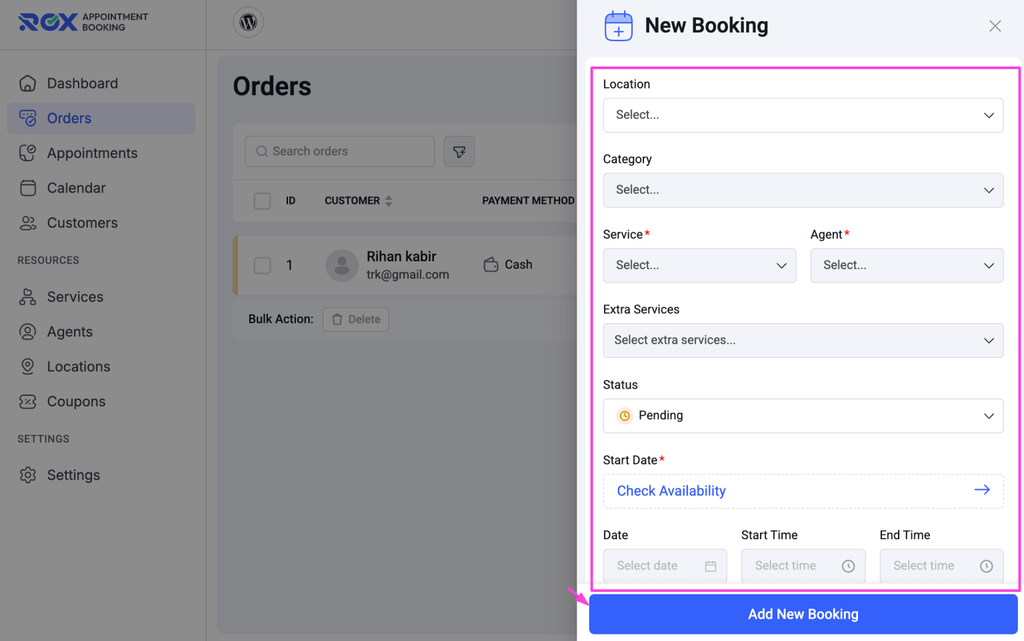
A booking panel opens where you can select the location, category, service, assigned agent, extra services, booking status, appointment date, available time slot, etc.
After filling in the required details, click Add New Booking to create the appointment instantly.
Step 4: Manage Orders
Every booking appears under the Orders page.
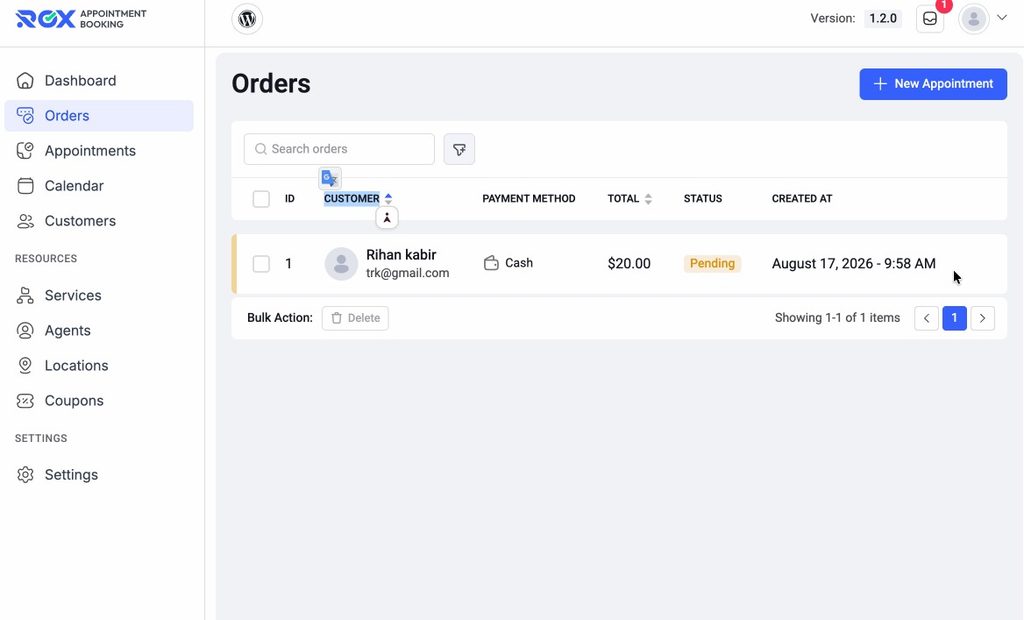
From here, you can search bookings, filter orders, and edit orders by modifying the service, agent, date, time, status, payment method, or other booking details. Once you’ve made the necessary changes, click Update Order or Appointment to save them.
Having a centralized order management system makes it easier to handle customer requests and track payments.
Step 5: View and Manage Appointments
Navigate to the Appointments page to see every scheduled appointment.
Use the search bar and filters to quickly locate appointments by date. The table displays appointment time, customer details, assigned agent, selected service, duration, booking status, and creation date, making it easy to monitor daily operations.
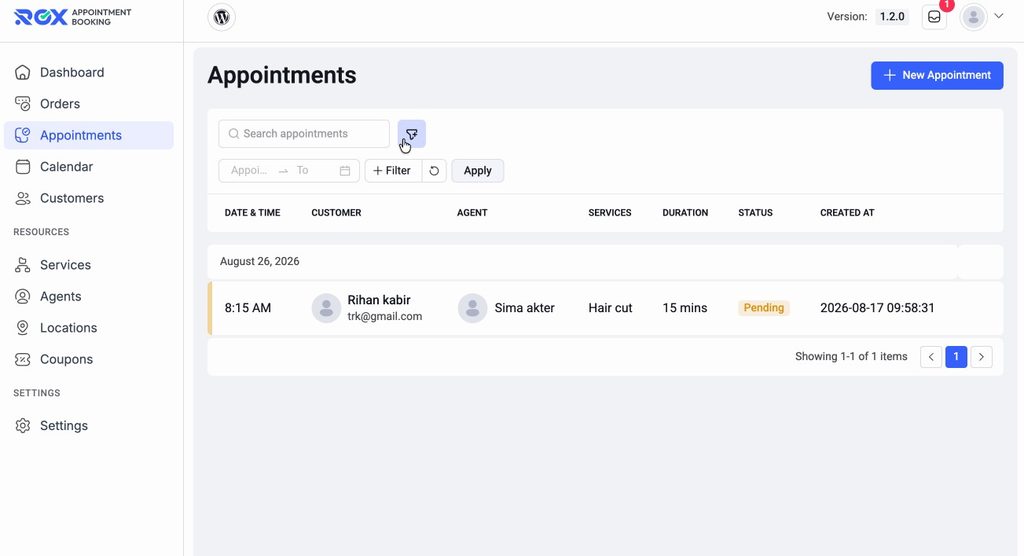
From here, add an appointment by clicking the “New Appointment” button and adding location, category, service, agent, extra service, status, date, time, customer, internal note, etc.
Further, update your existing appointment by clicking the edit icon, and there you will get the option to adjust existing appointments. Finally, press “Update order or appointment”.
Step 6: Organize Your Schedule from the Calendar
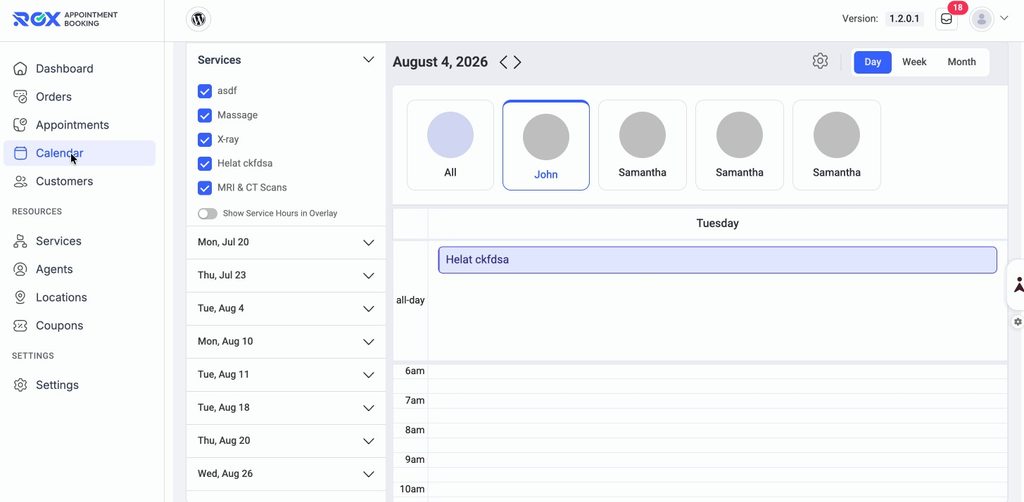
In this step, navigate to the “Calendar” and switch between Day, Week, or Month view to see upcoming appointments, filter appointments by services or agents, and quickly identify available time slots. This centralized calendar helps you manage workloads and avoid scheduling conflicts.
Step 7: Edit Appointments Directly from the Calendar
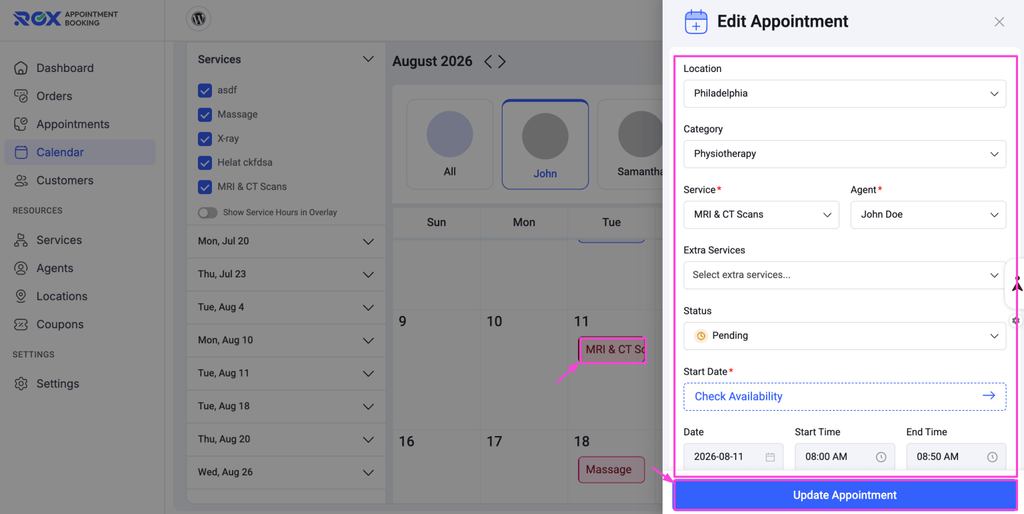
You don’t need to return to the appointments list every time you want to update a booking.
Simply click any appointment inside the calendar to open the editing panel. From there, you can change the assigned service, agent, location, appointment date, time, status, extra services, etc., before clicking Update Appointment.
This allows you to reschedule appointments much faster.
Step 8: Add Bookings Directly from Calendar
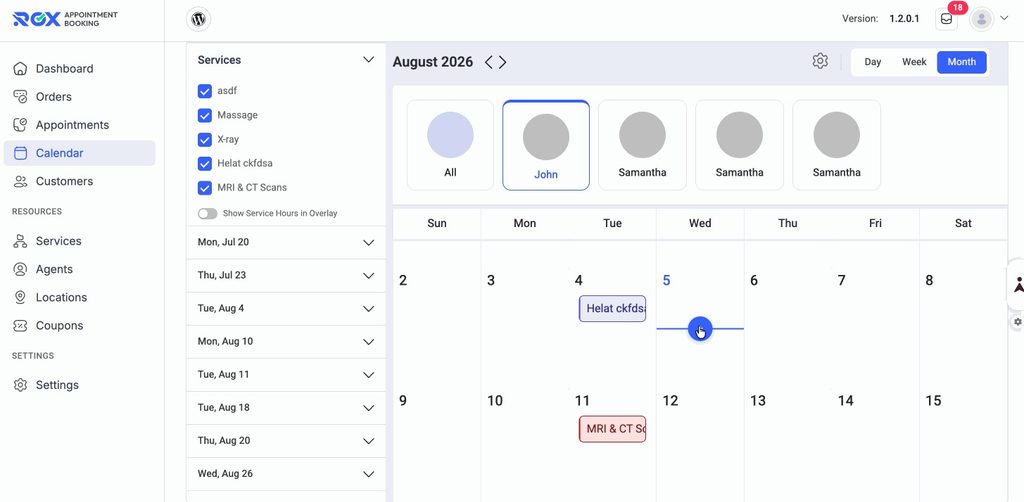
To add booking directly from the calendar, you simply have to click an available date or time slot inside the calendar to open the booking window. Fill in the appointment details and save the booking without leaving the calendar interface.
Step 9: Add and Update Customer Information

You can also add customers from your booking dashboard. For that, open the Customers page and click Add Customer.

Enter the customer’s email address, first and last name, gender, phone number, date of birth, profile picture, and internal notes. You can also enable WordPress login access if needed. Then, click Add New Customer to save the customer profile.
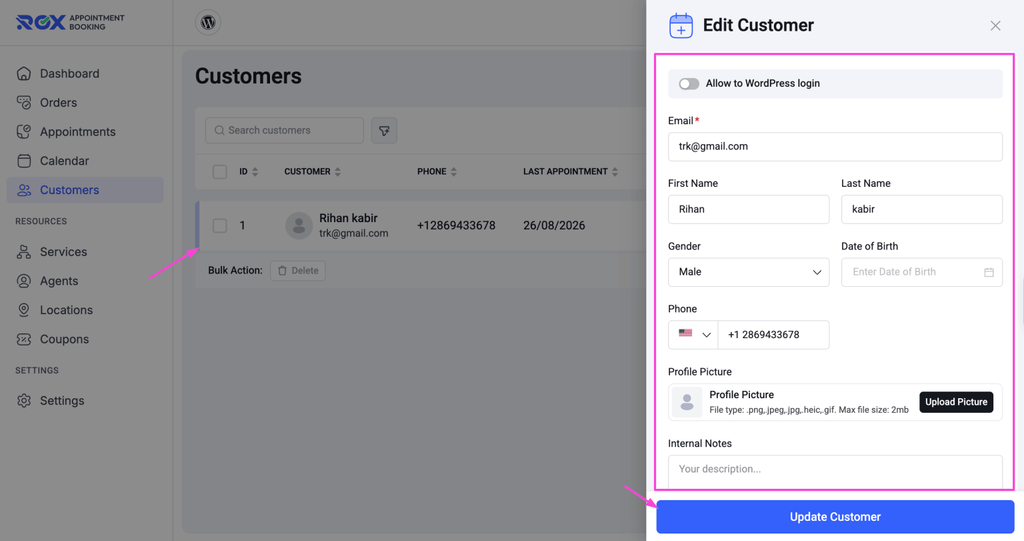
Customer information often changes over time.
To change an existing customer’s info, click an existing customer record. You can update contact information, profile picture, notes, or other personal details before clicking Update Customer button.
Additional Booking Features
Beyond the core booking and scheduling tools, Rox Appointment Booking gives you additional features to create a more flexible and customer-friendly booking experience. Here are some of the additional booking features you can use with Rox Appointment Booking:
Step 10: Add Categories, Services, and Extra Services
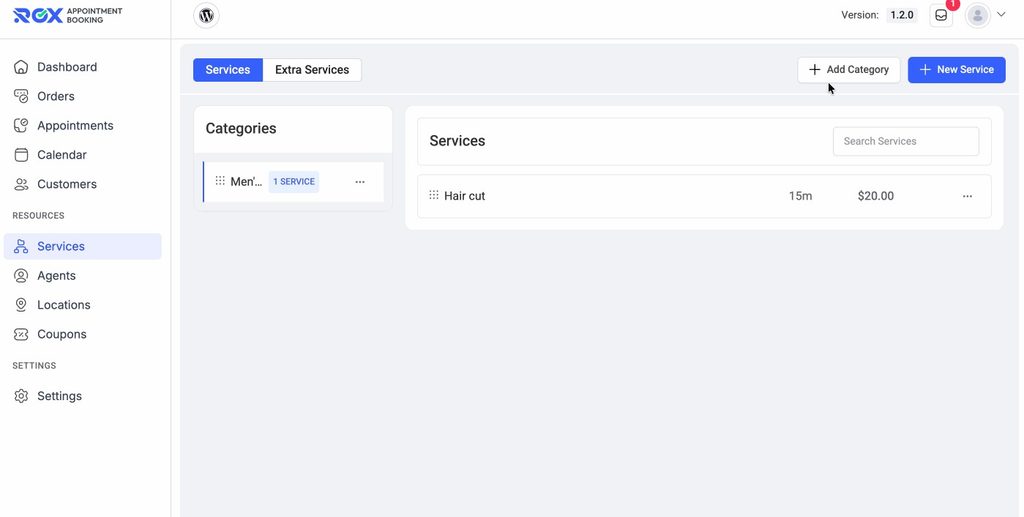
In this step, you have to add categories, services, and extra services for your customers. For that, navigate to Services from the left sidebar to organize the services customers can book.
Start by clicking Add Category to create a service category. Enter the category title, description, thumbnail, and internal note, then press Add New Category button. Next, click New Service, choose the category, and fill in the service details, including the title, location, duration, assigned agent, capacity, pricing, description, thumbnail, weekly schedule, and other settings. Once saved, the service will be available for online booking.
To offer optional add-ons, switch to the Extra Services tab and click New Extra Service. Enter the extra service title, price, duration, description, thumbnail, and internal note, then click Add New Extra Service. These optional add-ons allow customers to enhance their bookings while helping you increase the value of each appointment.
Step 11: Add and Update Agents for Providing Services
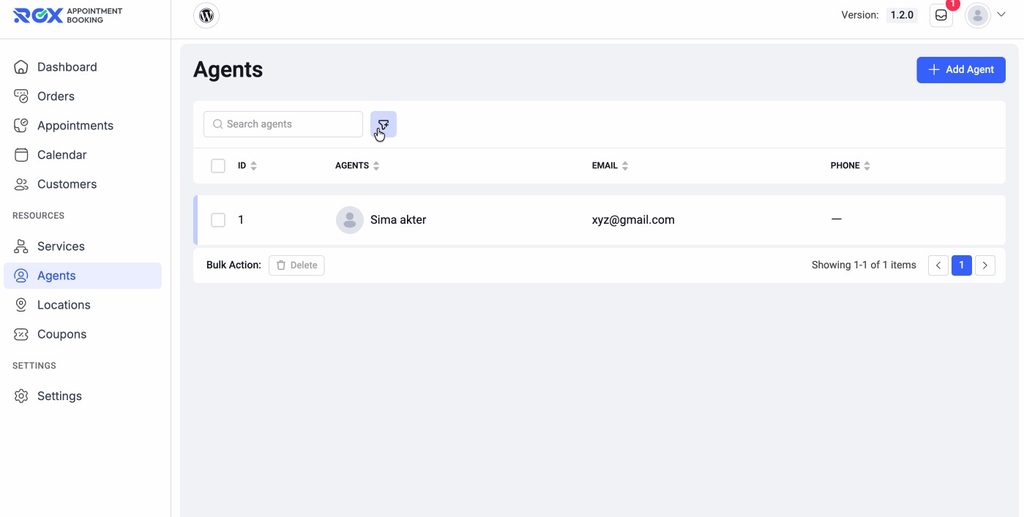
Every appointment needs an assigned staff member. Navigate to Agents from the left sidebar to manage the staff members who provide your services. Use the Search and Filter options to quickly find specific agents. To add a new staff member, click Add Agent, enter their details, weekly schedule, special days, and holidays, then press the Add New Agent button.
To edit an existing agent, simply click on the agent’s record from the list. The edit panel will open, allowing you to update their profile, assigned services, availability, contact information, and other details. After making your changes, click Update Agent to save them.
Step 12: Add Business Locations
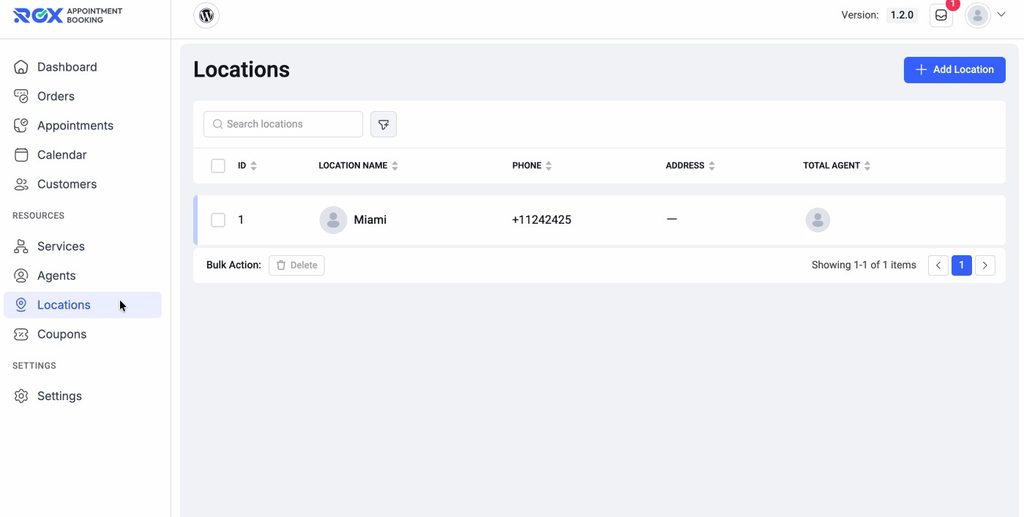
If your business operates from multiple branches, open Locations and create each business location.
Each location can have its own address, contact details, assigned agents, and available services. Also, you can edit existing locations according to your needs.
Step 13: Create Discount Coupons

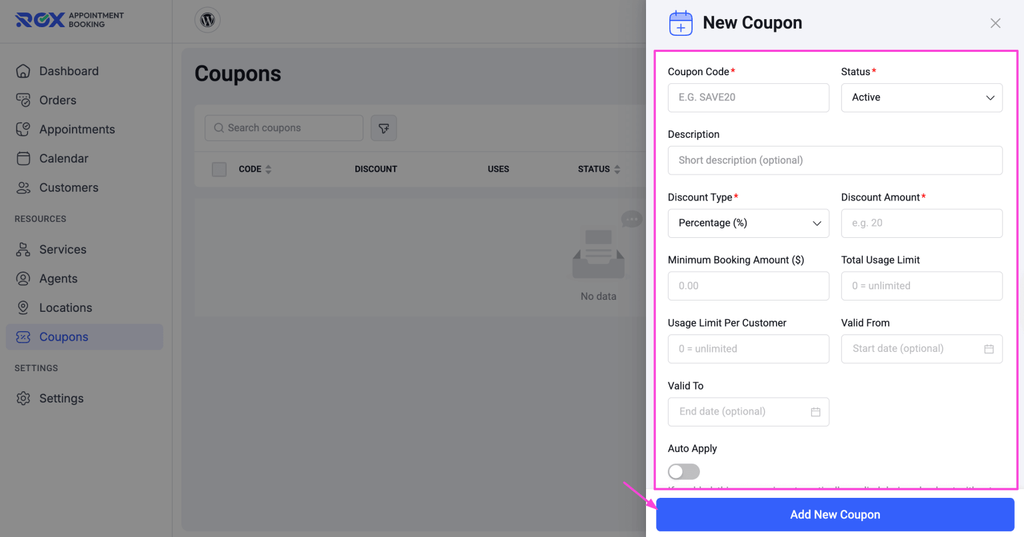
Enter a coupon code, choose the status, discount type, specify the discount amount, minimum booking amount, set usage limits, define validity dates, enable automatic application if needed, and click the button to add a new coupon.
You can create percentage discounts, fixed amount discounts, promotional campaigns, or seasonal offers.
Step 14: Configure General Settings
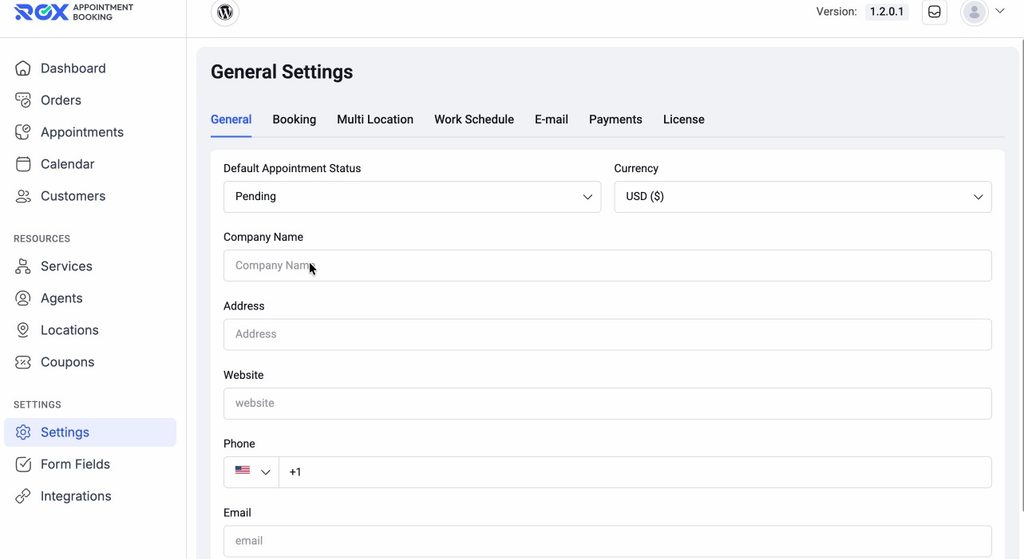
Before accepting bookings, configure the plugin settings according to your business requirements.
The settings panel allows you to configure:
- General business information
- Booking preferences
- Multi-location settings
- Work Schedule
- Payment gateways
- License
Reviewing these settings ensures your booking system operates exactly as your business requires.
Step 15: Add and Customize Booking Form Fields
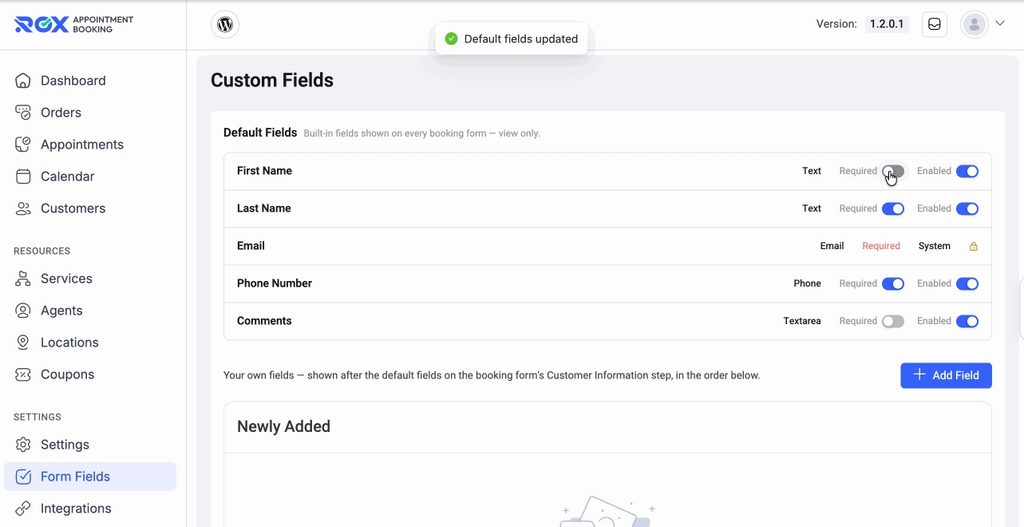
Next, customize your booking form by managing the default customer fields. Enable or disable optional fields such as First Name, Last Name, Phone Number, and Comments, or add your own custom fields to collect additional information from customers during the booking process. This helps tailor the booking experience to your business needs while keeping the form clean and relevant.
Step 16: Connect Third-Party Integrations
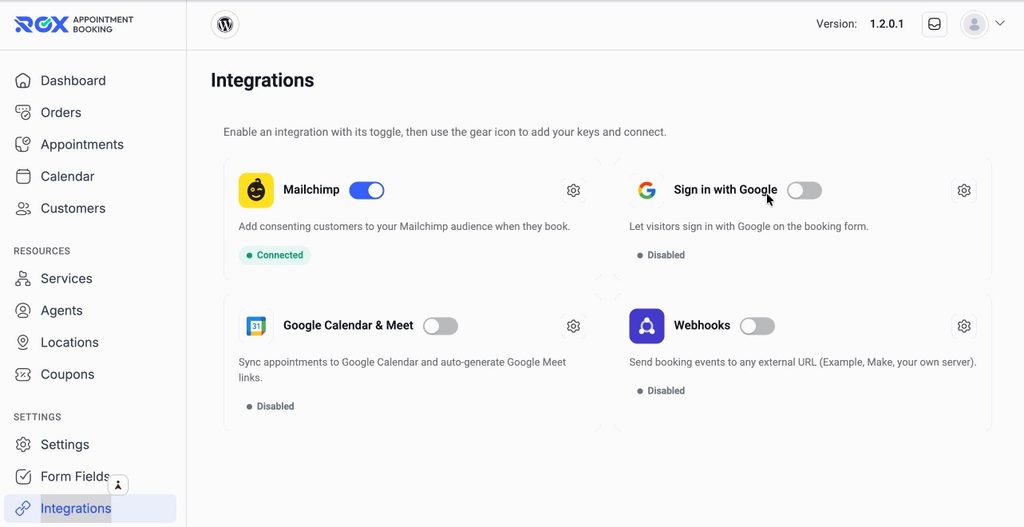
Now, you have to expand your booking system by integrating external services. You can connect third-party tools like Mailchimp, Google Sign-In, Google Calendar & Google Meet, and Webhooks.
Step 17: Publish Your Booking Panel
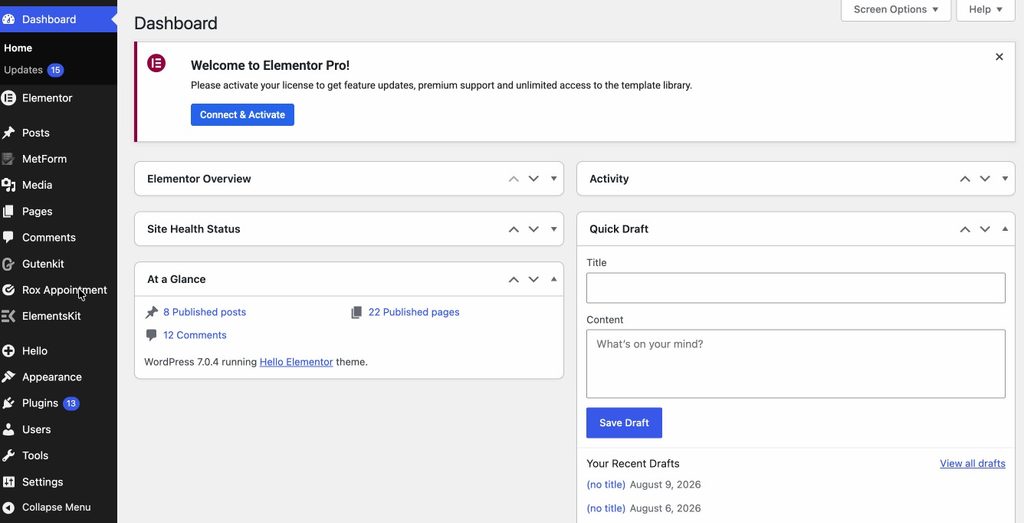
Once your booking system is fully configured, it’s time to make it available to visitors. In this final step, add the [rox_appointment_booking] shortcode to any WordPress page or post where you want the booking form to appear, and publish. Thus, your booking panel will be visible on the frontend.
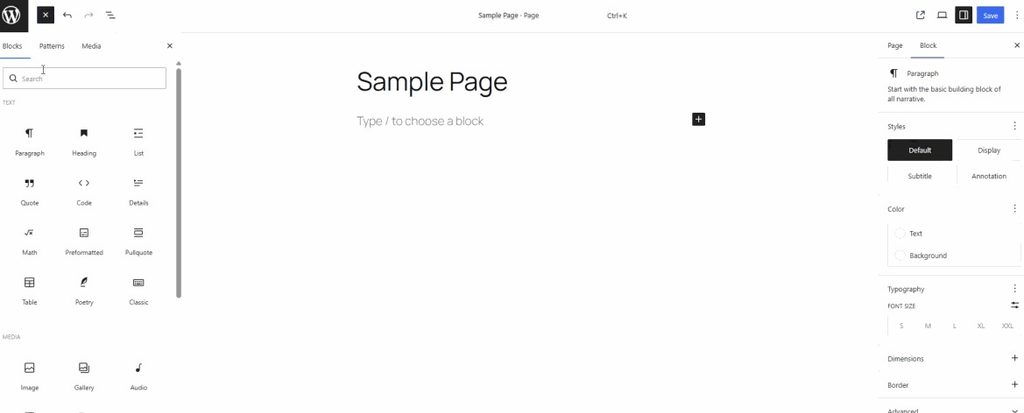
Besides, you can also add the booking panel with a block. Search for the “Rox Appointment Booking Panel” block and drag-and-drop it to add the booking panel.
If you’re using Elementor, simply drag the Rox Appointment Booking widget onto your page instead of using the shortcode.
After publishing the page, customers can immediately start booking appointments online.
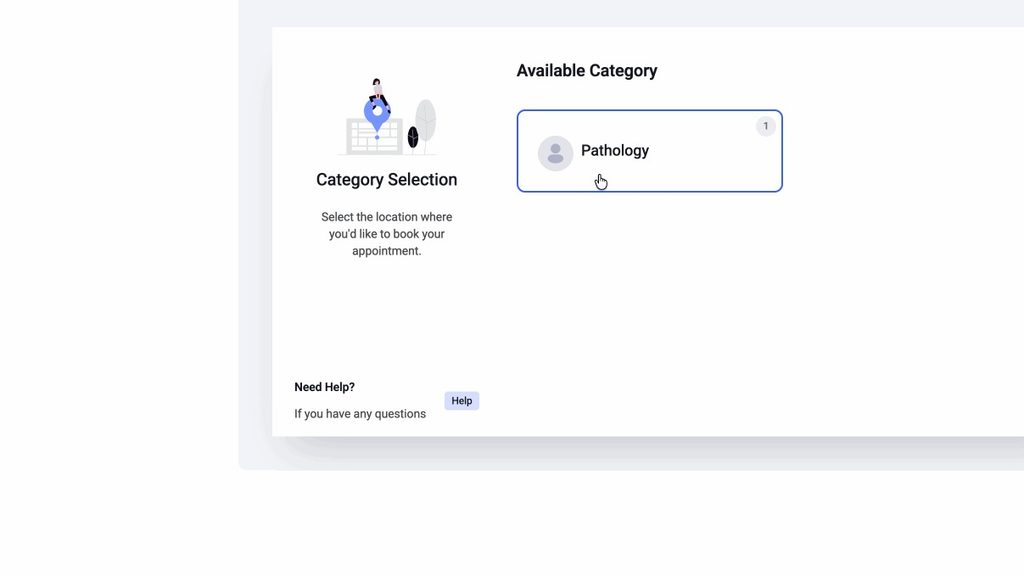
Step 18: Set Up the Customer Login Page
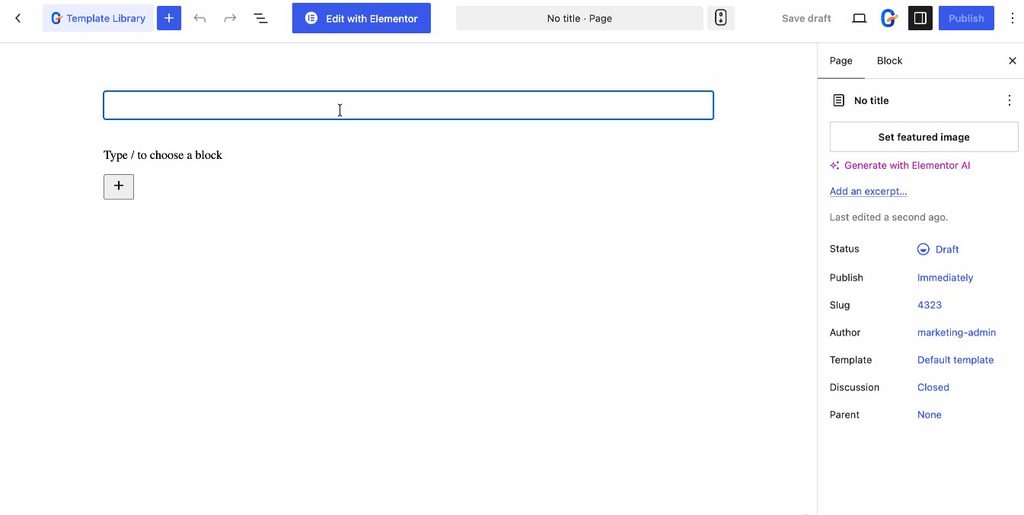
At last, create a dedicated login page so customers can easily access and manage their appointments. In your WordPress dashboard, add a new page, open it with the Block Editor, and insert the Rox Appointment Login Form block. Once the page is published, customers can sign in to their accounts to view upcoming bookings, check appointment history, and manage their reservations from a single place.
Best Practices for Running a Successful WordPress Appointment Booking System
Setting up your website is only the beginning. Following a few best practices can significantly improve customer experience and reduce administrative work.
- Keep your availability updated so customers only see bookable time slots.
- Add detailed service descriptions with accurate pricing and durations to help visitors make informed decisions.
- Enable email notifications to keep customers informed about bookings and changes.
- Offer multiple payment methods for convenience, and regularly review booking reports to understand customer trends and improve scheduling.
These small improvements create a smoother booking experience while helping your business operate more efficiently.
Why Rox Appointment Booking Is One of the Best Appointment Booking Plugins for WordPress
Rox Appointment Booking combines everything needed to build a modern appointment scheduling website.
It allows businesses to manage appointments, services, customers, staff, locations, coupons, calendars, payments, and integrations from one centralized dashboard. The intuitive interface makes setup simple, while advanced features provide the flexibility required by growing businesses.
Whether you’re looking for a WordPress appointment booking plugin free to get started or a scalable solution for managing multiple locations and staff members, Rox Appointment Booking offers the tools needed to automate your scheduling process.
Frequently Asked Questions
Can you create an appointment booking website with WordPress without coding?
Yes. Using a WordPress appointment booking plugin like Rox Appointment Booking, you can build a fully functional booking website without writing any code.
Is there a free WordPress appointment booking plugin?
Yes. Rox Appointment Booking offers a free version that allows businesses to create and manage appointments directly from WordPress.
Can customers book appointments online?
Absolutely. Customers can choose services, available dates, time slots, and complete bookings directly from your website.
Can you manage multiple staff members?
Yes. You can create multiple agent profiles, assign services, manage availability, and automatically allocate appointments.
Can you accept online payments?
Yes. The plugin supports payment gateway integration so customers can pay during the booking process.
Can you use Elementor with Rox Appointment Booking?
Yes. Rox Appointment Booking includes an Elementor widget, allowing you to build custom booking pages without using shortcodes.
Final Thoughts
Building an online booking website doesn’t have to be complicated. By following the steps above, you can create an appointment booking website with WordPress that allows customers to schedule appointments, make payments, manage their bookings, and interact with your business effortlessly.
With Rox Appointment Booking, you get everything needed to run a modern WordPress appointment booking system, including appointment scheduling, customer management, staff assignment, calendar synchronization, coupon creation, integrations, and customizable booking forms, all from a single dashboard.
All you will need is install the booking plugin, complete the setup, publish your booking panel, and start accepting appointments online today.