Once you look after more than a handful of WordPress sites, most of the work stops being about building and turns into upkeep: logging in, updating, checking nothing broke, and showing clients you did it. This guide explains what that upkeep involves, how InstaWP handles it from one dashboard, and then walks through the setup step by step.
- One dashboard for every site. Sites hosted on InstaWP appear in Manage automatically. Sites on any other host join through the free InstaWP Connect plugin.
- The daily work is free: magic login, users, plugin and theme updates across many sites at once, staging and the database editor.
- Monitoring and reporting need Advanced: uptime, vulnerability and performance scans, activity alerts, scheduled updates and client PDF reports.
- Advanced is included on Plus hosting and above, and costs $2 a month per site for sites hosted elsewhere.
- Backups belong to hosting. Connected sites keep their backups at their current host for now.
What WordPress site management involves
Site management is everything a site needs after launch to stay secure, fast and online. For one site, that is a few minutes a week inside wp-admin. For twenty client sites, it is a recurring workload with seven parts:
- Access: getting into each site quickly, and controlling who else can.
- Updates: WordPress core, plugins and themes, which ship fixes and security patches constantly.
- Testing: trying risky updates and changes on a copy before they reach the live site.
- Security: knowing when an installed plugin or theme has a known vulnerability.
- Uptime and speed: noticing when a site goes down or slows down, ideally before the client does.
- Troubleshooting: reaching logs, cache, the database and config when something breaks.
- Reporting: showing the client what was done, usually once a month.
None of these jobs is hard by itself. The trouble is repetition. Every site has its own login, its own update queue and its own mix of plugins, so the same task gets done twenty times over, and it is easy for one site to fall behind without anyone noticing. Our guide to managing multiple WordPress sites from one dashboard compares the general approaches. This one is about doing it in InstaWP.
How site management works in InstaWP
In InstaWP, site management lives in the Manage section of the dashboard, a product we call InstaManage. Every site you manage appears in one list with its status, uptime, security risk and performance score. Click a site and all of its tools are there: login, plugins, themes, users, staging, monitoring and reports.
Two kinds of sites can sit in that list side by side:
- Hosted sites run on InstaWP managed hosting. They appear in Manage automatically.
- Connected sites run on any other host: shared hosting, a VPS or another managed host. They join through the free InstaWP Connect plugin and stay exactly where they are.
Each site runs on one of two tiers. Basic is free and covers the hands-on work: access, updates, staging and the quick fix tools. Advanced adds monitoring, scheduled updates, the config manager and client reports. It is included on Plus hosting and above, and costs $2 a month per site anywhere else. The full breakdown is in InstaManage Basic vs Advanced, explained.
It is built for people who run sites on someone else’s behalf: agencies with care-plan clients, freelancers with a portfolio of past builds, and developers who inherited a pile of sites spread across different hosts.
Before you start
- An InstaWP account. Creating one is free.
- Admin access to each site you want to connect, so you can install or approve the InstaWP Connect plugin.
- A rough list of which sites need monitoring and client reports. Those go on Advanced, and the rest can stay on Basic.
- Nothing extra for sites already hosted on InstaWP. They are ready.
The workflow at a glance
The rest of this guide follows the order you would set things up in.
Step 1: Bring every site into one dashboard
Hosted sites need no setup. For each site on another host, add the InstaWP Connect plugin in one of two ways:
- From InstaWP: open Manage, click Connect Site, paste the site’s URL and approve the connection. InstaWP installs the plugin for you.
- From wp-admin: go to Plugins → Add New, search for InstaWP Connect, install and activate it, then connect the site to your account.
Once connected, the site reports its WordPress and PHP versions, theme, post and user counts and disk use back to the dashboard on a regular heartbeat. You can set that interval between 60 and 240 minutes, and if you turn the heartbeat off, the site disconnects after an hour. Full steps are in the Connect plugin docs.
Use Edit Label to give each site a name you will recognise in the list. Labels also appear on client reports, and they never change the site’s real title or URL.
Step 2: Get into any site in one click
Magic Login opens wp-admin in a new tab, already signed in. Under Manage → Users you choose which WordPress account that button uses, so your team never shares or resets a password.
The same Users screen covers access for other people: create a user with a role, open any profile in wp-admin, or copy a temporary login link that expires after 6 hours. That is the safe way to let a freelancer or a plugin developer’s support team in for one job. Users are managed per site. See WordPress user roles and permissions for which role to hand out.
Step 3: Keep core, plugins and themes up to date
On one site
The Plugins and Themes screens list every install with its version and any available update. Update with one click, activate or deactivate, install new ones by slug or .zip URL, and set auto-updates per plugin or per theme.
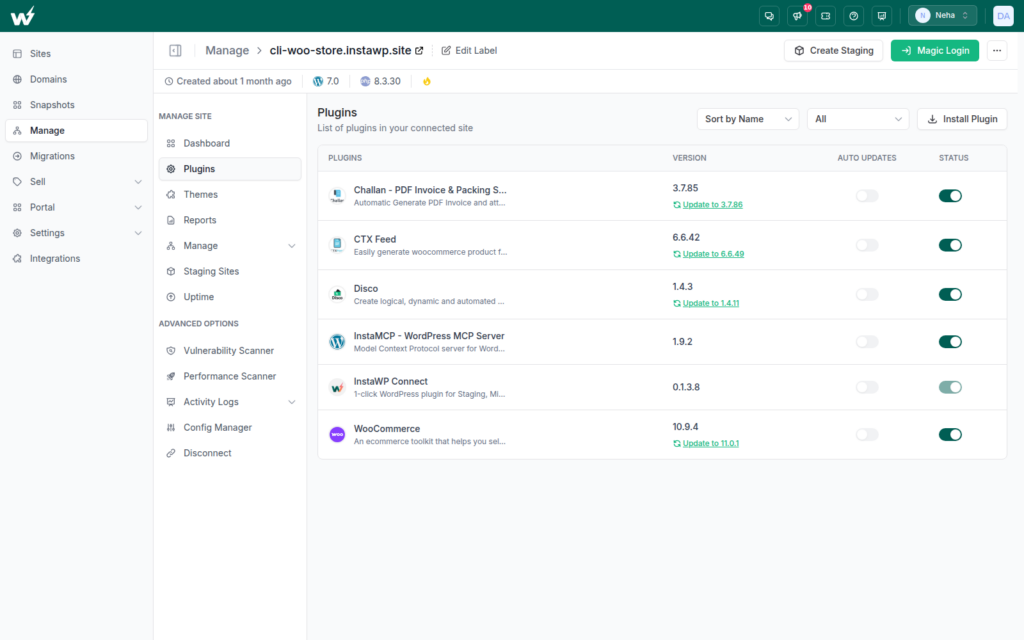
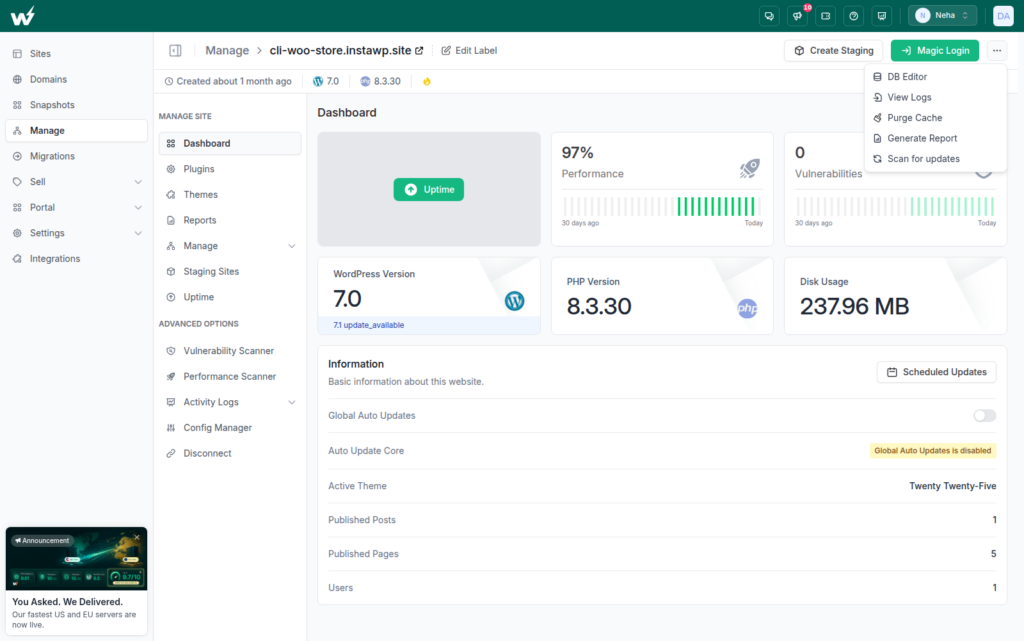
Two site-wide switches sit on the site dashboard. Global Auto Updates allows the WordPress updater to run at all. Auto Update Core then picks Yes (every release, including major versions), Minor (security and maintenance releases only, the WordPress default and the safest choice for a live site) or No. Both are written to the site’s wp-config.php, so they apply on the live site itself.
Across many sites
In the Manage list, tick the sites you want and open Bulk Edit. Core, Themes and Plugins each get a tab showing how many sites need each update, with Update All per item. You can also install a plugin on every selected site in one go: paste comma-separated slugs, a .zip URL or upload a .zip, and choose whether to activate it. A side panel tracks each site as Pending, In progress, Completed or Failed.
On a schedule (Advanced)
Scheduled Updates runs core, plugin and theme updates at a frequency and local time you set, so nobody has to remember the weekly round. Pair it with a staging test for anything major, which is step 4. More on timing in how to schedule WordPress core updates.
Step 4: Test changes on staging first
Click Create Staging on any managed site. The InstaWP Connect plugin opens its staging wizard in wp-admin with three options:
- Quick Staging: a copy without the media folder. The fastest way to test a plugin update.
- Full Staging: an exact copy of the site. Takes longer on big sites.
- Custom Staging: pick what to include, and exclude files and tables you do not need.
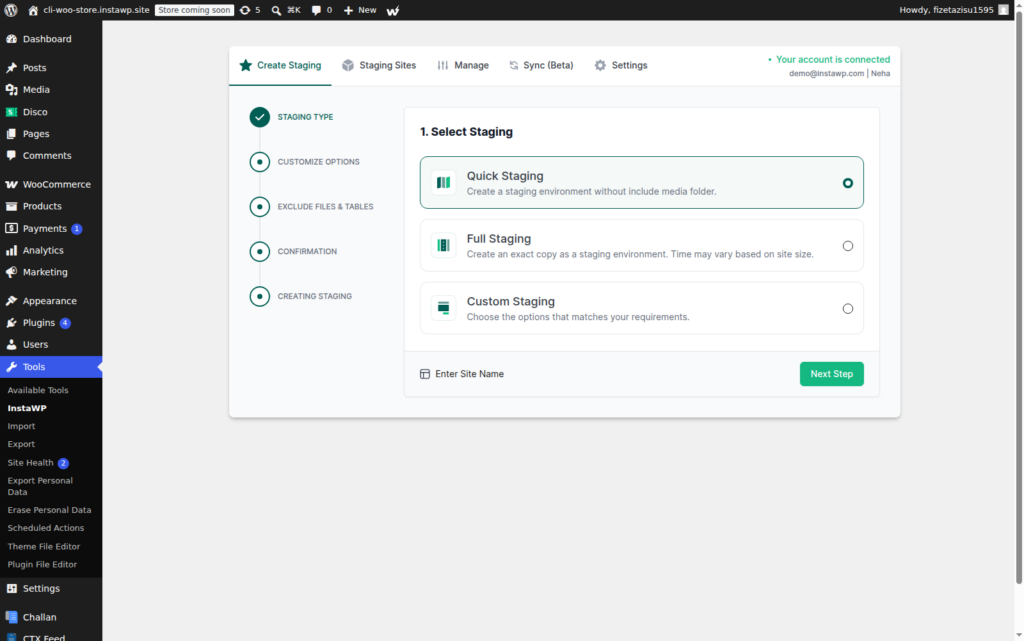
Every copy you make shows up under Staging Sites, where you can reserve one so it does not expire. When the change works, 2-way sync (beta) pushes what you did on staging back to the live site without overwriting new orders or posts that arrived in the meantime. It records changes made through wp-admin, so switch recording on before you start editing. Read more about staging and 2-way sync, or the staging feature.
Step 5: Watch uptime, security and speed (Advanced)
This is the step that turns site management from a chore list into something that runs while you work on other things. All of it lives under Uptime and Advanced Options in the site menu.
- Uptime and SSL: checks from several regions with response-time history and a certificate expiry countdown. Down alerts go by email, and to Slack if you add a webhook. Our uptime monitoring guide for agencies covers what to watch.
- Vulnerability Scanner: checks core, plugins and themes against known vulnerabilities, on a schedule or on demand, and shows a risk count for each site in the Manage list. Learn how to act on a vulnerability scan.
- Performance Scanner: mobile and desktop scores plus the recommendations behind them, the same signals as Core Web Vitals. Manual scans are limited to one per 24 hours.
- Activity Logs and Alert Rules: a record of every change with who made it, plus email alerts for the actions you pick. See WordPress activity logs for what to track.
Alert rules can watch content changes, media uploads, menus and widgets, user activity (logins, failed logins, new or deleted users), plugin and theme changes, and categories or tags. A sensible starting set for client sites: failed logins, new user registrations, and any plugin being deleted.
Step 6: Fix problems without leaving the dashboard
The quick tools menu (the ··· button on every managed site) handles most first-response fixes:
- DB Editor: browse tables, run SQL, import or export data.
- View Logs: read the site’s WordPress debug log.
- Purge Cache: clears the WordPress cache and the InstaWP CDN, and reports each result.
- Scan for updates: refresh the site’s version and update inventory right away instead of waiting for the next heartbeat.
On Advanced, the Config Manager also lets you change wp-config.php constants such as WP_DEBUG from the dashboard, which is the quickest way to switch on debugging while you chase an error.
Step 7: Report to clients (Advanced)
Generate Report builds a PDF for a period you choose, from this week to last year, with any of five sections: Summary, Performance, Uptime History, Security Scan and Activity Logs. Email it to the client straight away, or use Schedule Report to send it on repeat at a set time. If you sell care plans, this report is what the client sees each month. Here is what to include in a maintenance report.
Build it into a routine
The tools only save time if they run on a rhythm. Here is a routine that works for most agency portfolios.
Basic vs Advanced, and what it costs
Every site gets Basic for free, whether we host it or not. Advanced is switched on automatically for sites hosted on Plus ($9/mo) and above, and costs $2 a month per site for anything hosted elsewhere. Sandbox and Starter sites run Basic.
For the full feature list and how the tier follows your hosting plan, see InstaManage Basic vs Advanced.
What site management does not do
Backups come with hosting. Sites hosted with InstaWP get automatic off-site backups with one-click restore, weekly on Starter and daily on Plus and up. Connected sites keep their backups at their current host for now, so keep that host’s backup tool running.
White-label reports are on the way. Reports cannot carry your branding yet. For a branded client experience today, Portal gives clients their own panel on your domain with your logo.
Frequently asked
How do I manage multiple WordPress sites from one dashboard?
Can I update plugins on many WordPress sites at once?
Can I manage sites that are not hosted on InstaWP?
Does InstaWP back up connected sites?
How do I give someone temporary access to a client site?
How often should I update WordPress sites?
What does Advanced site management cost?
Can I push staging changes to the live site?
Connect every site to one dashboard, then work through seven steps: get in with magic login, keep updates moving (in bulk, or on a schedule with Advanced), test on staging, watch uptime, security and speed, fix things with the built-in tools, and send the client a report. Steps 1 to 4 and the quick tools in step 6 (database editor, cache purge, update scan) are free on every site. Monitoring, scheduled updates, the config manager and reports come with Advanced, included on Plus hosting and above.