Every website starts with the same two decisions: what to call it, and where it will live. Traditionally those decisions happen in two different places. You buy the name at a registrar, you rent the space at a host, and then you spend an afternoon in a DNS panel trying to introduce them to each other. It works, but it is a strange amount of ceremony for what is really one job: getting a site online at an address people can type.
InstaWP now does both. With Domains on InstaWP you can search for a domain, register it, and launch a WordPress site on it without ever opening a registrar account, editing a zone file, or waiting on a nameserver change. The DNS is created for you, SSL is issued for you, and the whole thing shows up on one invoice.
This guide walks through the whole arc: how to choose and buy a domain, how to link it to a site, how to manage DNS, nameservers and renewals afterward, and what to do in the awkward cases that trip people up. If you want the wider tour of what the feature does rather than a click-by-click walkthrough, read our introduction to Domains on InstaWP. Otherwise, start with the key takeaway below.
On this page
- What buying a domain actually means
- Choosing a domain name and a TLD
- How to buy a domain on InstaWP, step by step
- Linking your domain to a WordPress site
- Managing DNS records
- Nameservers: keep ours or bring your own
- Renewals, expiry and how people lose domains
- WHOIS and privacy protection
- The awkward cases: apex domains, existing domains, subdomains
- Why buying the domain where you host is simpler
- Frequently asked questions
Key takeaway
InstaWP is a domain registrar as well as a WordPress host. You can search for a name, register it, and have a live WordPress site running on it without touching a third-party registrar or a DNS panel.
- ✓ Buy the domain in the dashboard. Search a name, compare the available extensions and their prices, and register it in a few clicks.
- ✓ DNS is automatic. Link a domain or subdomain to a site and the CNAME record is created for you. There is no zone file to edit.
- ✓ SSL is included. Certificates are provisioned and renewed automatically for every domain you connect.
- ✓ Full control if you want it. A complete DNS manager (A, AAAA, CNAME, MX, TXT, NS, CAA, SRV, Redirect) and the option to point at your own nameservers.
- ✓ One bill, one login. Domain, hosting and SSL sit in the same account instead of three.
What buying a domain actually means
You do not really buy a domain. You lease the exclusive right to use it, usually a year at a time, from a registry that oversees the extension. A registrar is the company that handles that lease on your behalf, keeps your contact details on record, and renews it when the term is up. ICANN, which coordinates the domain name system, publishes the rights and responsibilities that come with being a registrant, and they are worth two minutes of your time.

Three things get set up when you register a name, and every problem people run into later traces back to one of them:
The registration
The lease itself, with an expiry date. Let it lapse and the name goes back on the market.
The WHOIS contact
The registrant details on public record. Privacy protection hides them from lookups.
The DNS
The records that tell the internet which server answers for the name. This is what connects it to your site.
The registrar handles the first two. The third is where a domain meets your host, and it is the step that historically goes wrong, because it happens in a different company’s control panel from the one your site lives in. Registering the domain where you host removes that seam entirely.
Choosing a domain name and a TLD
A good domain is short, easy to say out loud, and hard to misspell. If you have to spell it for someone over the phone, it is the wrong name. Avoid hyphens and doubled letters, skip numbers, and be careful with words that sound different from how they are written.
The extension, or TLD, matters less than people fear. .com is still the default assumption and the safest choice for a business. Beyond that, pick for meaning: .io and .dev read as technical, .co works when the .com is taken, .store and .shop signal commerce, and country extensions like .co.uk or .in signal where you operate. Google does not rank a .com above a .co simply for being a .com; what a country extension does change is which region Google associates you with. Choose the one your customers will remember.
Prices vary by extension, sometimes a lot. A .com and a .io are not in the same bracket, and some extensions are cheap for the first year and more expensive to renew. The domain search in InstaWP shows the price against each available extension before you commit, and the renewal price is shown on the domain’s own page after you buy, so there are no surprises at renewal time. If you want to think this through before you buy, our guide to whether .co is a good domain works through the trade-offs with a real example.
How to buy a domain on InstaWP: Step-by-step Guide
Registering a domain takes a couple of minutes and happens entirely inside the dashboard. There is no separate registrar account to create and nothing to configure afterward to make it work with your sites. The walkthrough below runs through the whole flow if you would rather watch it than read it.
Step 1: Open the Domains section
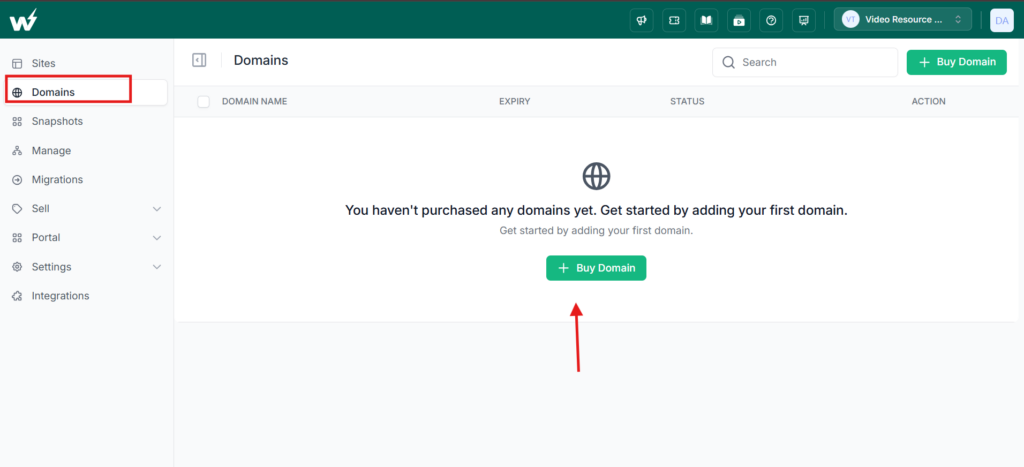
Log in to your InstaWP account and click Domains in the left sidebar. If you have not registered a domain yet you will see an empty state with a + Buy Domain button. Otherwise the button sits in the top-right corner. The docs cover the same flow in Register a domain.
Step 2: Search for a name
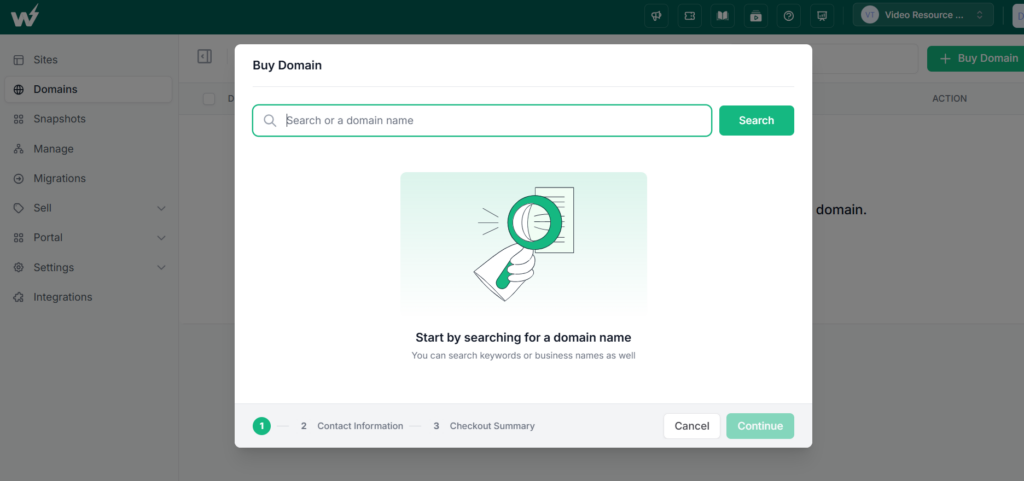
Type the name you have in mind and hit Search. You can search a business name or just a keyword.
Step 3: Pick an extension
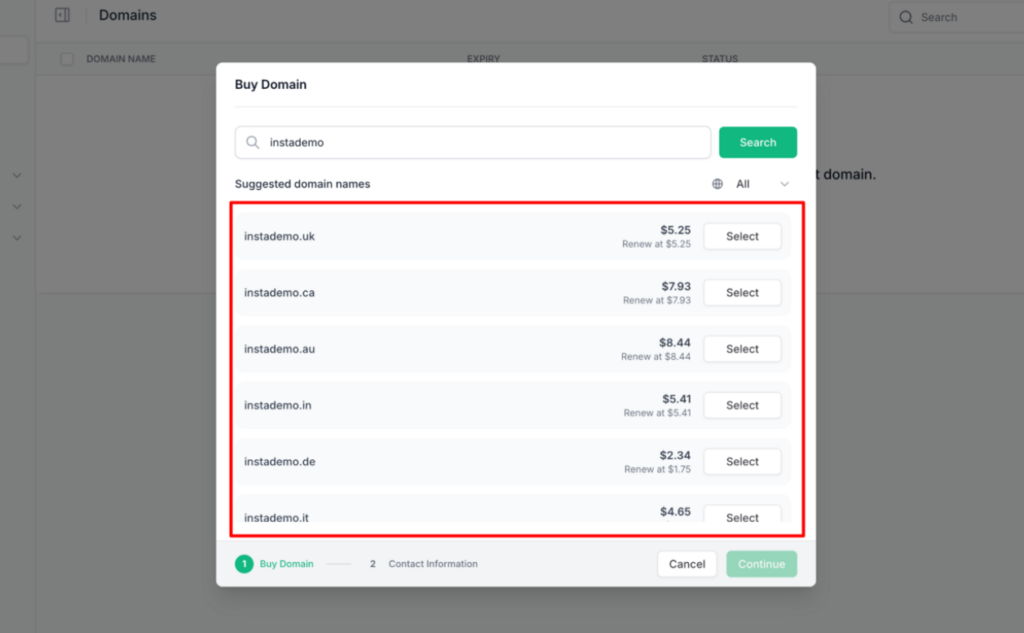
InstaWP returns the available names across a range of extensions, each with its price. This is where you weigh cost against the right fit, and where you will notice that pricing is per-TLD rather than one flat rate. Click Select on the one you want, then Continue.
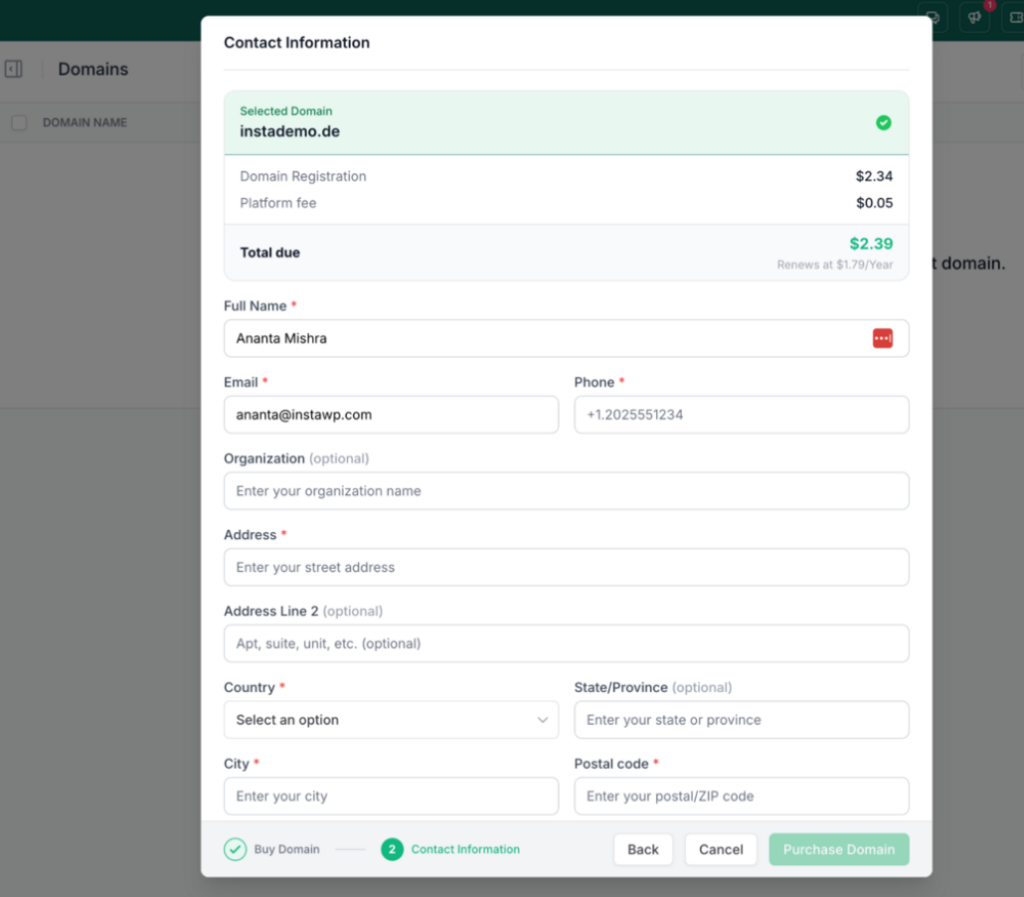
Step 4: Add your contact details
Registries require a real contact on record for every domain, so you will be asked for your name, email, phone and address. Get these right: they become the domain’s WHOIS record, and an invalid email can stall the registration.
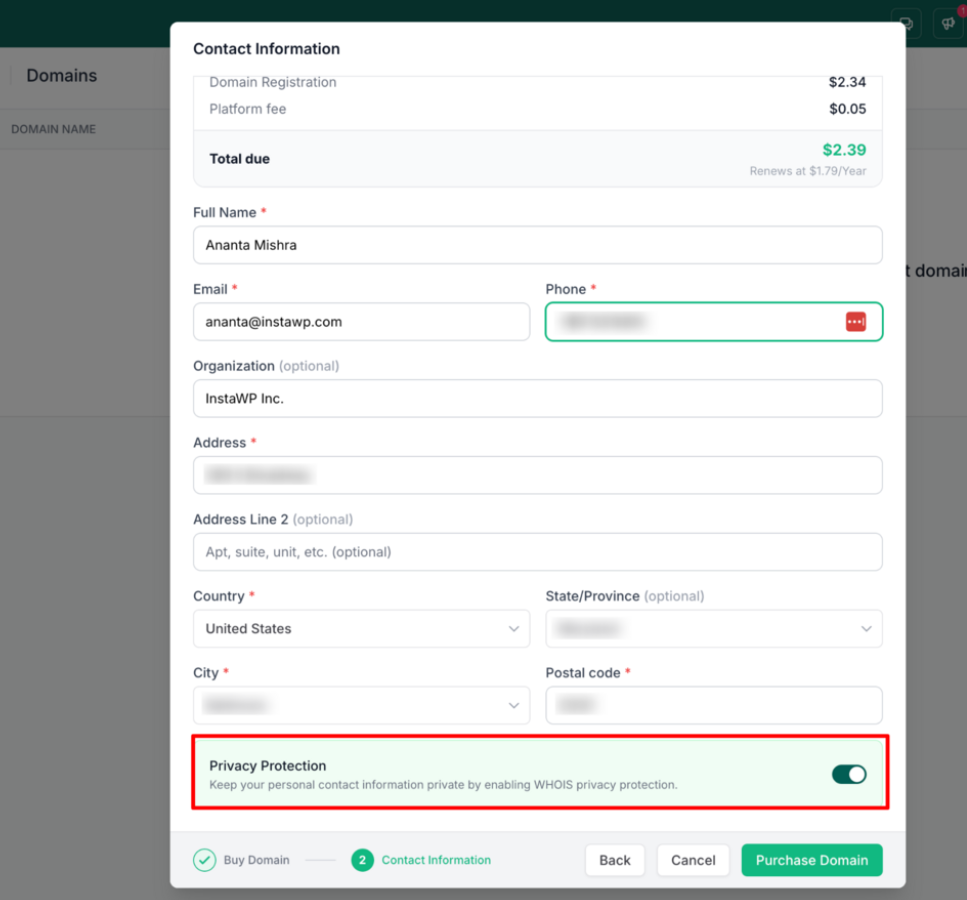
Privacy Protection sits at the bottom of the form and is on by default. Leave it on. It replaces your personal details in public WHOIS lookups with privacy-protection values, which is the difference between a quiet inbox and a permanent stream of cold calls.
Step 5: Confirm and wait a few minutes
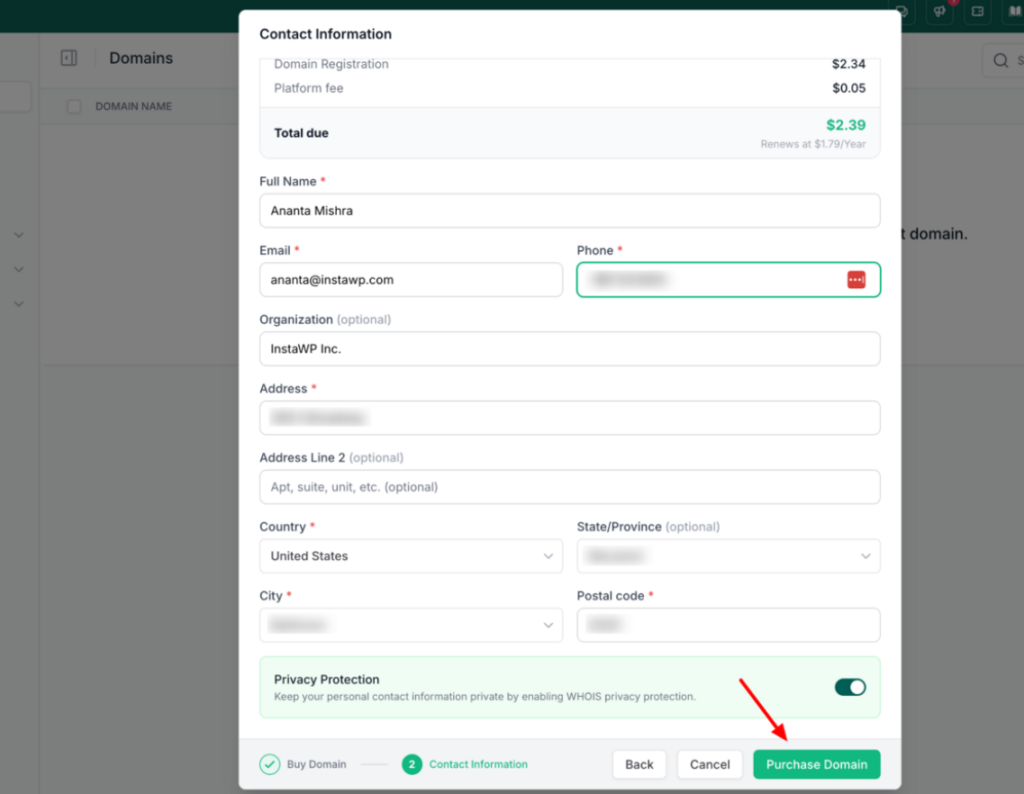
Click Purchase Domain.
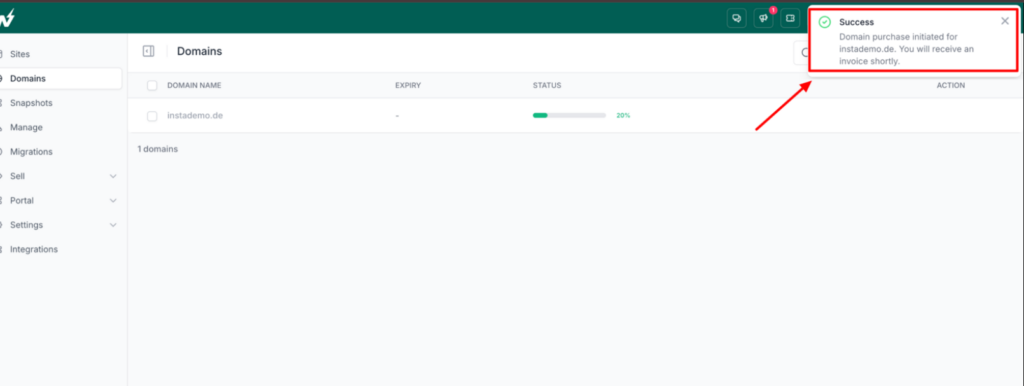
The domain appears in your list while the registry processes it, moving from a progress state to Pending Validation and finally to Active. How long that takes depends on the extension; most are done within minutes, some take a few hours. An invoice arrives by email, on the same billing account as your hosting.
| Status | What it means |
|---|---|
| Pending Validation | Submitted and waiting on the registry. Check your email if it sits here a while. |
| Active | Fully registered and ready to connect to a site. |
| Grace | Expired, but still renewable at the normal price. Act now. |
| Redemption | Past the grace period. Recovery is sometimes possible, usually at a much higher fee. |
Linking your domain to a WordPress site
This is the step that usually involves a DNS panel, a CNAME record, and a nervous wait. Because InstaWP manages the DNS for the domains it registers, it is instead a dropdown.
Open the domain from the Domains list, choose Sites in the left menu, and click Link Site.
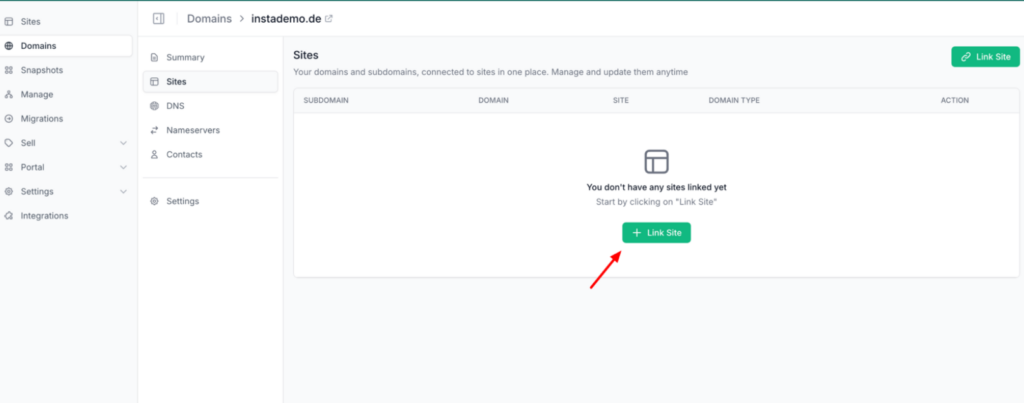
In the modal you set three things:
- Name — the subdomain you want to use, such as
www,blog, orapp. Your domain is appended automatically. - Domain Type — Primary makes this the site’s main address; Alias is an additional address that points at the primary.
- Site — pick any InstaWP site from the dropdown.
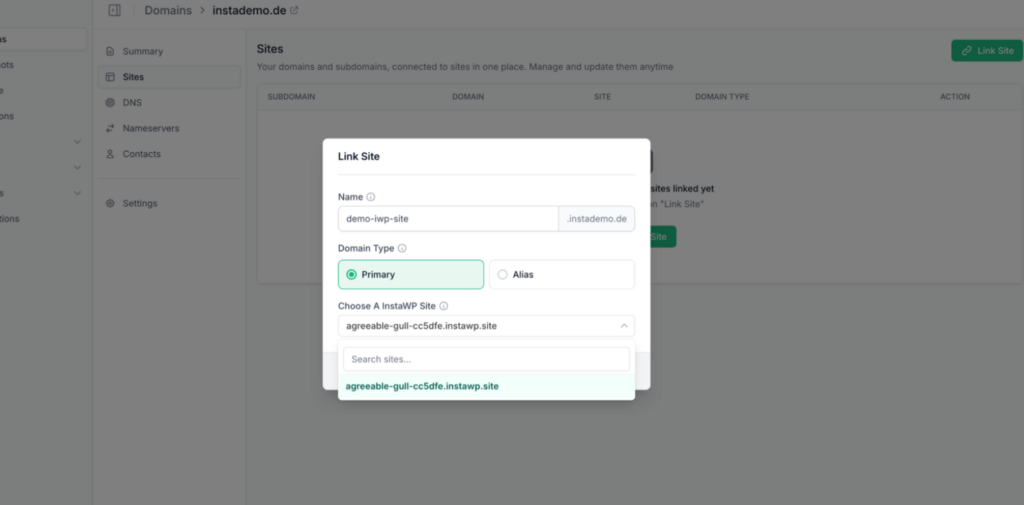
Hit Confirm and the CNAME record is written for you — the docs walk through the same steps in Link a domain or subdomain to a site. You can see it yourself under the domain’s DNS tab, and the mapping also appears on the site under Connectivity > Map Domain. SSL is provisioned automatically, so the site comes up on HTTPS without a certificate step.
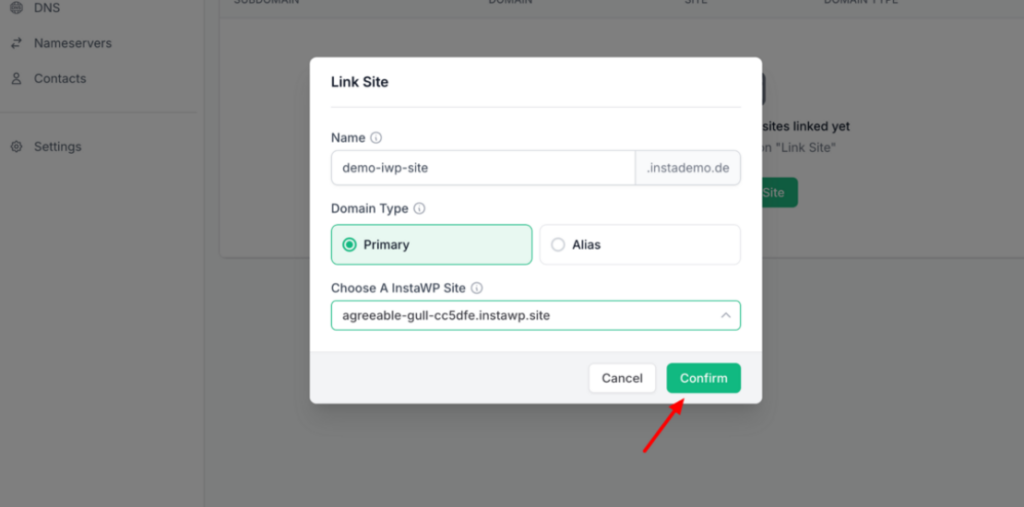
When you set a domain as Primary, it becomes the site’s main address and the InstaWP-generated address (your-site.instawp.site) keeps working as an alias. Changes take a few minutes to propagate; if the domain does not resolve on the first try, wait and reload before assuming something is broken.
Managing DNS records
Linking a site covers the common case, but a real domain does more than serve a website. It routes email, proves ownership to third-party services, and points subdomains at other systems. Every InstaWP-registered domain comes with a full DNS manager under its DNS tab, so you do not need an external DNS provider for any of that.
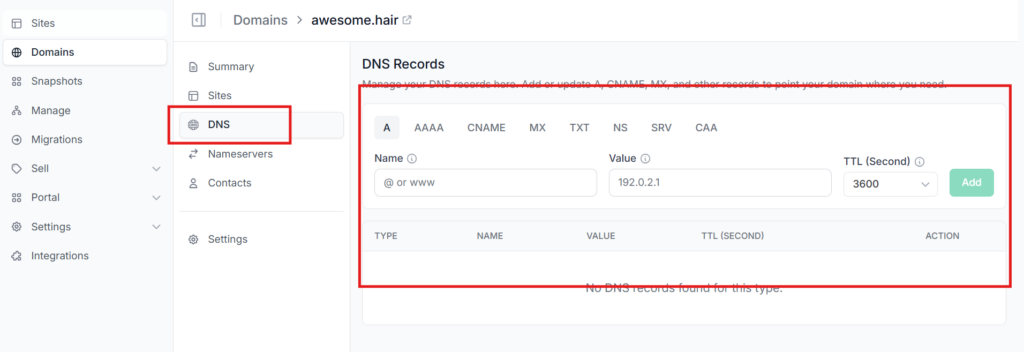
| Record | What you use it for |
|---|---|
| A / AAAA | Point the domain or a subdomain straight at an IPv4 or IPv6 address. |
| CNAME | Point a hostname at another hostname. This is what linking a site creates for you. |
| MX | Send your domain’s email to a mail provider such as Google Workspace or Microsoft 365. |
| TXT | Verify ownership with third-party services, and hold email security records (SPF, DKIM, DMARC). |
| NS | Delegate a single subdomain to a different DNS provider. |
| CAA | Restrict which certificate authorities may issue SSL certificates for the domain. |
| SRV | Locate a service such as SIP or XMPP, with priority, weight and port. |
| Redirect | Forward the domain or a subdomain to another URL over an accelerated HTTPS redirect. |
Two things worth knowing. DNS changes take time to spread, governed by each record’s TTL, so a change is rarely instant everywhere — which is why a domain can look broken with a DNS_PROBE_FINISHED_NXDOMAIN error for a few minutes after a change and then resolve on its own. And these records only apply while the domain uses InstaWP’s nameservers; if you switch to custom ones, DNS is managed at the new provider instead. Full detail on every record type is in Add and update DNS records.
Nameservers: keep ours or bring your own
Nameservers decide who is in charge of your DNS. Domains registered with InstaWP point at InstaWP’s nameservers by default, which is what makes the automatic DNS and one-click site linking possible. For most people that is the right answer and there is nothing to do.
If you have a reason to manage DNS elsewhere, for example a Cloudflare setup you already rely on, you can point the domain at custom nameservers from its Nameservers tab. Two are required and you can add up to four.
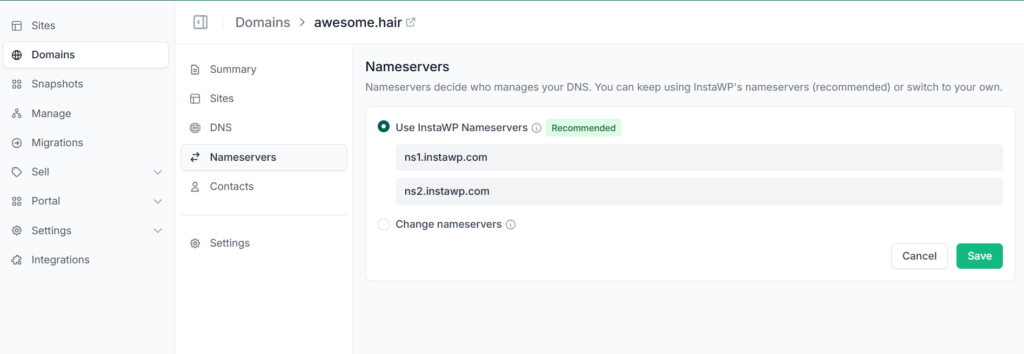
Before you switch: add every record you need (A, CNAME, MX, TXT) at the new provider first. The moment the nameservers change, the records held at InstaWP stop being used, and anything you forgot to recreate — your site, your email — goes dark until you fix it. Propagation can take up to 24 to 48 hours.
Switching nameservers moves only DNS management. The registration, the renewal and the billing stay with InstaWP, and you can move DNS back at any time. See Update nameservers for the exact steps and how to verify the change has propagated.
Renewals, expiry and how people lose domains
Domains are not lost dramatically. They are lost quietly, by someone who changed jobs, or changed email addresses, and never saw the renewal notice. The site goes down, the email stops, and by the time anyone notices, the name is in redemption and costs a great deal more to get back, if it can be got back at all. ICANN’s Expired Registration Recovery Policy sets out what happens at each stage, and it is not a process you want to be learning about in an emergency.
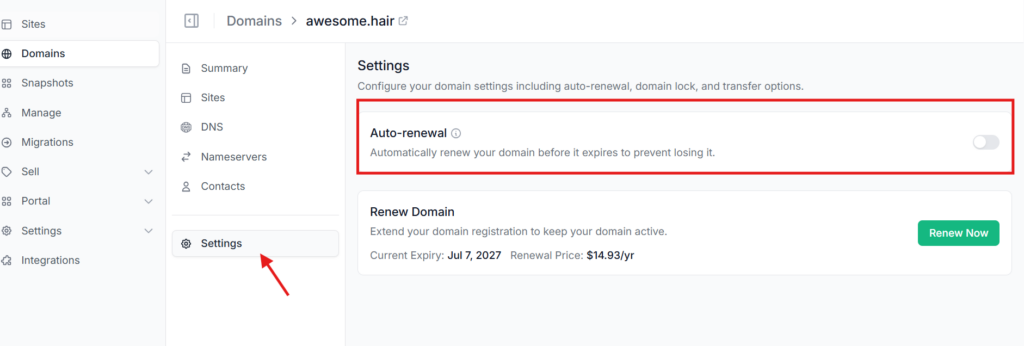
The fix is one toggle. Auto-renewal lives on the domain’s Settings page and, when it is on, InstaWP renews the domain before it expires. Leave it on.
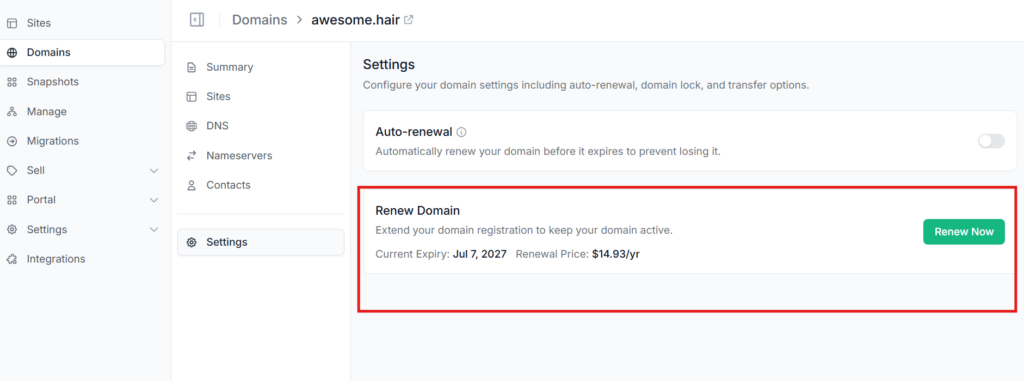
If you would rather handle it yourself, the same page has a Renew Now option where you can extend the registration by up to four years at once and see the renewal price and total before confirming.
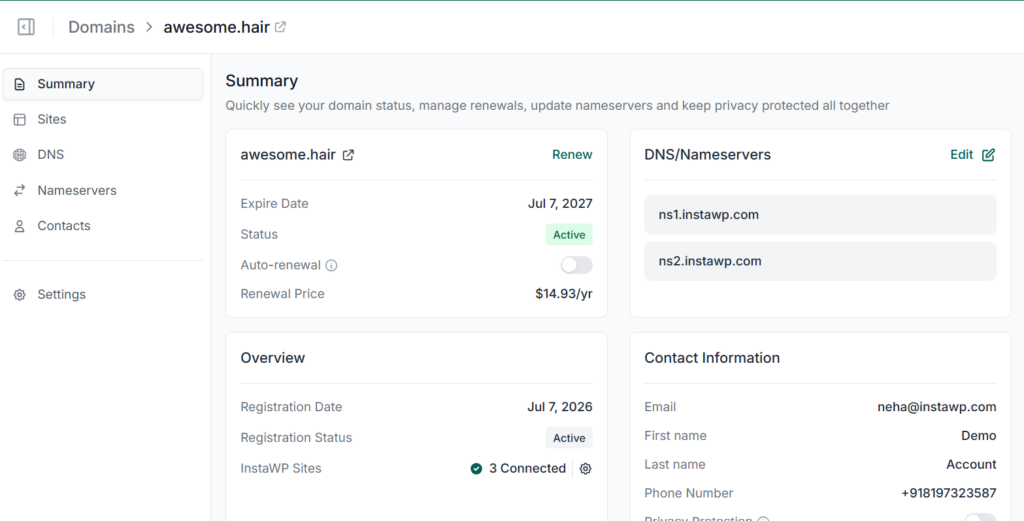
The domain’s Summary page is the place to check on all of this at a glance: expiry date, status, whether auto-renewal is on, the renewal price, the nameservers in use, how many sites are connected, and the WHOIS contact on record. See Enable or disable auto-renewal and View a domain’s summary in the docs.
WHOIS and privacy protection
Every domain has a public record of who registered it. Without privacy protection, that record exposes your name, email, phone number and address to anyone who runs a lookup, which in practice means to every SEO agency and web-design cold-caller with a scraper.
Privacy protection substitutes those details with privacy-protection values in public lookups, while the real contact stays on file with the registrar where the registry requires it. It is enabled by default on InstaWP domains and we recommend leaving it that way. You can review the contact and the privacy setting any time from the domain’s Contacts tab.
The awkward cases: apex domains, existing domains, subdomains
You already own the domain somewhere else
You do not have to register a new name to host with us. An existing domain can be mapped to an InstaWP site from your current registrar by adding the DNS records we give you, or by pointing the domain’s nameservers at InstaWP so the DNS is managed here alongside your sites. The custom domain mapping guide walks through it.
Your DNS provider will not put a CNAME on the root domain
Some DNS providers refuse a CNAME on the apex (example.com rather than www.example.com). If yours does and you would rather not move DNS, map the site to www and use your registrar’s domain forwarding to send the root there with a 301. It is a well-trodden workaround and we document it step by step. Domains registered with InstaWP do not hit this problem at all.
You want staging, demos or client previews on your own domain
Every subdomain of a domain you own is free to use, and each one can point at a different InstaWP site. That makes staging.yourdomain.com, demo.yourdomain.com or clientname.youragency.com a matter of linking another site, which is a far better look than sending a client a link on someone else’s domain. If you are deciding how to structure things, our guide on subdomains versus subdirectories covers the SEO side, and closing clients faster with a live demo link covers why it is worth doing on your own brand.
Why buying the domain where you host is simpler
The traditional setup has you in three places at once: a registrar that holds the name, a DNS provider that routes it, and a host that serves the site. Each has its own login, its own invoice, and its own way of describing the same records. When something breaks, the first hour goes on working out which of the three is at fault.

| Step | Domain bought on InstaWP | Registrar and host kept separate |
|---|---|---|
| Buying the name | In the dashboard you already use | A separate registrar account, upsold at checkout |
| Connecting it to a site | Pick the site from a dropdown; the CNAME is written for you | Copy records between two panels by hand |
| SSL | Issued and renewed automatically | A separate step, and a separate thing to forget |
| Subdomains for staging or demos | Link another site; nothing else to configure | A new record, a new certificate, a new wait |
| When something breaks | One place to look, one team to ask | Three vendors, each pointing at the other two |
| Billing | One account, one invoice | Separate renewals on separate cards |
For an agency running dozens of client sites, this compounds. Every client domain that lives in a different registrar account, on a card that expired two years ago, under a login only one person has, is a small future outage waiting for its moment. Keeping the domain next to the site it serves is the boring, correct answer — and it is one fewer moving part when you are maintaining sites for a lot of clients at once, reselling hosting, or choosing between hosting models for your agency.
From a name to a live site
Buying a domain and launching a WordPress site on it used to be two projects held together with a DNS panel. On InstaWP it is one: search a name, register it, pick the site it should point at, and you are live on HTTPS. The DNS manager, the nameserver control and the renewal settings are all there when you need them, and out of the way when you do not.
If you are starting something new, start it on its real address. And if you already have a domain somewhere else, you can bring the site over first and point the domain at it whenever you are ready — or, if the domain is staying put and only the name on the site is changing, read how to change a WordPress domain name without breaking the site. Domains sits on top of InstaWP’s managed WordPress hosting, so the name, the DNS and the server are all in one place.
Buy a domain. Launch a site on it.
Register the name, link the site, get SSL. All in one dashboard.
Search for a Domain See How Domains WorkKeep reading
- Introducing Domains on InstaWP — the full tour of what the feature does.
- Domains feature page — buy, build, connect, SSL.
- Domains documentation — every screen, step by step.
- Subdomain vs subdirectory — how to structure what sits on your domain.
- Is .co a good domain? — choosing an extension when the .com is gone.
Frequently asked questions
Can I buy a domain directly from InstaWP?
Yes. InstaWP is a domain registrar as well as a WordPress host. Go to Domains in your dashboard, search for a name, choose an available extension, enter your contact details, and register it. No third-party registrar account is needed.
How much does a domain cost on InstaWP?
It depends on the extension. A .com, a .io and a .store are all priced differently, and some extensions renew at a different rate than they register. The domain search shows the price next to each available extension before you buy, and the renewal price is shown on the domain’s own page afterward.
How do I connect my domain to a WordPress site?
If the domain is registered with InstaWP, open it, go to Sites, click Link Site, choose the subdomain and the site, and confirm. The DNS record is created automatically and SSL is issued for you. If the domain is registered elsewhere, you either add the DNS records we give you at your current provider or point the domain’s nameservers at InstaWP.
Do I need to configure DNS myself?
Not for the common case. Domains registered with InstaWP use InstaWP’s nameservers, so linking a domain or subdomain to a site writes the CNAME record for you. A full DNS manager is available if you need to add MX, TXT, A or other records yourself.
Is SSL included with the domain?
Yes. When you connect a domain to an InstaWP site, an SSL certificate is provisioned automatically and renewed automatically. There is no separate certificate step and no extra charge.
How long does it take for a new domain to work?
Registration usually completes within minutes, though some extensions take a few hours to move from Pending Validation to Active. Once the domain is Active and linked to a site, the DNS change typically resolves within a few minutes.
Can I use my own nameservers, like Cloudflare?
Yes. Point the domain at up to four custom nameservers from its Nameservers tab. Add all your records at the new provider before you switch, because the DNS records held at InstaWP stop being used the moment the nameservers change. Registration, renewal and billing stay with InstaWP either way.
What happens if my domain expires?
An expired domain takes your site and any email on it offline. It first enters a grace period where it can still be renewed normally, then redemption, where recovery is expensive and not guaranteed. Enabling auto-renewal avoids the whole scenario.
Is WHOIS privacy protection included?
Yes, and it is enabled by default. Your name, email, phone and address are replaced with privacy-protection values in public WHOIS lookups, which keeps your details away from scrapers and cold-callers.
Can I point a subdomain at a different site?
Yes. Each subdomain of your domain can be linked to a different InstaWP site, which is how you run staging.yourdomain.com, demo.yourdomain.com or a client preview on your own brand rather than a generic platform URL.