To connect a domain to a WordPress site, you point the domain’s DNS at the server your site runs on. There are three ways to do it: link the domain to the site inside your host if the host is also your registrar, change the domain’s nameservers to your host, or add A and CNAME records at your current DNS provider. All three end in the same place, and the right one depends on where your DNS lives and whether email is running on the domain. The steps differ slightly on WordPress.com and self-hosted WordPress, so this guide covers both and then walks through the self-hosted route in full.
Key takeaways
- ✓ Connecting a domain is a DNS change, not a WordPress setting. Nothing inside WordPress points your domain at your site. The record lives at whoever manages your DNS.
- ✓ Check which WordPress you are on first. WordPress.com points at Automattic’s nameservers. Self-hosted WordPress points at your own host, and that is the route most agencies and developers need.
- ✓ Fastest route: register the domain where you host. On InstaWP the DNS record is written for you and SSL is issued automatically, so linking a domain to a site takes one dropdown.
- ✓ Nameservers move everything, records move one thing. Changing nameservers hands all DNS to your host. Adding an A or CNAME record changes only that hostname and leaves email alone.
-
✓
Your root domain may refuse a CNAME. Many providers do not allow one on the apex. Map the site to
wwwand forward the root, or use a provider that supports it. - ✓ Expect minutes, allow up to 48 hours. Most DNS changes resolve quickly. Verify with a lookup rather than by refreshing your browser, which caches aggressively.
What connecting a domain actually does
A domain is a name. A site is a server. Connecting them means creating a DNS record that tells the internet which server answers for that name.

This trips people up because it feels like it should be a WordPress setting, and it is not. There is no field in the WordPress admin that makes your domain resolve. The change happens wherever your DNS is managed, which may be your registrar, your host, or a third party such as Cloudflare. WordPress only needs to know its own address afterwards, which your host usually handles for you.
You will see this job called several things, and they all mean the same DNS change: connect a domain, add a domain, link a domain, map a domain, or point a domain at your site. Note that none of them are the same as a domain name transfer, which moves the registration itself to a new registrar and leaves your hosting alone.
Two records do almost all the work:
The A record
Points a name at an IP address. Use it when your host gives you an IP, and on the root domain, which often cannot take a CNAME.
The CNAME record
Points a name at another name. Use it when your host gives you a hostname rather than an IP, which is normal on cloud platforms where the IP can change.
Nameservers sit one level above both. They decide which company gets to answer DNS questions about your domain at all. Change the nameservers and you hand over the whole zone. Change a record and you hand over one hostname. That distinction is the whole reason there is more than one method below.
WordPress.com or self-hosted WordPress? Check this first
Before you touch DNS, work out which WordPress you are on, because the destination is different and half the guides online do not say which one they are describing.
WordPress.com is a hosted service run by Automattic, where the software and the servers come as one product. Self-hosted WordPress is the open source software from WordPress.org installed on a host you choose. Self-hosted is what most businesses, agencies and developers run, and it is what InstaWP provides.
| WordPress.com | Self-hosted WordPress | |
|---|---|---|
| Where you add the domain | Upgrades then Domains, inside your WordPress.com dashboard | Your hosting dashboard, not the WordPress admin |
| What DNS points at | WordPress.com nameservers, or the A and CNAME records they give you | Your host’s nameservers, IP address or hostname |
| Plan requirement | A paid WordPress.com plan | Any plan on your host that allows custom domains |
| Who issues SSL | WordPress.com, automatically | Your host. On InstaWP this is automatic |
If you are on WordPress.com, their own documentation on connecting an existing domain is the accurate source, and their nameservers are ns1.wordpress.com, ns2.wordpress.com and ns3.wordpress.com. Everything from here on covers self-hosted WordPress, where you choose the host and therefore choose the method.
Before you start: four things to check
- Who is your registrar? The company you bought the name from and pay the renewal to. You will need to log in there.
- Who manages your DNS? Often the registrar, but not always. If you added the site to Cloudflare at some point, Cloudflare manages it, and changes made at the registrar will do nothing.
- Is email running on the domain? If you have Google Workspace or Microsoft 365 on it, the MX records matter. Changing nameservers without recreating them will break your email, which is the single most common way this goes wrong.
- Is the site ready? Connect the domain when the site is built, not before, so nobody lands on a half-finished page. If you are moving from another host, complete the WordPress migration first and connect the domain last.
Lower your TTL first. If you know a change is coming, drop the TTL on the records you are about to edit (to 300 seconds, say) a day beforehand. DNS resolvers will then forget the old answer quickly, and your switch takes minutes instead of hours.
Method 1: Link the domain inside your host (fastest way to add a domain to WordPress)
If your host is also your registrar, there is no DNS work to do at all. The platform already controls the name and the server, so it can write the record itself.
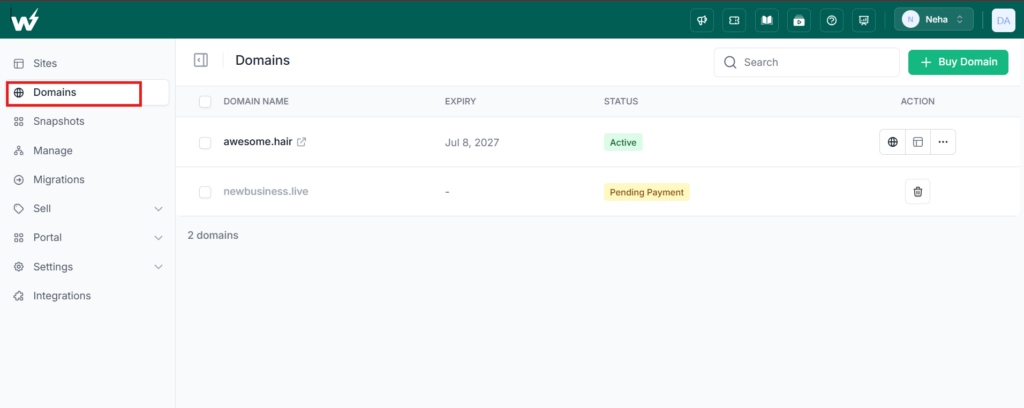
This is how Domains on InstaWP works. Domains you register in the dashboard use InstaWP’s nameservers by default, so connecting one to a site is a dropdown rather than a DNS task:
- Open Domains in the sidebar and click the domain you want to use.
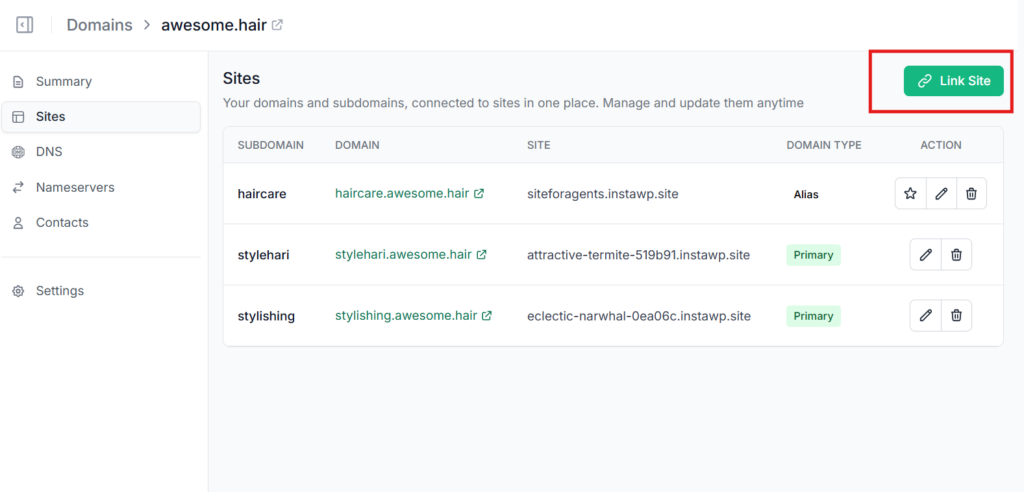
- Choose Sites from the domain’s menu, then click Link Site.
- Enter the subdomain you want (
www,blog, or leave it for the root), choose Primary or Alias, and pick the site from the list.
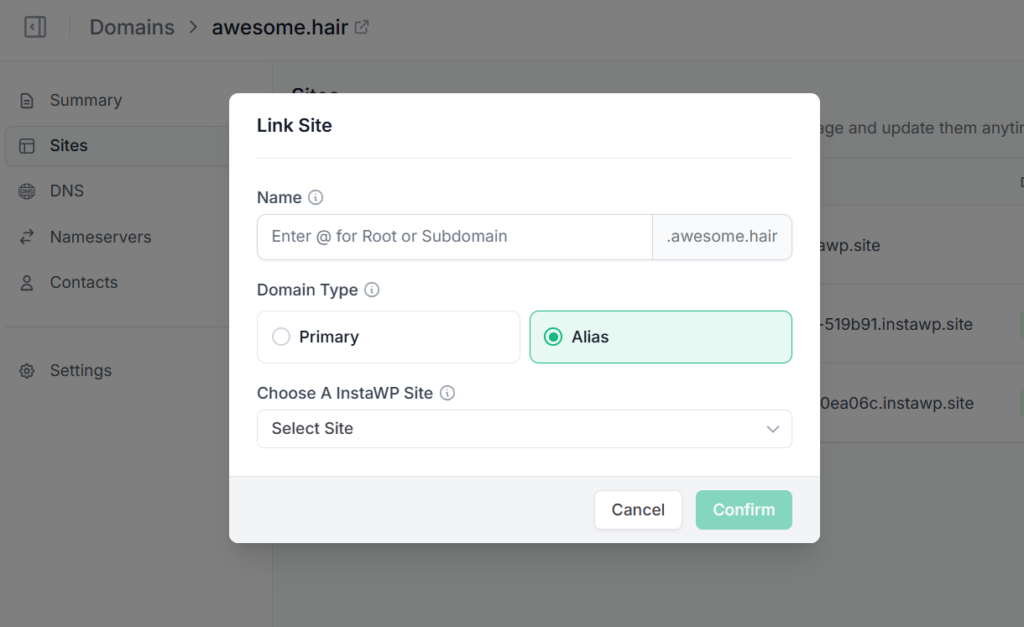
- Click Confirm. The CNAME record is created for you and SSL is issued automatically.
That is the whole job. No zone file, no copied values, no certificate step. The walkthrough below shows it end to end, and the docs cover it in Link a domain or subdomain to a site.
You do not have to buy a new name to get this. If you already own a domain elsewhere, Method 2 moves its DNS to InstaWP and gives you the same one-dropdown linking afterwards, while the registration stays where it is. If you have not bought the name yet, our guide to buying a domain for WordPress covers choosing and registering it.
Method 2: Point your nameservers at your host
This method hands DNS management for the whole domain to your host, while the registration stays with your current registrar. It is the right choice when you want one place to manage everything and you are willing to move your records across.
Step 1: Recreate your records at the new provider first
This step is not optional, and skipping it is what breaks people’s email. Before you touch the nameservers, add every record you currently rely on at the host that is about to take over: your MX records, any SPF, DKIM and DMARC TXT records, and any verification records for services such as Google Search Console.
The moment the nameservers change, the old provider’s records stop being consulted. Anything you did not recreate simply stops existing.
Step 2: Get your host’s nameservers
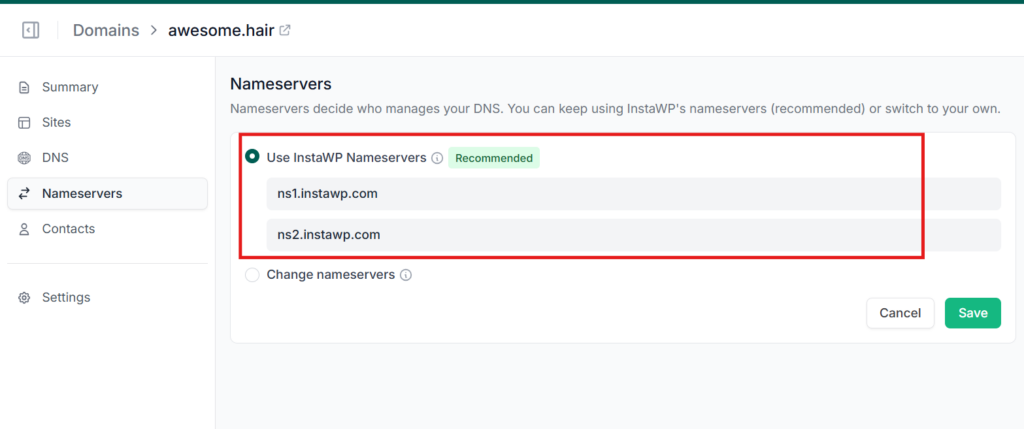
Your host will give you at least two, usually in the form ns1.example.com and ns2.example.com. On InstaWP these are ns1.instawp.com and ns2.instawp.com, shown on the domain’s Nameservers tab.
Step 3: Change them at your registrar
Log in to your registrar, find the domain, and look for a section called nameservers, DNS, or “custom DNS”. Replace the existing entries with your host’s. Most registrars accept up to four and require at least two. Save.
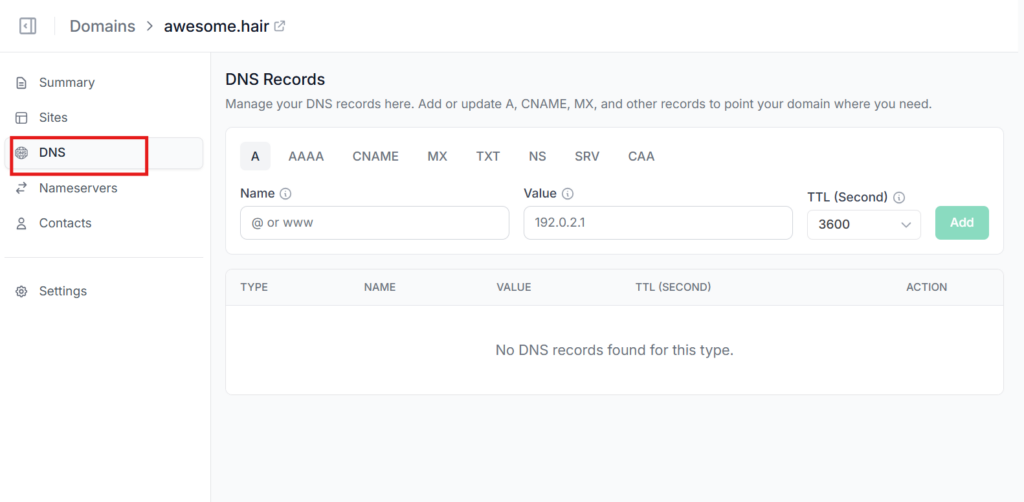
Step 4: Connect the site, then wait
Back at your host, add the domain to the site. On InstaWP, once the domain uses InstaWP nameservers, linking it to a site writes the record automatically, exactly as in Method 1. Nameserver changes typically take a few hours and can take up to 48. Our docs cover the change and how to check it in Update nameservers.
Method 3: Add A and CNAME records at your DNS provider
This is the surgical option. You leave your nameservers exactly where they are, leave email untouched, and change only the record that points at your website. Use it when your DNS is somewhere you want to keep it (Cloudflare is the usual reason), or when you are nervous about moving a live domain.
Your host will give you one of two things to point at:
| If your host gives you | Add this record | Name field |
|---|---|---|
| An IP address (for example 192.0.2.10) | A record | @ for the root, or www for the subdomain |
| A hostname (for example your-site.instawp.site) | CNAME record | www, or the subdomain you want to use |
How to point a domain to your WordPress site, step by step
The steps are the same at every provider, even though the menus differ:
- In your host, add the custom domain to the site so the platform expects traffic for that name. On InstaWP this is Connectivity > Map Domain on the site, covered in mapping a custom domain to an InstaWP site.
- Copy the value your host shows you, either an IP or a hostname.
- In your DNS provider, create the matching A or CNAME record from the table above.
- Delete any old A or AAAA record for the same name that points at your previous host. Leaving one behind sends a share of your visitors to the old server.
- Leave every other record alone, especially MX.
- Wait for the record to propagate, then confirm the domain in your host so SSL can be issued.
Using Cloudflare? Set the record to DNS only (grey cloud) while you connect the domain and while the certificate is issued. A proxied record (orange cloud) hides your origin, which can stop the certificate being validated. You can turn the proxy back on once the site is live and secure.
Some registrars can skip the manual record entirely. Domain Connect is an open standard that lets a host write the records for you after you approve a single prompt, and larger registrars including GoDaddy support it. If you see an offer to configure the domain automatically, it is doing exactly what Method 3 describes, with fewer chances to mistype.
Which method should you use?
| Your situation | Use this | Why |
|---|---|---|
| Starting fresh, no domain yet | Method 1 | Register where you host and there is no DNS step at all. |
| Own the domain, no email on it, want one dashboard | Method 2 | Nameserver change is a single edit and everything is managed in one place afterwards. |
| Email running on the domain | Method 3 | Touch only the website record and your MX records stay exactly as they are. |
| DNS is on Cloudflare and staying there | Method 3 | Keeps the Cloudflare setup you already rely on. |
| A live site you cannot risk breaking | Method 3 | Smallest blast radius, and it is trivially reversible by restoring one record. |
WordPress CNAME records explained
The CNAME is the record most people get stuck on, partly because WordPress itself has nothing to do with it. There is no CNAME setting in the WordPress admin and no plugin that creates one. A CNAME lives in your DNS zone, and WordPress simply receives the traffic that the record sends.
What a CNAME record does
CNAME stands for Canonical Name. It is an alias: it points one hostname at another hostname instead of at an IP address. When a visitor asks for www.example.com and finds a CNAME pointing at your-site.instawp.site, the resolver looks that second name up and uses whatever IP it currently resolves to.
That indirection is the point. Managed WordPress platforms sit behind load balancers and a CDN, so the IP serving your site can change without warning. A CNAME keeps working through those changes because it never hardcodes an address. That is why InstaWP hands you a hostname to point at rather than an IP.
CNAME or A record: which one your WordPress site needs
| CNAME record | A record | |
|---|---|---|
| Points at | Another hostname | An IPv4 address |
| Works on the root domain | Usually not, unless your provider flattens it | Yes |
| Survives a host IP change | Yes, automatically | No, you must edit it |
| Can share a name with other records | No | Yes |
| Best for | www and subdomains on cloud or managed hosting | Root domains, and hosts that give you a fixed IP |
The short rule: if your host gave you a hostname, use a CNAME. If it gave you an IP address, use an A record. Do not create both for the same name.
How to add a CNAME record for a WordPress site
Every DNS provider labels the fields slightly differently, which is why copied instructions so often fail. Here is what each field wants, whatever it is called:
| Field | Also labelled | What to enter |
|---|---|---|
| Type | Record type | CNAME |
| Name | Host, Hostname, Alias, Label | The subdomain only, such as www. Not the full domain. |
| Value | Target, Points to, Destination, Content | The hostname your host gave you, such as your-site.instawp.site |
| TTL | Time to live | Automatic is fine. Use 300 while you are testing. |
| Proxy | Cloudflare only | DNS only (grey cloud) until SSL is issued |
The mistake almost everyone makes once. Most providers append your domain to whatever you type in the Name field. Enter www and you get www.example.com, which is right. Enter www.example.com and you get www.example.com.example.com, which resolves for nobody. If your record is not working, check this first.
Not every CNAME points at your site
Plenty of WordPress owners are told to add a CNAME that has nothing to do with hosting. Email platforms, marketing tools and analytics services ask for one so they can prove you control the domain, or so their tracking links run on your name rather than theirs. Those records use their own subdomain, such as email or a random string, and they sit happily alongside the record pointing at your website. Add them exactly as given and change nothing else.
How to check your CNAME record is working
# show the CNAME itself, not the address it ends at
dig CNAME www.example.com +short

# follow the whole chain to the final IP
dig www.example.com +short
The first command should return the hostname your host gave you. If it returns nothing, the record is not live yet, or it was added at a provider that no longer runs your DNS. The second should end at an IP address, which is what visitors actually connect to.
When your root domain refuses a CNAME
Sooner or later you will hit this. Your host gives you a hostname to point at, so you need a CNAME, but you want it on the root domain (example.com, not www.example.com), and your DNS provider will not allow it. That is not a bug. The DNS specification does not permit a CNAME to coexist with other records at the apex, and the apex always has other records, so many providers refuse outright.
You have three ways out:
- Use a provider that fakes it. Cloudflare (CNAME flattening), and some others, resolve the target and serve an A record instead. It works and is invisible to visitors.
- Use an A record instead, if your host will give you a stable IP. Many cloud platforms will not, because the IP can change.
- Map the site to
wwwand forward the root to it with a 301 redirect from your registrar’s domain forwarding feature. Visitors typing the bare domain land on the right page, and search engines follow the permanent redirect. We document this in using domain forwarding as an alternative to CNAME.
Domains registered with InstaWP avoid the problem entirely, because InstaWP manages the zone and handles the apex for you.
How long does it take to connect a domain to WordPress?
Usually minutes, occasionally hours, rarely a full day or two. The variable is not your host. It is how long resolvers around the world were told to cache the previous answer, which is the TTL you set on the record.
| What you changed | Usually live in | Allow up to |
|---|---|---|
| A brand new A or CNAME record | A few minutes | 1 hour |
| An edit to a record that already existed | However long the old TTL was | 24 hours |
| A nameserver change | 2 to 6 hours | 48 hours |
| SSL issuance, once DNS resolves | A few minutes | 24 hours |
A new record is fast because nothing was cached for that name before, so there is no stale answer to expire. Editing an existing record is the slow case. This is why lowering the TTL a day in advance is worth the small effort on any site people are actively using.
One clarification on the phrase itself: DNS does not really propagate outward from a central point. Each resolver simply keeps its cached copy until it expires and then asks again, which is why two people in the same city can see different versions of your site for an hour.
SSL after you connect
A certificate can only be issued once the domain actually points at the server, because the certificate authority verifies control by checking exactly that. This is why the order matters: connect the DNS first, then let SSL happen.
On InstaWP the certificate is provisioned automatically for every domain you connect, and renewed automatically before it expires. If the certificate does not appear, it is almost always because DNS has not finished propagating or because a Cloudflare proxy is in the way. Wait, or set the record to DNS only, and it will resolve.
www or no www, and setting the primary domain
Pick one and redirect the other. It does not matter for SEO which you choose, but it matters that both do not serve the site independently, because that splits your signals across two addresses.
In practice: set one as the primary domain in your host, and make the other an alias that redirects to it. On InstaWP, the Primary and Alias choice in the Link Site dialog does exactly this, and your original your-site.instawp.site address keeps working as an alias too.
If you are deciding where a second site should live rather than which prefix to use, the trade-offs are different, and we cover them in subdomain vs subdirectory in WordPress.
If your site was already live on a different address, WordPress also needs to know its new home, and a straight DNS switch will not update the URLs stored inside your database. That is a separate job, covered in changing a WordPress domain name safely. Get it wrong and you get redirect loops and broken images.
How to verify it worked
Do not judge by loading the site in your browser. Browsers and operating systems cache DNS, so you may see the old server long after the change has taken effect, or a cached redirect that sends you somewhere confusing. Check the DNS itself.
# does the name resolve to the right place?
dig www.example.com +short

# which nameservers is the domain using?
dig NS example.com +short
If you would rather not use a terminal, a public lookup tool such as nslookup.io checks from multiple locations at once, which also tells you how far the change has spread. When most locations report the new value, you are done.
Once DNS is right, run through the rest:
- The domain loads your site over https with no certificate warning.
- The version you did not choose (www or bare) redirects to the one you did, rather than loading separately.
- Internal links, images and the login page all use the new address, not the old one.
- Email on the domain still arrives. Send yourself a test message.
Common mistakes and how to fix them
| What you see | Usual cause | Fix |
|---|---|---|
| Site does not load at all | DNS has not propagated, or the record was added at a provider that no longer manages the zone | Check which nameservers are live, then confirm the record exists at that provider. See fixing DNS_PROBE_FINISHED_NXDOMAIN. |
| Email stopped working | Nameservers changed without recreating the MX records | Add your MX (and SPF, DKIM, DMARC) records at the new DNS provider immediately. |
| Certificate warning in the browser | SSL has not been issued yet, or a proxy is blocking validation | Wait for DNS to settle, and set a Cloudflare record to DNS only while the certificate is issued. |
| Broken images, mixed content, redirect loops | The database still holds the old URL | Update the site URL properly rather than by DNS alone. |
| The old site keeps appearing | Browser or resolver cache, or a long TTL | Verify with dig instead of the browser, and wait out the TTL. |
| Some visitors reach the new site, others the old one | An old A or AAAA record for the same name was left in place beside the new one | Delete the leftover record. One name should have one answer, and IPv6 AAAA records are the ones people forget. |
| The provider rejects the CNAME, or it resolves to a doubled name | The full domain was typed into the Name field, which the provider then appended its own domain to | Enter only the subdomain, such as www. |
Connect the domain, then forget about it
Connecting a domain to WordPress is a small job that feels large, because it happens in an unfamiliar panel and the feedback loop is slow. Once you know that it is only ever a DNS record, and that nameservers move everything while a single record moves one thing, the three methods stop feeling like alternatives and start feeling like a choice you can make on purpose.
The least painful version is the one where the registrar and the host are the same system, because then there is nothing to copy and nothing to get wrong. That is what InstaWP’s domain mapping and registrar is for, on top of managed WordPress hosting that issues the certificate for you and keeps it renewed.
Put your site on its real address
Link a domain to any InstaWP site and the DNS record and the SSL certificate are handled for you.
Create a WordPress Site Buy a DomainKeep reading
Frequently asked questions
How do I connect a domain to a WordPress site?
Point the domain’s DNS at the server your site runs on. You can do this in three ways: link the domain to the site inside your host if the host is also your registrar, change the domain’s nameservers to your host, or add an A or CNAME record at your existing DNS provider. If your host gives you an IP address, use an A record. If it gives you a hostname, use a CNAME.
How do I add a domain to my WordPress site?
Adding a domain and connecting a domain are the same job. Add the domain to the site in your hosting dashboard first, so the platform expects traffic for that name, then create the DNS record your host asks for at whoever manages your DNS. On InstaWP you add it under Domains, click Link Site, and the record and the SSL certificate are created for you.
Do I connect the domain from inside WordPress?
No. There is no setting in the WordPress admin that makes a domain resolve to your site. Connecting a domain is a DNS change made wherever your DNS is managed, which may be your registrar, your host, or a provider such as Cloudflare. Your host then tells WordPress its new address.
What is a CNAME record in WordPress?
A CNAME is a DNS record that points one hostname at another hostname instead of at an IP address. WordPress does not create or read CNAME records, and there is no CNAME setting in the WordPress admin. You add the record at your DNS provider, and it is the usual way to connect www or a subdomain to managed WordPress hosting, because the platform’s IP address can change while the hostname stays the same.
How do I point or map a domain to my WordPress site?
Pointing, mapping, linking and connecting all describe the same DNS change. Add the custom domain to the site in your host, copy the IP address or hostname the host shows you, then create a matching A record or CNAME record at your DNS provider. Enter only the subdomain in the Name field, such as www, because most providers append your domain automatically.
Is connecting a domain the same as transferring it?
No. Connecting a domain points it at your website and leaves the registration where it is. Transferring a domain moves the registration to a different registrar and does not change where your site is hosted. You can connect a domain to WordPress without ever transferring it.
Should I change nameservers or add a DNS record?
Change nameservers if you want your host to manage all DNS for the domain and you are prepared to recreate your existing records, including MX. Add a single A or CNAME record instead if you have email on the domain, if your DNS lives on Cloudflare, or if you want the smallest possible change to a live site.
How long does it take for a domain to connect?
A brand new record is often live within minutes. Editing a record that already existed takes as long as its old TTL, up to about 24 hours. A nameserver change usually takes 2 to 6 hours and can take up to 48. Lowering the TTL a day in advance makes the switch propagate faster, because resolvers stop caching the old answer.
Will connecting a domain break my email?
Only if you change nameservers without recreating your MX records at the new DNS provider. Adding an A or CNAME record for the website does not affect email at all. If you are moving nameservers, add your MX, SPF, DKIM and DMARC records at the new provider before you switch.
Why will my DNS provider not let me add a CNAME on the root domain?
The DNS specification does not allow a CNAME to sit alongside other records, and the root domain always has other records, so many providers block it. Use a provider with CNAME flattening, use an A record if your host offers a stable IP, or map the site to www and forward the root domain to it with a 301 redirect.
Do I get an SSL certificate automatically?
On InstaWP, yes. A free SSL certificate is provisioned automatically once the domain is connected, and renewed automatically. The certificate can only be issued after DNS points at the server, so if it has not appeared, DNS is usually still propagating or a Cloudflare proxy is blocking validation.
Can I connect more than one domain to the same WordPress site?
Yes. Set one domain as the primary address and add the others as aliases, which redirect to it. This is how you keep an old domain working after a rebrand, or serve both the www and non-www versions without splitting your SEO signals.
Can I connect a subdomain instead of the whole domain?
Yes, and it is a common way to run staging sites, demos and client previews. Each subdomain can point at a different site, with its own DNS record and its own certificate, while the root domain carries on serving your main website.