To connect an AI agent to WordPress you need a WordPress MCP server, which tells the agent what your site can do and then runs those actions on its behalf. There are two ways to get one. InstaMCP is built into InstaWP and turns on with a single toggle, no plugin to install and no Application Password to manage. The official WordPress MCP Adapter is a plugin you install and wire up yourself, which is the right choice when you want to register custom abilities in PHP.
Either way, the relationship between WordPress and AI changes from “AI generates code for WordPress” to “AI operates WordPress directly.” No chatbot plugin. No copy-pasting content into ChatGPT. Your site describes its own capabilities, and the agent uses them through conversation.
This guide covers both methods in full. It starts with InstaMCP, because it is the fastest route to a working connection and the one that scales past a single site, then walks through the MCP Adapter end to end, including a custom ability you can copy.
We ran a hands-on workshop at WordCamp Asia 2026 in Mumbai where developers set this up on their own sites in under ten minutes. Much of what follows is that workshop written down, including the custom ability we built live and the security questions the room asked afterwards.
Key takeaways
- Two routes to a WordPress MCP server: InstaMCP, built into InstaWP and enabled with one toggle, or the official MCP Adapter plugin, which you install and configure per site.
- InstaMCP exposes 43 typed tools across content, taxonomies, blocks, meta, plugins, themes, media, diagnostics, skills and memory, with no plugin install, no JSON config files and no Application Passwords.
- InstaMCP connects every major AI client, including Claude Desktop, Claude Code, Claude.ai, ChatGPT, Cursor, Windsurf, Gemini CLI, GitHub Copilot and Zed.
- The Abilities API is in WordPress core from 6.9. The MCP Adapter is not core, it is a separate official plugin from GitHub.
- The adapter authenticates with a WordPress Application Password, which inherits the capabilities of the user who created it. InstaMCP uses a scoped token instead, with WordPress role scopes plus Safe Mode.
- An ability marked
public => trueis exposed to every connected agent. That is a deliberate decision, not a default to skip past. - Test on a throwaway site before you point an agent at a client site.
What Is a WordPress MCP Server?
A WordPress MCP server is a service that exposes a WordPress site over the Model Context Protocol, so an AI client can list the actions the site supports and call them directly. The agent does not guess at your database or write code for you to paste. It asks the site what it can do, gets a structured list of tools back, and calls the ones it needs.
The Model Context Protocol is an open standard for connecting AI applications to external systems. Your site does the work. The agent only decides what to ask for, and every action still runs through WordPress permissions.
An MCP server does not generate content on its own. It is plumbing. The intelligence sits in whichever client you connect, and the permissions sit in WordPress. For the wider background on the standard and where it came from, see our guide to WordPress MCP.
Two Ways to Connect AI Agents to WordPress
There are two practical routes, and the right one depends on whether you are extending WordPress or operating it.
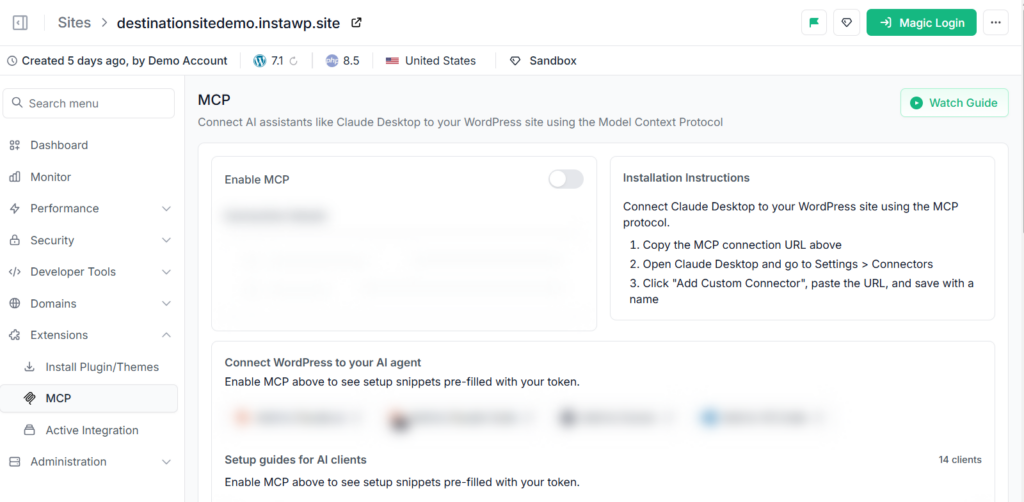
- InstaMCP, the WordPress MCP server built into InstaWP. One toggle turns it on, which installs the plugin, generates a scoped token and hands you a connection URL. No JSON config files and no Application Passwords. Choose this if you want a working connection in a couple of minutes, or if you manage more than one site.
- The WordPress MCP Adapter, the official plugin. You install it per site, create an Application Password, and write a config file for each AI client. Choose this if you are a plugin developer who wants to register custom abilities in PHP, or if you need the site to stay entirely on infrastructure you control.
They are not mutually exclusive. Plenty of developers run the adapter on a development site to build custom abilities, and use a managed WordPress MCP server on the client sites they maintain. If you want the full field, we compared the best WordPress MCP servers across setup, security and tooling.
Method 1: Connect with InstaMCP
InstaMCP is the MCP server built into InstaWP’s managed WordPress hosting. Turning it on installs the InstaMCP plugin on the site for you, generates a scoped token and gives you a connection URL. There is nothing to download, no server configuration, and no Application Password to create or rotate. It is available on a Sandbox plan and above.
The whole flow takes about two minutes. Here it is end to end. The full reference, including per-client setup, is in the InstaWP documentation on connecting AI assistants to your WordPress site using MCP, and there is a short walkthrough video if you would rather watch it first.
Step 1: Switch on the Enable MCP toggle
In the InstaWP dashboard, open Sites, choose your site, go to the MCP tab and switch Enable MCP on. InstaWP installs the InstaMCP plugin, generates the token and builds the connection URL in one step.
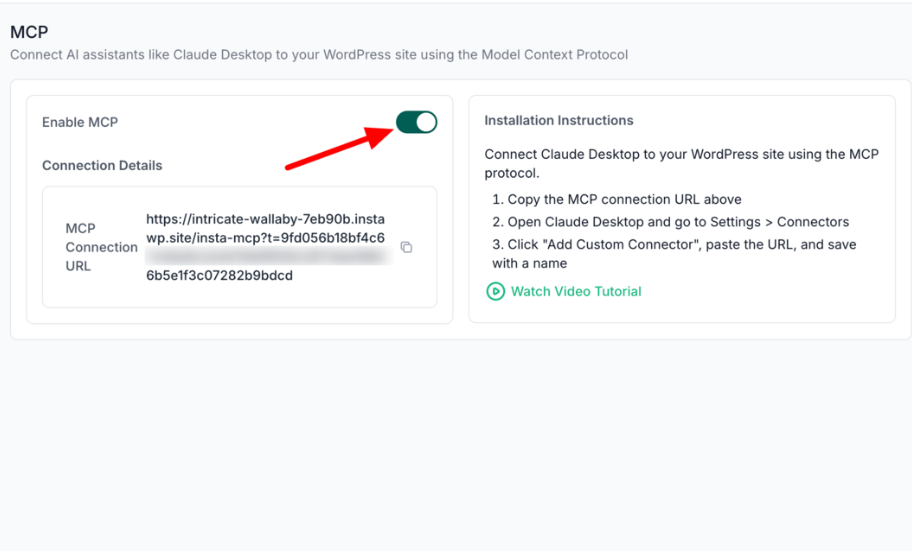
Expected result: the MCP tab shows the connection as enabled and displays a connection URL with an embedded token.
Step 2: Copy the connection URL
The connection URL carries its own token, so it is the only value your AI client needs. Treat it like a credential, because it is one. Anyone holding that URL can reach the site within the scopes the token allows.
The same MCP tab carries pre-filled setup snippets for each supported AI client, so in most cases you can copy the snippet for your client rather than assembling anything by hand.
Step 3: Add it to your AI client
The MCP tab lists 14 supported AI clients with a pre-filled setup snippet for each, among them Claude Desktop, Claude Code, Claude.ai, Cursor, Windsurf, Cline, Roo Code, GitHub Copilot, Zed, Gemini CLI, OpenAI Codex CLI, ChatGPT and Continue.dev. Paste the connection URL into whichever one you use as a remote MCP server. There are no JSON files to hand-edit and no application keys to manage.
In Claude Desktop, for example, that is Settings, then Connectors, then Add custom connector, and pasting the URL in.
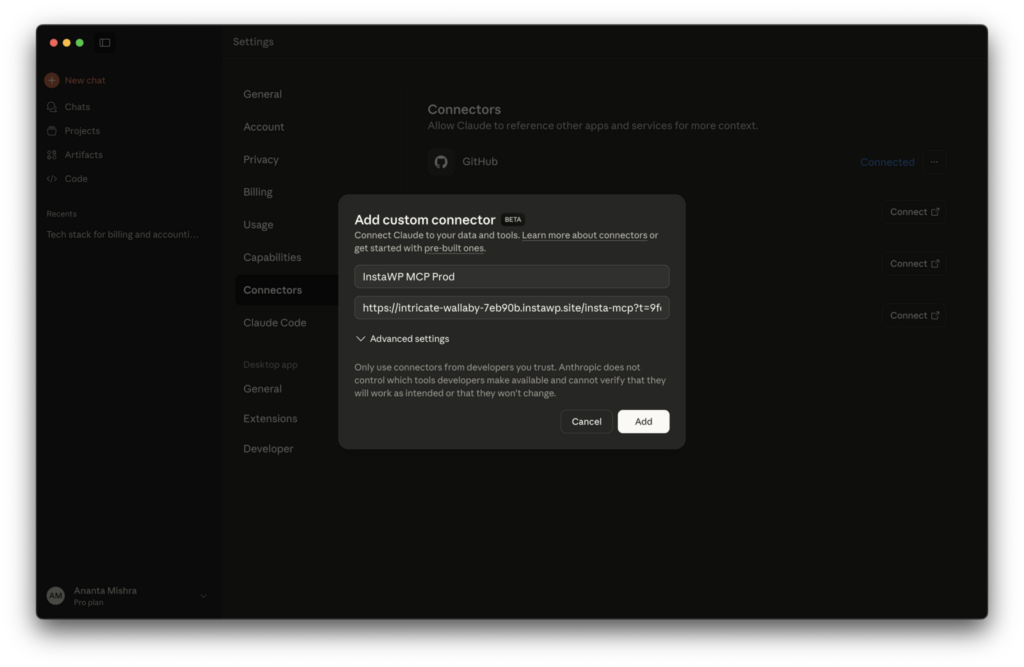
For client-specific walkthroughs, see how to connect Claude to WordPress or connect ChatGPT to WordPress.
Step 4: Ask the site what it can do
InstaMCP exposes 43 typed tools, so the agent gets a far larger surface than a bare adapter install returns. They break down like this:
Posts, pages, and custom post types
Categories, tags, and custom taxonomies
Gutenberg block discovery and validation
Custom fields, ACF, and SEO metadata
Plugin inventory and operations
Theme inventory and operations
Uploads and attachment metadata
Site logs for troubleshooting
Reusable playbooks stored on the site
Persistent context across sessions
execute_php db_query site_files Off by default
Ask your agent what the site can do and it lists them.
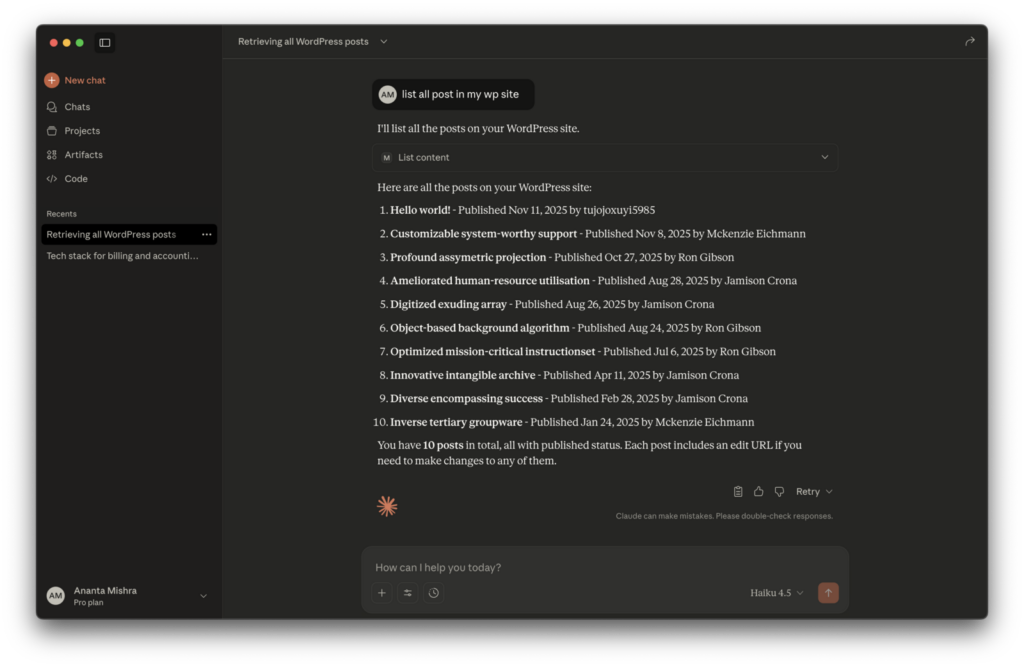
Then ask it to draft a post, tag it, upload an image or check the error log, and it uses the matching tool. For a worked example, see how to update WordPress posts using the MCP server.
InstaWP also offers an account-level MCP alongside the per-site one, which is what you want when an agent needs to manage multiple client sites rather than work inside a single install. The distinction matters more than it sounds, and we covered it in account MCP vs site MCP.
Method 2: Connect with the WordPress MCP Adapter
The WordPress MCP Adapter is an official WordPress plugin that exposes your site as an MCP server. It reads the abilities registered through the core Abilities API and republishes them as MCP tools. It is part of the AI Building Blocks for WordPress initiative and is distributed from GitHub rather than bundled in core.
This is the route to take when you want to register your own abilities in PHP, because that is something a managed server cannot do for you. The rest of this section is the full setup, from a plain WordPress site to a connected agent calling a custom ability you wrote. Our WordPress MCP Adapter review covers where it does and does not hold up in production.
What You’ll Need
Before we start, make sure you have:
- A WordPress 6.9 or later site, which is where the Abilities API lives. You can use any setup, though a disposable site keeps your production install out of the experiment. Learn how to create a site on InstaWP.
- An AI provider API key. OpenAI, Anthropic (Claude), or Google Gemini. You only need one, and only for the provider-backed features described below.
- An MCP-compatible AI tool. Cursor IDE, Claude Code CLI, or Gemini CLI (Antigravity).
- Node.js 18+ installed on your machine.
- An administrator account on the site, since you will create an Application Password and install a plugin.
WordPress Version Compatibility
The two pieces arrived separately, and mixing them up is the most common reason a setup stalls before it starts. The Abilities API shipped in WordPress core. The MCP Adapter did not.
WordPress 6.8 and earlier
WordPress 6.9
WordPress 7.0 and later
If you are on WordPress 7.0, everything below applies unchanged. If you are on 6.9, you have the Abilities API and you install the same adapter plugin.
Understanding the Three Layers
Three pieces work together to make a WordPress site AI-operable. Understanding what each one owns makes every step that follows make sense, and it tells you which piece to look at when something breaks.
Connectors UI
The Connectors screen is where you store your AI provider API key, at Settings → Connectors in wp-admin. It takes about ten seconds, with no config files and no terminal. WordPress supports OpenAI, Anthropic and Google here. If you do not see the screen on your install, it is being provided by the AI Experiments plugin rather than core, so install that first.
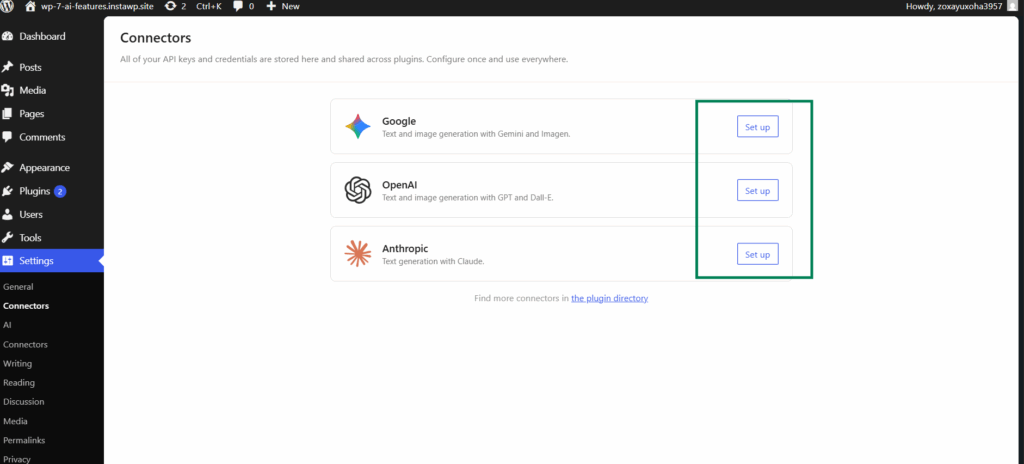
This key powers the provider-backed features such as alt text and excerpt generation. The MCP Adapter itself does not need it to answer a tool call, so you can skip this screen if all you want is agent access.
Abilities API
The Abilities API is the WordPress core interface, added in 6.9, that lets code describe what the site can do in a machine-readable way. Core registers abilities such as create_post, get_post, find_posts and update_post. Each one carries a description, an input schema and a callback.
Any plugin can register its own abilities through the Abilities API, which is where this gets interesting. We build a custom one later in this guide.
MCP Adapter
The MCP Adapter is the bridge between WordPress and AI tools. It takes the abilities registered through the Abilities API and exposes them over the Model Context Protocol, the standard that clients like Cursor and Claude Code use to talk to external services. Install the MCP Adapter plugin, and your WordPress site becomes an MCP server that any compatible AI tool can connect to.
Put simply: Connectors is the power plug, the Abilities API is the menu, and the MCP Adapter is the phone line the agent calls in on to place an order.
Set Up the MCP Adapter Step by Step
With the prerequisites in place, six steps take you from a plain WordPress site to one an AI agent can operate. Steps 1 to 4 are the connection. Step 5 confirms it works. Step 6 is where you extend it.
Step 1: Install the MCP Adapter Plugin
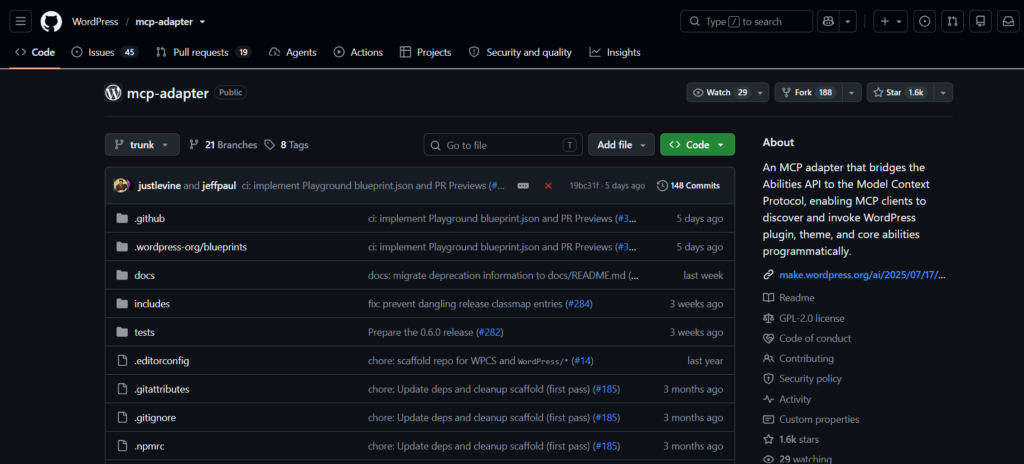
The MCP Adapter is an official WordPress plugin distributed through GitHub, not the plugin directory. Install it from a release ZIP.
Go to github.com/WordPress/mcp-adapter and download the latest release as a ZIP.
In your WordPress admin, go to Plugins → Add New → Upload Plugin.
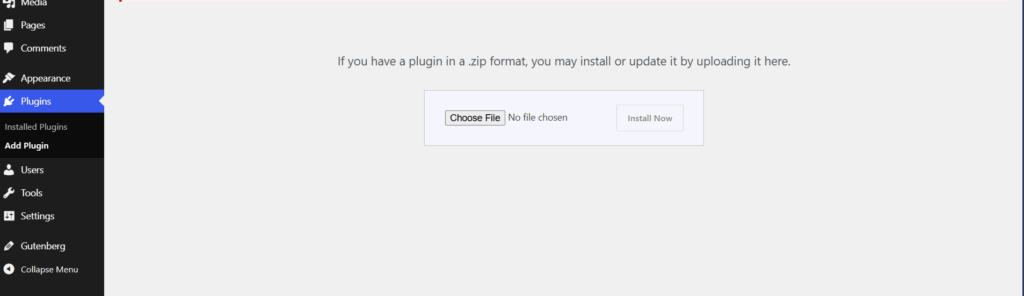
Upload the ZIP and activate. That is it. Your WordPress site is now an MCP server, reachable at /wp-json/mcp/mcp-adapter-default-server.
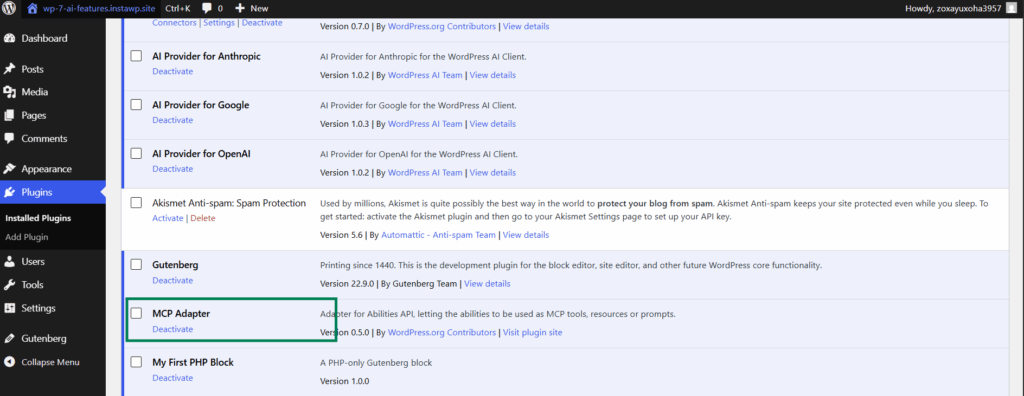
Expected result: the plugin appears as active, and visiting https://your-site.com/wp-json/mcp/mcp-adapter-default-server in a browser returns a JSON response rather than a 404.
Step 2: Configure Your AI Provider
Go to Settings → Connectors in your WordPress admin. You will see fields for OpenAI, Anthropic and Google. Enter the API key for whichever provider you are using.
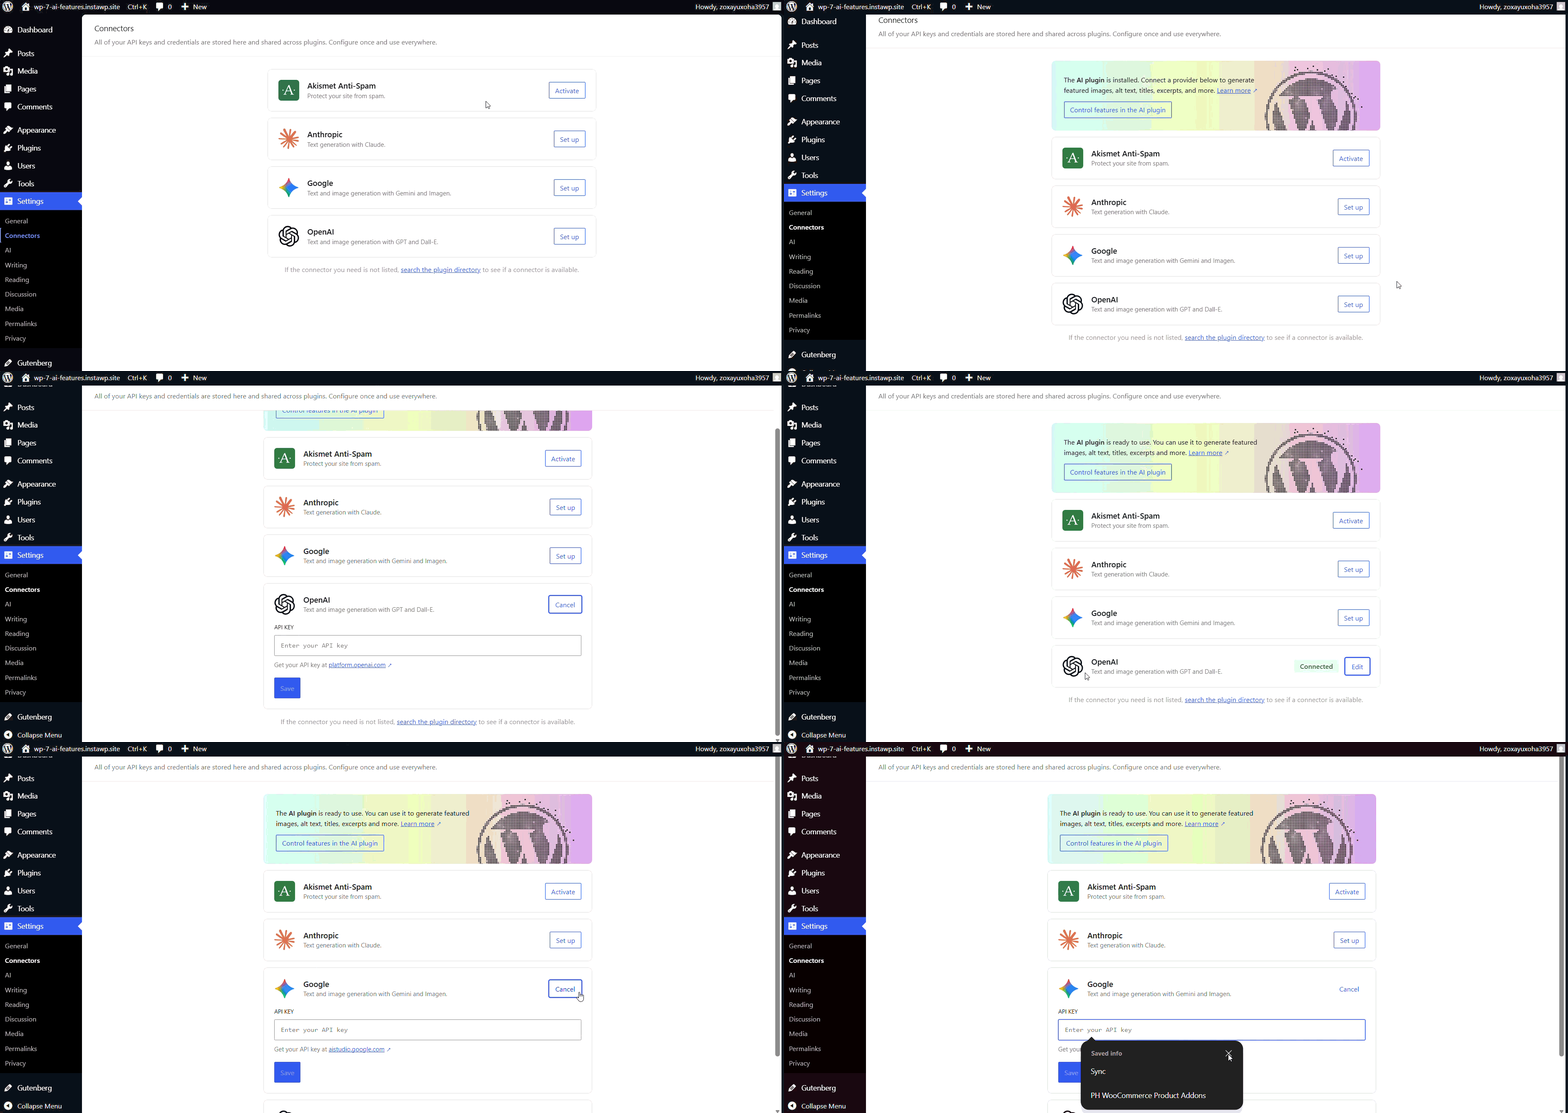
This step powers the AI features that run inside WordPress itself, such as alt text and excerpt generation. It also means the site has a provider available when an ability needs one.
Expected result: the key saves without an error. If you only want agent access and no in-WordPress generation, this step is optional.
Step 3: Create an Application Password
The MCP Adapter authenticates with WordPress Application Passwords, a core feature that issues a separate credential for programmatic access without exposing your login password.
Go to Users → Your Profile in wp-admin. Scroll down to Application Passwords. Enter a name like “MCP Connection” and click Add New Application Password.
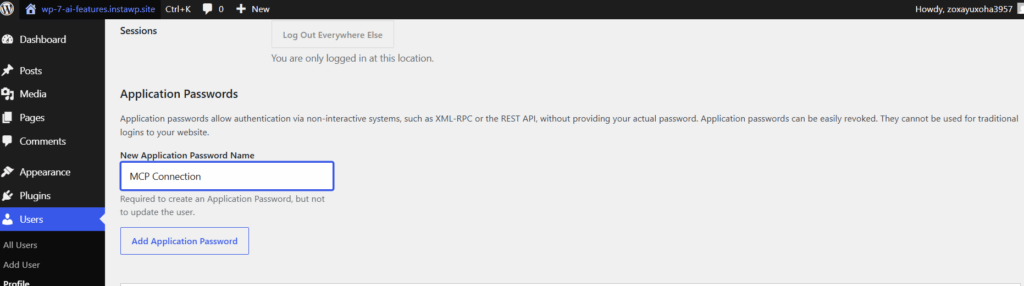
Copy the generated password now, because WordPress shows it once. Note your WordPress username and the site URL as well. You need all three in the next step.
Expected result: a 24-character password in six blocks of four. Treat it like a password, because it is one. It carries the capabilities of the user who created it, which is covered in the security section below.
Step 4: Connect Your AI Tool
This is where your AI agent meets your WordPress site. All three clients use the same remote MCP bridge and the same three environment values. Only the file location and the command differ.
Cursor IDE
Create a file called .cursor/mcp.json in your project root, or configure it globally in Cursor’s settings:
{
  "mcpServers": {
    "wordpress-mcp-server": {
      "command": "npx",
      "args": ["-y", "@automattic/mcp-wordpress-remote@latest"],
      "env": {
        "WP_API_URL": "https://your-site.com/wp-json/mcp/mcp-adapter-default-server",
        "WP_API_USERNAME": "your-username",
        "WP_API_PASSWORD": "xxxx xxxx xxxx xxxx xxxx xxxx"
      }
    }
  }
}
Replace your-site.com with your actual domain, your-username with your WordPress username, and the password with the Application Password you generated in Step 3.
Claude Code
Run this in your terminal, as a single command:
claude mcp add wordpress-mcp-server --command "npx" --args "-y @automattic/mcp-wordpress-remote@latest" --env WP_API_URL=https://your-site.com/wp-json/mcp/mcp-adapter-default-server --env WP_API_USERNAME=your-username --env WP_API_PASSWORD="xxxx xxxx xxxx xxxx xxxx xxxx"Confirm it registered with claude mcp list. The server should appear as wordpress-mcp-server.
Gemini CLI
Gemini CLI reads MCP servers from its settings file, at ~/.gemini/settings.json on macOS and Linux. Add the same server definition there:
{
  "mcpServers": {
    "wordpress-mcp-server": {
      "command": "npx",
      "args": ["-y", "@automattic/mcp-wordpress-remote@latest"],
      "env": {
        "WP_API_URL": "https://your-site.com/wp-json/mcp/mcp-adapter-default-server",
        "WP_API_USERNAME": "your-username",
        "WP_API_PASSWORD": "xxxx xxxx xxxx xxxx xxxx xxxx"
      }
    }
  }
}
Restart the CLI after editing the file, then run /mcp to list the connected servers.
Expected result: whichever client you chose lists wordpress-mcp-server as connected. If it shows as failed, jump to the troubleshooting section below.
Step 5: Ask Your Site What It Can Do
Open your AI tool and type this:
“What abilities does this WordPress site have?”
The agent connects to your site over MCP, discovers every registered ability, and returns a structured list. You will see something like:
create_post: create a new post or pageget_post: retrieve a post by IDfind_posts: search for posts by criteriaupdate_post: modify an existing postgenerate_alt_text: generate alt text for imagesgenerate_excerpt: generate an excerpt from content
This is the moment it clicks. The agent did not just get access to your site. It learned what your site can do, and it can now use any of it.
Try it:
“Create a blog post titled ‘Hello from AI’ with a paragraph about how WordPress and AI work together. Make it a draft.”
Switch to your WordPress admin. The post is sitting there as a draft. Real Gutenberg blocks, fully editable. Your client could update it tomorrow without knowing an agent wrote it.
Step 6: Build Your Own Custom Ability
This is where it gets useful for plugin developers. Any plugin can register its own abilities, and connected agents discover and call them automatically.
Here is a minimal plugin that registers a create_draft_post ability:
<?php
/*
Plugin Name: Draft Post Ability
Description: Registers a custom AI ability to create draft posts
Version: 1.0
*/

add_action('wp_register_abilities', function() {
    wp_register_ability('create_draft_post', [
        'description' => 'Creates a new draft blog post with a title and content.',
        'input_schema' => [
            'type' => 'object',
            'properties' => [
                'title' => [
                    'type' => 'string',
                    'description' => 'The title of the post',
                ],
                'content' => [
                    'type' => 'string',
                    'description' => 'The body content of the post',
                ],
            ],
            'required' => ['title', 'content'],
        ],
        'execute_callback' => function($input) {
            $post_id = wp_insert_post([
                'post_title'   => sanitize_text_field($input['title']),
                'post_content' => wp_kses_post($input['content']),
                'post_status'  => 'draft',
            ]);

            if (is_wp_error($post_id)) {
                return ['error' => $post_id->get_error_message()];
            }

            return [
                'post_id'  => $post_id,
                'edit_url' => admin_url("post.php?post={$post_id}&action=edit"),
                'message'  => 'Draft post created successfully.',
            ];
        },
        'mcp' => [
            'public' => true,
            'type'   => 'tool',
        ],
    ]);
});
Save this as a plugin, activate it, and reconnect your AI tool. If you would rather not upload a ZIP by hand each time you iterate, the InstaWP CLI and the WordPress API and webhooks both push files to a site from your own toolchain. Now ask:
“What abilities does this site have?”
Your custom create_draft_post ability shows up in the list. The agent discovered it on its own. Now ask it to use it:
“Create a draft post about WordPress security best practices.”
The agent calls your custom ability, the post gets created, and it returns the post ID and edit URL. Your plugin is now AI-controllable, and you did not write a single line of AI-specific code.
Note the 'public' => true line in the mcp array. That is what exposes the ability to connected agents. Leave it out and the ability stays internal to WordPress. The next section explains why that single line deserves a moment of thought.
Is MCP for WordPress Safe and Secure?
MCP for WordPress is as safe as the credential you connect it with. The risk is not the protocol. It is handing an agent an administrator account when a contributor account would have done. The two methods handle that differently, so the answer depends on which one you are running.
How InstaMCP Scopes Access
InstaMCP puts two gates in front of an agent. The first is the token itself, which carries explicit scopes (mcp:read, mcp:write, mcp:delete, mcp:admin) and sits on top of the site’s normal WordPress role permissions. An agent cannot do something the underlying role cannot do, and it cannot do something the token was not scoped for.
The second gate is Safe Mode over the three capability tools. execute_php, db_query and site_files are the ones that can genuinely break a site, and they are off by default. They are visible but inert until an administrator turns them on deliberately. That separation is the part agencies ask about most, because it means connecting an agent to a client site does not implicitly hand it shell-adjacent access.
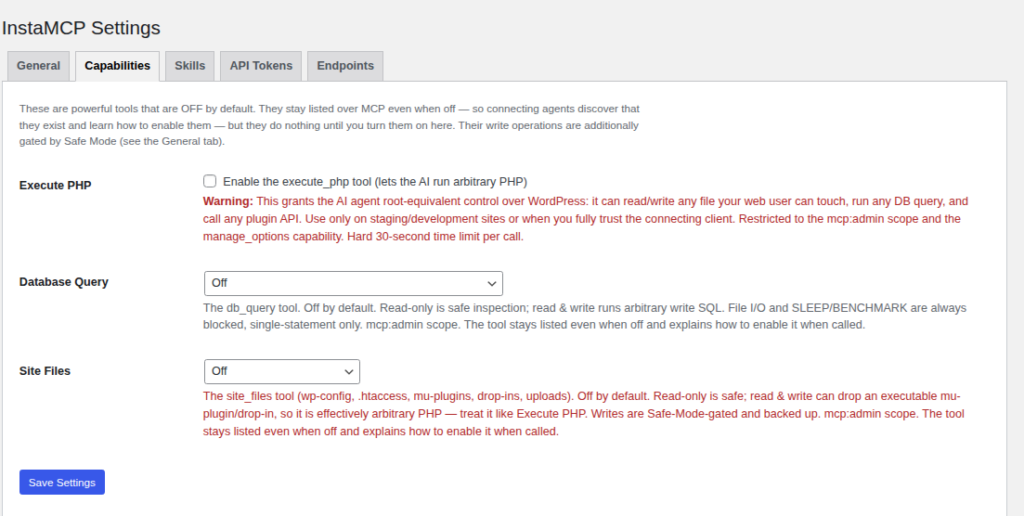
db_query has its own three-way setting, Off, Read-only or Read-and-write, so an agent can inspect the database without being able to change it. The MCP documentation explains what each capability tool does before you switch one on.
Revoking is a single action too. Turn the MCP toggle off and the connection URL stops working, with no per-client cleanup to chase.
How the MCP Adapter Scopes Access
The MCP Adapter adds no authentication of its own. It reuses WordPress Application Passwords, so an agent can do exactly what the user who created that password can do, and nothing more. There is no scope layer above the role, which is why the choice of user matters so much here.
What an Application Password Actually Grants
An Application Password inherits the full capability set of the user who generated it. If you generate one on your own administrator account, the connected agent can install plugins, edit users and change settings, because you can. WordPress requires HTTPS for Application Passwords, and the credential is sent on each request, so the transport is encrypted but the scope is not narrowed.
Two-factor authentication does not apply to Application Passwords. They are designed to bypass the interactive login, which is the point and also the reason the underlying role matters so much.
The practical fix takes two minutes: create a dedicated WordPress user with the lowest role that can do the job, generate the Application Password on that account, and connect your agent as that user. An agent that only needs to draft posts does not need to be able to deactivate your security plugin.
Public Abilities Are a Deliberate Decision
Setting 'public' => true in an ability’s mcp array is what makes it visible to connected agents. It reads like boilerplate in a code sample and it is not. Every custom ability you mark public becomes a tool an agent can call, with whatever side effects your callback performs.
Before you ship a plugin that registers abilities, read your own callbacks as though an agent will call them with unexpected input. Sanitize on the way in, as the sample above does with sanitize_text_field and wp_kses_post. Validate against your declared input schema rather than trusting it. And return only what the agent needs, because whatever you return leaves your site and lands in the client’s context.
Content Your Agent Reads Can Influence It
An agent that reads posts, comments or form submissions is reading text that other people wrote. Text can carry instructions. If an agent has both a read ability and a write ability, a comment on your own site can in principle steer what it does next. This is prompt injection, and it is a live concern for any system that mixes untrusted content with tool access.
The mitigation is boring and effective: keep the connected user’s capabilities narrow, keep destructive abilities out of the public set, and review what the agent did rather than assuming it did what you asked. Drafts rather than published posts, for the same reason.
Security Checklist Before You Connect a Client Site
- Test the whole flow on a disposable site first, not on the client’s production install. A WordPress staging site or a throwaway sandbox is the right place to break things.
- Create a dedicated WordPress user for the agent, with the lowest role that works.
- Generate the Application Password on that user, never on your own admin account.
- Name each Application Password after the machine or client it serves, so revocation is unambiguous later.
- Confirm the site is HTTPS-only before you connect anything.
- Audit every custom ability for
'public' => trueand remove it where the ability does not need to be agent-callable. - Revoke the Application Password when a laptop is lost, a contractor leaves, or an engagement ends. Revoking one does not affect the user’s login or any other password.
- Keep a backup you can restore from, because an agent with write access is still write access.
InstaMCP vs the WordPress MCP Adapter
Both put a WordPress site on MCP. They trade differently once you go past a single site, and the difference is mostly about who does the setup and who keeps it working.
| InstaMCP | WordPress MCP Adapter | |
|---|---|---|
| Setup | One toggle in the InstaWP dashboard, on any site you run on our managed WordPress hosting, with pricing per site rather than per seat | Download a release ZIP and install it per site |
| What you install | Nothing, InstaWP installs the plugin for you | A plugin, on every site |
| Authentication | Scoped token in a connection URL, generated for you | A WordPress Application Password you create and rotate |
| Client configuration | Paste one connection URL, no JSON files | A JSON config file per client, per site |
| Tools available | 43 typed tools across content, taxonomies, blocks, meta, plugins, themes, media, diagnostics, skills and memory | Whatever abilities are registered on the site |
| AI clients supported | 14, with a pre-filled setup snippet for each, including Claude, ChatGPT, Cursor, Windsurf, Gemini CLI, Copilot and Zed | Any MCP-compatible client you configure by hand |
| Custom abilities | Not the point of it, use the adapter for that | Yes, register your own in PHP |
| Permission model | Token scopes plus WordPress role scopes and Safe Mode, with execute_php, db_query and site_files off by default | Whatever the Application Password user can do |
| Updating | Handled for you | You update the plugin on every site |
| Across many sites | Enable per site from one dashboard, plus an account-level MCP for fleet-wide work | Repeat the whole setup per site |
| Best for | Anyone who wants agent access working today, and agencies running more than a handful of sites | Plugin developers extending WordPress with custom abilities |
InstaMCP removes the setup. The adapter gives you a place to write custom abilities.
If you are building a plugin and want it to be AI-callable, the adapter is the right answer, because custom abilities are the whole point of it. If you manage thirty client sites and want agent access on all of them, InstaMCP does that without thirty plugin installs, thirty Application Passwords and thirty JSON files to keep in sync. Most people end up running both: the adapter on a development site where they write abilities, and a managed WordPress MCP server on the sites they actually maintain.
Agent access also sits alongside the rest of the workflow rather than replacing it. An agent can draft and edit content, while WordPress staging gives you somewhere safe to test what it produced, WordPress migrations move the result onto production, snapshots and templates let you spin up an identical site to try again, and site management keeps the whole portfolio patched once the agent has stopped talking.
For a wider view of the options, see our comparison of the best WordPress MCP servers, the head-to-head on InstaWP MCP vs WordPress MCP, and what changes when you use MCP for WordPress in production.
Troubleshooting Common MCP Adapter Problems
Almost every failed setup lands in one of six places. Work down the list in order, because a problem lower down is often the earlier one in disguise.
The MCP endpoint returns 404
Visit https://your-site.com/wp-json/mcp/mcp-adapter-default-server in a browser. A 404 means the route is not registered. Confirm the plugin is active, then go to Settings → Permalinks and click Save to flush rewrite rules. If /wp-json/ itself 404s, the REST API is disabled on the site, often by a security plugin, and that has to be reversed first.
Authentication fails with 401
Check three things in this order. The username must be the WordPress username, not the email address. The Application Password must be pasted with its spaces intact, exactly as WordPress displayed it. And the site must be served over HTTPS, because WordPress refuses Application Password authentication over plain HTTP.
The server shows as failed in the client
This is usually the local Node environment rather than WordPress. Confirm node --version reports 18 or higher, then run the bridge by hand to see the real error rather than the client’s summary of it. Clearing the npx cache resolves a stale package version.
The abilities list comes back empty
An empty list with a successful connection almost always means the site is below WordPress 6.9, so the Abilities API is not there for the adapter to read. Check Dashboard → Updates for the actual version. It can also mean the adapter activated but no abilities were registered, which happens if core abilities are gated behind a plugin you have not installed.
A custom ability does not appear
Three causes, in order of likelihood. The registration is not hooked to wp_register_abilities. The mcp array is missing 'public' => true. Or the client is holding a cached tool list, which a reconnect clears. Agents fetch the tool list when they connect, not continuously.
Requests time out
Some hosts and firewalls block or throttle authenticated REST requests from outside the browser. Test the same endpoint with curl from your machine. If curl succeeds and the agent does not, the difference is in the client config. If curl also fails, the block is at the host or the firewall.
The Bigger Picture: Why This Matters
Think about what happens when widely used plugins adopt this pattern.
- WooCommerce registers
create_product,update_inventoryandget_orders, and an agent can manage a store through conversation. - A forms plugin registers
create_formandget_submissions, and an agent builds a form from a text description. - An SEO plugin registers
analyze_seoandupdate_meta_description, and an agent audits a whole site in one prompt.
Every plugin that registers abilities becomes AI-native without writing AI code. That is the part of this worth paying attention to. The Abilities API is the unlock, and the MCP Adapter is what carries it to the tools people already use.
Frequently Asked Questions
How do I connect an AI agent to WordPress without installing a plugin?
Use InstaMCP, the MCP server built into InstaWP. Switch on the Enable MCP toggle for the site and InstaWP installs the plugin for you, generates a scoped token and gives you a connection URL to paste into your AI client. There is no ZIP to download, no server configuration and no Application Password to create.
How many tools does InstaMCP expose?
43 typed tools, covering content, taxonomies, blocks, meta, plugins, themes, media, diagnostics, skills and memory. Three of them (execute_php, db_query and site_files) are capability tools that stay off until an administrator enables them.
Which AI clients work with InstaMCP?
The InstaWP MCP tab lists 14, with a pre-filled setup snippet for each. They include Claude Desktop, Claude Code, Claude.ai, Cursor, Windsurf, Cline, Roo Code, GitHub Copilot, Zed, Gemini CLI, OpenAI Codex CLI, ChatGPT and Continue.dev.
Should I use InstaMCP or the WordPress MCP Adapter?
Use InstaMCP if you want a working connection quickly, or if you manage more than one site, because there is no per-site plugin install, Application Password or JSON config to maintain. Use the MCP Adapter if you are a plugin developer registering custom abilities in PHP, which is the one thing a managed server cannot do for you.
What is MCP in WordPress?
MCP in WordPress means exposing a WordPress site over the Model Context Protocol, an open standard for connecting AI applications to external systems. A WordPress site running an MCP server can tell a connected AI agent which actions it supports, and the agent can then call those actions directly instead of generating code for a human to run.
How do I enable MCP on WordPress?
Install the official MCP Adapter plugin from its GitHub release on a WordPress 6.9 or later site, create an Application Password under Users and Your Profile, then add the site URL, your username and that password to your AI client’s MCP configuration. The site is then reachable at /wp-json/mcp/mcp-adapter-default-server.
Is the MCP Adapter part of WordPress core?
No. The MCP Adapter is an official package in the AI Building Blocks for WordPress initiative, installed as a plugin from GitHub. The Abilities API that it reads from is in core, from WordPress 6.9 onward.
Which WordPress version do I need for the Abilities API?
WordPress 6.9 or later. The Abilities API was introduced in 6.9 and is present in every version after it. On 6.8 and earlier the adapter has nothing to expose, which is why a connected agent returns an empty ability list.
Is MCP WordPress integration safe and secure?
It is as safe as the WordPress account you connect. The MCP Adapter uses Application Passwords, which inherit the capabilities of the user who created them and require HTTPS. Connecting an agent through a dedicated low-privilege user rather than your administrator account is the single change that matters most.
Do I need an AI provider API key to use the MCP Adapter?
Not for agent access. The API key you enter on the Connectors screen powers AI features that run inside WordPress, such as alt text and excerpt generation. The MCP Adapter answers tool calls from your connected client without needing a provider key of its own.
What is the difference between the Abilities API and the MCP Adapter?
The Abilities API is how WordPress describes what it can do, in a machine-readable form, to anything running on the site. The MCP Adapter is what publishes those descriptions outside the site, over the Model Context Protocol, so an external AI client can discover and call them.
Can I connect more than one AI client to the same site?
Yes. Cursor, Claude Code and Gemini CLI can all point at the same endpoint at once. Generate a separate Application Password for each client and name it accordingly, so you can revoke one without disconnecting the others.
What’s Next
MCP is one of four ways to use AI with WordPress. You can also use AI with the REST API for remote site management, WP-CLI for deep operations, or a no-code automation tool. We covered all four approaches in our WordCamp Asia workshop.
If you want to experiment with this right now:
- WordPress MCP Adapter: the official plugin
- The MCP Adapter announcement: the background on why it exists and how it fits the AI Building Blocks work
- mcp-wp: our open-source MCP server for managing multiple WordPress sites via REST API
- AI Experiments Plugin: the canonical plugin showing the Abilities API in action, and the source of the Connectors screen on some installs
- Agent Skills: portable instruction sets that teach AI assistants WordPress best practices
And if you would rather skip the setup entirely, the fastest route is still a managed WordPress MCP server: one toggle, 43 tools, a setup snippet for every major AI client, no config files, on our managed WordPress hosting. Related reading: WordPress MCP for the background, InstaWP MCP vs WordPress MCP for the head-to-head, account MCP vs site MCP for fleet-wide work, and using MCP for WordPress in production for what changes on live client sites.
WordPress has gone from a CMS that AI can generate code for, to a platform that AI can operate directly. The infrastructure shipped. What gets built on it is up to the rest of us.
This guide is based on the “AI + MCP to Build, Manage & Automate WordPress End-to-End” workshop presented by Vikas (InstaWP) and Kalpesh (miniOrange) at WordCamp Asia 2026 in Mumbai.


