Need to clear cache in WordPress? Open your caching plugin and click Clear Cache or Purge All. If you do not use a plugin, purge from your hosting dashboard, or run wp cache flush from the command line. If the change still does not appear, something else is holding the old copy: your browser, your CDN, the object cache, or PHP itself.
This guide covers all nine ways to clear, flush and purge WordPress cache, which layer each one actually touches, and the order to work through them so you stop guessing.
Quick answer
The fastest way to clear WordPress cache is to click Clear Cache (or Purge All) in your caching plugin’s admin bar menu. No plugin? Purge from your hosting dashboard, or run wp cache flush with WP-CLI. If the change still will not show, clear your browser with a hard refresh (Ctrl/Cmd + Shift + R), then purge your CDN. Those four layers account for almost every stuck cache.
Clear vs Flush vs Purge: What They Mean
People search for “clear cache WordPress”, “flush WordPress cache” and “purge WordPress cache” as if they were different jobs. They are the same action. Each one tells WordPress, a plugin, or your host to delete the saved copies of your pages so the next visitor gets a freshly generated version.
Practical takeaway: if you changed something and it is not showing, you need to clear, flush, or purge whichever cache layer is holding the old version. The rest of this guide covers each layer in order.
What Exactly Is WordPress Cache?
Imagine you are running a busy restaurant. Every time a customer orders a dish, the kitchen has to cook it from scratch. That is slow. Now imagine you pre-cook the popular dishes and keep them warm. That is caching.
In WordPress, caching stores static versions of your pages, posts and other content. When a visitor arrives they get the cached version rather than a freshly generated one. That reduces work for your server and the page loads faster.
The trade-off is the reason you are here: a cached copy is a snapshot in time. When you edit something, the snapshot is now out of date, and it keeps being served until something clears it.
Types of WordPress Cache
Caching does not happen in one place. A single page view can pass through five or six separate caches, each owned by different software. Before you clear anything, it helps to know which layer you are dealing with. If you have not picked one yet, see our roundup of the best WordPress caching plugins.
Most “why is my change not showing” problems come from the page cache or the CDN cache. Object and opcode caches matter more for developers pushing code updates.
Which WordPress Cache Should You Clear?
Rather than clearing everything and hoping, match the symptom to the layer. This is the fastest route to the right fix.
Rule of thumb
Work from the visitor inward: browser, then plugin or host, then CDN. Roughly nine out of ten stuck-cache reports are solved before you reach the CDN, and the deeper methods below are for the remainder.
Method 1: Clear Cache Through Your Managed Host
If your site runs on a managed WordPress host, server-level caching sits outside WordPress. No plugin button can fully clear it, so you purge it from the hosting panel instead.
On InstaWP, you can purge the site cache directly from the dashboard if you’re on managed hosting plans. This is useful when you have pushed a design change, updated CSS or JavaScript, changed dynamic content, or fixed something on staging but the live site is still serving an older cached version.
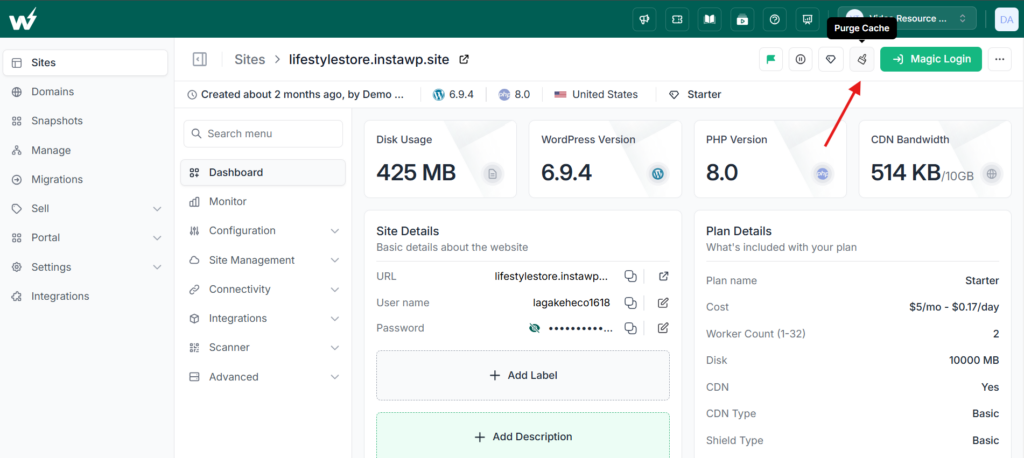
Instead of hunting through plugin settings, you can clear the hosting-level cache from the same place you already manage the site. This helps remove stale responses without touching your WordPress files or database.
The location differs by host, but it is almost always one of these:
- A button in the WordPress admin bar that the host adds automatically, common on SiteGround, Bluehost and Kinsta.
- A purge control in the hosting dashboard, usually under a performance, caching or CDN section.
- An automatic purge that fires when you publish a post, which several managed hosts now do by default.
Server caching and CDN caching are often two separate buttons even on the same host, so check whether purging one also purges the other. If your host runs an edge or CDN layer, assume it does not, and clear both.
Method 2: Clear Cache With a WordPress Caching Plugin
This is the most common method and the right place to start on regular hosting. A WordPress caching plugin stores static HTML versions of your pages and gives you a button to clear them.
To install one, go to Dashboard > Plugins > Add New, search for a WordPress caching plugin, then click Install and Activate. Agencies running the same stack across many client sites should see our notes on caching plugins for agencies.
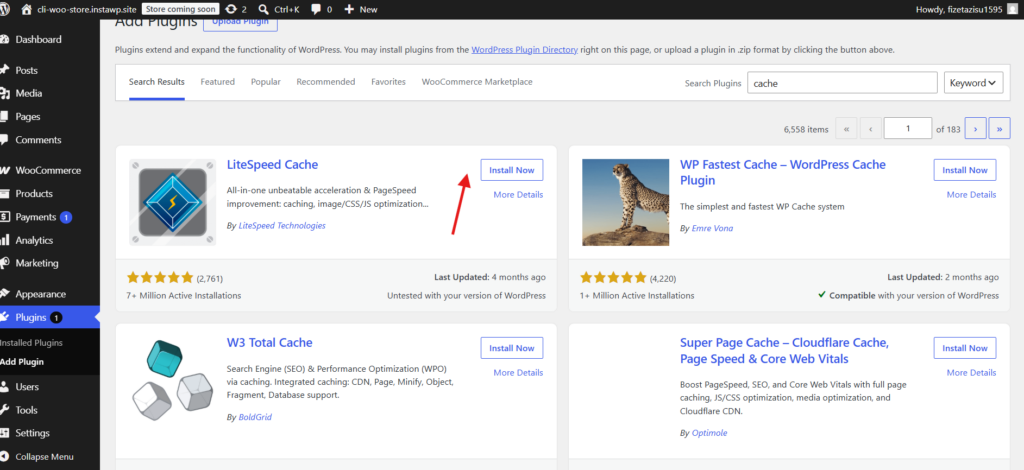
The menu wording changes from plugin to plugin, but the pattern is the same in every one:
Log in to your WordPress dashboard so the admin bar is visible. In the admin bar, hover over your caching plugin’s menu item (it normally carries the plugin’s own name).
Click Clear Cache or Purge All to remove every cached file across the site.
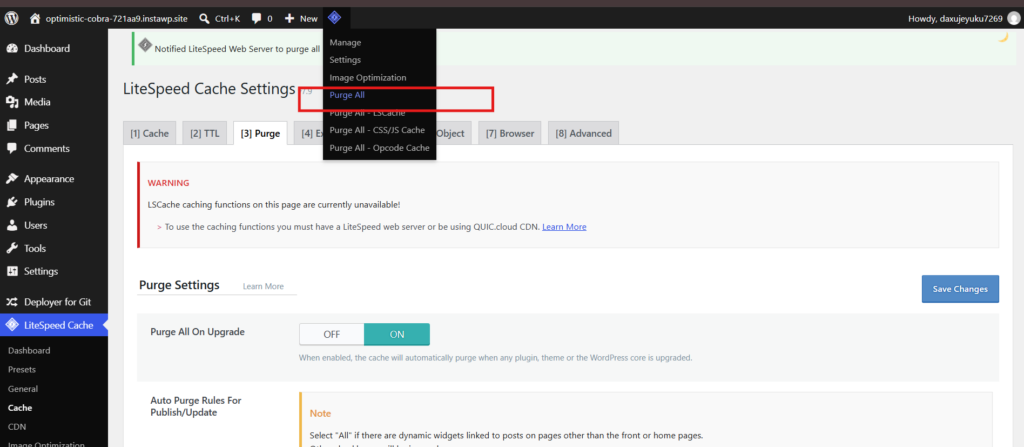
No admin-bar menu? Open the plugin’s settings page (usually under Settings or its own menu item) and use the same clear or purge button.
Hard refresh the page (Ctrl or Cmd + Shift + R) to confirm the fresh version is being served.
Here is where the button actually lives in the six most widely used caching plugins, so you do not have to hunt for it.
Most caching plugins also offer a targeted purge, so you can clear a single page, just the front page, or one layer instead of the whole site. Use a targeted purge when you have edited one page, and a full purge after a theme, plugin or sitewide change.
⚠ Heads up
Caching plugins can conflict with other plugins, may not auto-clear after every update, and stop working if the plugin is deactivated. Managing many client sites means installing and configuring the plugin on each one.
A WordPress site management service lets you purge cache across all sites, or clear one site in a single click.
Method 3: Clear Cache With WP-CLI
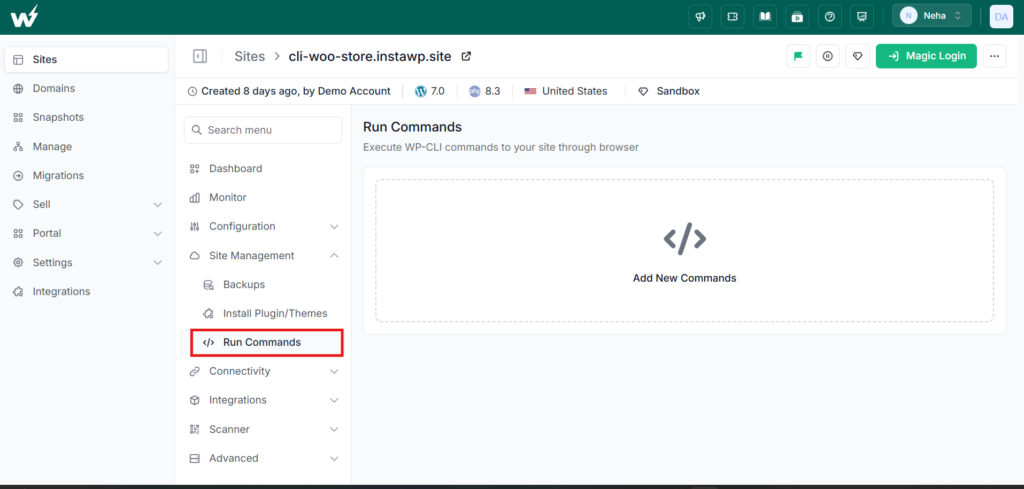
WP-CLI is the fastest option when you are already in the terminal, and the only practical one when a broken cache locks you out of the admin. The two commands you need:
wp cache flushempties the object cache (Redis, Valkey or Memcached).wp transient delete --allremoves all transients stored in the database.
Many caching plugins add their own commands too, such as wp rocket clean --confirm for WP Rocket or wp w3-total-cache flush all for W3 Total Cache.
The catch is that many hosts do not give you shell access, or hide it behind a support ticket. Check whether your plan includes SSH before you rely on this method, because on shared hosting it is frequently unavailable.
Flush and reset via WP-CLI
wp cache flush
rm wp-content/advanced-cache.php
wp config delete WP_CACHE
Run these when a removed caching plugin leaves a broken drop-in behind. WordPress rebuilds cleanly on the next load.
Method 4: Purge the CDN Cache
If your site sits behind Cloudflare, Bunny, Fastly or another CDN, copies of your pages and assets live on edge servers around the world. No WordPress plugin can touch those. Log in to your CDN dashboard and use Purge Everything (Cloudflare) or the equivalent purge option.
Prefer a targeted purge where the CDN supports it. Purging a single URL refreshes that page in seconds, while purging everything forces every page to be rebuilt from your origin, which briefly increases server load and slows the first visitor to each page.
Some hosts run their own edge layer rather than a third-party CDN, such as InstaCDN. Those are purged from the host panel, not from a separate CDN dashboard.
When to purge the CDN
Purge the CDN after you have cleared the server and plugin cache but visitors in other regions still see the old version. The CDN is the last layer between your server and the visitor, so always clear it last.
Method 5: Delete Cache Files via SFTP
When the site is broken and you cannot reach the admin or the terminal, delete the cache files directly. Most caching plugins store them in wp-content/cache/. Connect via SFTP, open that folder, and delete its contents. The plugin rebuilds the cache on the next page load, so nothing is lost.
Clear cache via SFTP in 4 steps
- Connect to your server with an SFTP client (FileZilla, Cyberduck).
- Navigate to
wp-content/cache/ - Select everything inside the folder and delete it (keep the folder itself).
- Reload the site so the plugin rebuilds a fresh cache.
Delete the contents of the folder, not the folder itself. Some plugins will throw a permissions error if the directory disappears entirely.
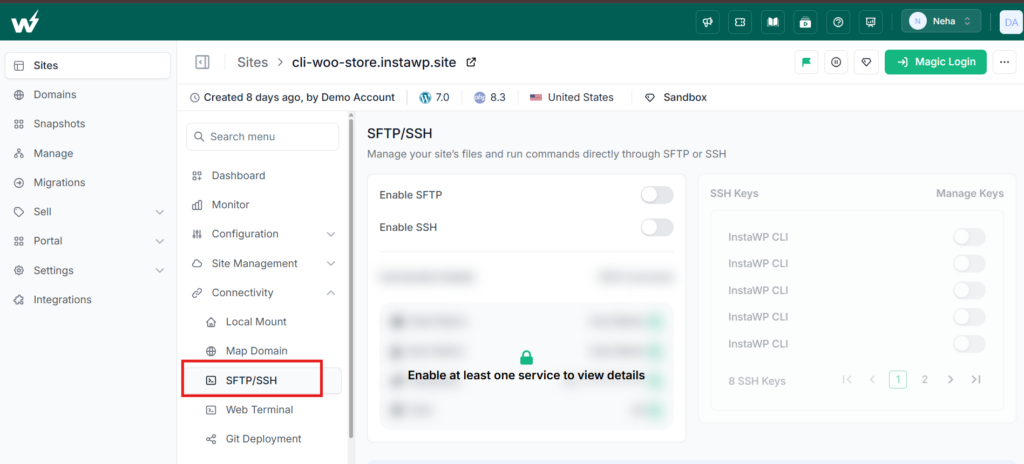
This route needs SFTP or SSH credentials from your host. On InstaWP you enable SFTP and SSH per site from the dashboard (step-by-step guide).
Method 6: Clear Your Browser Cache
Sometimes the site is fine and only your browser is serving the old copy. Rule this out before you purge anything server-side, because it takes five seconds.
Do a hard refresh with Ctrl + Shift + R on Windows or Cmd + Shift + R on Mac. Or open the page in an incognito window. If the incognito version looks correct, the problem was your browser, not the site.
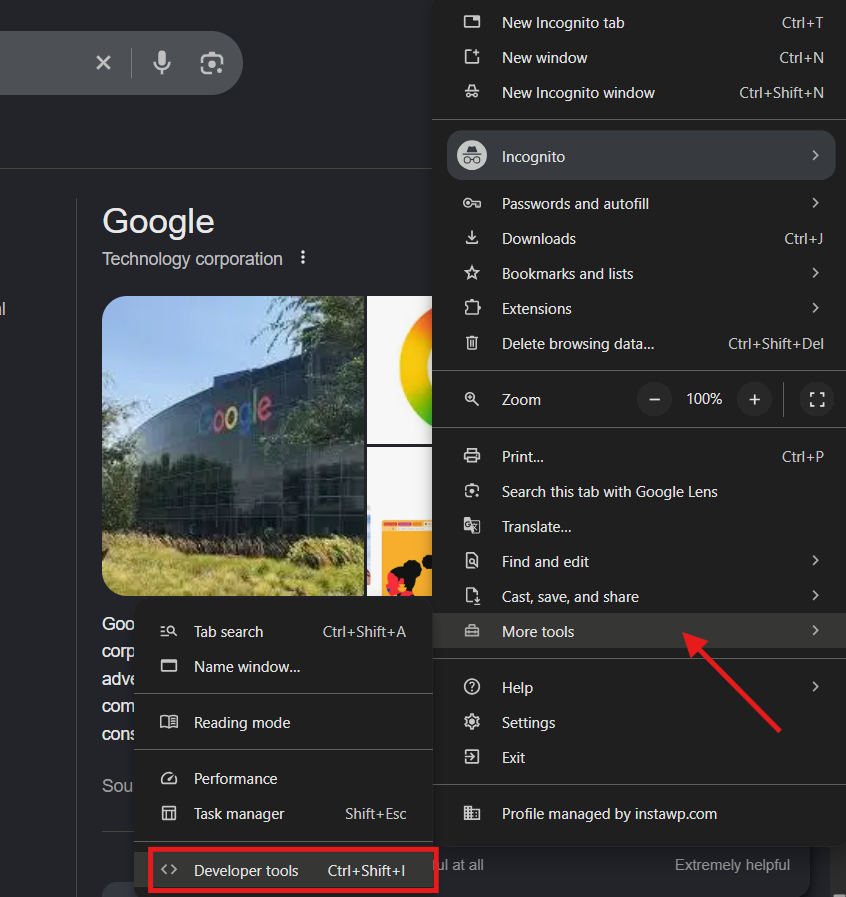
To disable browser cache entirely while you work:
- In Chrome, open the three-dot menu, then More Tools > Developer Tools.
- Open the Network tab and tick Disable cache.
- Reload the page, keeping DevTools open. The setting only applies while DevTools is open.
Method 7: Restart PHP to Clear OPcache
OPcache stores compiled PHP code in memory. This is why a code change (a theme edit, a plugin update, a deployed fix) can fail to appear even after you have purged every other cache. The fix is to restart PHP-FPM.
On managed hosts this is usually a button in the panel, sometimes labelled “restart PHP” or exposed as a PHP version switch. On a VPS you restart the service directly.
On InstaWP you can switch or reload PHP from the site settings, which clears OPcache as a side effect.
Restart PHP-FPM (VPS)
sudo service php8.2-fpm restart
Replace 8.2 with your PHP version. This clears OPcache and reloads all compiled code.
Method 8: Flush Cache With a Code Snippet
For deploy scripts or automation, you can clear the object cache programmatically. Add this to a must-use plugin or run it through a snippets plugin:
Flush object cache in PHP
wp_cache_flush();
Overkill for daily use, but handy inside deployment hooks and CI pipelines.
If you deploy through Git, deployment workflows can run this automatically after each push. Overkill for daily use, but useful inside deployment hooks and CI pipelines where you want the cache cleared on every release without anyone remembering to click a button.
Method 9: Clear Transients
Transients are temporary values WordPress stores in the database, and expired ones can pile up. They are a common cause of a widget, menu or dashboard panel that keeps showing old data even after every other cache is clear.
The command-line version is wp transient delete --all. If you would rather not use WP-CLI, a plugin such as Transients Manager lets you view and delete them from the admin. Deleting transients is safe: WordPress regenerates any it still needs.
Which Method Should You Use First?
Most of these are edge-case tools rather than daily habits. Work from the visitor inward: browser first, then plugin or host, then CDN, and the manual methods only when something is stuck.
The right order to clear cache
Hard refresh the browser. Rules out a local caching issue in 5 seconds.
Purge from your host or plugin. Clears page and object cache at the source.
Purge the CDN. Refreshes copies stored on edge servers worldwide.
Still stuck? Delete cache files via SFTP, restart PHP to clear OPcache, or flush transients.
How to Clear WooCommerce Cache
WooCommerce shows live data: cart totals, stock levels, prices and account pages. If those get cached, customers see wrong prices, stale stock, or someone else’s cart. Clear WooCommerce cache the same way you clear page cache, then make sure the dynamic pages are never cached in the first place.
- Clear your WordPress caching plugin cache using the steps above.
- Exclude the Cart, Checkout and My Account pages from page caching in your plugin’s settings.
- Exclude the WooCommerce cart fragments and session cookies so mini-cart counts stay live.
- After a price or stock change, purge the product and shop pages, then hard refresh to confirm.
Never cache these in WooCommerce
| Exclude | Why |
|---|---|
| /cart/, /checkout/, /my-account/ | Unique per visitor, caching them mixes up customer data |
woocommerce_items_in_cart |
Cookie that keeps the mini-cart count live |
woocommerce_cart_hash |
Cookie that tracks cart contents between page loads |
Stores lean heavily on object cache, because every product query hits the database. A persistent object cache is usually the single biggest speed win for WooCommerce, as long as the cart, checkout and account pages stay excluded from page cache. See speeding up WordPress with object cache for the setup.
How to Clear the Object Cache and advanced-cache.php
Object caching stores the results of database queries (usually in Redis, Valkey or Memcached) so WordPress runs fewer queries per page load. When a persistent object cache is active, WordPress adds an object-cache.php drop-in to wp-content. Page caching plugins add a second drop-in, advanced-cache.php.
Three things you may need to do here:
- Flush the object cache: run
wp cache flushwith WP-CLI, or use the flush button in your object cache plugin or host panel. - Fix a stuck
advanced-cache.php: if page caching misbehaves after you remove a plugin, delete the leftoverwp-content/advanced-cache.phpdrop-in and remove theWP_CACHEconstant fromwp-config.php. - Reset cleanly: deleting a drop-in forces WordPress to regenerate the cache from scratch on the next load, so it is a safe reset.
A leftover drop-in from an uninstalled plugin is one of the most common causes of a cache that appears impossible to clear. If nothing you do has any effect, check wp-content for orphaned object-cache.php and advanced-cache.php files before anything else.
Clearing Cache on InstaWP Managed Hosting
We build managed WordPress hosting, so this section covers how cache clearing works on InstaWP specifically. If you are on another host, the nine methods above are what you need and you can skip this.
There are two separate cache controls, and they sit in different places because they clear different layers.
A few specifics worth knowing, because they differ from most hosts:
- Publishing a post purges that URL automatically. InstaWP Connect hooks WordPress post transitions, so when you publish a post or move a published post to trash, that specific URL is purged from the CDN without you doing anything. It is debounced to avoid duplicate purges and retries once on failure. The toggle is CDN Auto Cache Purge in the plugin settings and it is on by default.
- The object cache is Valkey, a high-performance Redis alternative, rather than Redis itself. Enabling it typically cuts database queries substantially on query-heavy sites like WooCommerce stores.
- The two purges are genuinely separate. Purging the CDN does not flush the object cache, and clearing the object cache does not touch the edge. After a big change, do both.
- WP-CLI needs no setup. Run Commands executes
wp cache flushor any other command from the dashboard without opening a terminal, and there is a purge command in the plugin too:wp instawp purge-url <url>. - You can automate it. Every site can be made MCP-ready, so an AI assistant can clear cache across your sites on your behalf, for example after a plugin update.
Worth knowing
The automatic purge only covers post URLs. Theme edits, CSS changes, menu updates and bulk edits are not post transitions, so those still need a manual Purge CDN Cache. That is the single most useful thing to understand about cache on any host that auto-purges.
Beyond the buttons, if you manage sites for clients you can manage multiple WordPress sites from one dashboard, including sites hosted elsewhere, and test cache configuration changes on a WordPress staging site before they reach production.
Why Clearing WordPress Cache Matters
Cache speeds up your site, but stale cache causes real problems. Clearing it keeps four things healthy:
- Content accuracy: visitors see the latest prices, hours and promotions instead of an outdated page, which protects trust and sales.
- Functionality: cached pages can break dynamic forms, live maps and real-time stock. Clearing cache restores the interactive parts.
- Development speed: you see code and CSS changes immediately instead of debugging an old cached file.
- Security: after a plugin or core update, clearing cache stops old, vulnerable files from being served.
Cache Not Clearing? Common Fixes
If your change still does not show after clearing cache, you are almost always looking at a second cache layer. Work through these in order:
- Hard refresh your browser (
Ctrl/Cmd + Shift + R) to rule out browser cache. - Purge the CDN (Cloudflare, Bunny, Fastly) after the plugin cache.
- Clear the host cache too, since many hosts cache on top of your plugin.
- Flush the object cache with
wp cache flushif you use Redis, Valkey or Memcached. - Check for two page cache plugins running at once, which is a common cause of a cache that never clears.
- Look for orphaned
object-cache.phporadvanced-cache.phpdrop-ins left behind by a removed plugin. - Restart PHP to clear OPcache if the change was to PHP code rather than content.
Pro Tips for Clearing WordPress Cache
Caching is great for speed and a headache when changes do not appear. These habits keep cache management smooth:
- Test updates in a staging environment first, so caching issues never reach your live site.
- Use browser developer tools to inspect elements and disable cache while debugging.
- Add cache busting to assets, for example
style.css?v=1.2.3, to force browsers to fetch the latest file. - Automate cache clearing with hooks so cache empties whenever content updates.
- Use WP-CLI (
wp cache flush) for instant, scriptable cache clearing. - Check your host’s documentation, since many managed WordPress hosts have built-in caching with their own purge steps.
- Never cache the WordPress admin, cart, checkout or account pages.
Conclusion
Clearing cache in WordPress comes down to finding the right layer and hitting purge. For most changes, your caching plugin’s Clear Cache button does the job. When a change still will not show, work through the browser, host, CDN and object caches in turn. The decision table near the top of this guide is the shortcut: match the symptom to the layer instead of clearing everything at once.
Manage caching across every WordPress site from one dashboard
Try InstaWP managed hostingFrequently Asked Questions
How often should I clean my WordPress cache?
It depends on how often you update your site. If you make frequent changes, clean it more often. Otherwise, cleaning it periodically is sufficient.
Will clearing the cache delete my website content?
No, clearing the cache only deletes the stored static files. Your website content remains intact.
Can I automate cache clearing?
Yes, many caching plugins allow you to automate cache clearing based on specific events or schedules.
What is the best caching plugin for WordPress?
It depends on your needs. WP Super Cache, W3 Total Cache, and LiteSpeed Cache are popular choices. Test a few and see which one works best for you.
Why does my site still show the old version after clearing the cache?
It could be due to browser caching or CDN caching. Make sure to clear those as well.
How can I tell if my site is using caching?
Use browser developer tools to check the “Cache-Control” headers. If you see headers like “max-age,” it indicates caching is enabled.
What is the difference between clearing cache and disabling cache?
Clearing cache deletes the stored cached files. Disabling cache prevents the site from creating new cached files. Disabling cache during development is often helpful.
How do I clear the cache in WordPress?
Open your caching plugin from the WordPress admin bar and click Clear Cache or Purge All. If you do not use a caching plugin, purge from your hosting dashboard, or run wp cache flush with WP-CLI. Then hard refresh your browser with Ctrl/Cmd + Shift + R to confirm the new version is being served.
How do I clear WordPress cache without a plugin?
You have three options without a plugin. Purge from your hosting dashboard, which clears server-level cache. Run wp cache flush and wp transient delete --all if you have WP-CLI access. Or connect via SFTP and delete the contents of wp-content/cache/. A hard refresh in your browser handles the client side.
Will clearing the cache delete my website content?
No. Clearing cache only deletes stored copies of your pages. Your posts, pages, media, settings and database are untouched. The cache rebuilds automatically the next time someone visits, so the only side effect is that the first visit after clearing is slightly slower.
Why is my WordPress cache not clearing?
Almost always because a second cache layer is still holding the old copy. Check your browser first with a hard refresh, then your CDN, then your host’s server cache, which often sits on top of your plugin. Two caching plugins running at once, or an orphaned advanced-cache.php drop-in from a removed plugin, are the other common causes.
What is the difference between clearing, flushing and purging cache?
Nothing meaningful. All three mean deleting stored copies so fresh ones are generated. The words come from different tools: caching plugins say clear, WP-CLI and object cache stores say flush, and CDNs and server caches say purge.
How often should I clear my WordPress cache?
You rarely need to on a schedule. Clear it after you change something and the change does not appear, and after theme or plugin updates. Most caching plugins clear relevant pages automatically when you publish or edit a post, so routine clearing is usually unnecessary.
Does clearing cache improve site speed?
Not directly. Clearing cache temporarily makes your site slower, because the next visitor to each page triggers a fresh build. Caching is what makes a site fast; clearing it is how you make sure visitors see current content. The speed returns as the cache rebuilds.
How do I clear the WordPress object cache?
Run wp cache flush with WP-CLI, or use the flush button in your object cache plugin or hosting panel. If a removed plugin left an object-cache.php drop-in behind in wp-content, delete that file so WordPress falls back cleanly.
Why do I still see the old version after clearing cache?
Your browser is the most likely culprit. Hard refresh with Ctrl/Cmd + Shift + R, or open the page in incognito. If incognito shows the new version, it was your browser. If it still shows the old one, purge your CDN next, then check for OPcache if the change was to PHP code rather than content.