Migrating a WordPress site to a new host doesn’t have to be painful. If you’ve built your site on another platform and are ready to move to InstaWP’s managed cloud hosting, this guide walks you through every available method, from a one-click automated tool to SSH-based migration for large or complex sites.
Pick the method that fits your site size, technical comfort, and how much testing you need before going live.
Table of Contents
Key Takeaway

InstaWP offers four migration methods: automated tool, staging-first, SSH, and manual plugin, each suited to different site sizes and complexity levels.
The automated migration tool at migrate.instawp.com handles most sites under 5GB without any manual file handling.
Sites over 5GB, WooCommerce stores, and complex builds should migrate through a staging site first for safe testing before go-live.
Every InstaWP site comes with managed cloud hosting built in — no separate server setup needed after migration.
Before You Migrate: What to Prepare
Rushing into a WordPress site migration without preparation is the most common cause of data loss and downtime. Before you move anything, spend ten minutes on these steps.
- Back up your current site. Export a full copy of your files and database from your existing host. Use your host’s built-in backup tool, a plugin like UpdraftPlus or Duplicator, or download everything manually via FTP and phpMyAdmin. Store this backup somewhere outside your current host, a local drive or cloud storage like Google Drive works fine.
- Know your site size. Check your total disk usage including the database, media uploads, plugins, and themes. If your site is under 5GB, the automated tool will handle it smoothly. Over 5GB, you’ll want Method 2 or 3.
- Note your site’s complexity. A blog or portfolio migrates differently from a WooCommerce store with active orders, or a membership site with user data. The more complex your setup, the more testing you’ll want before pointing your domain to the new host.
- Create your destination site on InstaWP. Before migrating, log in to your InstaWP dashboard, create a new site, and select a site plan. This becomes your destination environment. Because InstaWP’s hosting is native to the platform, there’s no separate server to configure, your site environment is ready the moment you create it.
Self-Service WordPress Migration Methods: Which Migration Method Should You Use?
For those who prefer control over their migration process, InstaWP provides several self-service methods that allow for flexible, quick, and easy migrations. Below are the most commonly used methods.
| Your Situation | Best Method |
|---|---|
| Site under 5GB, blog or portfolio, quick move needed | Method 1: Automated Migration Tool |
| Site over 5GB, eCommerce, needs testing before go-live | Method 2: Via InstaWP Staging Site |
| Very large site, SSH access available, technical user | Method 3: SSH Migration |
| Other methods failed, need maximum manual control | Method 4: Plugin-Based Migration |
Way 1 – Using InstaWP’s WordPress Migration Tool
One of the most straightforward options is using InstaWP’s dedicated WordPress migration tool, available at migrate.instawp.com. This tool makes the process fast and hassle-free, eliminating the need for lengthy manual steps.
Best for: Sites under 5GB, blogs, portfolios, content-heavy sites, quick migrations where testing upfront isn’t critical.
Here’s how you can migrate your WordPress site in under 5 minutes:
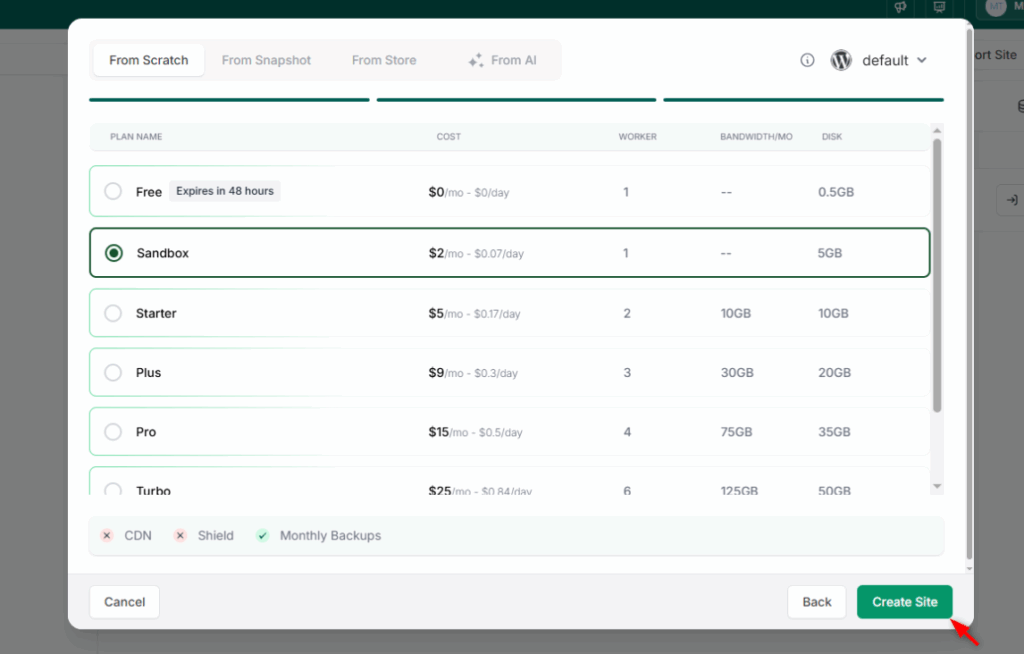
Step 1: Create Your Destination Site
Log in to your InstaWP dashboard and create a new WordPress site. Select a site plan that matches your needs; this becomes the destination for your migration. Your managed hosting environment is ready immediately.
Step 2: Open the Migration Tool
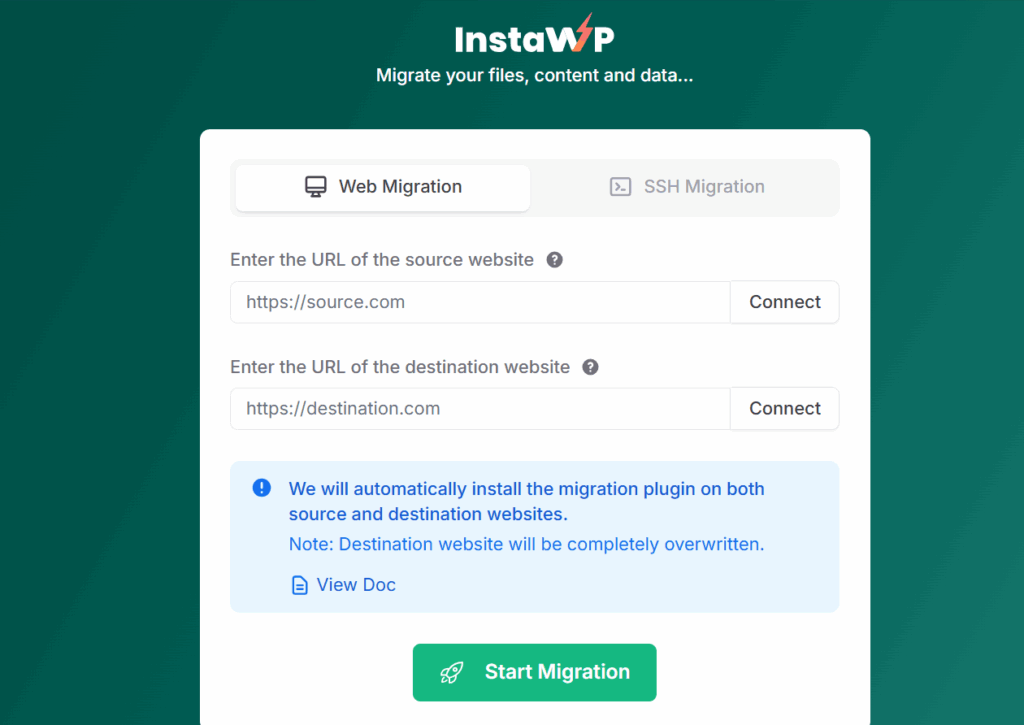
Go to migrate.instawp.com or access it from your InstaWP profile by clicking Migrate Websites.
Step 3: Connect Your Source Site
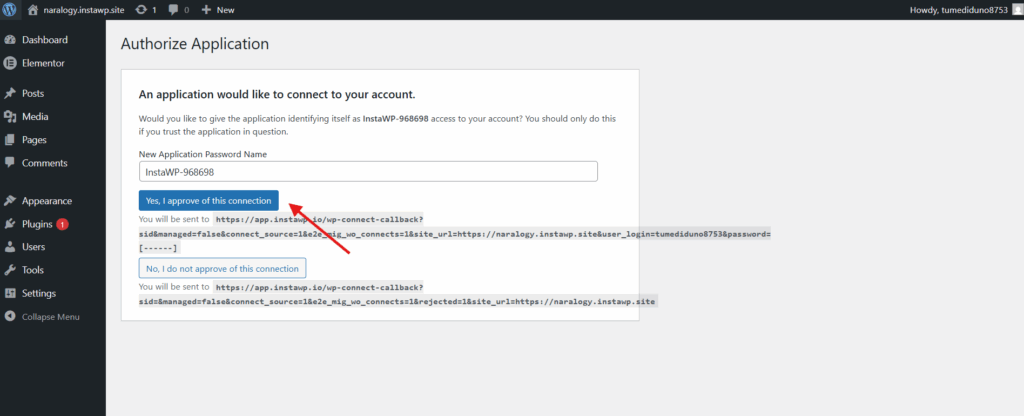
Enter the URL of your current site (the one you’re migrating from). Click Connect and approve the connection when prompted. This installs a temporary connector on your existing site to authorize the transfer.
Step 4: Connect Your Destination Site
Enter the URL of your new InstaWP site. Click Connect, approve the connection, and then start the migration.
Step 5: Track the Migration
Use the Track Migrate button to monitor real-time progress. The migration tracker shows you exactly where the process is — files, database, and URL replacement are all handled automatically.
Step 6: Map Your Domain and Enable SSL
Once migration is complete, map domain inside the InstaWP dashboard and enable SSL. Your site is now live on InstaWP’s managed hosting infrastructure.
With this method, you’re only a few clicks away from successfully moving your website, regardless of its size.
Method 2: Via InstaWP Staging Site (Best for Testing Before Go-Live)
This method creates a staging copy of your current site inside InstaWP first, lets you verify everything works correctly, and then promotes it to your live hosted environment. It’s the safest approach for complex or business-critical sites.
InstaWP makes this seamless through its WordPress staging and live environments.
Best for: Sites over 5GB, WooCommerce or membership sites, agency client sites, any migration where you need to verify functionality before switching DNS.
Step 1: Connect Your Live Site to InstaWP
You have two ways to do this:
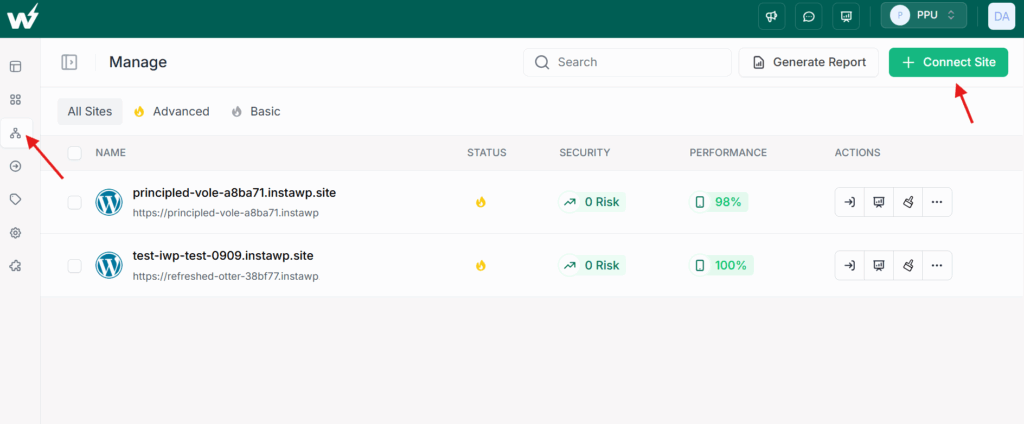
Option A: Via the InstaWP Dashboard
Go to the Manage page in your InstaWP dashboard and click Connect Site.
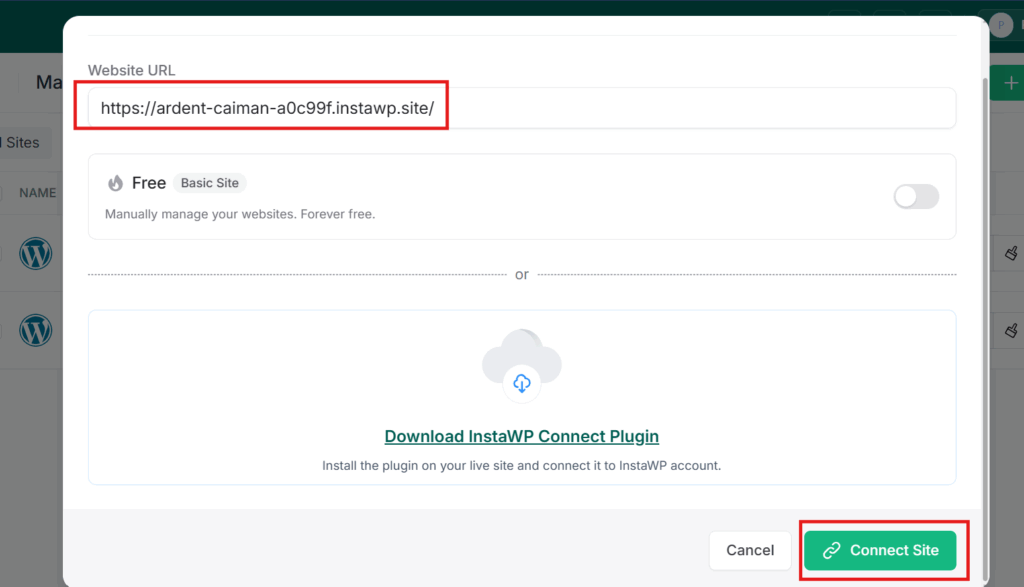
Enter your live site’s URL and click on Connect Site.
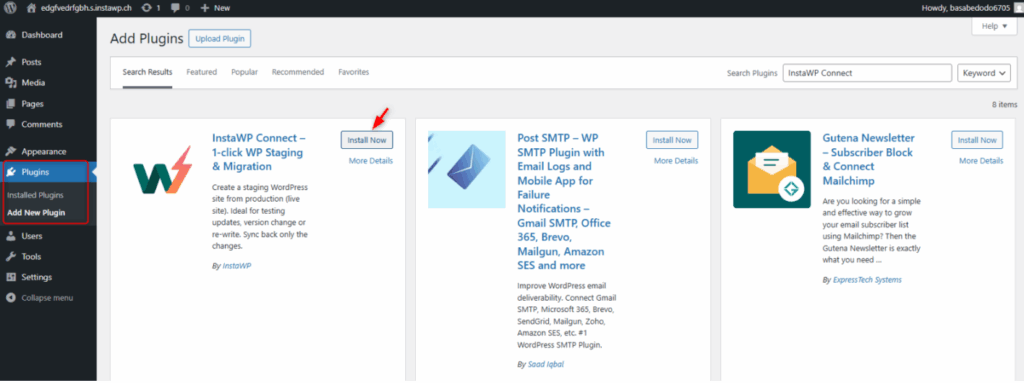
Option B: Via the InstaWP Connect Plugin
Install the InstaWP Connect plugin on your existing WordPress site.
Once the plugin is installed and active, go to Tools > InstaWP in your WordPress admin.
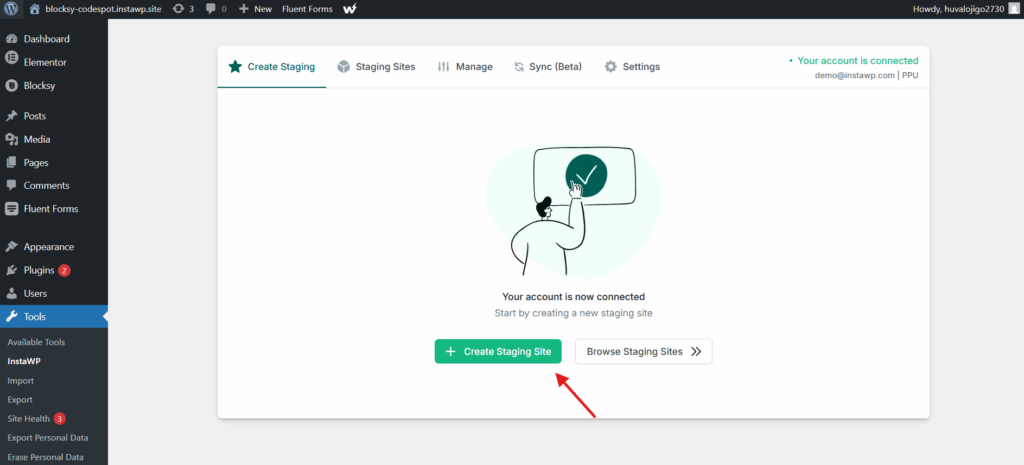
Choose your staging type:
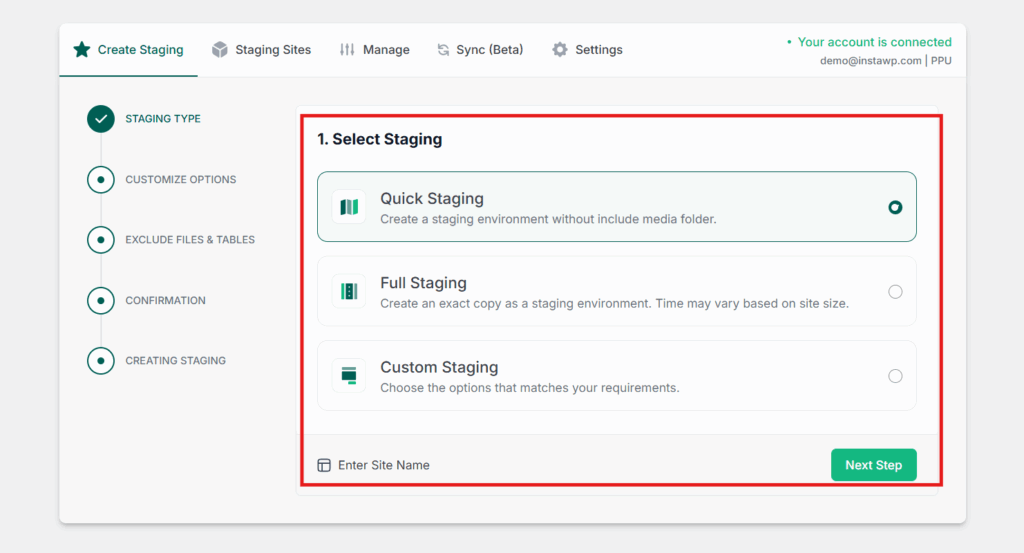
- Quick Staging — Skips the media folder for a faster pull. Good for initial testing.
- Full Staging — Complete copy of your site including all media. Recommended for final pre-launch testing.
- Custom Staging — Select specific files, plugins, or content to include.
Step 2: Test on the Staging Environment
Once your staging site is created inside InstaWP, test it thoroughly. Check all pages, forms, payment flows (on WooCommerce), plugin functionality, and third-party integrations. Fix anything that needs attention before going live.
Step 3: Migrate to Your InstaWP Hosted Site
Go to the Sites page in your InstaWP dashboard. Click the three-dot menu on your staging site and select Migrate. Choose your destination (InstaWP managed hosting), click Next Step, and select a site plan. Your tested staging site is now promoted to production.
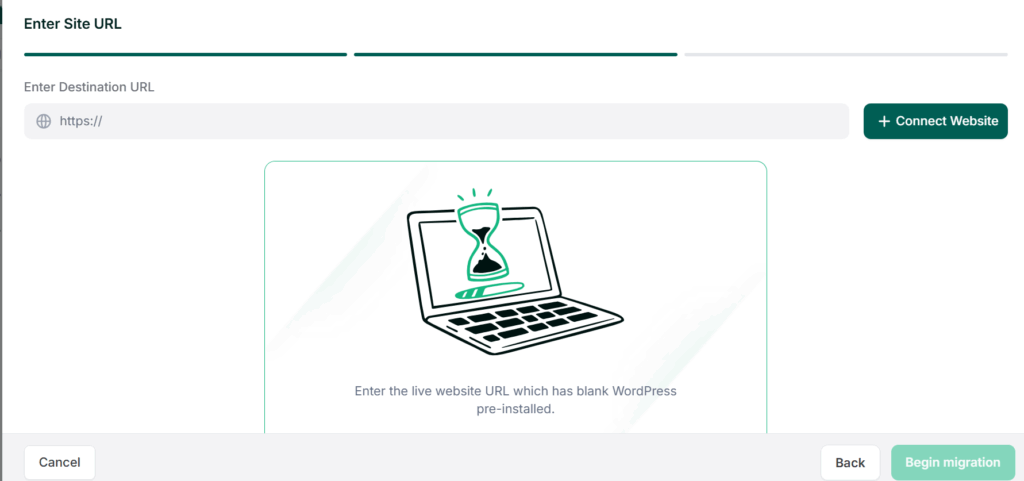
Step 4: Map Your Domain and Go Live
Map your custom domain and enable SSL inside the InstaWP dashboard. Update your DNS records at your domain registrar to point to InstaWP. DNS propagation typically takes a few hours, your old site stays live during this window, so there’s no downtime for visitors.
Full Guide to Creating a Staging Site from your Live Site →
Method 3: SSH Migration (For Large Sites and Technical Users)
SSH migration is the fastest option for very large sites, it transfers files directly between servers without relying on plugin-based uploads, which can time out on slow or restrictive hosting environments.
Best for: Sites over 5GB, hosts that don’t maintain long plugin connections, technical users comfortable with the command line.
Method 3: SSH Migration (For Large Sites and Technical Users)
SSH migration is InstaWP’s fastest and most reliable option for moving sites over 5GB. It works by connecting directly to both your source and destination servers through the terminal, generating a backup on the source, and applying it to the destination. Because it bypasses browser-based upload limits and doesn’t rely on plugin connections staying alive, it succeeds where other methods time out.
Before You Start: Prerequisites
Make sure the following are available on your source server before beginning. These are all standard Linux utilities:
wp— WP-CLI client for managing WordPress via the terminalscp— for securely transferring files between serverstarandzip— for file compressionmysqldump— used by WP-CLI to export the database
You will also need SSH access credentials for both your source site (current host) and your destination InstaWP site. SSH credentials for your InstaWP site are available inside the site’s settings panel in your InstaWP dashboard.
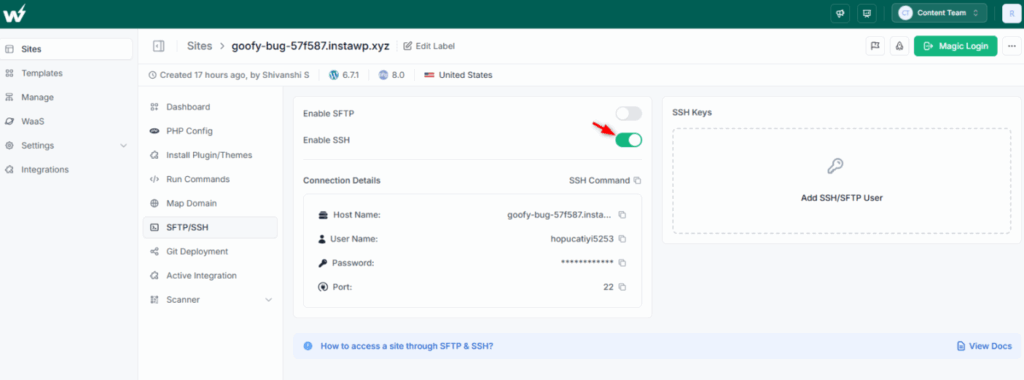
Step 1: Enable SSH on Your Source Site
Go to your source site’s settings and enable SSH access. If your current host requires you to contact support to enable SSH, do that first. Copy the SSH connection command provided.
Open your terminal and paste the command to connect to the source server.
Step 2: Enable SSH on Your InstaWP Destination Site
Repeat the same process for your InstaWP site. We suppose you already have created a site on InstaWP.
Must Read: Create Site | InstaWP Docs
Go to the site settings in your InstaWP dashboard, enable SSH, copy the connection command, and connect via terminal in a separate window.
Step 3: Run the Source Server Backup Command
Navigate to your WordPress installation directory on the source server using cd and confirm the correct location with ls.
InstaWP provides a ready-made source command via their GitHub repository. Copy the source command from the InstaWP migration page and paste it into your source server terminal:
curl -sSL https://github.com/InstaWP/ssh-migration/releases/download/latest/source.phar -o source.phar && php source.phar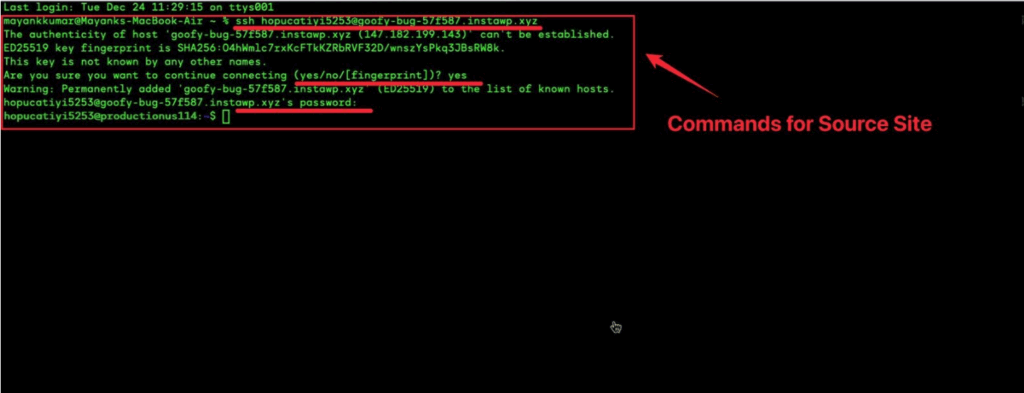
This generates a backup of your WordPress files and database and uploads it to InstaWP’s cloud for the migration. Once the upload completes, you will see a confirmation on the migration page along with a backup ID.
Note: The backup excludes wp-config.php intentionally to avoid configuration conflicts on the destination site.
Step 4: Run the Destination Server Command
Switch to your InstaWP destination site terminal. Navigate to the WordPress directory again using cd and ls.
Copy the destination command from the InstaWP migration page and paste it into the destination server terminal:
curl -sSL https://github.com/InstaWP/ssh-migration/releases/download/latest/dest.phar -o dest.phar && php dest.phar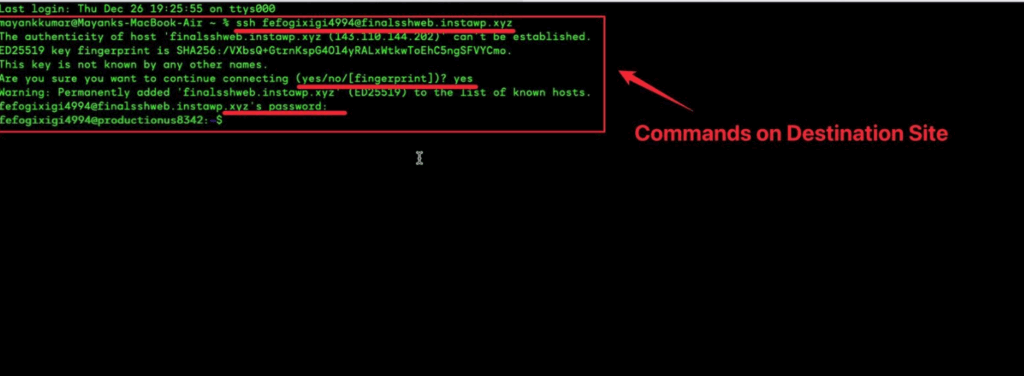
When prompted, enter the backup ID generated in Step 3. Confirm the action by typing Y and pressing Enter.
Step 5: Confirm Migration Completion
The migration will complete within a few moments. You will see a completion confirmation both in the terminal and on the InstaWP migration page.
Step 6: Handle Domain Changes (If Applicable)
If you are migrating to a new domain name (for example, from oldsite.com to yournewdomain.com), run a search-and-replace on the database to update all URL references. WP-CLI handles this cleanly:
wp search-replace 'https://oldsite.com' 'https://yournewdomain.com' --all-tablesIf you are keeping the same domain, this step is not required.
Step 7: Map Your Domain and Enable SSL
Once the migration is complete, map your custom domain inside the InstaWP dashboard and enable SSL. Your site is now running on InstaWP’s managed cloud infrastructure.
For a full walkthrough with exact commands, refer to InstaWP’s official SSH migration documentation.
Way 4 – Third-Party Tools
Several third-party migration plugins can also be used for WordPress migrations. Each tool offers unique features, making it easier to choose the one that best fits your needs.
Best for: Situations where other methods have failed, partial migrations, or when you want to migrate specific components rather than the whole site.
All-in-One WP Migration: This plugin simplifies the process by allowing you to export your entire WordPress site as a single file. It’s ideal for smaller sites or those with fewer customizations.
Duplicator: Duplicator offers advanced migration options for larger sites, with features like scheduled backups and multi-site support.
Migrate Guru: If you’re migrating a large site with heavy content, Migrate Guru offers speed and reliability by using cloud storage during the migration process.
Install your chosen plugin on your existing site. Export your site as a package file. If you’re using Duplicator or UpdraftPlus, the process become ways too easy as it supports it natively.
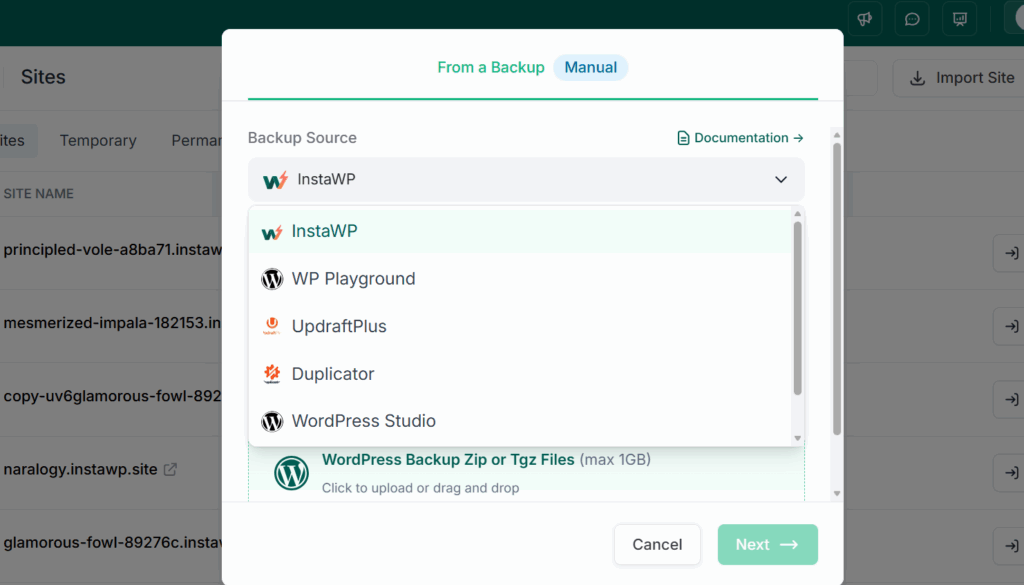
On your new InstaWP site, install the same plugin and import the package file.
Follow any post-import steps the plugin requires (usually updating permalinks and clearing cache).
Test thoroughly, then map your domain.
After the Migration: Final Checks
Migrating your files and database is only part of the job. Run through these checks before you call it done:
- Test every critical page. Home page, key landing pages, contact forms, checkout flow (if WooCommerce), login, and any membership-restricted content.
- Check internal links and media. Use a plugin like Broken Link Checker or search-replace to make sure no URLs still reference your old domain or host.
- Verify SSL is active. InstaWP handles SSL via the domain mapping flow, but confirm the padlock is showing and no mixed content warnings appear.
- Flush your cache. If your site uses a caching plugin or server-level caching, clear it after migration so visitors get the new environment, not cached pages from the old host.
- Update your DNS records. Point your domain’s A record or nameservers to InstaWP. DNS changes propagate within a few hours to 48 hours depending on your domain registrar’s TTL settings.
- Confirm your backup on InstaWP. InstaWP’s managed hosting includes automated backups on a schedule tied to your site plan. Verify backups are active so you have a clean restore point from day one on the new host.
- Remove the migration connector. If you used the InstaWP Connect plugin on your old site during migration, deactivate and delete it once the move is complete.
What Happens to Your Hosting After Migration?
This is worth clarifying because it works differently from traditional hosting setups.
When you migrate a site to InstaWP, the hosting doesn’t need to be configured separately. Every site on InstaWP runs on managed cloud infrastructure that’s already built into the platform. The site plan you selected when creating your destination site is your hosting tier — it controls your CPU allocation, storage, CDN delivery, backup frequency, and security features.
You don’t point the migrated site at a separately provisioned server. The environment is already there. After migration, the main tasks are domain mapping, SSL activation, and verifying your site plan covers your resource needs.
If your site grows in traffic or complexity after migration, you can upgrade your site plan inside the dashboard without re-migrating anything.
Why Developers and Agencies Migrate to InstaWP
People move their WordPress sites to InstaWP for a few consistent reasons:
- Native staging built in. Rather than paying for separate staging environments or setting up manual copies, every InstaWP site can be staged, tested, and snapshotted from within the platform. For agencies managing multiple client sites, this eliminates a significant portion of workflow overhead.
- No environment mismatch. Because development, staging, and production all live within the same InstaWP infrastructure, there are no “works on staging, breaks on live” surprises. The environment your site is built and tested in is the same environment it runs on.
- Managed security from the start. InstaWP’s hosting includes InstaShield WAF, automated backups, and vulnerability scanning baked into every site plan — not as optional add-ons you configure manually after setup.
- Central site management. Agencies and freelancers managing multiple client sites can access, update, and monitor all of them from a single dashboard rather than logging into separate hosting accounts.
Move Your WordPress Site to InstaWP Today
Migrating a WordPress site to a new host is one of those tasks that feels bigger than it is. With the right method and a clean pre-migration checklist, most sites move in under an hour and land on infrastructure that’s already set up with managed hosting, automated backups, a built-in WAF, and a staging workflow that makes future changes easier.
Whether you’re migrating one site or a full client roster, InstaWP gives you a managed cloud environment that’s ready to go the moment your files arrive.
Create your InstaWP site and start migrating today
WordPress Migration FAQs
How long does it take to migrate a WordPress site to InstaWP?
For sites under 5GB using the automated tool, the migration typically completes in 15 to 30 minutes. Larger sites migrated via SSH or staging may take longer depending on file size and your source server’s connection speed. DNS propagation after domain mapping adds a few hours but doesn’t require your old site to be offline.
Will my site have downtime during the migration?
No, if you follow the recommended approach. Keep your old site live while migrating and testing on InstaWP. Only update your DNS records once you’ve confirmed the new environment works correctly. Your visitors continue using the old host during propagation, then switch over automatically once DNS resolves to InstaWP.
Can I migrate a WooCommerce store to InstaWP?
Yes. For WooCommerce sites, Method 2 (via staging) is strongly recommended so you can test the full checkout flow, product pages, and payment integrations before switching DNS. Sites with active orders during migration should schedule the move during low-traffic hours to avoid any order data discrepancies.
What is the file size limit for the automated migration tool?
The automated migration tool at migrate.instawp.com works best for sites under 5GB. For larger sites, use Method 2 (staging-based migration) or Method 3 (SSH migration) to avoid timeouts or incomplete transfers.
Do I need to set up hosting separately after migrating to InstaWP?
No. InstaWP’s hosting is native to the platform, every site you create is already running on managed cloud infrastructure. After migration, you select a site plan that matches your resource needs (CPU, storage, CDN, backups), map your domain, and you’re done. There’s no separate server provisioning require
Can I test my migrated site before pointing my domain to InstaWP?
Yes. Your site runs on a temporary InstaWP URL before you map your custom domain. You can browse, test, and verify the entire site using this URL without affecting your live site or changing any DNS settings prematurely.
What is the best method for migrating a WordPress website?
The best method depends on your technical skills. For non-technical users, InstaWP’s Migration Tool or managed service is ideal. For developers, SSH or third-party tools like Duplicator might be a better fit.