If you build sites for clients, you already know email is where the real ROI lives. A solid Mailchimp WordPress integration turns a basic brochure site into a lead machine but wiring it up across dozens of installs can be messy, repetitive work. In this guide, we will show you how to connect Mailchimp to WordPress the smarter way.
Table of Contents
What is Mailchimp Integration with WordPress and why it Matters
At a basic level, a Mailchimp WordPress integration connects your site to your Mailchimp audience so every form fill, newsletter opt in, or demo request becomes a subscriber you can actually market to. Instead of contacts living in your WordPress database, they move directly into Mailchimp with the right list and tags. That is the core of any WordPress Mailchimp integration.

For agencies and developers, this is bigger than “add a form and forget it.” A solid Mailchimp integration with WordPress is what powers:
- Launch campaigns for new features or products
- Onboarding journeys for new clients or users
- Maintenance reminders and renewal sequences
- Upsell flows for WaaS, website care plans, and add-ons
When you connect Mailchimp to WordPress, this automation scales across all your builds, not just one site.
How to Connect Mailchimp to WordPress: Best Method
The cleanest way to set up Mailchimp WordPress integration is to build your sites on a managed WordPress cloud platform like InstaWP. Instead of fighting with per-site plugins, broken API keys, or forms that silently stop syncing, you configure Mailchimp once in your InstaWP account and reuse that setup across templates, demo sites, and production hosting.
When you try to connect Mailchimp to WordPress directly on each site, you often end up with:

InstaWP’s Mailchimp WordPress integration solves this.You get:
- A central integration panel for Mailchimp credentials
- One Mailchimp connection that can power many shared templates
- Automatic email collection whenever someone spins up a WordPress demo site or sandbox
- Safe testing in disposable WordPress sandboxes before you roll anything into production
Here is how to connect Mailchimp to WordPress using InstaWP step by step.
Step 1: Enable Mailchimp inside InstaWP
Log in to your InstaWP dashboard and go to the Integrations section in your account. Find Mailchimp in the list and toggle it On.
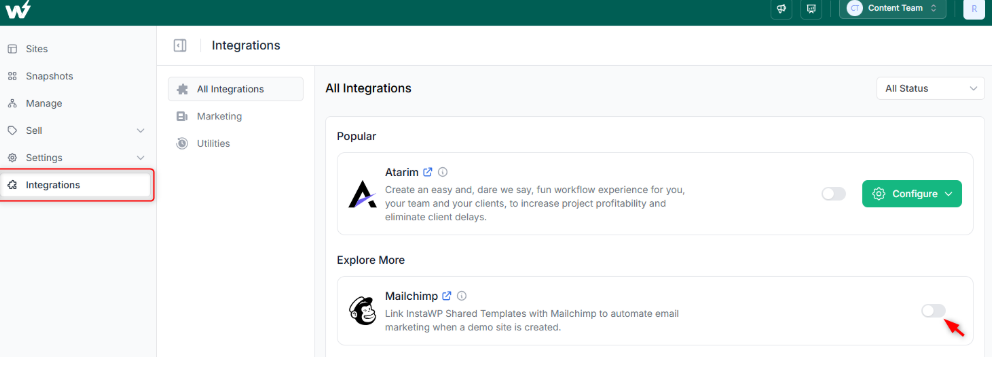
This turns on the Mailchimp and WordPress integration layer for your account.
Step 2: Add your Mailchimp API key, audience, and tags
When you toggle Mailchimp, a modal will open asking for:
- Alias: A friendly name for this Mailchimp connection. Helpful if you manage multiple brands or audiences.
- API Public Key:Your Mailchimp API key. You can find this in your Mailchimp account under Account settings → Extras → API keys.
- Mailchimp List ID (Audience ID): The audience that should receive contacts from your WordPress sites. Mailchimp calls this the Audience ID.
- Tags (comma separated): Optional labels you want applied to every contact that comes from InstaWP templates. For example:
demo,plugin-trial,care-plan-lead. - Visibility: Decide who can use this integration inside your InstaWP workspace. Choose All team members or Admin only.
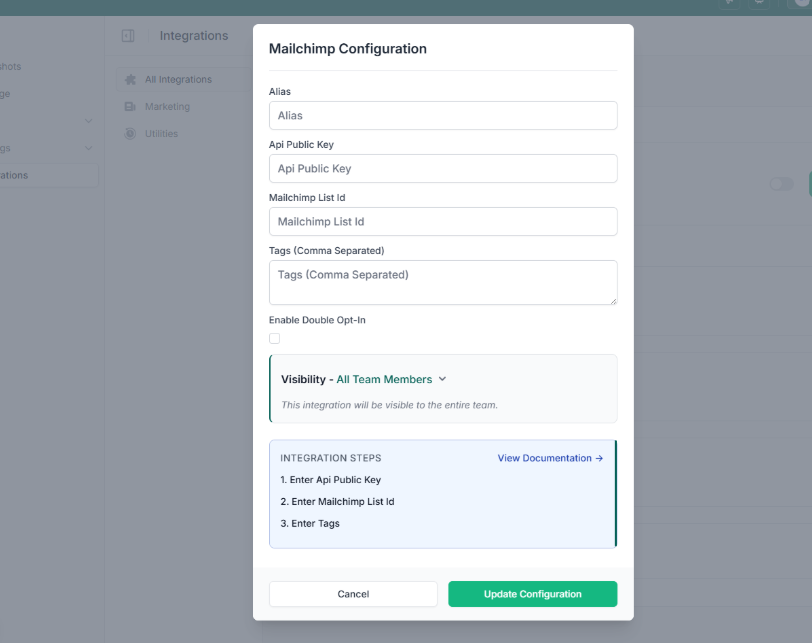
Fill these fields and click Save or Update. At this point, your base Mailchimp integration WordPress layer is ready inside InstaWP.
Step 3: Link to Your Mailchimp Account
Now, you need to connect your Mailchimp account with InstaWP through API. For this, simply log in to your Mailchimp account and go to Settings > Extras > API Keys and copy your API key.
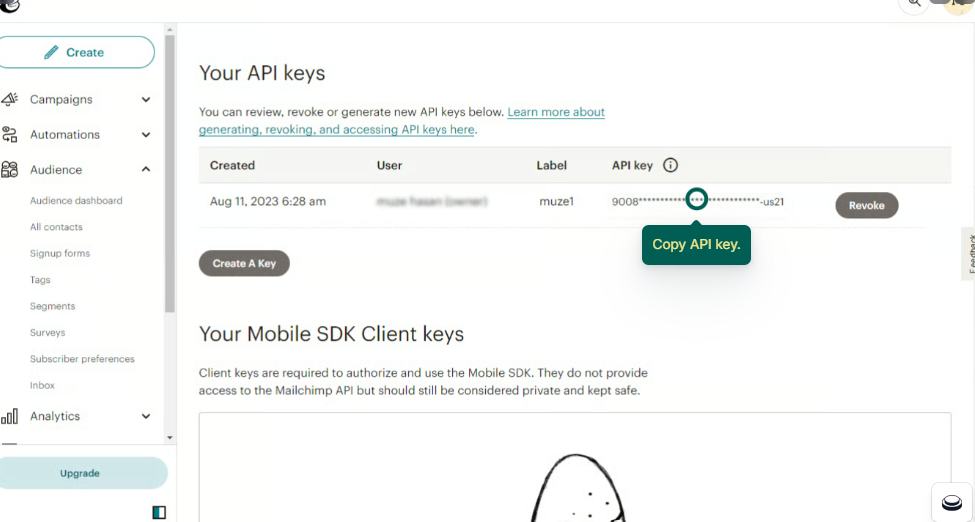
Find your Audience ID (List ID). If you are not sure where to find it, you can refer to this link. Once you have the Audience ID, go back to your Mailchimp configuration screen in WordPress/InstaWP and paste:
- The API key
- The Audience ID
- Any Tags you want to apply
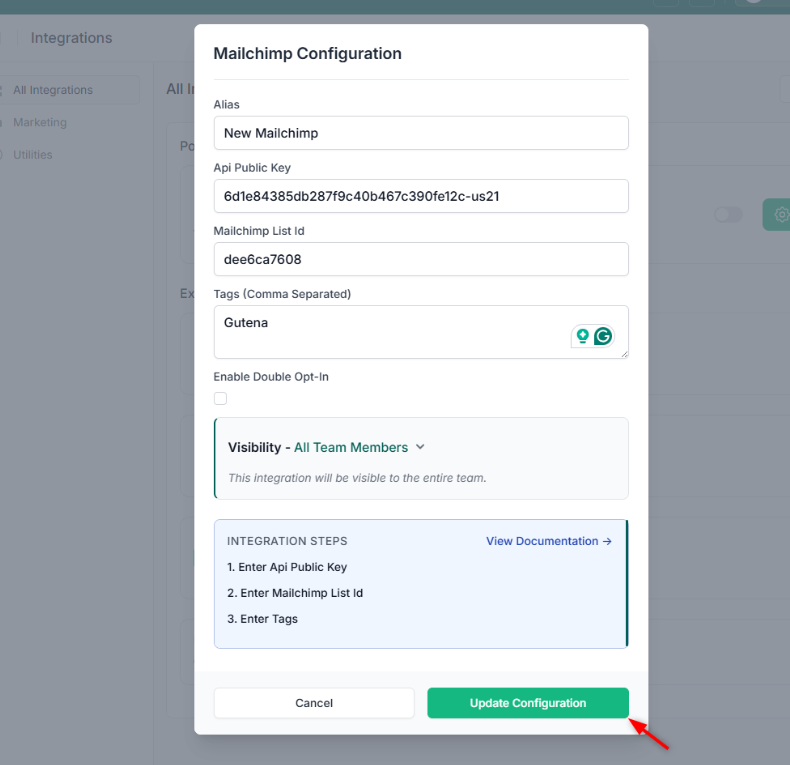
Click Update to save the Mailchimp configuration. Once you save the changes, your Mailchimp integration is ready to use.
Step 4: Link Mailchimp to Shared Templates
InstaWP allows you to link a Shared Template with Mailchimp for automatic email collection:
What it does:
• When someone creates a new site using your shared template link
• Any emails collected are automatically synced with Mailchimp
To make this actually useful for client work, you connect Mailchimp to the templates you already use for new sites.
- Go to your Shared Snapshots / Shared Templates in InstaWP.
- Open the template you use for demos, trials, or new builds.
- Find the Integrations or Connect email provider option.
- Select the Mailchimp integration alias you configured earlier.
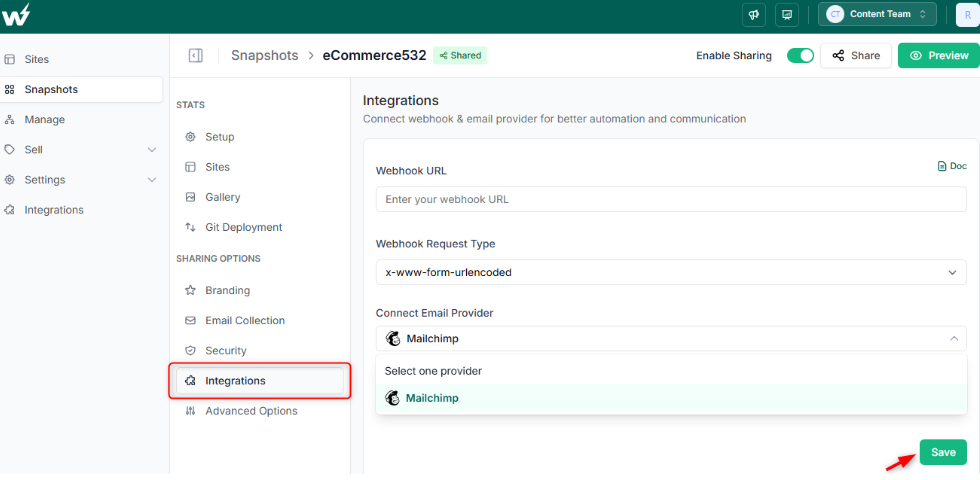
From now on, whenever someone creates a site from that shared template in your online WordPress development environment, their email is sent straight to the configured Mailchimp audience with the right tags.
Before you roll this out across all clients, test it safely.
- Launch a new WP sandbox site from the shared template connected to Mailchimp.
- Submit the newsletter form, demo request, or opt in that is on the site.
- Check your Mailchimp audience to confirm the contact, list, and tags.
If everything looks correct, you have a reusable Mailchimp WordPress integration that sits on top of your entire InstaWP workflow, not just one site.
Other Ways to Connect Mailchimp to WordPress
Even if you never touch InstaWP, there are plenty of ways to get a Mailchimp WordPress integration running. These are the usual paths agencies and developers use today, and they are all valid. The problem is scale. They work fine on a few sites, then start to feel fragile once you manage dozens of client projects.
1. Using Mailchimp form or Newsletter Plugins
The most common method is a dedicated WordPress Mailchimp integration plugin. You install it, paste your API key, pick an audience, and drop a form block or WordPress shortcode on a page. This is simple for single-brochure sites, one brand with one Mailchimp audience, and basic “join our list” opt-in flows.
The catch is that you repeat the same configuration on every site and every staging copy. If you rotate keys, change audiences, or switch tagging rules, you now have to touch each install individually. At agency scale, that is a lot of manual work for a basic Mailchimp integration with WordPress.
Here is how a typical Mailchimp WordPress integration works when you use a newsletter or WordPress form plugin directly inside WordPress:
Log in to your WP Admin dashboard and go to Plugins > Add New. Search for a Mailchimp or “email marketing” plugin that supports Mailchimp.
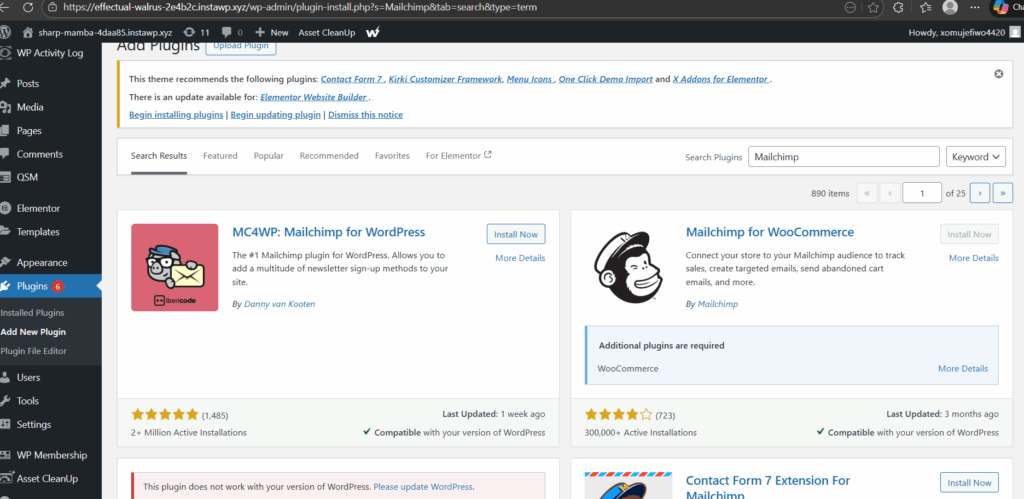
Check that it is updated, well reviewed, and works with your theme or page builder. Click Install Now, then Activate. You will usually see a new menu item for the plugin inside the WordPress admin. Once the plugin is activated, get your Mailchimp API key. Log in to your Mailchimp account and go to Account settings > Extras > API keys.
Create or copy an existing API key. This is what allows the plugin to talk to Mailchimp. Now, connect WordPress to Mailchimp using the API key. Paste the API key into the Mailchimp field.
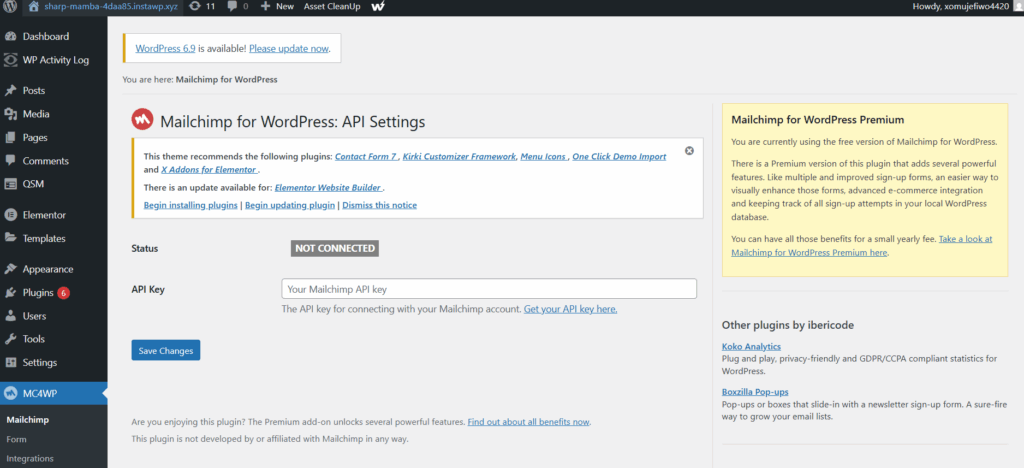
Save changes so the plugin can verify the connection. Inside the plugin settings, choose which Audience / List new subscribers should go to. If supported, enable default tags or groups so you can segment contacts later.
These steps will connect Mailchimp to WordPress for a single site. For agencies, the repetitive part is doing this on every new client project. That is exactly what InstaWP avoids by handling Mailchimp integration at the platform level and letting your shared templates carry the connection into every new sandbox, staging site, or live build automatically.
2. Connect Mailchimp to WordPress Using Native Embed Forms
This method skips plugins and uses the raw HTML form that Mailchimp generates. It is lightweight, but you have to manage the code yourself, so it is better suited for developers who are comfortable editing templates and blocks.
Here is how to do this type of Mailchimp WordPress integration.
Log in to your Mailchimp account and go to Audience > Signup forms. Choose Embedded forms and configure fields, GDPR text, and any basic styling options.
Generate the embed code and decide where the form will live in WordPress. In the WordPress dashboard, edit the page or template to add the embed form using a block or widget.
Adjust styling to match your theme and test the Mailchimp integration WordPress setup.
This method keeps your Mailchimp WordPress integration lightweight and plugin free, but you trade that for more manual maintenance, which is why many agencies prefer to centralize things through InstaWP when they have to repeat the same patterns across dozens of projects.
3. Connect Mailchimp to WordPress Using Page Builder Widgets
This method leans on your page builder’s own Mailchimp widget. It feels smooth for designers, but you still repeat the Mailchimp WordPress integration on every single site you build.
Open your page builder settings and look for a Form, Newsletter, or Mailchimp widget in the element panel.
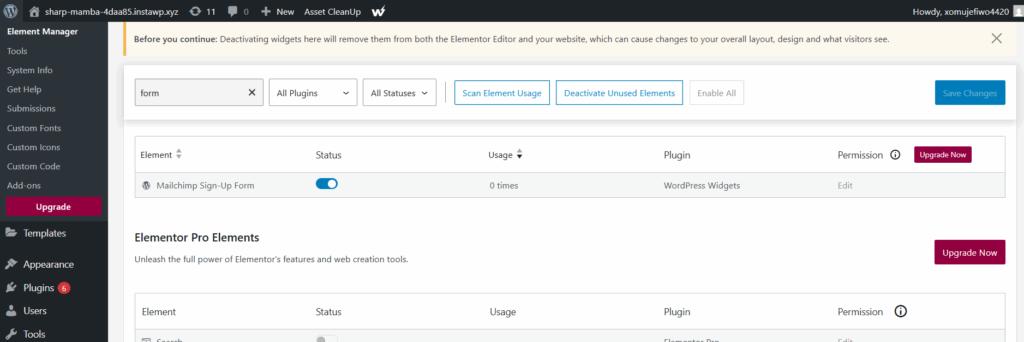
Add a Mailchimp form widget to your layout.
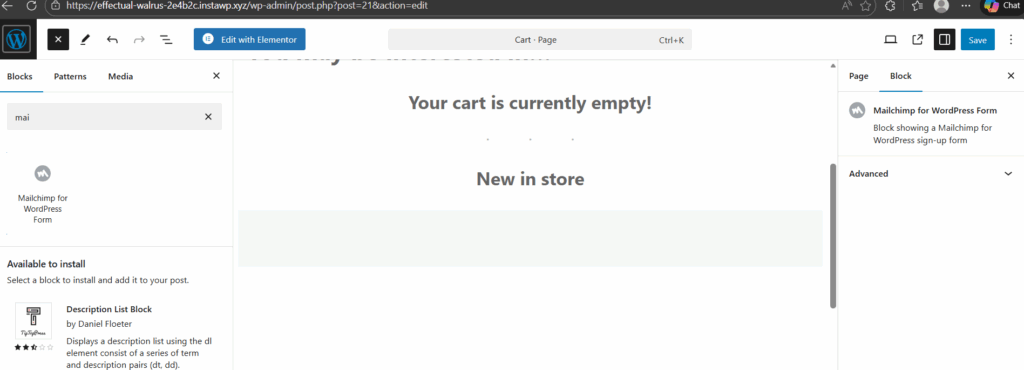
Place it where high intent visitors will see it, like blog sidebars or hero sections. In the widget settings, look for Integrations, Actions after submit, or Mailchimp.
Paste your Mailchimp API key or connect your account if the builder supports OAuth. This is the core step that turns a basic form into a Mailchimp and WordPress integration.
This workflow is fine when you manage a few sites and stick to one builder. For agencies juggling many stacks, it becomes another repeated task. With InstaWP, you can move this responsibility up a level: test your favorite builder based Mailchimp forms in WP sandboxes, lock them into a shared template, and then let the platform handle Mailchimp WordPress integration for every new site you spin up.
4. Connect Mailchimp to WordPress Using WooCommerce and Checkout Integrations
If you run stores for clients, a lot of your best email data sits in WooCommerce. This method connects Mailchimp to WordPress at checkout so every buyer and subscriber flows straight into your Mailchimp audience with order context.
In the WordPress dashboard, go to Plugins → Add New and search for a WooCommerce Mailchimp or Mailchimp for WooCommerce extension.
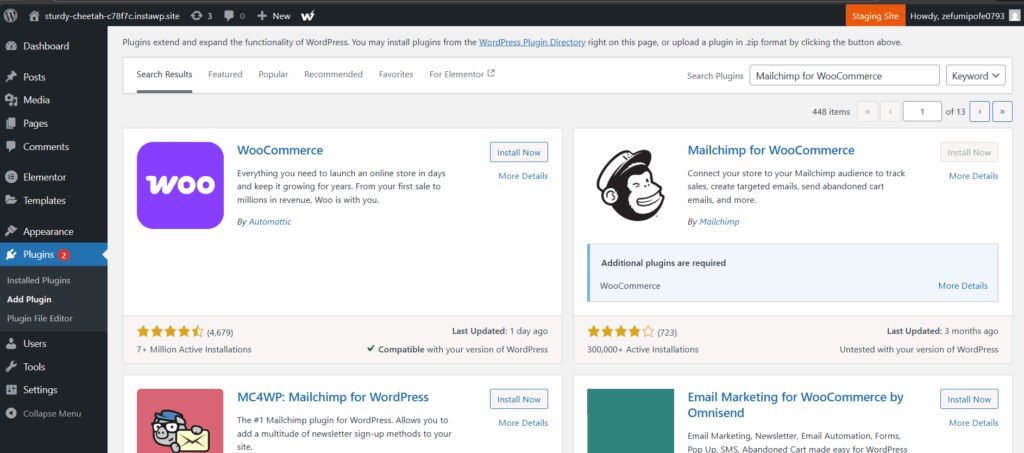
Check that it is compatible with your WooCommerce version and still maintained. Install and activate the plugin. Go to the new Mailchimp or WooCommerce Mailchimp settings page. Either paste your Mailchimp API key or click a Connect button that opens Mailchimp’s authorization screen.
Approve the connection so the plugin can sync customers and orders. For a single store this works very well. For agencies that manage many WooCommerce installs, the pain is in repeating it.
A smarter pattern is to standardize a WooCommerce starter site inside InstaWP, connect Mailchimp once at the platform and template level, test the whole checkout and email flow in a sandbox, then spin up new client stores from that proven template instead of redoing the connection every time.
Real World Use Cases for Mailchimp and WordPress Integration with InstaWP
A good Mailchimp WordPress integration should quietly collect leads while you focus on building and shipping sites. When you connect Mailchimp integration with WordPress through InstaWP, it starts working at the template and workflow level, not just on a single plugin form. Here is how that looks in real agency scenarios.
Demo sites that automatically collect leads
If you already use shared templates or demo links for product previews, this is where InstaWP becomes a lead engine. You connect your Mailchimp integration WordPress setup once inside InstaWP, then attach it to the shared template you use for demos, trials, or proof of concept builds. After that:
- A prospect clicks your demo link.
- InstaWP spins up a fresh sandbox site from that shared template.
- The email they use to request or access the demo is captured and sent straight into your Mailchimp audience.
- Tags identify which demo or product they tried, for example
plugin-demo,theme-preview,client-portal-demo.
Instead of manually exporting demo signups or relying on a separate form, your Mailchimp WordPress integration turns every trial into a contact ready for onboarding sequences, follow ups, or upgrade offers. You can even test the whole flow in a temporary sandbox site first, make sure contacts land in the right list with the right tags, and only then roll it into your live funnel.
Lead magnets and resource libraries on WordPress
Agencies often run multiple lead magnets at once. A checklist here, a template there, maybe a full resource library on a dedicated WordPress site. The risk is ending up with fragmented audiences because every asset uses a slightly different plugin or embed.
With InstaWP, you can use a single Mailchimp and WordPress integration for all of these gated assets, while still keeping segmentation clean:
- Build a standard opt in pattern into your shared templates.
- Attach your Mailchimp integration to that template in InstaWP.
- Launch new lead magnet pages, microsites, or resource hubs from the same base.
- Use different tags per template so Mailchimp knows which asset someone requested, for example
whitepaper-speed,woo-checklist,agency-pricing-kit.
Now your WordPress Mailchimp integration sends everyone into one well structured audience, while tags keep campaigns targeted. You can nurture “performance guide” leads differently from “WooCommerce playbook” leads, without rebuilding the integration for each new landing page.
WaaS, productized sites, and recurring revenue
Website as a Service is where platform-level Mailchimp integration with WordPress really shines. When you sell productized WordPress packages, you usually have:
- One or more base templates that every new site is created from.
- Standard onboarding flows, upgrade paths, and support touchpoints.
InstaWP lets you connect Mailchimp to those shared templates once, then every new WaaS site inherits the same Mailchimp WordPress integration automatically:
- A customer signs up and launches their site from your WaaS template.
- Their email is added to your Mailchimp audience with tags like
waas-basic,waas-pro,trial-user. - Automated sequences handle onboarding, feature education, upsells to higher plans, and renewal nudges.
You do not have to configure mailing lists or opt-in forms separately for each WaaS customer. Mailchimp automatically builds segmented lists for upgrades, cross-sell campaigns, and support updates, while InstaWP keeps the WordPress side consistent through shared templates, WP sandboxes, and production-ready hosting on the same platform.
Conclusion: Turn Every WordPress Build into a Mailchimp-powered Asset
Mailchimp WordPress integration is no longer just a plugin checkbox. For agencies and developers, it is part of your standard stack, just like staging, backups, and performance tools. When you connect Mailchimp to WordPress through InstaWP, you configure it once, attach it to shared templates, test it in sandboxes, and let every new demo, WaaS site, or client project inherit a proven setup.
Instead of repeating the same WordPress Mailchimp integration on dozens of installs, treat InstaWP as your control center. Set up Mailchimp integration with WordPress at the platform level, wire it into your templates, and let the platform quietly collect, tag, and segment leads while you focus on shipping better sites.
FAQs: Mailchimp WordPress integration
How is InstaWP different from using a regular Mailchimp plugin for WordPress?
A regular plugin handles Mailchimp and WordPress integration one site at a time. You install it, paste an API key, pick a list, and repeat for every project. InstaWP moves Mailchimp WordPress integration to the platform level. You configure the integration once in your account, then attach it to shared templates so every new sandbox, staging site, or live build starts with Mailchimp already wired in.
Do I still need a Mailchimp plugin if I use InstaWP integration?
You can still use a form or newsletter plugin for design, but you do not have to use it as the main connection to Mailchimp. InstaWP stores the API key, audience ID, and tags centrally, then your WordPress forms simply send data into that existing Mailchimp integration WordPress layer. This keeps credentials and list logic in one place, while you are free to swap themes, blocks, or form plugins as needed.
Can I use different Mailchimp lists or tags for different templates?
Yes. When you configure Mailchimp integration with WordPress inside InstaWP, you can create multiple aliases that point to different audiences or tag sets. You might have one integration for product demos, another for WaaS customers, and a third for internal projects. Each shared template can be linked to the most relevant Mailchimp alias so segmentation stays clean right from the first signup.
Is it safe to store Mailchimp API keys in an online WordPress development environment?
Treat your Mailchimp API keys like production credentials. InstaWP keeps them inside the integrations panel instead of scattering them across multiple wp admin screens and plugins. Only the users you specify through the Visibility setting can manage the Mailchimp WordPress integration, and you can rotate keys in one place rather than chasing them across dozens of sites.
How can I test Mailchimp integration with WordPress without touching a live site?
This is where InstaWP is especially useful. You spin up a sandbox from a shared template that already has Mailchimp attached, submit a few test signups, and check that contacts land in the right Mailchimp audience with the correct tags. Once you are happy with how the Mailchimp WordPress integration behaves in that sandbox, you can safely roll the same template into staging or production without risking a live client site.