ou can block countries in WordPress using a security plugin, a cloud firewall like Cloudflare, a dedicated geoblocking plugin, or .htaccess rules. The fastest approach for most site owners is installing a security plugin with geo-blocking built in, selecting the countries you want to restrict, and applying the rules to your login page or full site.
This guide walks you through all four methods step by step so you can pick the one that fits your setup.
Table of Contents
Key Takeaway

WordPress does not support country blocking natively. You need a plugin, a cloud firewall, or server-level rules to restrict access by location.
Plugin-based geoblocking is the simplest option and works from the WordPress dashboard. Cloud firewalls like Cloudflare block traffic before it reaches your server, which is better for performance.
Always test geo-blocking rules on a WordPress staging environment before applying them to a live site. A misconfigured rule can lock out legitimate users or search engine crawlers.
Country blocking is a useful layer for performance tuning and compliance, but it should not be your only security measure. VPNs and proxies can bypass geo-restrictions easily.
What Is WordPress Geoblocking (Country Blocking)?
WordPress geoblocking is the practice of restricting visitors from specific countries or regions from accessing parts or all of your site. Instead of leaving your site open to everyone worldwide, you set rules that deny or redirect traffic based on a visitor’s geographic location, determined through their IP address.
Every device connected to the internet has an IP address, and IP addresses are assigned in ranges that map to physical locations. Geolocation databases (like MaxMind’s GeoLite2) maintain these mappings and update them regularly.
When a visitor lands on your site, the geoblocking tool checks their IP against the database, identifies their country, and then applies whatever rule you have configured: block access entirely, show a custom message, redirect to another URL, or return a 403 Forbidden error.
There are four main ways to implement this on a WordPress site:
| Method | Technical Skill | Performance Impact | Best For |
|---|---|---|---|
| Using AI Tools | Intermediate | Low | Most WordPress users |
| Security plugin (e.g., MalCare, Wordfence) | Beginner | Moderate (request still hits server) | Most WordPress users |
| Cloud firewall (e.g., Cloudflare WAF) | Intermediate | Low (blocked before server) | High-traffic and e-commerce sites |
| Dedicated geoblocking plugin (e.g., iQ Block Country) | Beginner | Moderate | Sites needing only geo-restriction |
| .htaccess rules | Advanced | Very low (blocked before PHP loads) | Developers on Apache servers |
Understanding where blocking happens in the request chain matters. Plugin-based blocking happens after the request reaches WordPress, meaning your server still processes the initial connection. Cloud firewalls and .htaccess rules stop traffic earlier, which reduces server load and improves performance for your legitimate visitors.
It is worth noting that geoblocking is not the same as geo-targeting. Geo-targeting personalizes content based on location (showing different prices, languages, or offers), while geoblocking outright denies access. Both use IP geolocation, but the intent and outcome are very different.
How to Block Countries From Your Website in WordPress: 5 Best Methods
There’s no single “best” way to block countries in WordPress. The right approach depends on your site’s size, your technical comfort, and whether you need simplicity or full control. Below are the four most reliable methods, starting with beginner-friendly plugins and moving up to advanced server rules.
Method 1: Block Countries Using AI and WordPress MCP (The Fastest Way)
What if you could block countries from your WordPress site by simply telling an AI assistant to do it for you? No plugin hunting, no dashboard navigation, no manual configuration. Just a plain-language command like: “Install a geoblocking plugin and block traffic from Russia and China on my login page.”
That is exactly what becomes possible when you connect an AI tool like Claude Desktop or Claude Code to your WordPress site using the Model Context Protocol (MCP).
MCP is an open protocol that lets AI assistants interact directly with your WordPress site through authenticated API calls. Instead of generating instructions for you to follow, the AI actually executes the actions on your site in real time.
What you need to get started:
- A WordPress site hosted on InstaWP (Sandbox plan or above)
- Claude Desktop (Pro or Team plan) or Claude Code installed on your machine
- About 5 minutes of setup time
Step 1: Create your WordPress site on InstaWP.
Sign up or log in at instawp.com and create a new site. InstaWP provisions a fully hosted WordPress environment in under 30 seconds, complete with a temporary URL, SSL, and all developer tools ready to go.
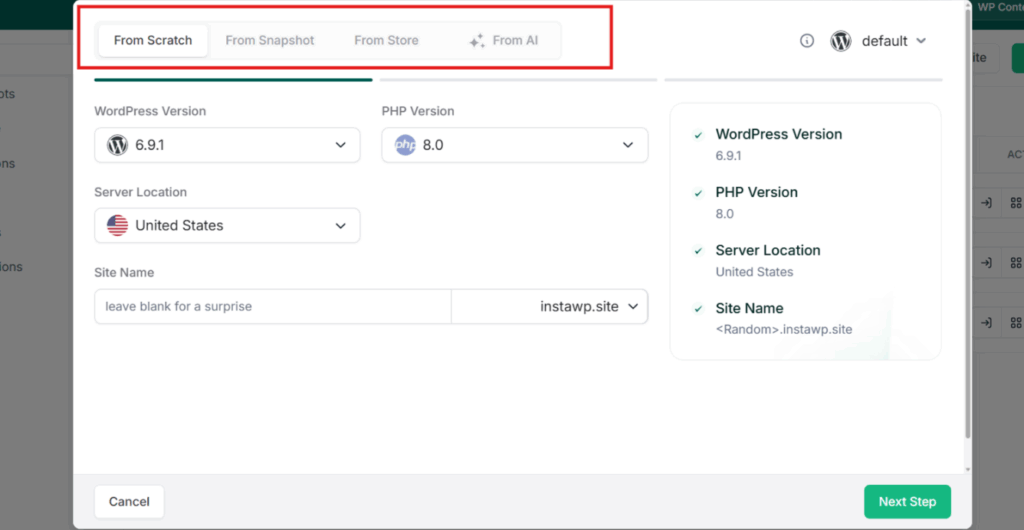
If you already have a site, skip to Step 2.
Step 2: Enable MCP on your InstaWP site.
From your InstaWP dashboard, click on the site name to open the Site Details page. In the left sidebar, click on “MCP” and toggle the Enable MCP switch to ON.
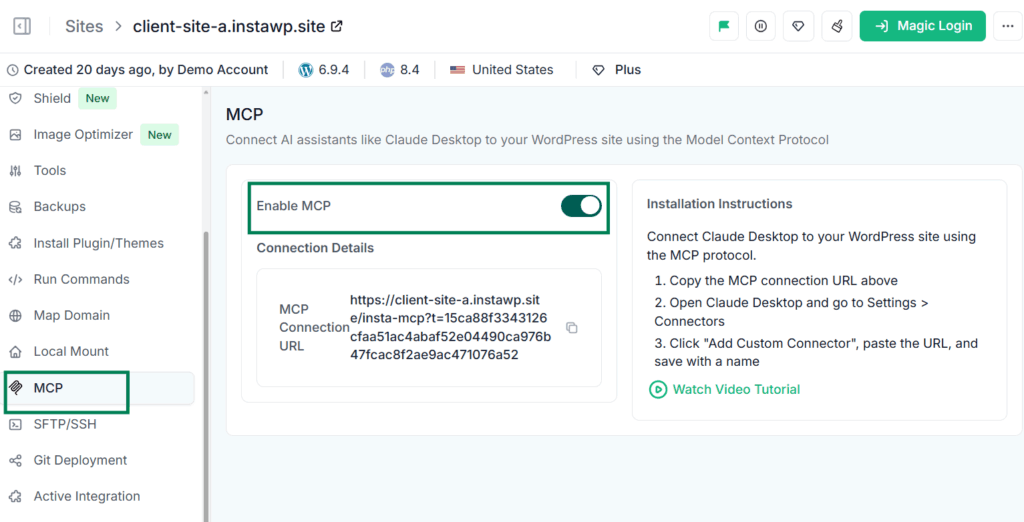
InstaWP automatically installs the MCP plugin on your site, generates a secure 64-character authentication token, and creates your unique MCP connection URL. No manual configuration, no JSON files, no application passwords to set up.
Copy the MCP Connection URL. This is what connects your AI assistant to your WordPress site.
Step 3: Connect Claude to your WordPress site.
For Claude Desktop: Open Claude Desktop, go to Settings, navigate to the Connectors section, and click “Add Custom Connector.” Paste your MCP URL, give it a name (e.g., “My WordPress Site”), and click Add.
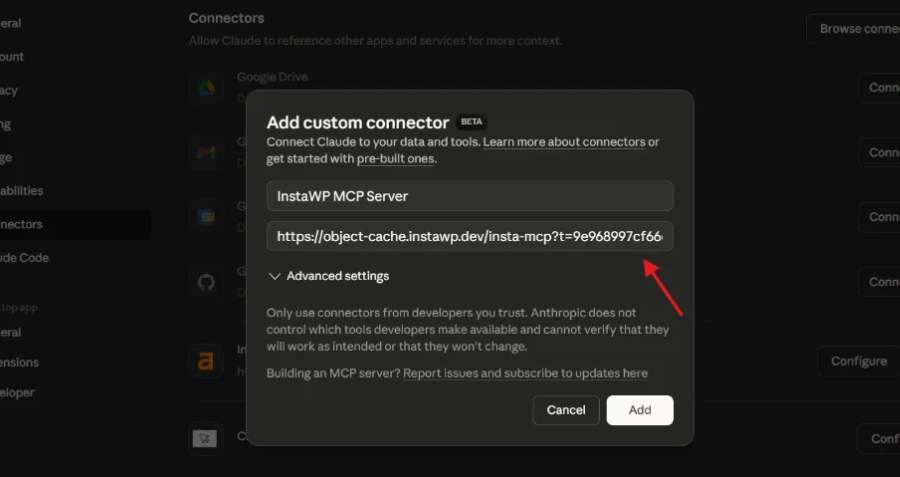
Watch the video tutorial:
For Claude Code (terminal): Run this command:
claude mcp add --transport http my-wp-site <your-mcp-url>That is it. Claude now has authenticated access to read, create, update, and manage your WordPress site through natural language commands.
Step 4: Tell Claude to set up geoblocking.
Open a conversation in Claude Desktop or Claude Code and give it a command like:
- “Install and activate the IP2Location Country Blocker plugin on my site.”
- “Configure the country blocker to block all frontend traffic from China, Russia, and Brazil.”
- “Set up backend blocking so only traffic from the United States and United Kingdom can access wp-admin.”
- “Make sure Googlebot and Bingbot are whitelisted so SEO is not affected.”
Claude translates these natural language prompts into WordPress REST API calls through the MCP server. It installs the plugin, adjusts the settings, and confirms the changes, all without you ever opening wp-admin.
Step 5: Verify and test.
After Claude completes the setup, you can ask it to confirm what was configured:
- “Show me the current geoblocking settings on my site.”
- “Which countries are currently blocked on the frontend?”
- “Is crawl access whitelisted for Google?”
You can also use a VPN to simulate traffic from a blocked country and verify the rules are working as expected.
Why this method works well for agencies and developers:
If you manage multiple WordPress sites, the AI-powered approach scales beautifully.
You can connect Claude to several InstaWP sites simultaneously (each site gets its own MCP URL and token) and run the same geoblocking setup across all of them through conversational commands. What would normally take 20 minutes of clicking through dashboard settings per site becomes a single prompt that Claude executes in seconds.
This approach is also ideal for testing. Since InstaWP lets you spin up disposable WordPress sandbox environments, you can connect Claude to a sandbox site, test your geoblocking configuration thoroughly, and only apply it to production once you are confident everything works correctly. No risk, no downtime, no accidental lockouts.
InstaWP’s MCP integration supports plugin management, content operations, taxonomy handling, user administration, and site settings out of the box. You are not limited to geoblocking; once the connection is live, you can use Claude for any WordPress management task.
Did you know?
InstaWP’s managed MCP server is plug-and-play. Unlike self-hosted MCP setups that require Node.js installation, JSON configuration files, and manual Application Password creation, InstaWP handles the entire authentication and server infrastructure for you with a single toggle.
You can go from zero to a working AI-powered WordPress assistant in under two minutes. Learn more about connecting Claude to WordPress via MCP.
Method 2: Block Countries Using a Security Plugin
For most WordPress users, a security plugin with built-in geo-blocking is the easiest path. These plugins combine firewalls, malware scanning, and IP filtering in one package, so you get country blocking along with broader protection without touching any server files.
This method requires no coding, and all settings are managed directly from your WordPress dashboard. Popular options include MalCare, Wordfence (Premium), and All-In-One WP Security. Each of these lets you select countries to block and choose whether the restriction applies to just the login page or the entire site.
Here is how to set it up using MalCare, one of the most straightforward options for this task:
Go to your WordPress admin panel and install the MalCare plugin. If you’re building WordPress sites with InstaWP, you can choose it at the very beginning and MalCare auto installs this plugin.
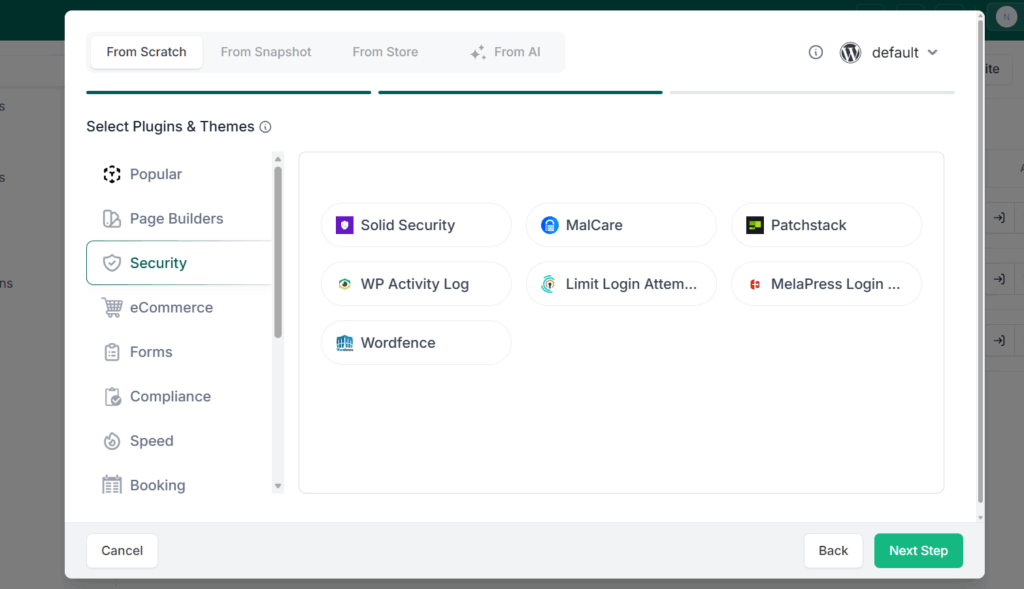
Activate it and navigate to MalCare > Ozone Layer > Firewall from your dashboard. Click the Geo Blocking tab, then select Country.
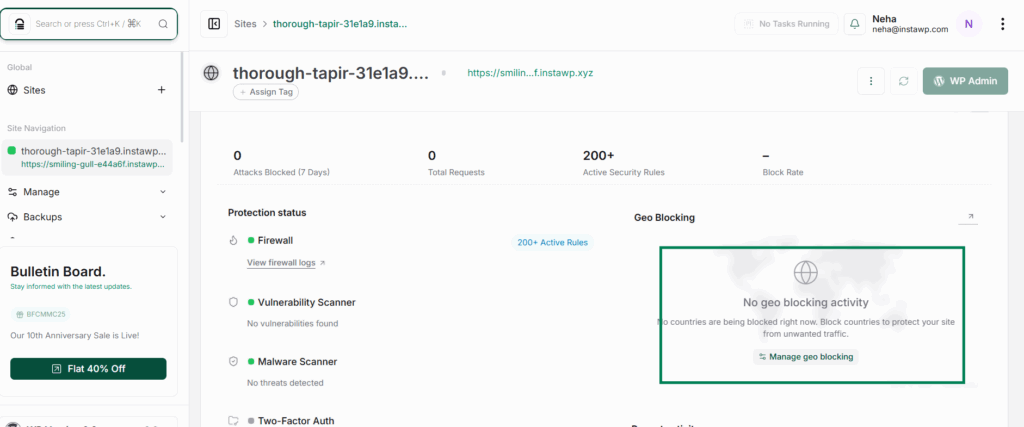
Pick the countries you want to block from the dropdown list. Choose whether to block only the login page or the entire site. Click Save Changes.
Important: Before enabling full-site blocking on a production site, always test the configuration on a staging site first. A single misconfigured rule can accidentally lock out your own admin access or block search engine crawlers.
If you are using InstaWP, you can create a staging site in seconds and test how the plugin affects both admin access and public-facing pages before pushing changes live.
Did you know?
If your WordPress site is hosted on InstaWP, you can skip manual plugin installations entirely. InstaWP’s dashboard includes a built-in WP-CLI command interface and bulk plugin/theme installation feature, so you can install security plugins (or any other plugin) directly from the dashboard without logging into wp-admin.
This is especially useful for agencies setting up geo-blocking rules across multiple client sites.
Method 3: Use a Cloud-Based Firewall (Best for Performance and Security)
If your site handles significant traffic or runs an e-commerce store, blocking at the DNS or edge level is the smarter choice. A cloud firewall like Cloudflare intercepts requests before they ever reach your server, which means blocked traffic never consumes your server’s CPU, memory, or bandwidth.
This method is particularly effective for agencies managing client sites that need both global performance and region-specific restrictions. The blocking happens upstream, so your WordPress installation stays lightweight and responsive for the visitors you actually want to reach.
Here is how to configure country blocking using Cloudflare’s WAF:
- Sign in to your Cloudflare dashboard and select the website you want to secure.
- Navigate to Security > WAF > Firewall Rules.
- Click Create a Firewall Rule and name it (e.g., “Block Traffic from [Country]”).
- Set the condition: Field = Country, Operator = Equals, Value = the country code (e.g., CN for China).
- Set the Action to Block.
- Click Deploy.
You can add multiple countries to the same rule using the “Or” operator, or create separate rules for different regions if you want different actions (block vs. challenge vs. JS challenge).
One thing to keep in mind: if you are already using a hosting platform with a built-in WAF and CDN, you may not need Cloudflare as an additional layer.
For example, InstaWP’s managed WordPress hosting includes InstaShield (WAF and DDoS protection) and a built-in CDN for WordPress with up to 119 global edge locations on premium plans. This gives you edge-level security and fast content delivery without subscribing to a separate service.
Pro tip: Use a WordPress sandbox to simulate traffic from different geographic locations and verify that your CDN caching and geo-based rules work correctly before deploying them on a live site.
Method 4: Use a Dedicated WordPress Geoblocking Plugin
If you only need country-level access control and do not want the overhead of a full security suite, a dedicated geoblocking plugin is a lightweight alternative. These plugins focus specifically on restricting access by location and tend to have simpler interfaces with fewer resource requirements.
Popular options include iQ Block Country, IP2Location Country Blocker, and Geo Blocker by Geotargeting WP. Most of them rely on the MaxMind GeoLite2 database for IP-to-country mapping, which offers around 99.5% accuracy at the country level.
Here is a walkthrough using the iQ Block Country plugin, which is one of the most established options in this category:
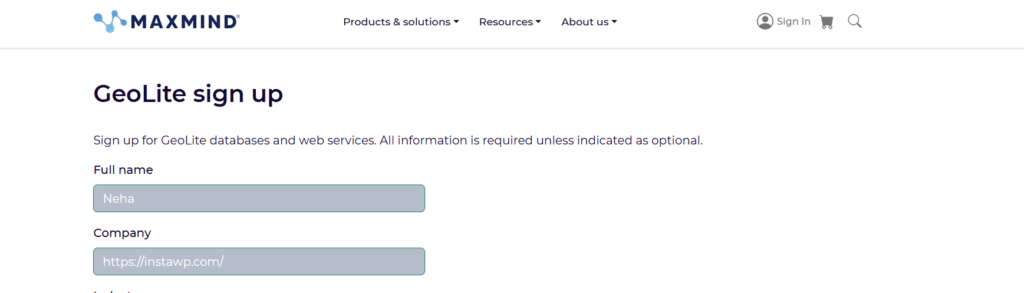
Step 1: Create a free MaxMind account.
Go to the MaxMind website and sign up. This gives you access to the GeoLite2 Country database, which is sufficient for most WordPress geoblocking needs.
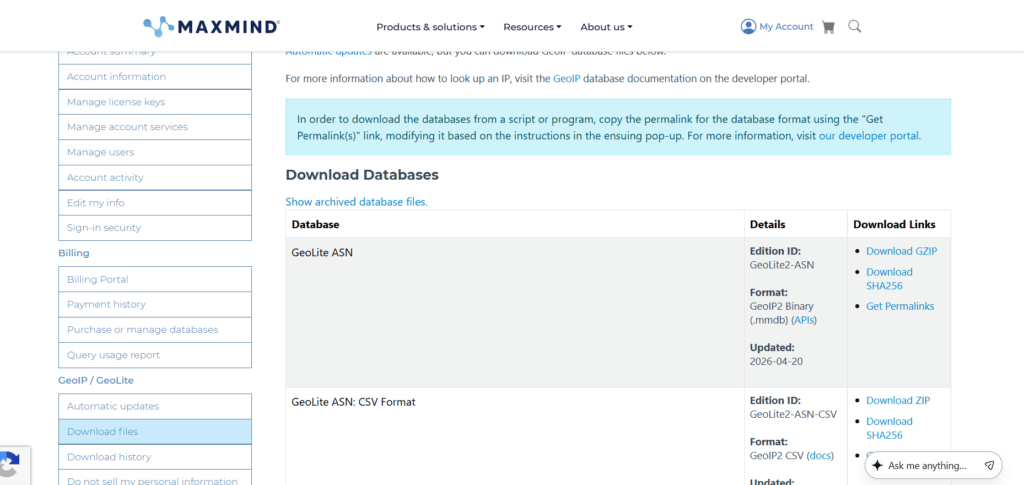
Step 2: Download the GeoLite2 Country database.
From your MaxMind account dashboard, navigate to the GeoIP2/GeoLite2 section and download the database in .mmdb format.
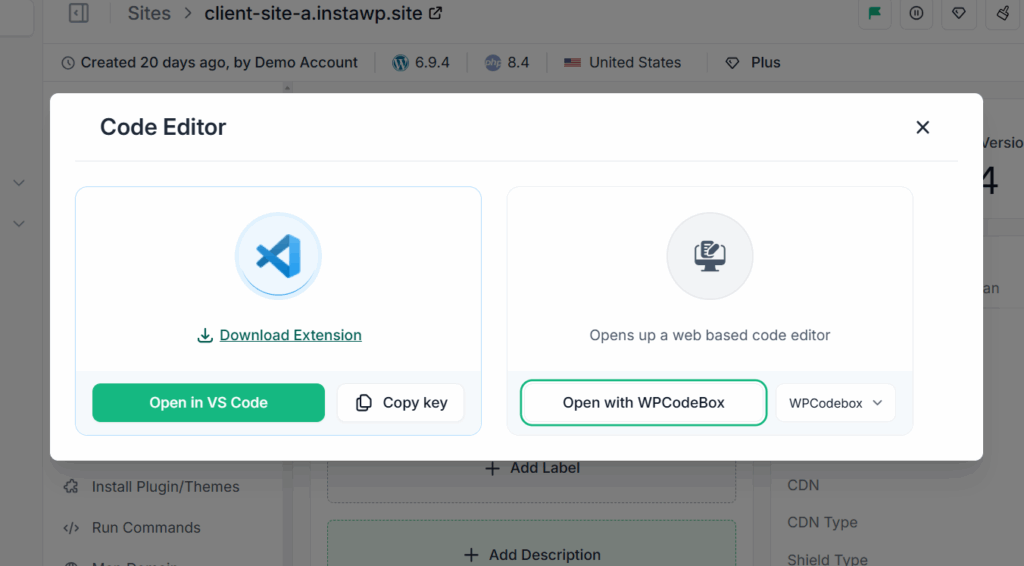
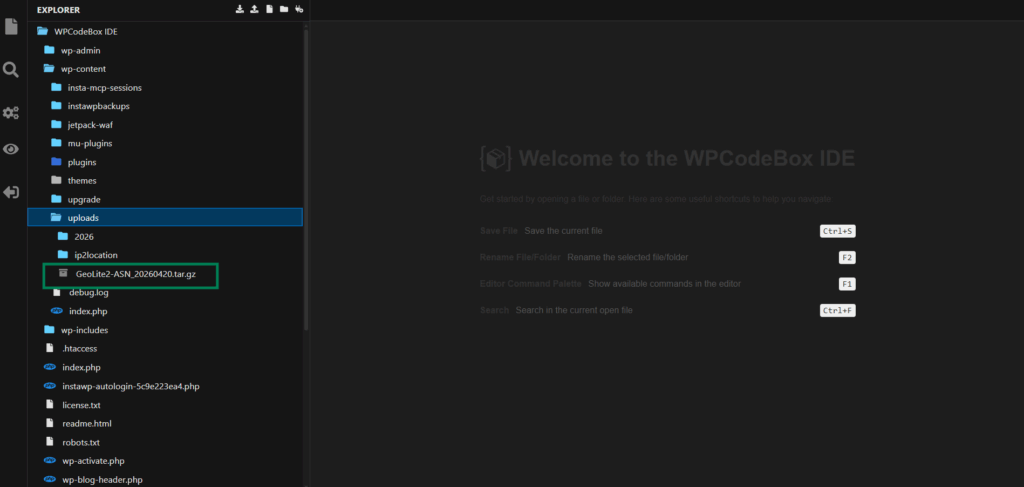
Step 3: Upload the database to your WordPress site.
Use FTP, your hosting panel’s file manager, or a tool like InstaWP’s built-in Code Editor Manager to upload the .mmdb file to your /wp-content/uploads/ directory.
The file path should look something like: /wp-content/uploads/GeoLite2-Country.mmdb
Step 4: Install and configure the plugin.
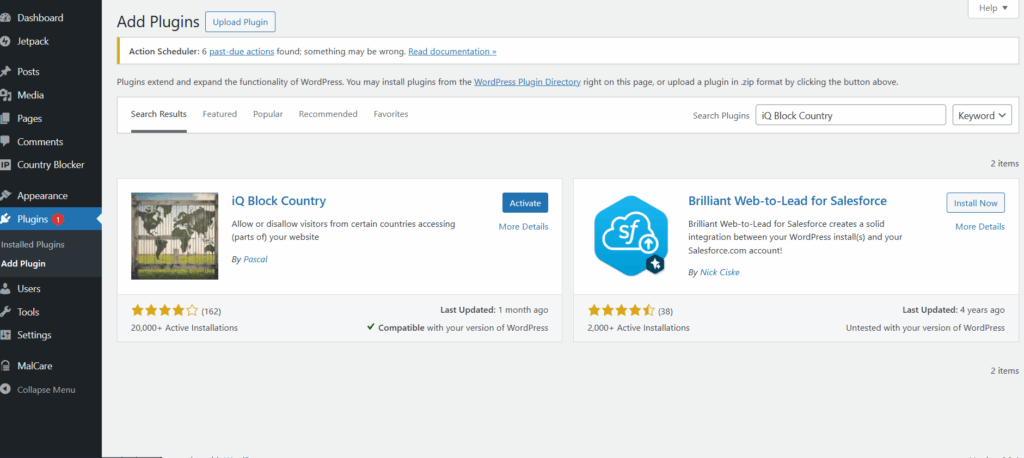
From your WordPress dashboard, go to Plugins > Add New, search for “iQ Block Country,” install and activate it.
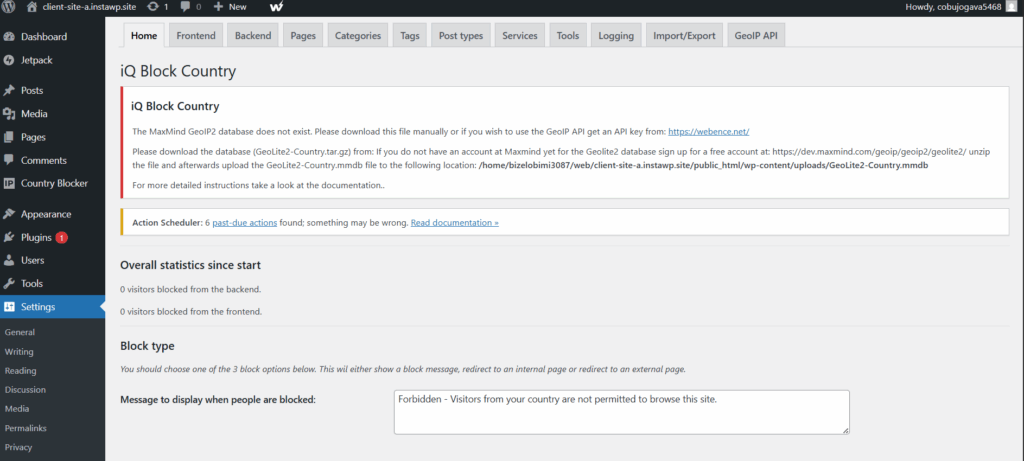
Then navigate to Settings > iQ Block Country, enter your forbidden message or redirect URL.
Go to the Frontend tab, select the countries you want to block, and save your changes.
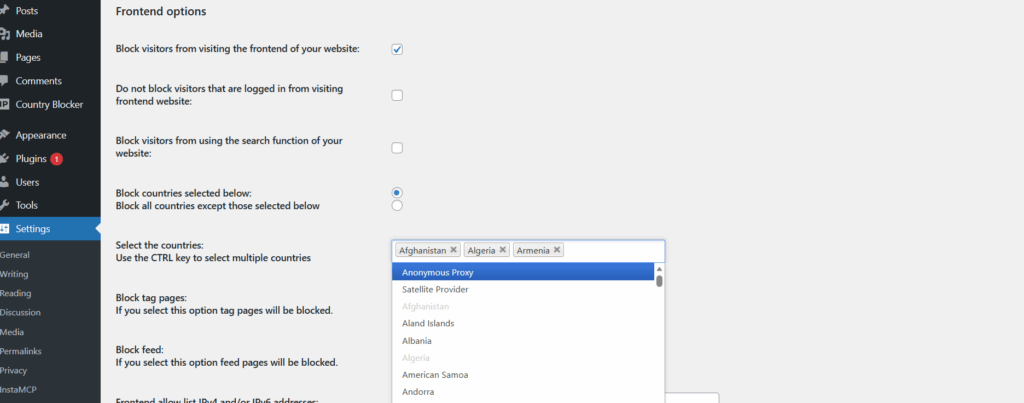
You can also configure backend blocking (restricting access to /wp-admin/ from specific countries), control access at the post, page, or category level, and set up logging for denied requests.
A word of caution about caching: Geoblocking plugins and caching plugins often conflict. When a page is served from cache, the geoblocking plugin may not execute, meaning blocked visitors could still see cached content.
If you are using a WordPress caching plugin, test the interaction carefully. In some cases, you may need to exclude geo-restricted pages from caching or consider a server-level or CDN-level blocking approach instead.
Method 5: Use the .htaccess File (Advanced Control for Apache Servers)
For developers who are comfortable editing server configuration files, the .htaccess file provides the most direct way to block countries in WordPress. Rules defined here execute at the Apache server level, before PHP or WordPress even loads. This makes it the fastest blocking method in terms of performance, but also the riskiest if something goes wrong.
A single syntax error in .htaccess can take your entire site offline. Always keep a backup of the original file before making changes.
How it works: You generate a list of IP ranges associated with the countries you want to block, then add Deny directives to your .htaccess file. Apache reads these rules on every request and rejects connections from the specified IP ranges before WordPress processes them.
Step 1: Generate IP ranges.
Use a service like IP2Location or Country IP Blocks to generate IP ranges for your target country. Select the output format as .htaccess Deny. The downloaded list will contain lines like:
Deny from 203.0.113.0/24
Deny from 198.51.100.0/24Step 2: Access your .htaccess file.
Connect via FTP, use your hosting panel’s file manager, or if you are on InstaWP, use the built-in WP Config and File Manager tools to edit .htaccess directly from the dashboard.
Step 3: Add the deny rules.
Open the .htaccess file (located in /public_html or your WordPress root directory) and insert the deny rules at the top, above other directives:
# Block traffic from [Country Name]
Deny from 203.0.113.0/24
Deny from 198.51.100.0/24
Step 4: Save and test.
Use a VPN or a 4g proxy set to the blocked country to verify the rules are working. Check that your own access and search engine crawlers are not affected.”
Critical reminder: Do not edit .htaccess directly on a live site. Use a WordPress staging environment to catch syntax errors or misconfigurations before they cause downtime. If you are unsure about the difference between staging and sandbox environments for testing, this guide on WordPress staging vs sandbox sites explains when to use each.
Also keep in mind that IP ranges change over time. Country-level IP allocations are updated regularly, so you will need to regenerate and replace the deny list periodically to maintain accurate blocking.
When and Why You Might Need to Block Countries or IPs on Your Website
Country blocking is not something you should implement just because you can. It is a targeted measure that makes sense in specific situations. Here are the scenarios where it delivers real value:
Persistent bot traffic and brute-force login attacks. If your firewall logs show repeated failed login attempts, fake registrations, or comment spam originating consistently from the same regions, geoblocking can reduce that noise significantly. It will not stop every attacker (VPNs exist), but it raises the bar enough to deter automated bots.
Reducing server load from irrelevant traffic. Every request your server processes costs resources. If a large percentage of your traffic comes from regions where you have no customers, no audience, and no business interest, blocking those regions frees up resources for the visitors who matter. This is especially relevant for sites on shared hosting or plans with limited bandwidth.
Hyperlocal or region-specific businesses. If your business only serves customers in a specific country or region (a local law firm, a regional e-commerce store, a country-specific SaaS product), there is little benefit in serving content to the rest of the world. Geoblocking keeps your analytics clean, your server lean, and your user experience focused.
Legal and regulatory compliance. Some industries have strict geographic restrictions. Online gambling platforms, certain financial services, and some eLearning providers must block access from countries where their services are not legally permitted.
In these cases, geoblocking is not optional; it is a compliance requirement. You may also need to pair geoblocking with geo-targeted privacy notices (like showing GDPR cookie consent banners only to EU visitors) to meet regional data protection laws.
Cleaner analytics and marketing data. Spam traffic from bots and irrelevant regions skews metrics like bounce rate, session duration, and conversion rates. For agencies that generate performance reports for clients, cleaning up traffic sources through geoblocking leads to more accurate data and better decision-making.
Did you know?
InstaWP lets you manage hundreds of sites from a single dashboard, including monitoring uptime, running security scans, and generating PDF reports for clients. If you are an agency implementing geoblocking across multiple client sites, having centralized visibility into traffic patterns and security events saves hours compared to logging into each site individually
Why Blocking IPs or Countries Isn’t Always the Best Security Strategy
Blocking countries or IPs may seem like a quick win for security, but it’s more of a performance optimization or business control tactic than a comprehensive defense strategy. Even if you’re using advanced WordPress plugins for blocking countries, here’s why it shouldn’t be your primary line of defense:
1. It’s Easy to Bypass
Sophisticated attackers use VPN, proxies, or TOR to mask their real location. This means your carefully crafted WordPress country block can be evaded with just a few clicks by someone determined enough.
2. You Might Block Legitimate Users
IP resolution isn’t perfect. You may accidentally block real users, search engine bots (like Googlebot), or third-party services hosted in restricted regions. For example, blocking Germany could also block uptime monitors hosted on German servers—breaking your alerts.
3. Constantly Updating IP Lists Is a Headache
IP ranges for countries change frequently. Manual blocking using .htaccess or even semi-automated plugins still requires regular updates. If you’re wondering how to block countries from your website in WordPress and never touch it again, you can’t. You’ll need to revisit it periodically.
4. Risk of Hurting SEO and Ads
Geoblocking can prevent search engines from crawling your site, especially if they originate from regions you’ve restricted. This affects indexing, ranking, and even Google Ads approvals. Blocking countries without search bot exceptions can backfire fast.
5. You Could Lock Yourself Out
Yes, it happens. Developers and admins occasionally add their own IP or region to the block list, especially when using dynamic IPs. Without a secure backdoor (or remote site management tool), this mistake could mean downtime.
6. Malware Is Global
You can’t stop malware by blocking a few countries. Bots and infections often come from compromised devices in “safe” locations. Real security needs firewalls, activity logs, and malware scanning—not just IP blocking.
Best Practices When Blocking Countries or IPs on a WordPress Site
While applying a WordPress country block or configuring geoblocking WordPress rules might seem like a one-click solution, it’s important to follow best practices to avoid accidental site issues or missed traffic opportunities.
Here’s what agencies and developers should keep in mind:
- Always have a proper firewall in place: Plugins that offer geoblocking features work best when paired with a comprehensive security firewall that protects your site from more than just location-based threats.
- Backup your site before applying manual rules: Whether you’re updating the .htaccess file or applying IP blocks via a plugin, always create a full backup. One small error can lock you or your users out of critical areas.
- Use analytics to monitor traffic and impact: Before and after you block country access to website WordPress setups, check Google Analytics or your firewall logs to verify whether blocking reduced malicious traffic or affected legitimate users.
- Avoid blocking search engines unless necessary: Blocking regions like the US, EU, or Asia can inadvertently block Googlebot or Bing, especially if those bots operate from those regions. Always whitelist crawlers if SEO is a priority.
- Combine geoblocking with CAPTCHA or 2FA for best results: If the goal is to stop login abuse or spam, consider combining WordPress block country rules with CAPTCHA challenges or two-factor authentication for tighter security.
Conclusion
Implementing a WordPress country block can be a smart move when you’re managing performance, reducing spam, or tailoring access based on geographic relevance. For agencies and developers, it’s about making data-driven decisions—understanding where your traffic comes from, identifying potential threats, and ensuring the site runs efficiently for the right audience.
That said, country-level blocking should always be handled with care. It’s not just about keeping unwanted traffic out—it’s about maintaining a reliable user experience, protecting SEO value, and ensuring legitimate users aren’t mistakenly locked out.
Whether you’re configuring geoblocking WordPress settings or evaluating IP behavior, the goal is to strike a balance between security, performance, and accessibility.
And as with any structural change to a site’s access rules, it’s crucial to test thoroughly, document clearly, and monitor results over time. With the right approach, blocking countries or IPs can help create faster, safer, and more focused WordPress experiences.
FAQs
u003cstrongu003eCan I block a country in WordPress without a plugin?u003c/strongu003e
Yes, you can. Advanced users can manually block IP ranges by editing the .htaccess file or configuring server-level rules. However, this method is error-prone and difficult to maintain. Most developers prefer using WordPress plugins for blocking countries to simplify the process.u003cbru003eu003cbru003eu003cstrongu003eWhat is WordPress geoblocking?u003c/strongu003eu003cbru003eu003cbru003eWordPress geoblocking is the practice of blocking or allowing visitors based on their country or region. Plugins, firewalls, or server rules read the visitor’s IP address and apply rules that let you block specific countries from accessing your WordPress site.u003cbru003eu003cbru003eu003cstrongu003eHow do I set up geo blocking in WordPress quickly?u003c/strongu003eu003cbru003eu003cbru003eThe fastest way to set up geo-blocking in WordPress is to install a security plugin that supports country blocking, enable its firewall, and then choose which countries to block in the Geo Blocking or Country rules screen. For most sites, this is safer and easier than editing geo-blockingu003ccodeu003e htaccessu003c/codeu003e manually.u003cbru003eu003cbru003eu003cstrongu003eWhat is the best way to geo block WordPress traffic for security?u003c/strongu003eu003cbru003eu003cstrongu003eu003cbru003eu003c/strongu003eFor security, geo-block WordPress traffic at the edge using a cloud firewall like Cloudflare or a managed WordPress hosting firewall. This stops bad traffic before it hits PHP, reduces server load, and keeps login attempts and bots under control.u003cbru003eu003cbru003eu003cstrongu003eHow do I know which country is sending bad traffic?u003c/strongu003eu003cbru003eu003cbru003eUse tools like your plugin’s traffic logs, Google Analytics’ geo report, or server access logs. This data helps identify patterns before you apply WordPress block country rules to avoid blocking legitimate users.u003cbru003eu003cbru003eu003cstrongu003eWill blocking countries affect SEO or Google Ads?u003c/strongu003eu003cbru003eu003cbru003eIt can. If you block search engine crawlers (even unintentionally), it may reduce your site’s visibility in search results. Some users also report issues with Google Ads disapprovals when geoblocking WordPress traffic too aggressively.u003cbru003eu003cbru003eu003cstrongu003eCan VPN users bypass country restrictions?u003c/strongu003eu003cbru003eu003cbru003eYes. VPNs and proxies can mask the user’s IP and make them appear to be from a different country. That’s why country blocking should be used as a performance or business control—not a primary security layer.u003cbru003eu003cbru003eu003cstrongu003eShould I block an entire country just because of some bad traffic?u003c/strongu003eu003cbru003eu003cstrongu003eu003cbru003eu003c/strongu003eOnly if the country has no business relevance to your site. If the traffic is causing performance or resource strain and isn’t contributing value, blocking might make sense. However, it’s often better to start with login protection, spam filtering, or IP-specific blocks before implementing a full WordPress country block.