A WordPress booking system lets your customers schedule appointments, reserve time slots, and pay online without a single phone call or email thread. You don’t need custom code to build one. In this guide, you will set up a fully working booking system using the Amelia plugin on a fresh WordPress site powered by InstaWP’s managed cloud hosting.
The entire process takes under 30 minutes, whether you run a salon, a consulting practice, a fitness studio, or any service-based business.
Table of Contents
Key Takeaway

No coding required. The Amelia WordPress Booking plugin handles calendars, time slots, email confirmations, and payments out of the box.
Faster setup with InstaWP. You can create a WordPress site with Amelia pre-installed directly from the InstaWP dashboard, skipping manual plugin installation entirely.
Works for appointments and events. Amelia supports one-on-one appointments, group bookings, recurring schedules, and ticketed events from a single plugin.
What Does a WordPress Booking System Actually Do?
Before diving into the setup, it helps to understand what you are building. A booking system on WordPress is not just a contact form with a date field. It is a complete scheduling engine that works around the clock so you do not have to.
At a minimum, a proper booking system handles five things: it displays a calendar showing your real-time availability, it lets customers pick a service and a time slot, it collects their contact details and any custom information you need, it sends automated confirmation and reminder emails, and it optionally processes payments at the time of booking.
More advanced systems also support multiple staff members with individual schedules, recurring appointments, group sessions, buffer time between bookings, and integration with Google Calendar or Zoom.
You could technically piece this together using a combination of a form plugin, a calendar widget, and a payment gateway. But a dedicated booking plugin like Amelia bundles all of these features into a single, cohesive system that is purpose-built for scheduling. That means fewer plugin conflicts, less maintenance, and a much smoother experience for your customers.
How to Create a Booking System in WordPress: Step-by-step Guide
Let’s learn about the process of building a booking system in WordPress. But, we need a booking plugin to get started. There are dozens of WordPress booking plugins available. For this guide, we are using Amelia for several practical reasons.

First, Amelia is trusted by over 90,000 customers and handles more than 16,000 appointment bookings every week. It covers both appointment scheduling and event management in one plugin, which means you do not need separate tools if your business runs both.
The step-by-step booking wizard is designed for conversion, guiding customers through service selection, date and time picking, and checkout in a clean, mobile-friendly flow.
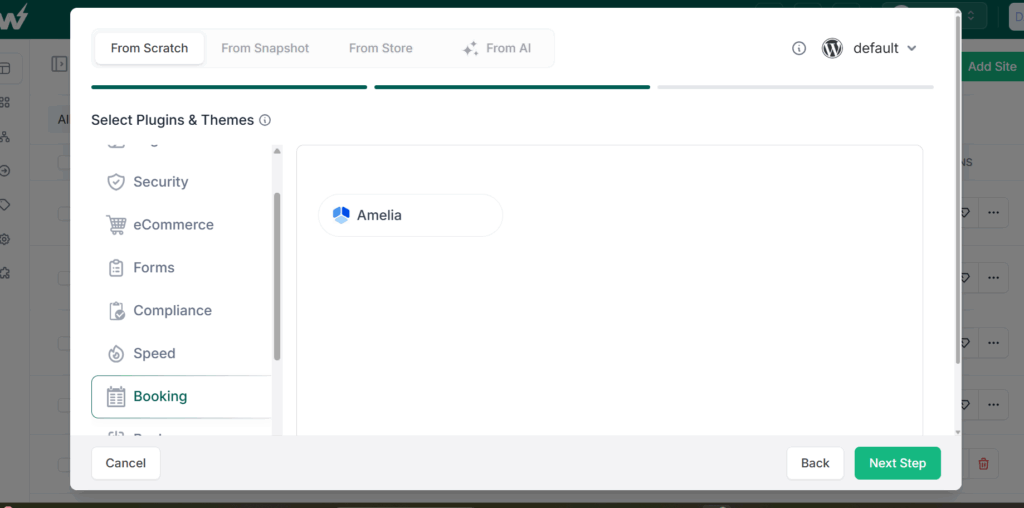
Second, Amelia is available as a partner plugin inside the InstaWP dashboard. When you create a new WordPress site on InstaWP, you can select Amelia from the Booking category during setup, and it gets auto-installed on your site.
No need to download a ZIP file, upload it, or activate it manually. You go straight from site creation to configuring your booking system.
The free version (Amelia Lite) supports one employee, unlimited services, email notifications, and the full booking wizard. The paid versions unlock multiple employees, payment gateways, recurring appointments, custom notifications, WooCommerce integration, and much more.
Step 1: Launch a WordPress Site with Amelia Pre-Installed
The traditional way to start building a booking site involves finding a host, installing WordPress, then searching for and installing your booking plugin. With InstaWP, you can collapse all of that into a single step.
This is all-in-one cloud for WordPress and provides everything, from hosting to site maagement, under one roof. This makes building a booking system for WordPress way more sorted than ever.
Here is how to get started.
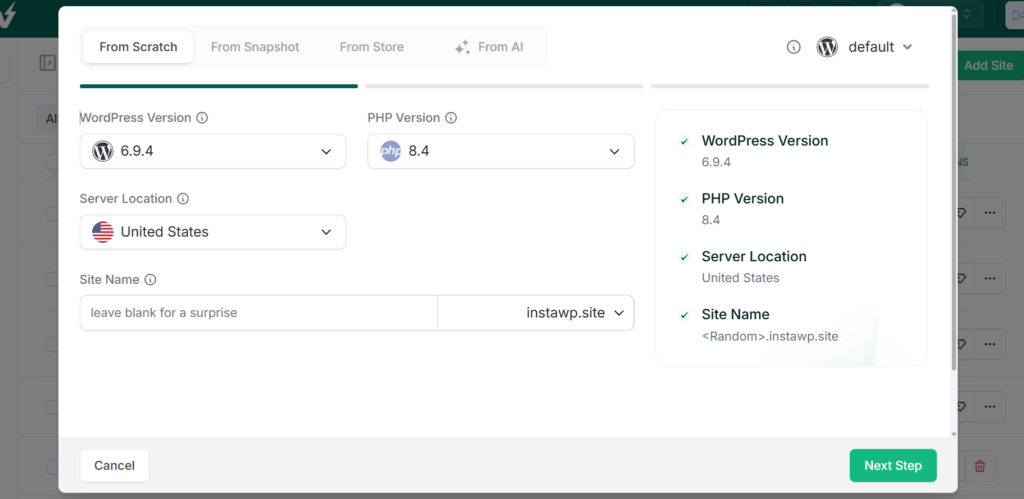
Log into your InstaWP dashboard and click Create Site. Choose the From Scratch tab. Here, you can choose the WordPress version, PHP, configuration, servers, and other basic aspects of your site.
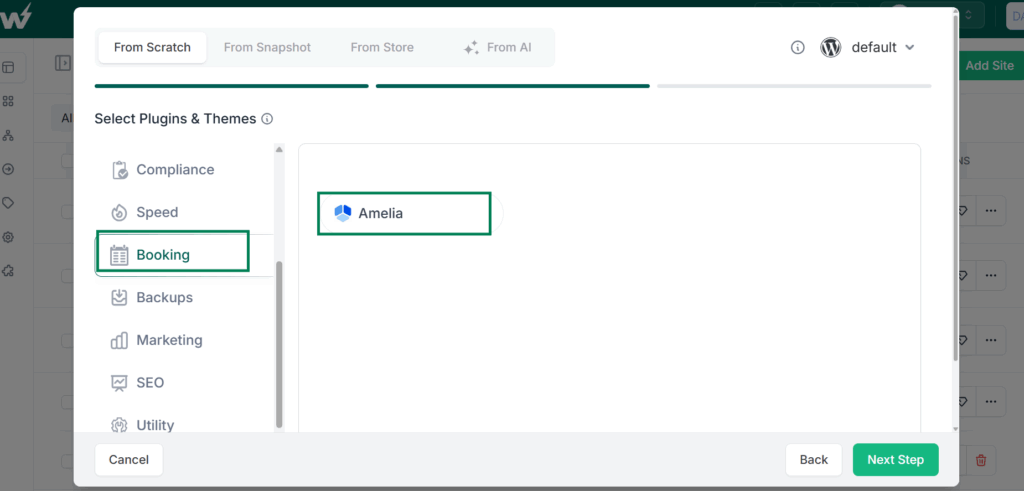
Next, you will see a Select Plugins & Themes panel with categories listed on the left side. Scroll down to the Booking category, click it, and you will see Amelia listed as an available plugin. Select it.
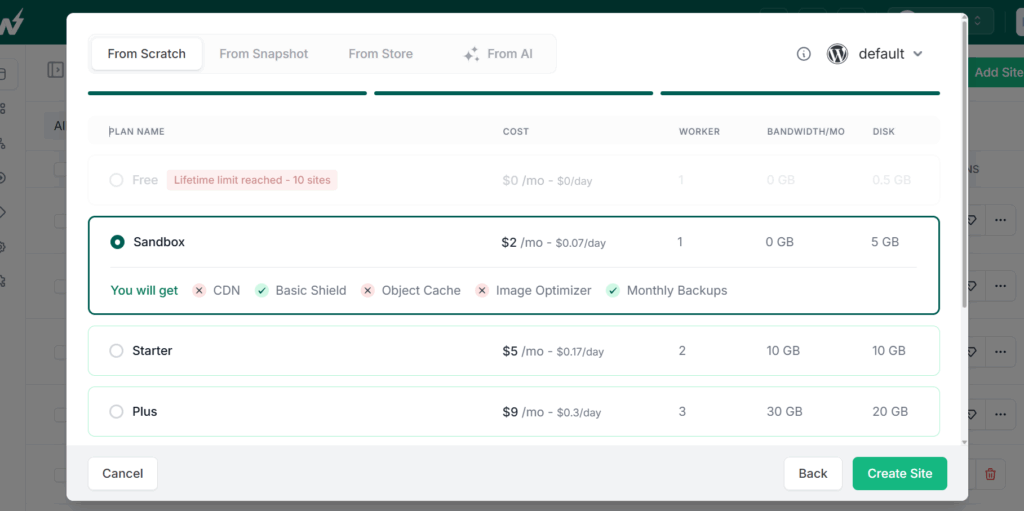
Click Next Step, choose a site plan (the Sandbox plan at $2/month is perfect for building and testing), and hit Create Site.
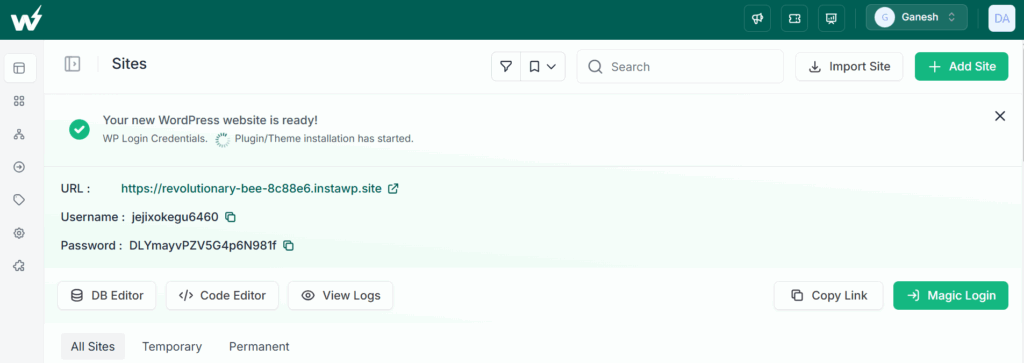
Within seconds, you will have a live WordPress environment with Amelia already installed and activated. No plugin uploads, no activation steps, no wasted time.
Did you know?
InstaWP lets you pre-install plugins and themes during site creation. You can save entire site configurations as reusable templates, so the next time you build a booking site for a client, you launch it with a single click instead of repeating the setup.
Step 2: Configure Your Business Details in Amelia
With Amelia active on your site, use Magic Login to go to your WordPress admin panel and navigate to Amelia > Settings. This is where you configure the foundation of your booking system.
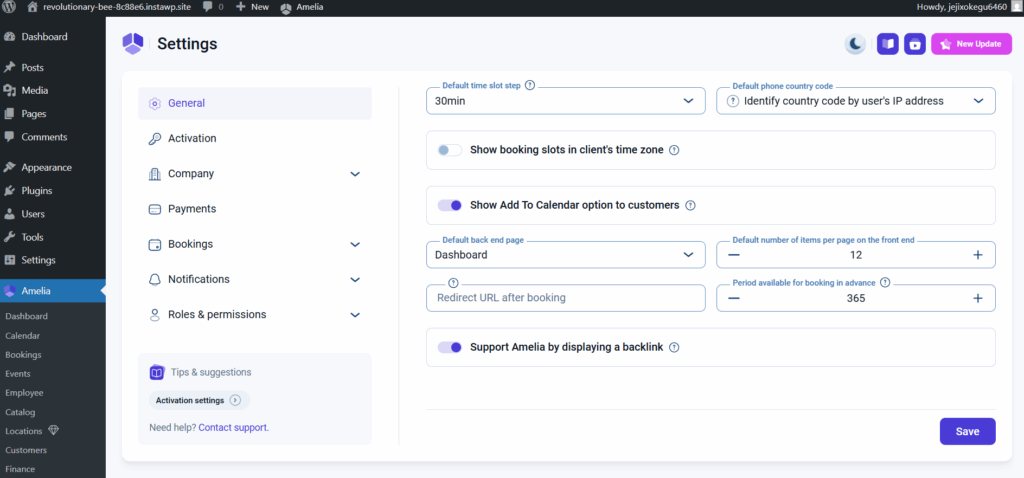
Start with Company Details. Enter your business name, address, phone number, and website URL. This information appears on booking confirmation emails, so make sure it is accurate.
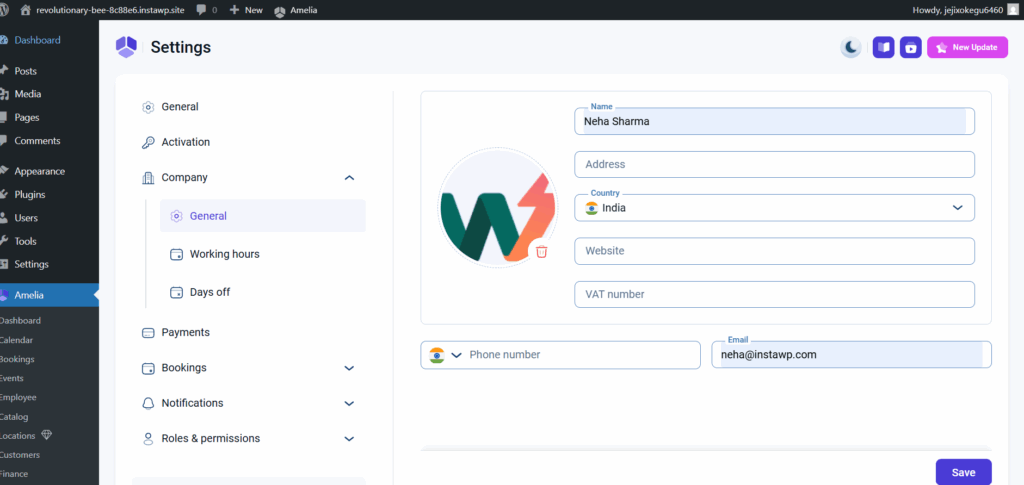
Next, move to Working Hours & Days Off. Set the days and hours you are available for bookings. For example, if you operate Monday through Friday from 9:00 AM to 5:00 PM with a lunch break from 12:00 to 1:00 PM, configure that here. You can also add specific days off for holidays or closures.
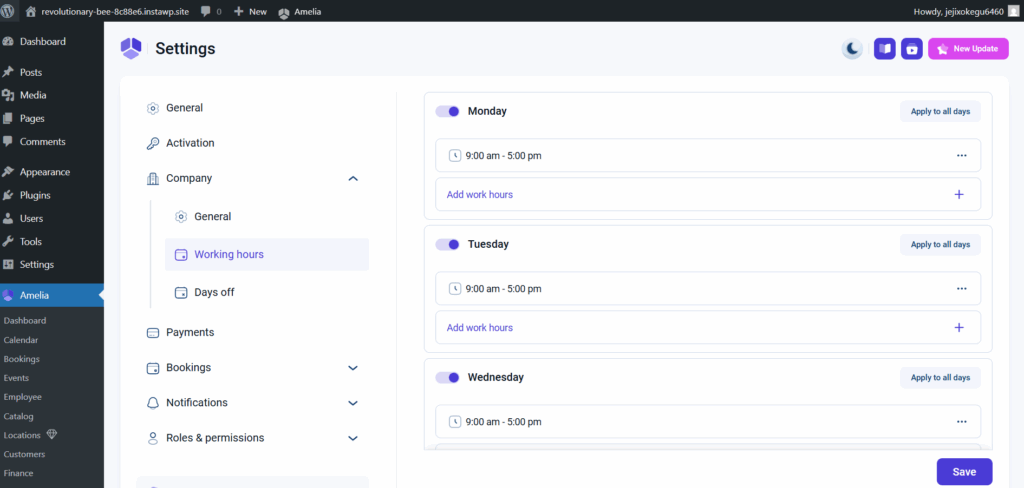
Check the General Settings tab to configure your time zone (Amelia uses your WordPress time zone by default), the default time slot step (15, 30, or 60 minutes), the minimum time before booking, and whether appointments need admin approval or get auto-confirmed. For most service businesses, auto-confirmation works best because it removes friction for the customer.
Step 3: Add Your Employees (Service Providers)
Employees in Amelia represent the people who provide services. Even if you are a solo practitioner, you still need to create at least one employee record for the booking system to work.
Go to Amelia > Employees and click Add Employee.
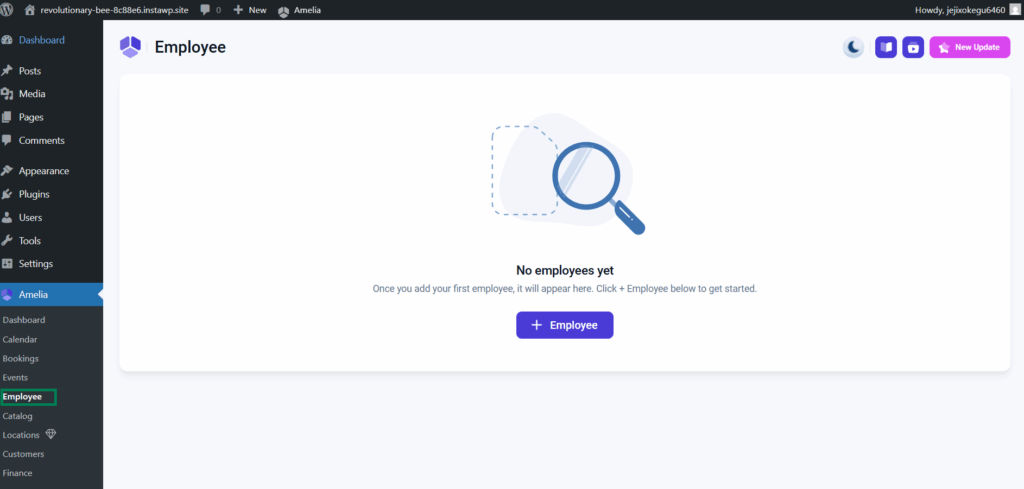
Fill in the name, email, and phone number. Toggle on Show on Website so this person appears in your booking forms. Each employee gets their own working hours and availability settings, which override the global defaults you set earlier.
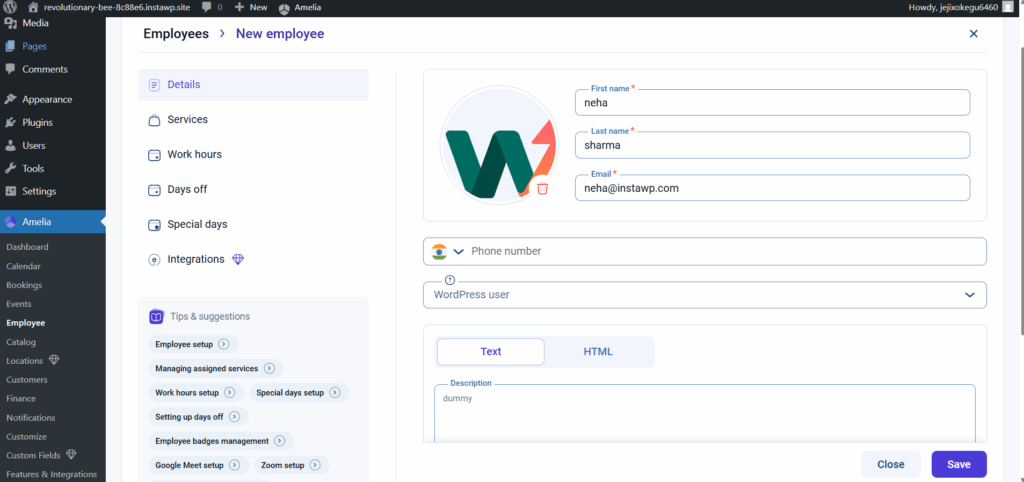
If you are using the free version (Amelia Lite), you are limited to one employee. The paid versions remove this restriction and let you manage entire teams, each with individual schedules, services, and pricing.
Step 4: Set Up Service Categories and Services
Services are the core of your booking system. They define what your customers can book, how long each session lasts, what it costs, and who provides it.
Navigate to Amelia > Services. Start by creating a category to organize your offerings. For a fitness studio, your categories might be “Personal Training,” “Group Classes,” and “Nutrition Consultations.” For a salon, you might have “Haircuts,” “Coloring,” and “Spa Treatments.”
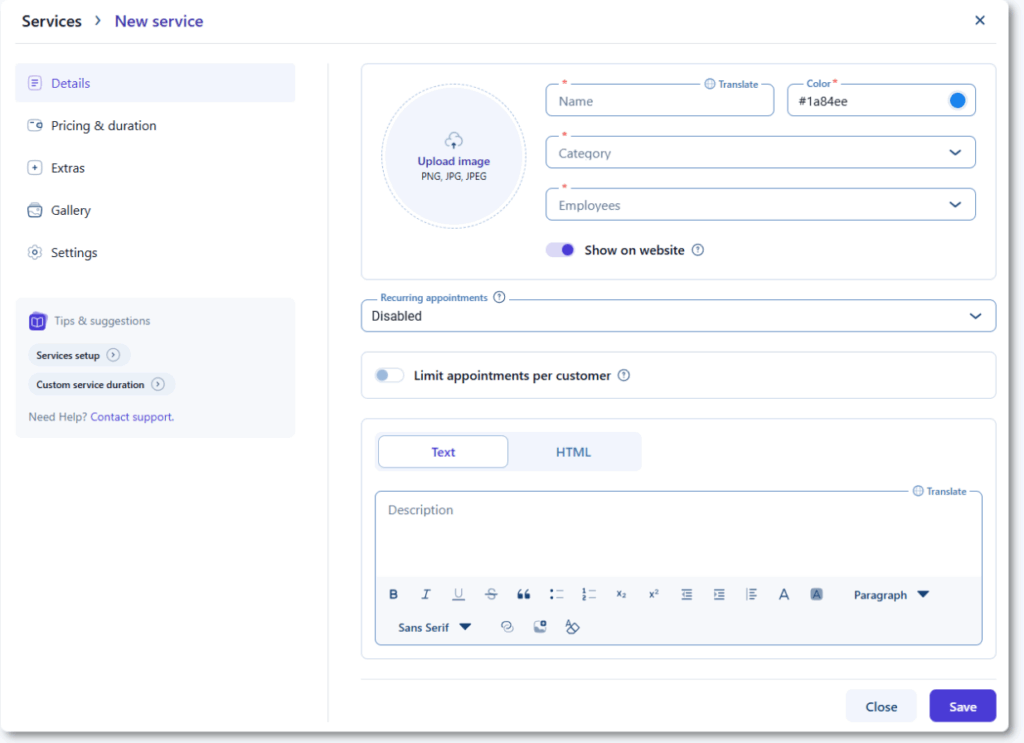
Click Add Service within a category. The mandatory fields are the service name, category, duration, at least one assigned employee, and price (set to 0 for free services). Toggle Show on Website to make it bookable. You can also add an optional description, a gallery image, buffer time before and after the appointment, and minimum or maximum capacity for group bookings.
Repeat this process for every service you offer. The more specific you are with durations and descriptions, the smoother the booking experience will be for your customers.
Step 5: Add the Booking Form to Your Website
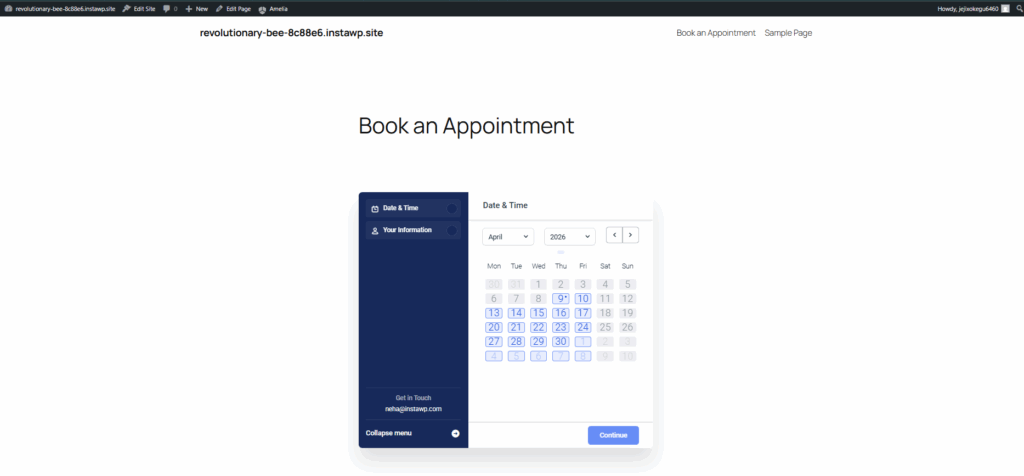
With employees and services configured, it is time to put the booking form on your front-end so customers can actually book.Create a new page in WordPress (for example, “Book an Appointment”) and add the Amelia booking form using one of these methods:
Gutenberg Block Editor: Click the + button to add a block, search for “Amelia,” and insert the Amelia Booking block. Choose your preferred form style.
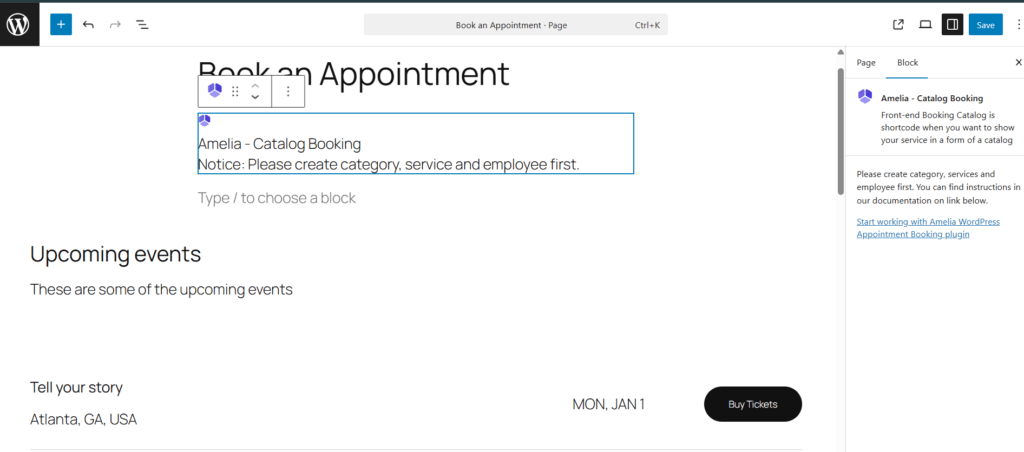
Elementor or Divi: Use the dedicated Amelia widget available in both page builders.
Shortcode (works everywhere): Paste [ameliastepbooking] into any page or post editor.
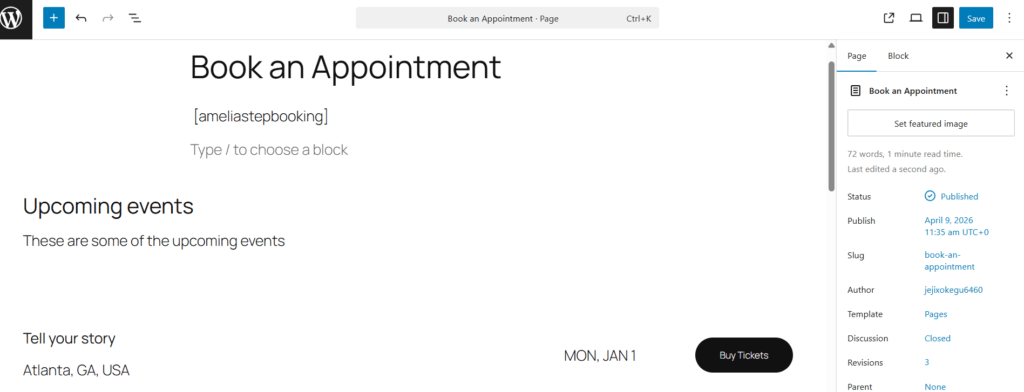
This renders the step-by-step booking wizard, which is the most conversion-friendly layout. For a catalog-style view showing all services as cards, use [ameliacatalogbooking] instead.
Publish the page. The booking form will immediately appear on your site, displaying only the services, employees, and time slots you have configured.
Step 6: Test the Booking Flow
Before sharing your booking page with real customers, always test the entire flow end to end. Open the page you just published in an incognito browser window (this simulates a first-time visitor) and walk through the process.
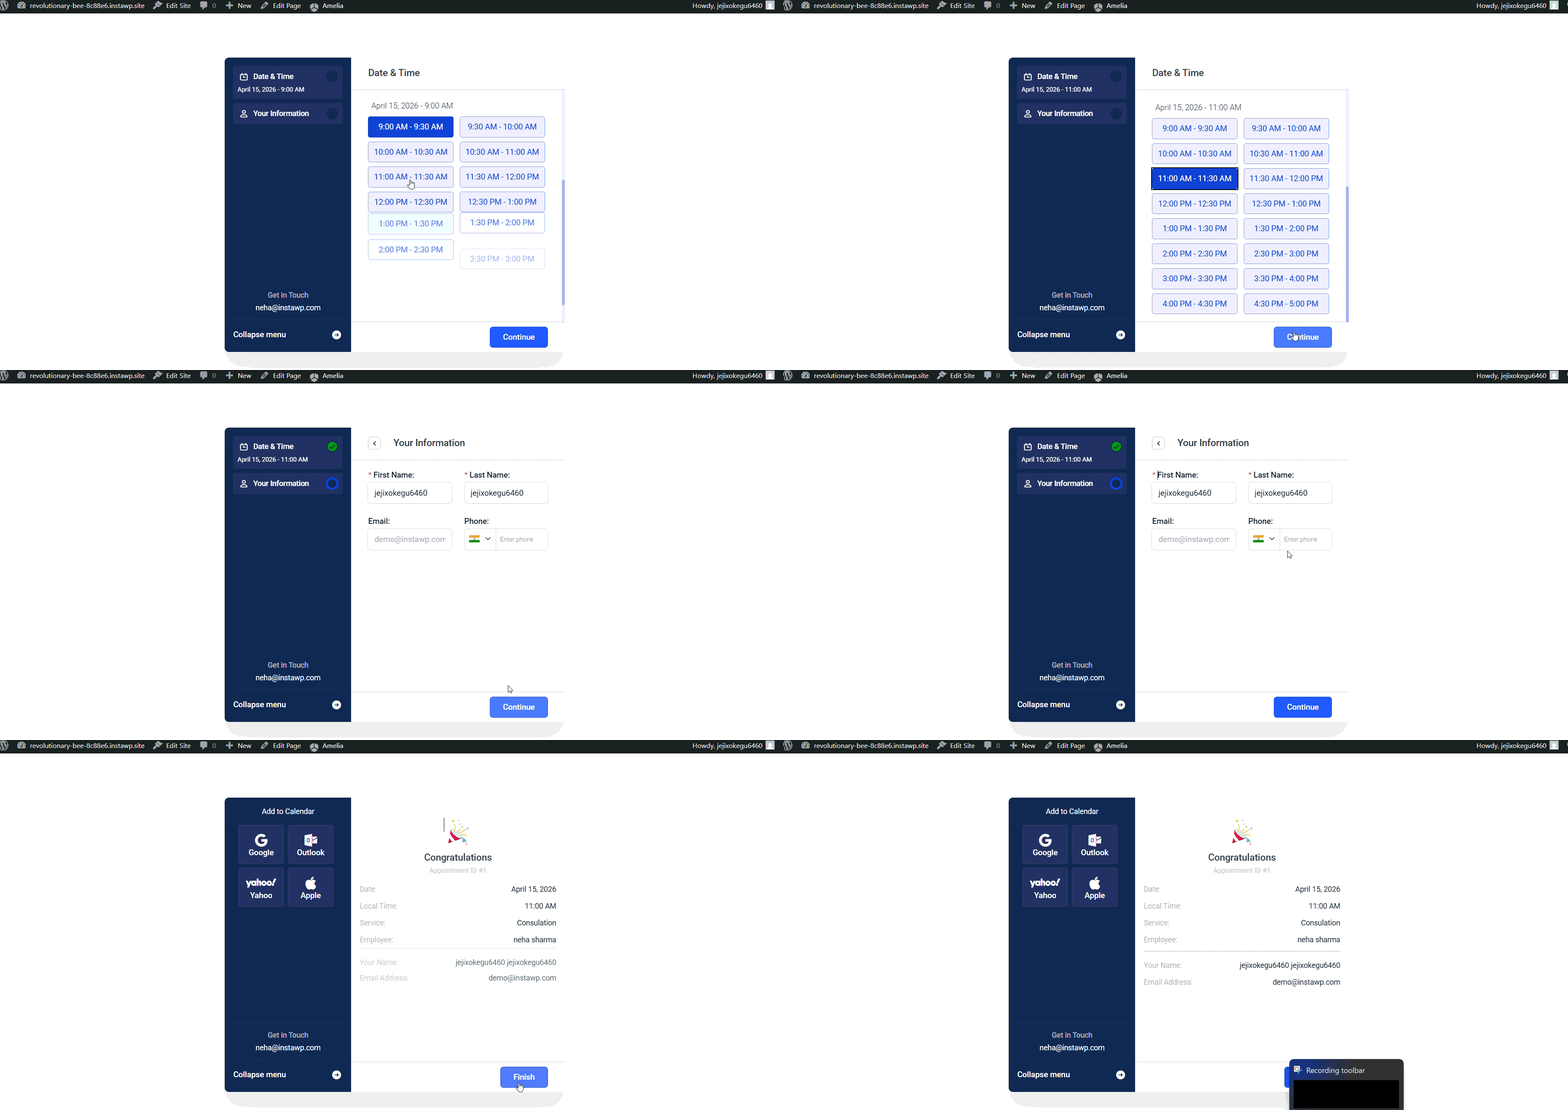
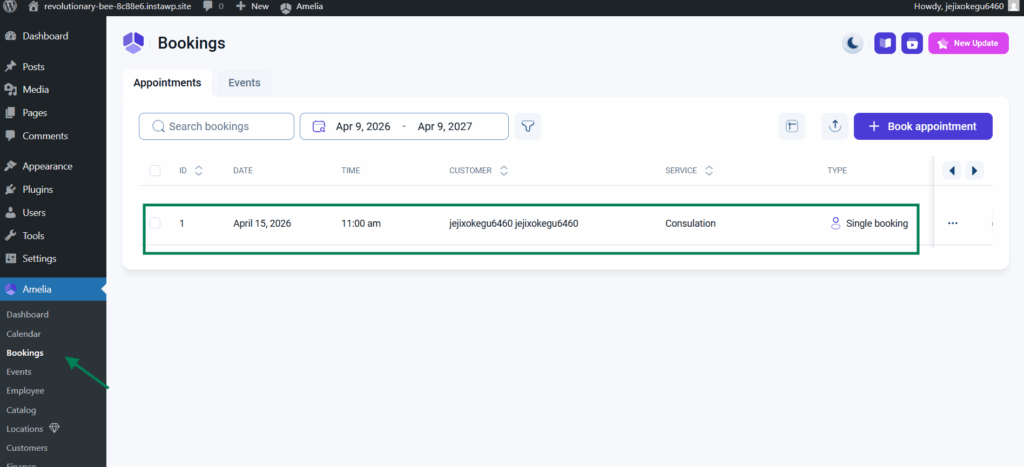
Select a service, choose a date and time slot, enter test contact details, and submit the booking. Once you confirm, go back to your WordPress admin and open Amelia > Appointments. You should see the test booking listed there with all the details. From this panel, you can approve, reject, reschedule, or cancel any appointment.
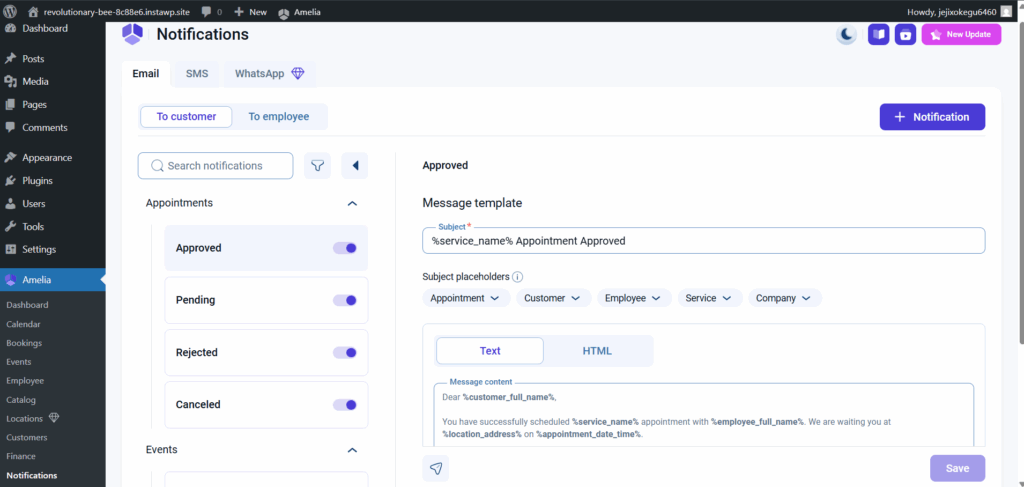
Check your email inbox too. Amelia sends automated confirmation emails to both the customer and the admin. Make sure these are arriving correctly and that the content looks professional. If you need to tweak the email templates, go to Amelia > Notifications to customize the subject lines and body text.
Step 7: Set Up Payment Collection
If your services are paid, you will want to collect payments at the time of booking rather than chasing invoices later. This is where Amelia’s payment integration comes in.
Note that payment gateways are a Pro feature. With Amelia Pro, you can connect Stripe, PayPal, Mollie, or RazorPay. Go to Amelia > Settings > Payments and enable your preferred gateway.
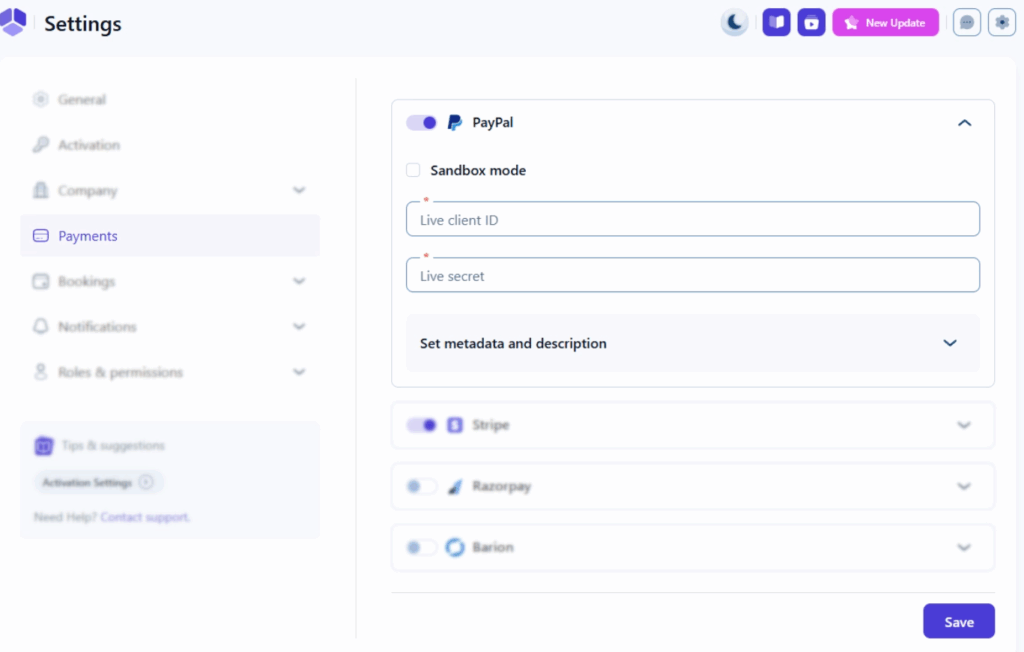
Enter your API keys (available from your payment provider’s dashboard), set the currency, and choose whether to collect full payment upfront or require a deposit with the balance due later.
Must Read: Amelia API Payments
Amelia also integrates with WooCommerce for businesses that want to manage bookings and product sales through a unified checkout experience. This is especially useful for businesses like spas or gyms that sell both services and physical products.
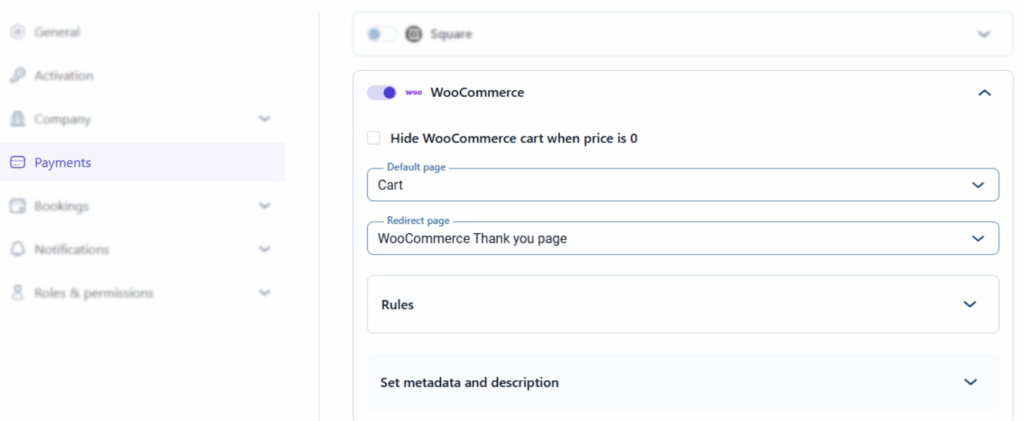
If you are using the free version and your services are paid, you can still list prices on the booking form and collect payment manually at the appointment. Many small businesses start this way and upgrade to online payments as their booking volume grows.
Step 8: Configure Email Notifications and Reminders
Automated emails are what turn a basic booking form into a reliable scheduling system. Without them, your customers forget appointments, you miss cancellation windows, and no-shows pile up.
Amelia handles several notification types: booking confirmation (sent immediately after a customer books), appointment reminders (sent a configurable number of hours or days before the appointment), cancellation confirmations, and follow-up messages after the appointment.
Each notification can be customized with placeholders for the customer’s name, service name, date, time, employee, and location.
Customizing Your Booking System Further
Once the basics are running, Amelia offers several ways to tailor the system to your specific business needs.
- Custom Fields: Add checkboxes, text areas, or dropdown menus to your booking form to collect extra information. A photographer might ask about the type of shoot, a therapist might request a brief description of the issue, and a trainer might ask about fitness goals.
- Recurring Appointments: Let customers book repeating sessions (daily, weekly, monthly) in a single transaction. Great for coaching, therapy, and personal training businesses.
- Service Packages: Bundle multiple sessions into a discounted package. For example, offer 10 yoga classes for the price of 8, encouraging customers to commit upfront.
- Resource Management: Share physical resources like rooms, equipment, or chairs among employees. Amelia tracks resource availability and prevents double-booking automatically.
- Event Bookings: Beyond one-on-one appointments, Amelia supports event management with ticket types, custom pricing, capacity limits, and recurring events.
- Design Customization: Adjust the colors and fonts of the booking form to match your brand. Amelia’s customizer lets you control the look of both appointment and event forms without writing CSS.
Did you know?
InstaWP’s staging workflow lets you clone your live booking site into a sandbox, test changes to services or pricing safely, and push updates back to production with 2-Way Sync. You never risk breaking your live booking flow while experimenting.
Taking Your Booking Site Live
If you followed this guide on an InstaWP Sandbox site, you now have a working booking system ready for real customers. The question is: how do you go from a test environment to a production-ready website?
With InstaWP, the transition is seamless. Go to your site in the InstaWP dashboard and click Change Plan.
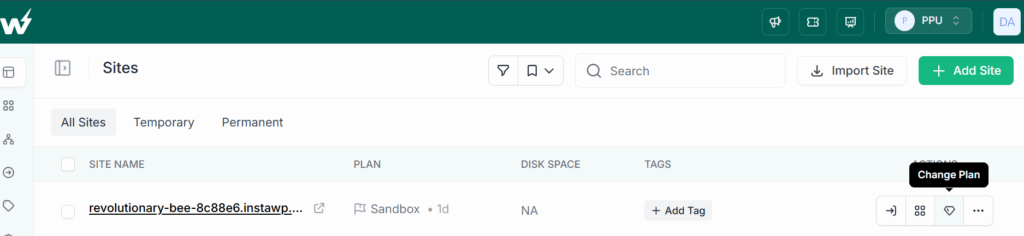
Upgrade to a production plan like Starter ($5/month) for a small appointment site, or Plus ($9/month) or higher for a busier booking operation that needs more PHP workers and daily backups. The upgrade happens instantly with no migration or downtime.
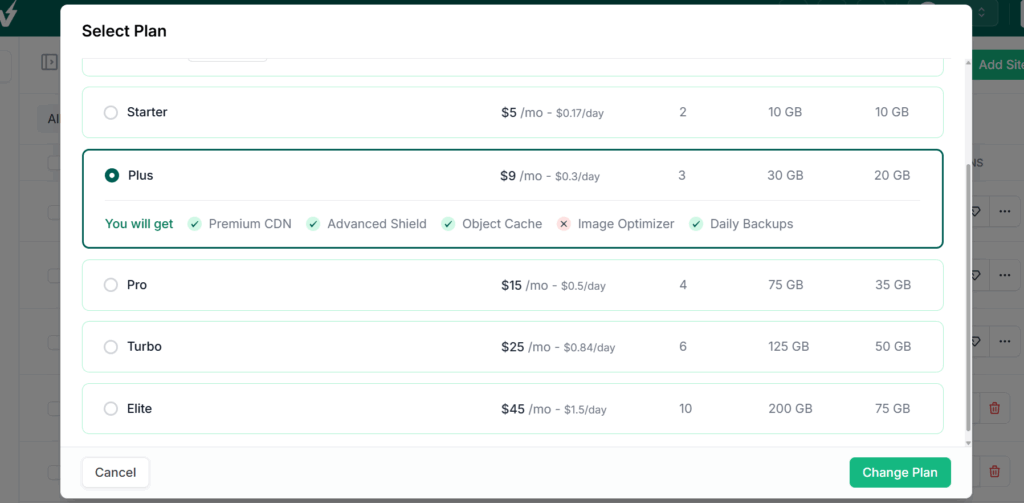
Your WordPress sandbox becomes a production site on the same infrastructure, now with CDN, SSL, security shield, and automated backups included.
Map your custom domain (like bookings.yourbusiness.com), and your booking system is live.
Amelia Free vs Pro: Quick Comparison
Choosing between Amelia Lite and the paid versions depends on your business size and needs. Here is a side-by-side overview of the key differences.
| Feature | Amelia Lite (Free) | Amelia Pro / Elite |
| Employees | 1 | Unlimited |
| Services | Unlimited | Unlimited |
| Booking Wizard | Yes | Yes |
| Email Notifications | Basic | Fully customizable |
| SMS Notifications | No | Yes |
| Payment Gateways | No | Stripe, PayPal, Mollie, RazorPay |
| Recurring Bookings | No | Yes |
| Service Packages | No | Yes |
| Custom Fields | Limited | Yes |
| WooCommerce Integration | No | Yes |
| Google Calendar Sync | No | Yes |
| Zoom / Google Meet | No | Yes |
| Multilingual Support | No | Yes |
| Domains | N/A | 1 (Standard) to Unlimited (Elite) |
Conclusion
Building a booking system in WordPress is no longer a complex development project. With the Amelia plugin handling your scheduling logic and InstaWP giving you a ready-to-go WordPress environment, you can go from zero to a fully functional appointment booking site in under 30 minutes.
Start by launching a fresh site with Amelia pre-installed on InstaWP, configure your business details and services, add the booking form to your site, test the flow, and upgrade to production hosting when you are ready. The entire workflow stays on one platform, from sandbox to live site.
If you are building booking sites for clients, this workflow is even more valuable. Save your configured Amelia setup as an InstaWP template, and you can spin up identical booking sites for new clients in seconds.
Ready to build your booking site?
Get started on InstaWP and claim your $25 in free credits. Launch a WordPress site with Amelia in seconds, build your booking system, and go live when you are ready. Create your free site now.
Frequently Asked Questions
Is Amelia free to use?
Yes. Amelia Lite is free and available on WordPress.org. It supports one employee, unlimited services, the step-by-step booking wizard, and basic email notifications. For payment gateways, multiple employees, recurring bookings, and advanced features, you need a paid plan.
Can I accept online payments through my booking system?
With Amelia Pro or higher, you can connect Stripe, PayPal, Mollie, or RazorPay to collect full payments or deposits at the time of booking. You can also route payments through WooCommerce if you need a unified checkout for both services and products.
Does Amelia work with WooCommerce?
Yes. The WooCommerce integration is available in the paid versions. It lets customers add bookings to their WooCommerce cart and check out alongside physical or digital products, using any WooCommerce-compatible payment gateway.
Can I manage multiple employees with different schedules?
The free version is limited to one employee. Paid plans support unlimited employees, each with their own working hours, days off, assigned services, and pricing. Customers can choose a specific employee or let the system assign one automatically based on availability.
How do I test my booking system before going live?
Build your booking site on an InstaWP Sandbox (costs just $2/month). Test everything in a real WordPress environment without any risk to a production site. Once satisfied, upgrade the plan to move to production, or use staging and 2-Way Sync to push changes safely to a live site.