Want to add Google Tag Manager to WordPress without breaking your live site? The safest way is to test GTM on a staging site first, confirm that the container fires correctly, then push the verified setup to production. You can install GTM in WordPress using a plugin, a header/footer code manager, or manual theme file edits.
Table of Contents
Key Takeaways
- The safest method is to add Google Tag Manager on a WordPress staging site first, then publish after testing.
- The easiest method is using a GTM or header/footer plugin, especially for non-developers.
- The cleanest developer method is adding the GTM code through a child theme or theme hooks.
- Avoid editing the parent theme directly, because updates can overwrite your tracking code.
- Always test with GTM Preview mode, Google Tag Assistant, and your WordPress cache/CDN settings before going live.
What Is Google Tag Manager?
Google Tag Manager, or GTM, is a free tag management tool from Google that lets you add and manage tracking scripts from one dashboard instead of editing your WordPress code every time.
You install one GTM container on your site, then use that container to manage tags for tools like Google Analytics 4, Google Ads, Meta Pixel, LinkedIn Insight Tag, Hotjar, Microsoft Ads, and conversion tracking platforms.

For WordPress users, this matters because marketing teams often need to add tracking pixels, event tracking, form tracking, and ad conversion scripts quickly. GTM lets you do that without repeatedly touching theme files or waiting for a developer for every small tracking change.
GTM Container
The main code snippet installed on your WordPress site.
Tags
Tracking scripts such as GA4, Ads, pixels, or custom HTML tags.
Triggers
Rules that decide when a tag should fire, such as page views or form submits.
Before You Add Google Tag Manager to WordPress
Before installing GTM, create your Google Tag Manager account and container. Choose Web as the container type, then copy the two code snippets Google gives you. One snippet goes inside the <head> section. The second snippet goes immediately after the opening <body> tag.
You should also decide how you want to add the code. The right method depends on your technical comfort, the theme you use, your access level, and whether you are working on a client site, WooCommerce store, or production website.
| Method | Best For | Difficulty | Risk Level |
|---|---|---|---|
| InstaWP staging first | Agencies, developers, live client sites | Easy | Lowest |
| Dedicated GTM plugin | Beginners and marketers | Easy | Low |
| Header/footer code plugin | Sites already using code snippets | Easy | Low to medium |
| Manual code method | Developers and custom themes | Medium | Medium |
| Theme or builder settings | Elementor, Divi, Astra, GeneratePress users | Easy | Low |
Five Best Methods to Add Google Tag Manager in WordPress
Here are the best methods to add Google Tag Manager in WordPress.
Method 1: Add Google Tag Manager to WordPress Safely Using InstaWP
The best way to add Google Tag Manager to WordPress is to test it on a staging site before touching production. This is especially important for agencies, WooCommerce stores, high-traffic websites, and any site where tracking mistakes can affect reporting, ad campaigns, checkout events, or client dashboards.
InstaWP is an all-in-one WordPress cloud platform for building, hosting, managing, and selling WordPress sites. You can create a WordPress site, clone an existing site, create a staging environment, test tracking changes, review logs, and then move the verified setup to production.
For teams that manage WordPress hosting and client sites, this workflow avoids the usual “paste code and hope” problem.
Recommended Workflow
Test GTM in staging before production
Create or clone your WordPress site in InstaWP, add Google Tag Manager, test the container, confirm tracking, then publish the safe version. This is cleaner than editing code directly on a live website.
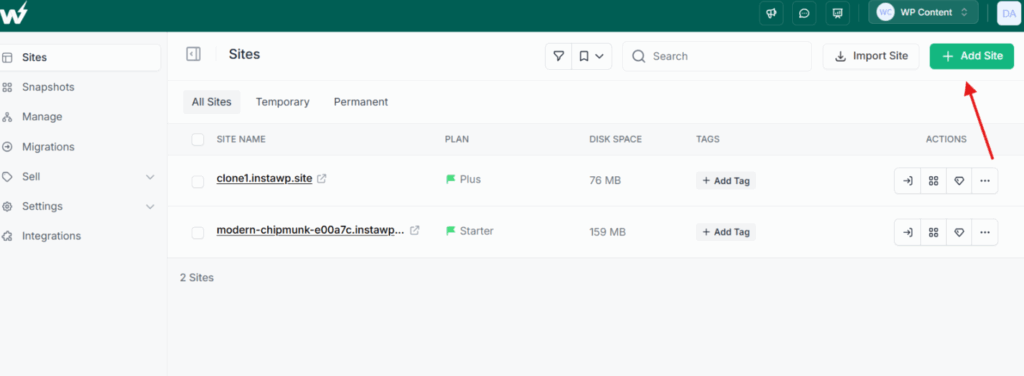
Step 1: Create or clone your WordPress site in InstaWP
Start by creating a fresh WordPress site in InstaWP or cloning the site where you want to install GTM. If you are working on an existing client website, use a staging setup so you can test the GTM container without affecting live visitors.
Watch the Video Tutorial:
This is useful when you are adding GTM to WooCommerce checkout pages, lead generation forms, landing pages, membership sites, or any funnel where incorrect tracking can distort campaign data.
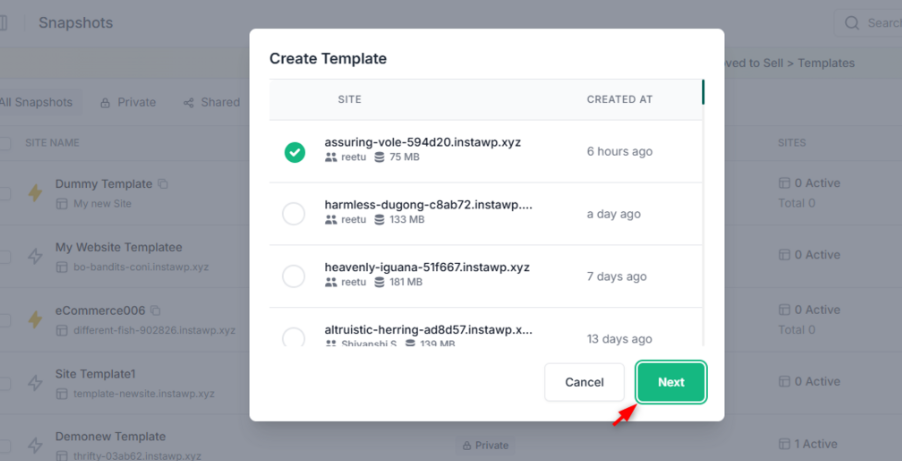
Step 2: Save a snapshot before making changes
Before adding tracking code, save the current site state as a snapshot. A snapshot gives you a restore point if the GTM setup, plugin conflict, cache rule, or theme change causes an issue. This is a simple habit, but it saves a lot of debugging time when working on client sites.
Step 3: Add the GTM container using your preferred method
Inside your InstaWP site, add the GTM code using a plugin, a header/footer manager, theme settings, or manual code. The installation method can vary, but the safety workflow stays the same: install on staging first, test, then publish.
If your site is hosted on InstaWP, you can also use managed hosting features such as CDN, cache controls, backups, SSL, security protection, logs, and PHP configuration while testing.
Step 4: Test the GTM container before going live
Use Google Tag Manager Preview mode and Google Tag Assistant to confirm that your container loads correctly. Visit key pages such as the homepage, contact page, pricing page, checkout page, thank-you page, and campaign landing pages.
For WooCommerce and form-heavy sites, test conversion events carefully. A tag that fires on the wrong page or fires twice can make your ad reports unreliable.
Step 5: Push the tested setup to production
Once GTM is verified, move the change to the live site. If your staging and production workflows are connected, use your preferred deployment or sync process. If the site is hosted on InstaWP, you can combine staging, backups, monitoring, and hosting controls in one place instead of switching between separate tools.
CTA: Test GTM without touching your live site
Use InstaWP to create a staging version of your WordPress site, install Google Tag Manager, test every tag, and publish only when everything works. It is a safer workflow for agencies, developers, and teams managing client websites.
Method 2: Add Google Tag Manager to WordPress Using a Plugin
The plugin method is the easiest way to add Google Tag Manager to WordPress. It is ideal for beginners, marketers, and site owners who do not want to edit theme files.
A dedicated GTM plugin usually asks for your GTM container ID, which looks like GTM-XXXXXXX. The plugin then places the GTM scripts in the correct areas of your WordPress site.
Steps to add GTM with a plugin
- Go to your WordPress dashboard.
- Open Plugins → Add New.
- Search for a Google Tag Manager plugin.
- Install and activate the plugin.
- Open the plugin settings page.
- Paste your GTM container ID.
- Save the settings.
- Open your site in GTM Preview mode and confirm that the container loads.
This method is simple, but you should still test it on staging first. Some plugins may conflict with caching plugins, optimization plugins, consent tools, or themes that already inject header scripts.
Pros
- Beginner-friendly
- No code editing required
- Easy to update or remove
- Good for marketing teams
Cons
- Adds another plugin dependency
- Can conflict with optimization tools
- May not support advanced placements
- Needs regular plugin maintenance
Method 3: Add GTM Using a Header and Footer Plugin
A header and footer code plugin lets you insert scripts into your site without editing theme files. This method is useful if your site already uses a code snippets plugin for analytics, verification tags, schema scripts, or ad pixels.
The only thing to watch carefully is placement. Google Tag Manager gives you two snippets. The first belongs in the <head> section. The second belongs immediately after the opening <body> tag. Some generic header/footer plugins may not provide a true body placement field, so check the plugin settings before using this method.
Steps to add GTM with a header/footer plugin
- Install a trusted header/footer code plugin.
- Open the plugin’s script settings.
- Paste the first GTM script into the header or head section.
- Paste the second GTM noscript snippet into the body section, if the plugin supports it.
- Save your changes.
- Clear your WordPress cache and CDN cache.
- Test the site with GTM Preview mode.
If the plugin does not support body placement, use a dedicated GTM plugin, your theme’s hook system, or the manual child theme method instead.
Method 4: Add Google Tag Manager to WordPress Without a Plugin
You can add Google Tag Manager to WordPress without a plugin by placing the GTM code inside your theme. This method is best for developers, custom WordPress builds, and teams that prefer fewer plugins. Do not edit your parent theme directly. Use a child theme or a theme hook system so your changes are not lost during theme updates.
Developer Note
Manual GTM installation is clean, but only if you control the theme safely. Use a child theme, test on staging, and keep a rollback point before editing code.
Option A: Add GTM to a child theme manually
In this method, you add the first GTM snippet to the theme header and the second snippet after the opening body tag.
- Create or activate a child theme.
- Open the child theme files using your preferred code editor, SFTP, or hosting file manager.
- Locate the header file or the theme hook responsible for the
<head>area. - Paste the first GTM script as high in the
<head>section as possible. - Locate the opening
<body>tag or use thewp_body_openhook if your theme supports it. - Paste the second GTM noscript snippet immediately after the opening body tag.
- Save your changes.
- Clear caches and test with GTM Preview mode.
Modern WordPress themes should support the wp_body_open hook. If your theme does not support it, you may need to update the theme or place the body snippet manually in the correct template file.
Option B: Add GTM through functions.php
Developers can also inject GTM using WordPress hooks in a child theme. This keeps the setup more maintainable than pasting code randomly into templates.
Add the head snippet using wp_head and the body snippet using wp_body_open. Test carefully after adding the code, because a syntax error in functions.php can break the site.
add_action('wp_head', function () { ?>
  <!-- Google Tag Manager -->
  <script>
    (function(w,d,s,l,i){w[l]=w[l]||[];w[l].push({'gtm.start':
    new Date().getTime(),event:'gtm.js'});var f=d.getElementsByTagName(s)[0],
    j=d.createElement(s),dl=l!='dataLayer'?'&l='+l:'';j.async=true;j.src=
    'https://www.googletagmanager.com/gtm.js?id='+i+dl;f.parentNode.insertBefore(j,f);
    })(window,document,'script','dataLayer','GTM-XXXXXXX');
  </script>
  <!-- End Google Tag Manager -->
<?php });

add_action('wp_body_open', function () { ?>
  <!-- Google Tag Manager (noscript) -->
  <noscript>
    <iframe src="https://www.googletagmanager.com/ns.html?id=GTM-XXXXXXX"
    height="0" width="0" style="display:none;visibility:hidden"></iframe>
  </noscript>
  <!-- End Google Tag Manager (noscript) -->
<?php });
Replace GTM-XXXXXXX with your actual GTM container ID.
If you are using InstaWP, test this code on a staging site first. You can use snapshots as rollback points, logs for troubleshooting, and managed hosting tools such as CDN/cache controls when validating whether the tag fires correctly on production-like infrastructure.
Method 5: Add GTM Through Your Theme or Page Builder Settings
Many modern WordPress themes and builders include built-in fields for header, body, or footer scripts. This is often the cleanest no-code method if your theme supports correct placement.
Look inside your theme or builder settings for labels like Custom Code, Header Scripts, Body Scripts, Tracking Code, or Integrations. Paste the GTM snippets into the correct fields, save, clear cache, and test.
This method is commonly available in page builders, block themes, agency frameworks, and performance-focused WordPress themes. The main benefit is that you avoid another plugin while still avoiding manual file edits.
Which GTM Method Should You Use?
Use a dedicated GTM plugin.
Use child theme hooks.
Test in InstaWP staging first.
Use built-in custom code settings.
How to Test If Google Tag Manager Is Working in WordPress
Adding the GTM code is only half the job. You also need to confirm that the container loads, the correct tags fire, and the setup does not conflict with WordPress caching, consent tools, or security rules.
1. Use GTM Preview mode
Open Google Tag Manager, click Preview, enter your website URL, and connect your site. Then browse your WordPress site and check whether GTM detects the container. You should see events such as page views, clicks, and form interactions inside the preview panel depending on your setup.
2. Use Google Tag Assistant
Google Tag Assistant helps verify whether GTM and related Google tags are installed correctly. Use it to check whether the container is present and whether the right tags fire on the right pages.
3. Check your page source
Open your website in a browser, right-click, and choose View Page Source. Search for your GTM container ID. If you cannot find it, the code may not be installed correctly, your cache may be serving an old version, or your plugin/theme setting may not be active.
4. Clear WordPress, CDN, and browser cache
If GTM does not appear immediately, clear all relevant caches. This includes your WordPress cache plugin, hosting cache, CDN cache, and browser cache. On managed hosting platforms like InstaWP, cache and CDN behavior matters because performance layers can affect when new scripts appear publicly.
5. Test consent behavior
If your site uses a cookie consent platform, confirm that GTM tags respect consent settings. Analytics, ads, and remarketing tags may need different consent conditions based on your region and compliance requirements.
This is the step most GTM setups get wrong. A container that fires analytics and ad tags before the visitor has agreed to anything will collect data you are not allowed to collect, and no amount of correct GTM installation fixes that.
A consent management platform such as Cookiebot handles the part GTM does not: it scans the site to find which cookies and trackers are actually present, blocks them until the visitor consents, and signals that choice to GTM through Google Consent Mode so your tags fire only when they are permitted to.

Test that handshake on staging, because a consent banner that looks correct while silently failing to block anything is the failure mode you will not notice from the front end.
GTM Testing Checklist
- GTM container ID appears in page source
- Preview mode connects successfully
- GA4 page_view fires once
- Conversion tags fire only on target pages
- Consent rules work correctly
- Cache is cleared after setup
- No duplicate GTM containers exist
- Checkout and form pages are tested
Common Mistakes When Adding Google Tag Manager to WordPress
Most GTM issues in WordPress come from incorrect placement, duplicate installation, caching, or publishing tags before testing. Here are the mistakes to avoid.
Mistake 1: Installing GTM twice
Do not add GTM manually and through a plugin at the same time. Duplicate containers can fire duplicate page views and conversions, which makes analytics and ad reporting unreliable.
Mistake 2: Putting both snippets in the header
The first GTM script belongs in the head section. The noscript iframe should go after the opening body tag. If your plugin does not support body placement, choose a better method instead of forcing both snippets into the header.
Mistake 3: Editing the parent theme
Parent theme updates can remove your manual GTM code. Use a child theme, plugin, or theme custom code area instead.
Mistake 4: Not testing conversion pages
Do not stop after testing the homepage. Test contact forms, thank-you pages, checkout pages, account pages, and lead magnets. The pages that matter most for marketing are often the pages where GTM issues are most expensive.
Mistake 5: Ignoring performance and privacy
GTM itself is only a container. The tags inside it can still affect performance, privacy, and compliance. Keep your tag setup clean, remove unused tags, audit third-party scripts, and test consent behavior before publishing.
Why InstaWP Is a Better Workflow for GTM Testing
Adding GTM directly to a live WordPress site is fast, but it is not always safe. A wrong tag can break tracking, duplicate conversions, slow down important pages, or send incorrect data to your ad platforms.
InstaWP gives agencies, developers, and site teams a safer workflow. You can create a sandbox or staging site, add GTM, test tracking, save a snapshot, check logs, and move the setup to production after validation. If you host on InstaWP, the same platform also supports managed WordPress hosting with CDN, security, SSL, backups, object cache, image optimization, and site monitoring.
InstaWP Use Cases for GTM Setup
Test client tracking changes before pushing them live.
Validate checkout and purchase events without risking live revenue data.
Use staging, snapshots, logs, and deployment workflows before production changes.
Run tracking on a managed WordPress cloud stack with CDN, backups, SSL, and security controls.
For teams that manage multiple client sites, this matters even more. GTM is rarely a one-time setup. Clients keep adding ad pixels, analytics events, conversion goals, landing pages, and consent requirements. A cloud-first WordPress workflow helps keep those changes controlled, testable, and reversible.
Conclusion: Add GTM to WordPress the Safe Way
You can add Google Tag Manager to WordPress using a plugin, a header/footer tool, a theme setting, or manual code. The easiest method is usually a plugin. The most developer-friendly method is a child theme or hook-based setup. But the safest workflow is to test GTM on staging first, confirm your tags, and then publish the verified setup to production.
With InstaWP, you can create a WordPress staging site, test GTM, save snapshots, review changes, and host production WordPress sites on a managed cloud platform built for modern WordPress workflows.
Test Google Tag Manager before it goes live
Create a staging site on InstaWP, add GTM safely, validate your tags, and publish with confidence.
Try InstaWP FreeFAQs About Adding Google Tag Manager to WordPress
u003cstrongu003eHow do I add Google Tag Manager to WordPress?u003c/strongu003e
You can add Google Tag Manager to WordPress by installing a GTM plugin, using a header/footer code plugin, adding the code through your theme or page builder settings, or manually placing the GTM snippets in a child theme. For live sites, test the setup on staging before publishing.
u003cstrongu003eCan I add Google Tag Manager to WordPress without a plugin?u003c/strongu003e
Yes. You can add GTM without a plugin by placing the GTM script in the head section and the noscript snippet after the opening body tag. Use a child theme or WordPress hooks instead of editing the parent theme directly.
u003cstrongu003eWhere should I paste the Google Tag Manager code in WordPress?u003c/strongu003e
The first GTM script should be placed as high as possible inside the head section. The second noscript snippet should be placed immediately after the opening body tag. Some plugins support both locations, while others only support header scripts.
u003cstrongu003eIs it better to use a plugin or add GTM manually?u003c/strongu003e
Use a plugin if you want the easiest setup and do not want to edit code. Add GTM manually if you are comfortable with child themes, hooks, and testing. Agencies and developers should test either method on staging before applying it to a live site.
u003cstrongu003eWill Google Tag Manager slow down my WordPress site?u003c/strongu003e
GTM itself is designed to load asynchronously, but the tags inside your container can affect performance. Too many third-party scripts, duplicate tags, or poorly configured triggers can slow down important pages. Audit your tags regularly and test performance after publishing.
u003cstrongu003eHow do I know if GTM is working on my WordPress site?u003c/strongu003e
Use Google Tag Manager Preview mode, Google Tag Assistant, and your browser’s page source to confirm that the GTM container is installed. Then test key pages and events to make sure tags fire only where they should.
u003cstrongu003eCan I use Google Tag Manager with WooCommerce?u003c/strongu003e
Yes, but WooCommerce tracking should be tested carefully. Check product views, add-to-cart events, checkout steps, purchase events, and thank-you pages. Use a staging site before changing live checkout tracking.
u003cstrongu003eShould I add Google Analytics directly or through Google Tag Manager?u003c/strongu003e
If you only need basic analytics, adding Google Analytics directly may be enough. If you manage multiple tags, ad pixels, conversion events, and marketing scripts, GTM is usually better because it centralizes tracking management.