A client pays your deposit on a Friday afternoon. Someone on your team has to notice, log in to InstaWP, pick the right template, name the site, copy the login and write the welcome email. If that person is busy, the client waits until Monday to see anything, and the first impression of your agency is silence.
This guide removes that person from the loop. You will build one n8n workflow that listens for a new client, asks the InstaWP API to create a site from your template, waits for it to finish installing, and emails the client their login. Nobody on your team has to touch it, at 4pm on a Friday or at 11pm on a Sunday.
Key takeaway
Point your payment page or intake form at an n8n Webhook node. n8n calls POST /api/v2/sites/template with your InstaWP API token, polls the task status endpoint if the site is still installing, reads the login from the credentials endpoint and emails it to the client. Ten nodes, no custom plugin, and the site itself comes from a template you build once.
What you are building
Here is the finished workflow in n8n. Every n8n screenshot in this guide comes from this exact workflow, running on a real n8n instance.

- New client signup (Webhook) receives the client’s name, email, business name and package.
- Prepare site details (Edit Fields) turns “Lopez Family Bakery” into a clean site name and picks the template for the package they bought.
- Create site from template (HTTP Request) calls the InstaWP API.
- Ready from pool? (IF) checks whether InstaWP handed back a finished site straight away.
- Wait, Check install task, Still installing? loop until the site is ready, if it was not ready immediately.
- Get site credentials (HTTP Request) reads the WordPress login.
- Email client their login and Post to #new-clients tell the client and your team.
There is no InstaWP node in n8n, so the InstaWP calls are plain HTTP Request nodes. That works in your favour: you see exactly what gets sent, and you are not relying on a community node someone may stop maintaining.
What you need before you start
| Piece | What it does here | Where to get it |
|---|---|---|
| An InstaWP template | The starting point every client site is cloned from | Build a site, save it as a snapshot, turn it into a template |
| An InstaWP API token | Authenticates every API call | app.instawp.io/user/api-tokens |
| n8n on a public HTTPS URL | Receives the new-client event and runs the workflow | n8n Cloud or a self-hosted instance (see below) |
| An email account (SMTP) | Sends the welcome email with the login | Your agency mailbox or any transactional email service |
| Slack (optional) | Tells the team a new client site exists | A Slack app with a bot token |
InstaWP’s API page says the REST API is available on every plan, so you do not need a special tier to follow along. Each site the workflow creates is billed on a paid site plan, though: the template’s own plan, or your cheapest paid plan if the template’s is free. Bake that into the price of the package you sell, and send plan_id in the request if you want to pick the tier yourself.
The one requirement people trip on is the third row. Stripe, WooCommerce and your form plugin all send their event from the public internet. An n8n running on your laptop at localhost:5678 will never hear from them. Sort out where n8n lives before you build anything. There is a short section on that near the end.
Step 1: Build the template your client sites start from
Every site this workflow creates is a copy of one template, so the template is where your agency’s work lives: theme, page builder, the plugins you always install, a contact page, sensible defaults, your support widget.
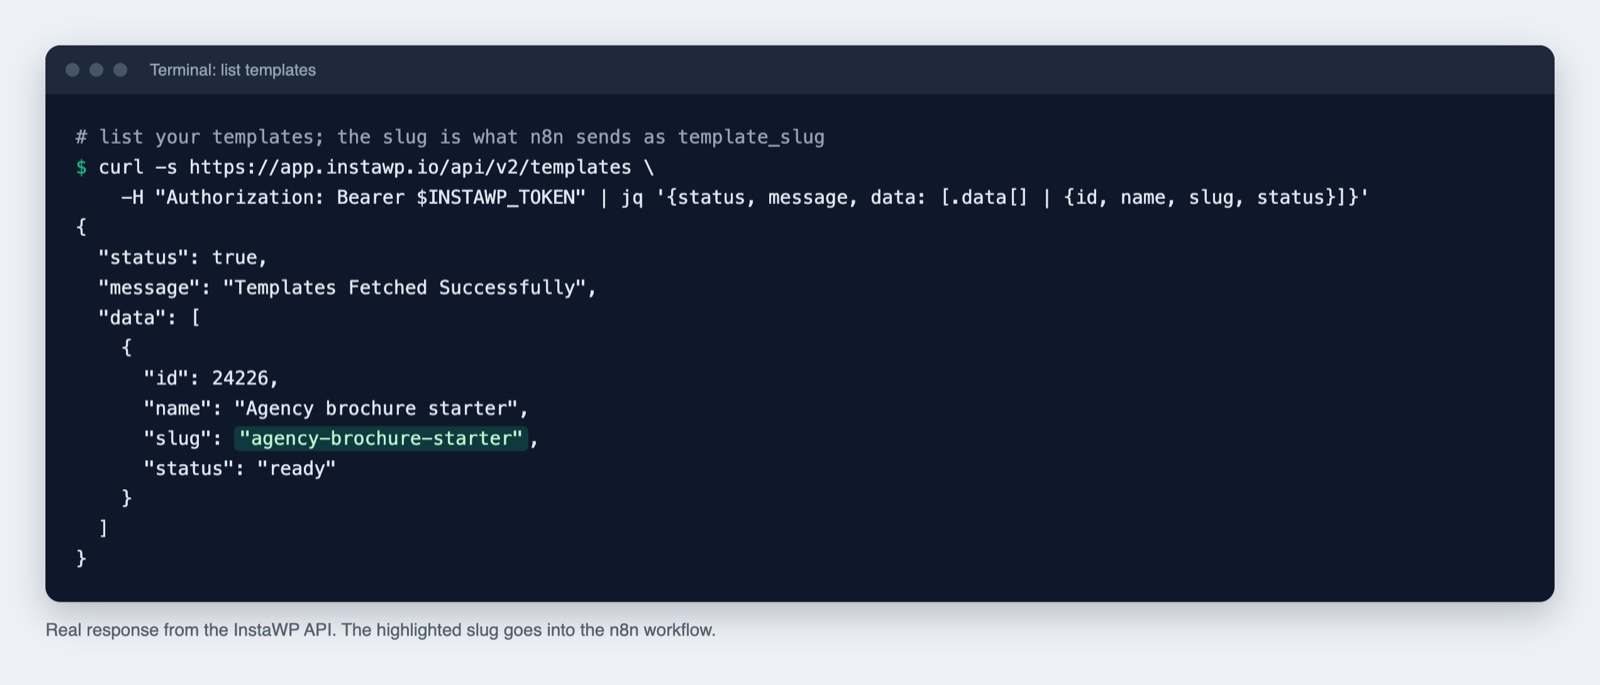
Set it up once in InstaWP: build the site, save it as a snapshot, and create a template from that snapshot. Open the template’s details page and note its template slug. That slug is the only thing the API needs to know which site to clone. InstaWP’s docs say you can also read it from the template list API.
If you sell more than one package (a brochure site and a shop, say), make one template per package. The workflow picks between them later.
Step 2: Create an InstaWP API token and store it in n8n
In InstaWP, go to app.instawp.io/user/api-tokens, click Add New, give the token a name such as “n8n client onboarding”, choose a token role and click Create. Copy the token somewhere safe.
The docs note one permission detail that matters for this workflow: the credentials endpoint you will call in Step 7 needs your token to have the view ability on the site. If that call fails while the create call works, check the token role first.
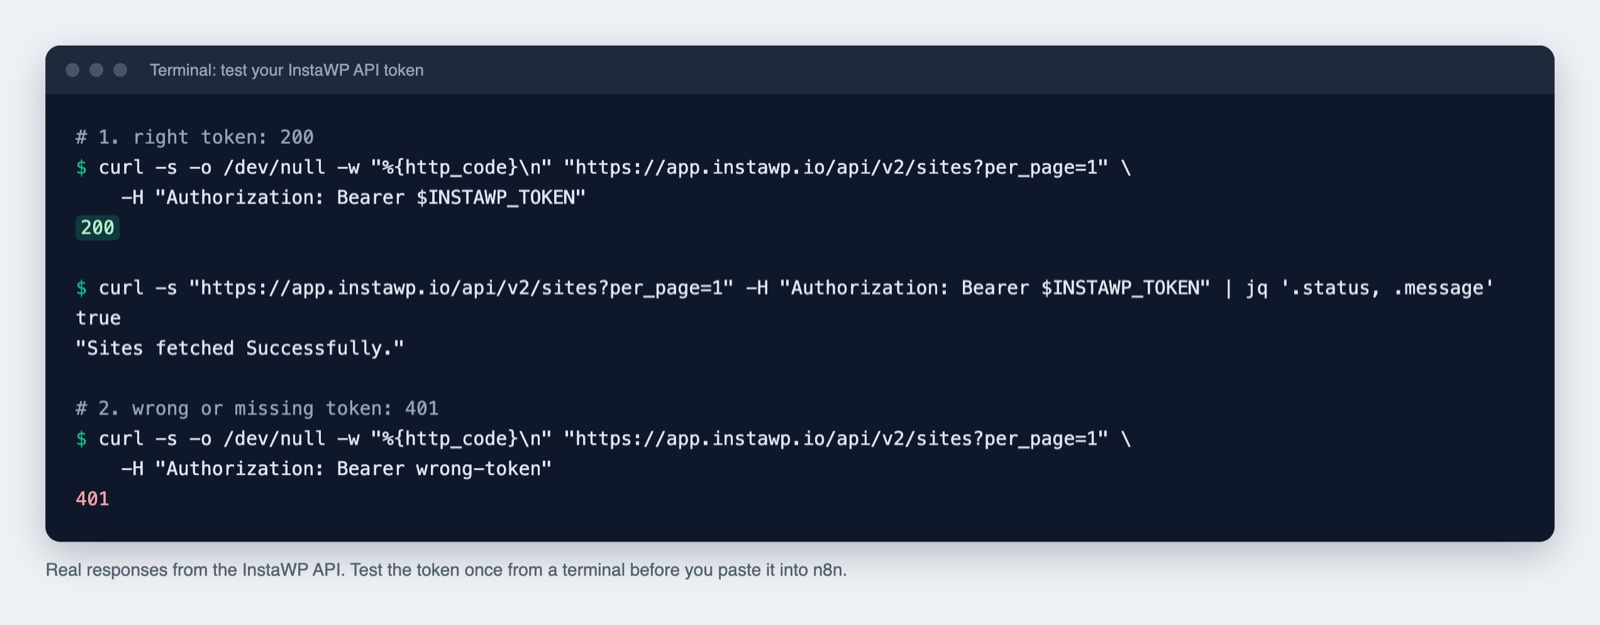
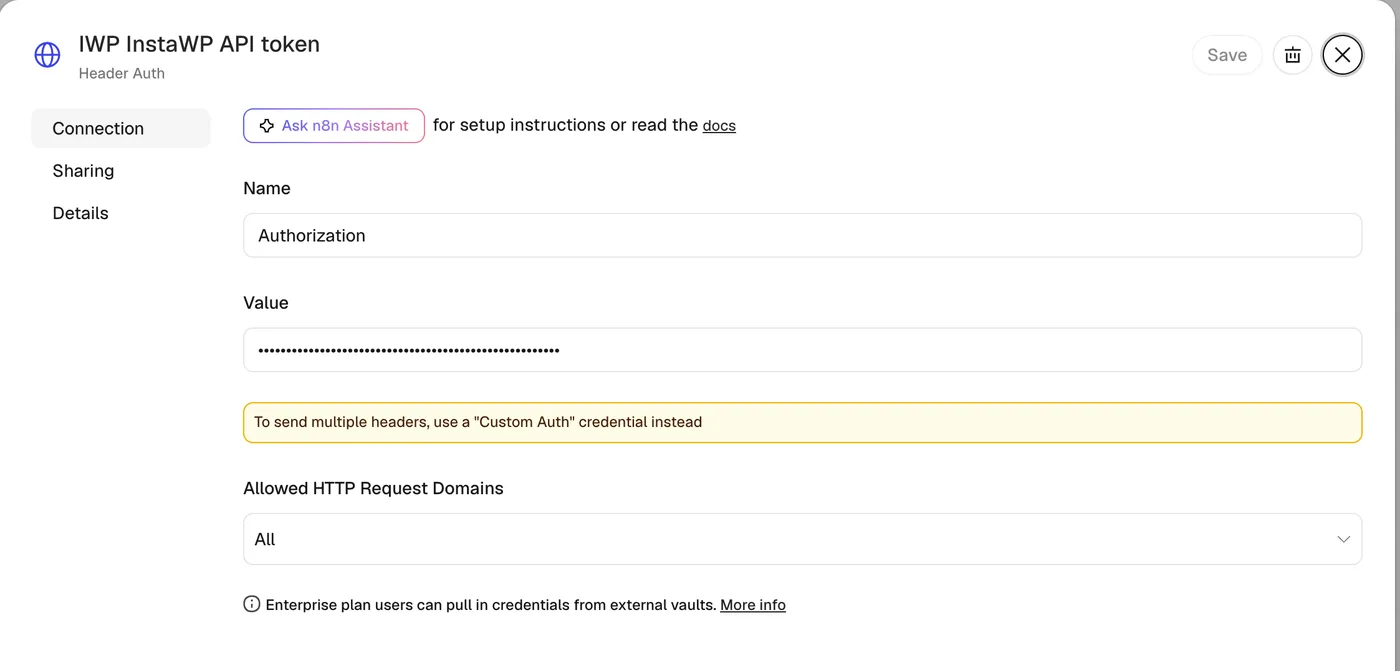
In n8n, do not paste the token into a header field on the node. Create a credential instead, so the token stays out of workflow exports and screenshots. Go to Credentials, add a new Header Auth credential and fill it in like this:
- Name:
Authorization - Value:
Bearer YOUR_INSTAWP_API_TOKEN(the word Bearer, a space, then the token)
Step 3: Catch the new client with a Webhook node
Add a Webhook node, set the method to POST and give it a readable path like new-client. Whatever system announces a new client will POST to this URL.
Here is what arrived when I sent a test client through it:
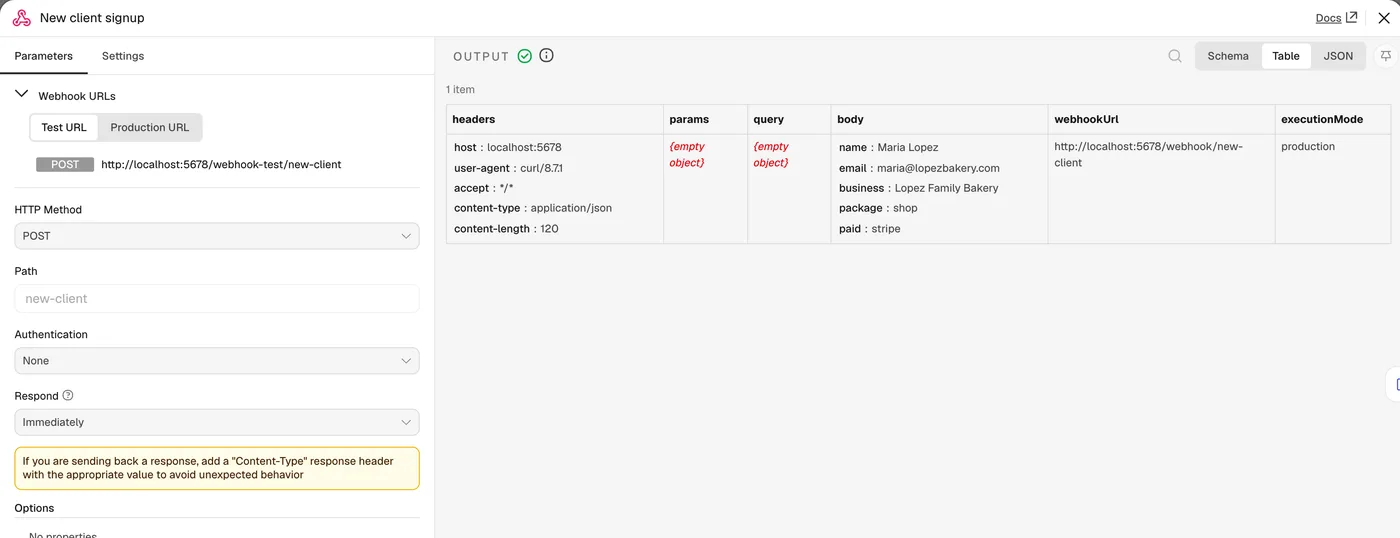
Two things to know about this node:
- Test URL vs Production URL. The test URL only works while you have the editor open and are listening for a test event. Once the workflow is published, the production URL is the one to give Stripe or your form.
- The URL has to be public. If the webhook URL n8n shows you starts with
localhost, nothing outside your machine can reach it. Here is how to fix the n8n webhook URL when it shows localhost behind a reverse proxy.
Further down there is a table of the usual places this event comes from: a Stripe checkout, a WooCommerce order or a plain form.
Step 4: Turn the business name into a site name
Add an Edit Fields (Set) node. It keeps the client’s name and email and builds two new values: the site name and the template slug.
site_name     = {{ $json.body.business.toLowerCase().replace(/[^a-z0-9]+/g, '-').replace(/^-|-$/g, '').slice(0, 24) }}
template_slug = {{ $json.body.package === 'shop' ? 'agency-woo-starter' : 'agency-brochure-starter' }}
“Lopez Family Bakery” becomes lopez-family-bakery, and because Maria bought the shop package, the workflow picks the WooCommerce template. Swap in your own template slugs from Step 1.
Step 5: Create the site from your template
This is the call that does the work. Add an HTTP Request node:
- Method: POST
- URL:
https://app.instawp.io/api/v2/sites/template - Authentication: Generic Credential Type, then Header Auth, then the credential from Step 2
- Send Body: on, Body Content Type: JSON
{
  "template_slug": "{{ $json.template_slug }}",
  "site_name": "{{ $json.site_name }}",
  "plan_id": 2,
  "is_reserved": true
}
plan_id picks the site plan the client site is billed on. 2 is Sandbox on a standard InstaWP account; read your own IDs from GET /api/v2/get-plans?product_type=sites rather than hard-coding mine. Leave it out and the site takes the template’s plan.
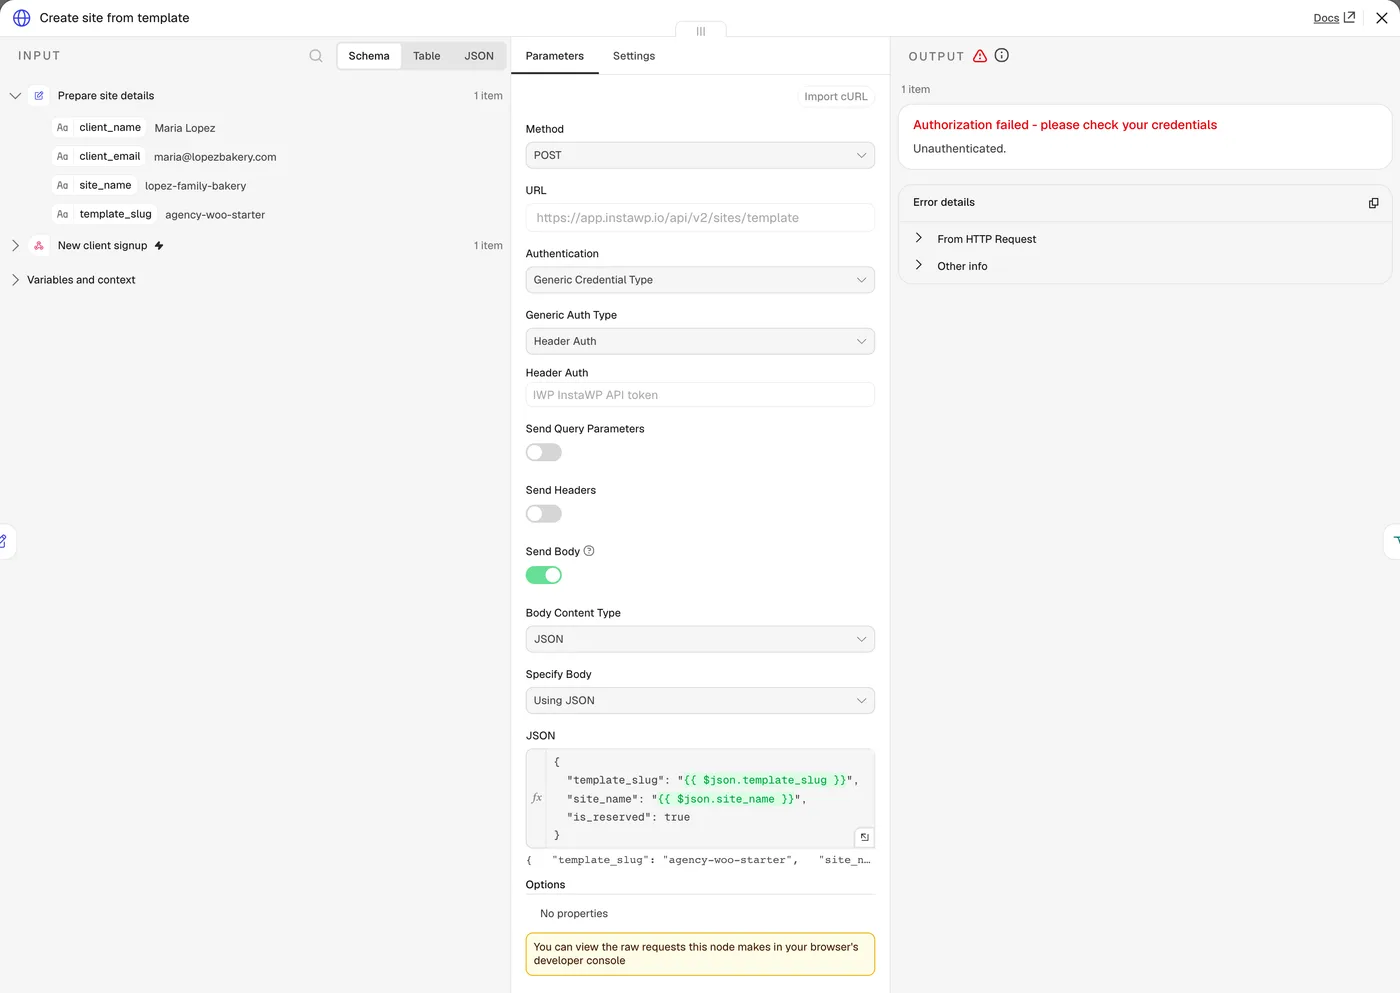
That error in the screenshot is real. I ran this workflow with a placeholder token, and InstaWP answered with HTTP 401 and the message “Unauthenticated.” If you see the same thing, the token is missing, expired, or the credential value is missing the word Bearer in front of it.
Do not skip is_reserved. InstaWP’s docs are explicit: leave it out, or set it to false, and you get a temporary site. A temporary site is great for a sales demo and terrible for a client who just paid you. Set it to true for anything you plan to hand over.
When the token is valid, InstaWP’s documentation shows a response shaped like this for a site that was ready immediately:
{
  "status": true,
  "message": "Site installation work is completed, Your website is ready!",
  "data": {
    "is_pool": true,
    "status": 1,
    "wp_url": "https://xyzsitename.instawp.xyz",
    "wp_username": "zuvalebuca7835",
    "wp_password": "iUnzmX2l1WRk3uMQA0NS",
    "id": 1333819,
    ...
  }
}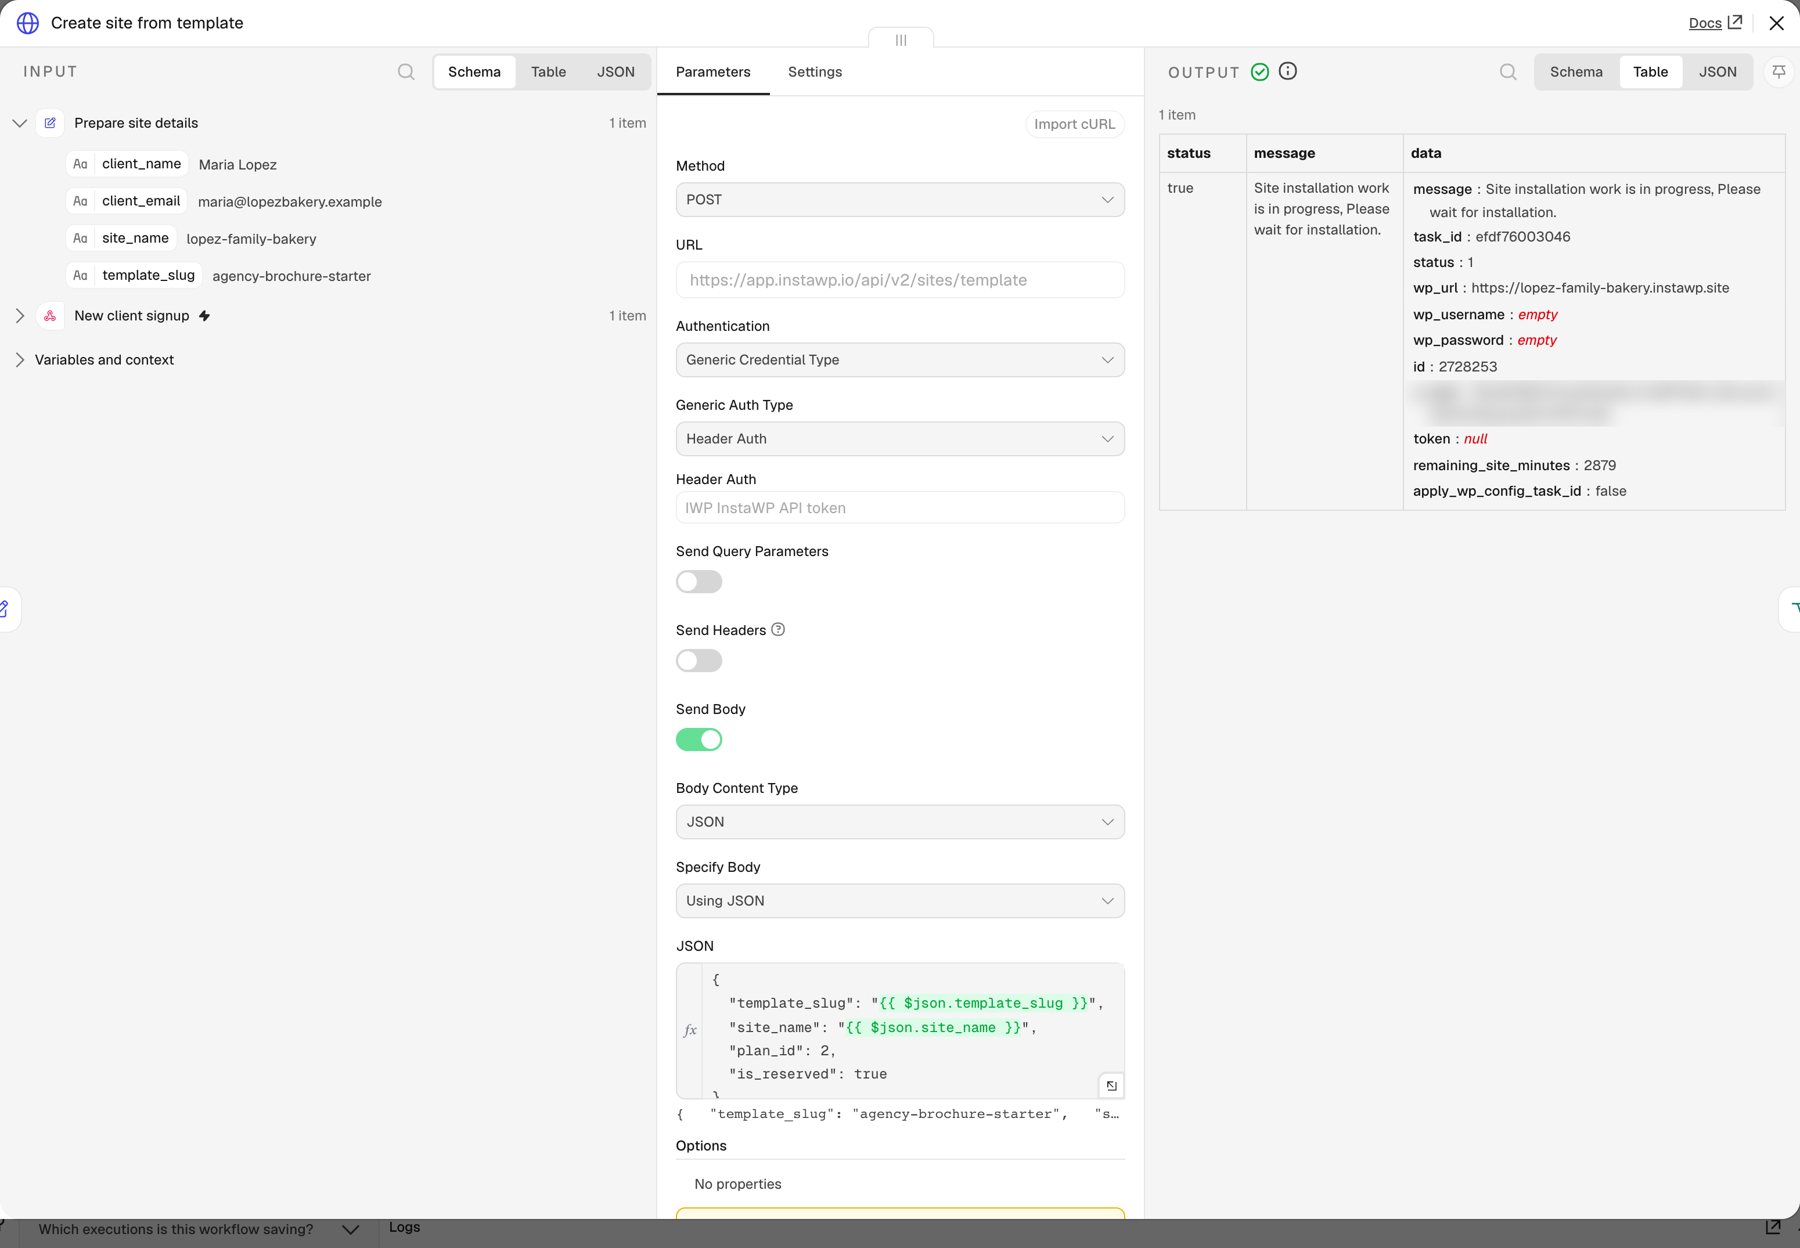
Three fields matter for the rest of the workflow: data.is_pool, data.id (the site ID) and data.wp_url. In my test the site was still installing, and wp_url was already filled in while the username and password came back empty. The site finished installing in under a minute.
Step 6: Handle “ready now” and “still installing”
InstaWP keeps a pool of pre-built sites, so a create call can come back in one of two states:
is_poolis true: the site is ready right now.is_poolis missing or false: the site is still installing, and the response includes atask_idyou can use to check on it. In my real run the key was simply absent, and the IF node correctly sent it down the waiting branch.
The Ready from pool? IF node checks {{ $json.data.is_pool }}. The true branch goes straight to Step 7. The false branch enters a small loop:
- Wait 10 seconds (Wait node).
- Check install task (HTTP Request, GET) calls
https://app.instawp.io/api/v2/tasks/{task_id}/statuswith the same credential. - Still installing? (IF) checks whether
{{ $json.data.status }}equalsprogress. If it does, loop back to the Wait node. If not, move on.
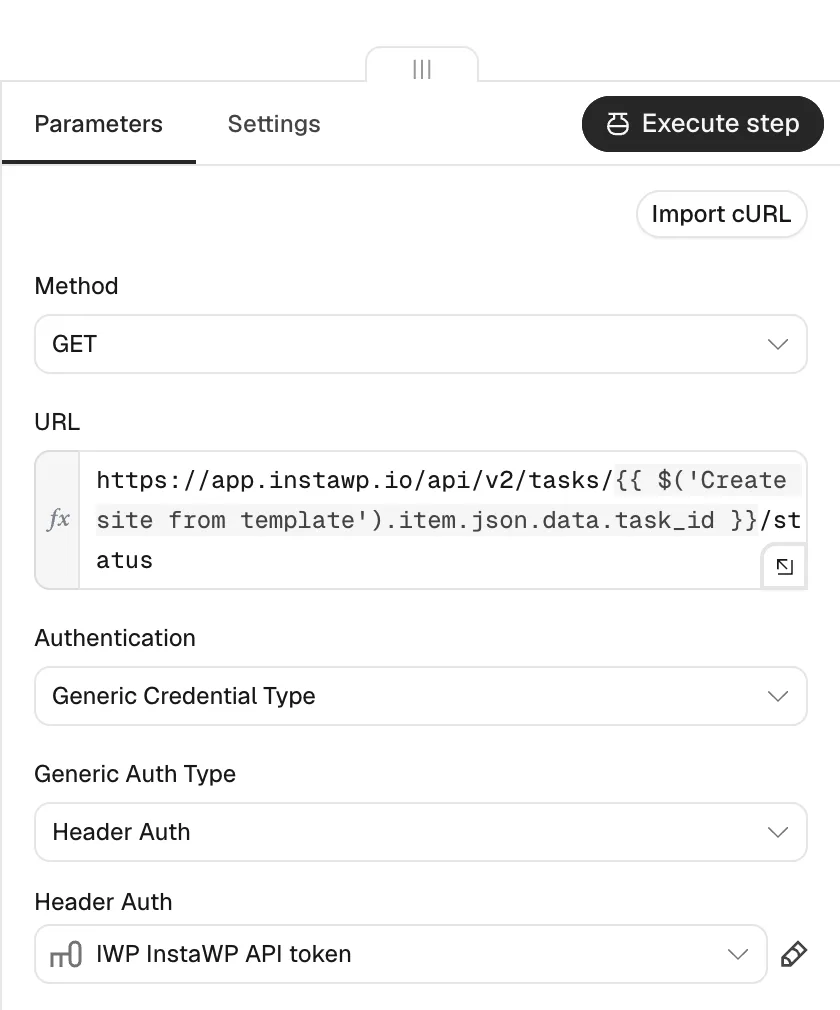
The URL in that node reads the task ID from the create step:
https://app.instawp.io/api/v2/tasks/{{ $('Create site from template').item.json.data.task_id }}/statusTwo warnings from InstaWP’s own docs. First, do not retry the create call while a site is installing. Wait for the task instead, or you will end up with two sites for one client. Second, the task ID lives at data.task_id, and while the site is still installing wp_username and wp_password come back empty. That is by design, which is why Step 7 fetches the login separately. Their sample polls every 2 seconds. I used 10, which is plenty for a welcome email and kinder to the API. InstaWP rate-limits with HTTP 429 when you push too hard.
Step 7: Fetch the login and email the client
Add one more HTTP Request node, Get site credentials:
GET https://app.instawp.io/api/v2/sites/{{ $('Create site from template').item.json.data.id }}/credentialsWhy a separate call? The create response always contains wp_username and wp_password keys, but they are only filled in when the site came from the pool. For a site that was still installing, they come back as empty strings, by design, because the WordPress admin user does not exist yet. The docs also say the site list and site detail endpoints do not return credentials at all. The credentials endpoint is the one place to read them, and it also returns SFTP details (server_username, server_password, ip_addr) if you want to keep those in your CRM.
Then the Send Email node writes to the client:
Hi {{ $('Prepare site details').item.json.client_name }},

Your site is live at {{ $('Create site from template').item.json.data.wp_url }}.

Log in at {{ $('Create site from template').item.json.data.wp_url }}/wp-admin with
username {{ $json.data.wp_username }} and password {{ $json.data.wp_password }}.
Please change the password the first time you log in.
A word on that password. Email is not a secure channel, so the email asks the client to change it straight away. If your clients are less technical, a softer option is to email only the site URL and username, and let them set their own password through the normal WordPress reset link.
The last node posts the new site to a #new-clients Slack channel so your designers know there is a fresh site waiting for them. Swap it for a CRM update, a ClickUp task or a Google Sheets row if that is where your team works.
Where the “new client” event comes from
The Webhook node does not care who calls it. These are the three setups most agencies use:
| Source | How to wire it | Good for |
|---|---|---|
| Stripe checkout | Replace the Webhook node with n8n’s Stripe Trigger, listening for a completed checkout session | Agencies selling fixed packages with a payment link |
| WooCommerce order | Use n8n’s WooCommerce Trigger, or add a WooCommerce webhook pointing at the n8n URL | Agencies that sell website packages from their own WordPress shop |
| Intake form | Have your form plugin POST to the n8n webhook on submit | Free trials, demos, or onboarding after a sales call |
Whichever you pick, map its fields into the same four values (name, email, business, package) in the Edit Fields node, and the rest of the workflow stays the same. If you want the general version of this plumbing (WordPress talking to n8n and back), our guide on how to connect n8n to WordPress covers every connection method.
Where to run n8n
The whole flow depends on n8n being reachable at a public HTTPS address around the clock. Stripe retries a failed webhook for a while, but a client who pays at 11pm should not wait for someone to switch a laptop on.
You have three realistic options: n8n Cloud, a VPS you set up and patch yourself, or a managed self-hosted instance. If you are still weighing them up, this comparison of the cheapest ways to host n8n puts real prices for each side by side.
The setup we used to test this guide is InstaPods, which runs n8n as a one-click app on its own server with HTTPS and a custom domain already configured. That means the production webhook URL is public from the first minute. The Build plan at $7 a month gives n8n 2 vCPU and 2 GB of RAM, a flat price with no per-execution billing, so a busy launch month does not change the bill.
Get n8n on a public HTTPS URL in about a minute
A real server with HTTPS, a custom domain and SSH handled for you, on a flat monthly price. New accounts get $10 in credit when they add a card.
Deploy n8n on InstaPodsGotchas worth knowing before you go live
- Temporary vs reserved. Covered above, but it is the mistake that costs you a client: no
is_reserved: true, no permanent site. - No card on the InstaWP account. New sites always go on a paid plan, so an account with no payment method gets HTTP 402 with
payment_method_requiredand nothing is created. Add an IF on the response status so a failed create alerts you instead of emailing the client a blank login. - Two clients with the same business name. Two “Smith Plumbing” clients produce the same site name. Add a short suffix in the Edit Fields node, for example the last four digits of the order ID.
- Rate limits. InstaWP’s API docs say over-limit requests get HTTP 429 and are paused until enough time has passed. Keep the polling interval sensible, and if you onboard clients in bulk, add a pause between them.
- Close the loop with InstaWP webhooks. InstaWP can also notify an external URL when a site is created or deleted. Pointing those InstaWP webhooks at a second n8n workflow gives you an audit trail of every client site, including ones your team creates by hand.
- Demo first, paid site second. If your sales process starts with a demo, the live demo link guide for agencies pairs well with this workflow: the demo closes the deal, and this workflow builds the real site the moment the client pays.
Frequently asked questions
Does n8n have an InstaWP node?
No. I checked the node list on a current n8n release (2.48) and there is no InstaWP node. The HTTP Request node with a Header Auth credential handles every call in this guide, and it is easier to debug because you see the raw request.
Which InstaWP endpoint creates a site from a template?
POST https://app.instawp.io/api/v2/sites/template, with template_slug in the JSON body. site_name is optional (InstaWP generates one if you leave it out), and is_reserved: true makes the site permanent.
Why are wp_username and wp_password empty in the API response?
The site was still installing when the API answered, so the WordPress admin user did not exist yet. InstaWP’s docs say this is expected. Poll the task status endpoint until it is no longer progress, then call /sites/{id}/credentials.
Can I run this on n8n Cloud instead of self-hosting?
Yes. The workflow uses only core nodes, so it runs the same way on n8n Cloud. Self-hosting mostly changes the cost: Cloud plans are priced around executions, while a self-hosted instance costs the same however many clients you onboard.
Can I use this for AI-built client sites too?
Yes, and it combines well with our guide to building AI automation workflows with n8n. Create the site from your template with this workflow, then hand the new site to an AI step that drafts the client’s first pages from their intake form answers.