If you push a WordPress theme update to GitHub and want it to appear on your staging site automatically, you need two things: a GitHub repository and a hosting environment with native Git integration.
On InstaWP, a managed WordPress hosting platform, that connection is built in from day one. No VPS, no GitHub Actions YAML, no shell scripts. This guide walks through the complete setup, from your first git push to pushing approved changes to your live site with one click.
By the end, every commit you push to GitHub will automatically update your InstaWP staging site, and your client or QA team can review it via a no-password Magic Login link before anything touches production.
Table of Contents
Key Takeaways
- InstaWP’s managed WordPress hosting has native Git Integration built in; no GitHub Actions YAML, no shell scripts, no server configuration required.
- Connect your GitHub repo once, choose a branch and a target directory, and InstaWP pulls your theme changes automatically on every push.
- Magic Login drops you straight into the staging wp-admin to review changes without a password; shareable with clients and QA teams.
- Always create an InstaWP Snapshot before deploying so rollback is one click if something breaks.
- 2-Way Sync pushes your approved staging theme changes to the live site without overwriting orders, posts, or other production data.
- Advanced teams can use InstaWP’s API with GitHub Webhooks to spin up a separate staging environment for every pull request automatically.
What is WordPress Git Deployment?
WordPress Git deployment is the automatic synchronization of code changes from a Git repository into a WordPress environment, without manual file uploads or FTP transfers. When you commit and push an update to a theme file on GitHub, a Git deployment system detects the push and pulls the changed files into the correct directory on your WordPress site.
The key word is automatic. A manual deployment means you open an FTP client, navigate to wp-content/themes/your-theme/, and drag files across. A Git deployment means you type git push origin main and the site updates itself. Your commit history becomes a complete audit trail: who changed what, when, and why.
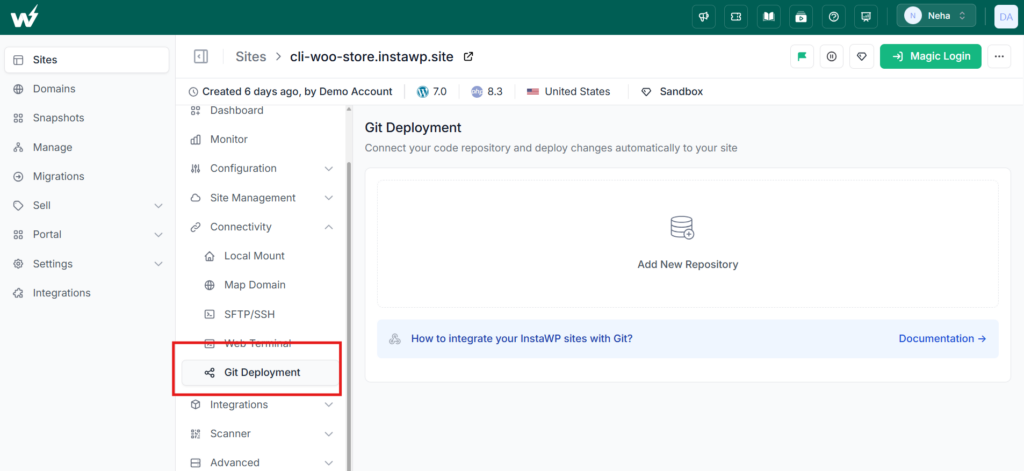
On a traditional VPS or shared host, setting this up requires SSH key management, a GitHub Actions workflow file, a deploy script, and a runner that can connect to your server. On InstaWP managed WordPress hosting, Git deployment is a built-in panel in the Site Tools dashboard. No scripts, no YAML, no server access required.
Did You Know?
Before native Git integration existed in managed WordPress hosting, setting up automated theme deployment required a GitHub Actions workflow file, a configured SSH deploy key, a remote shell script, and a VPS with the right firewall rules. InstaWP reduces that entire setup to a single form in the Site Tools panel.
Why Automate WordPress Theme Deployments with GitHub?
Manual FTP uploads are the default for most WordPress developers. They work until they don’t: a missed file, an overwritten customization, a stylesheet that didn’t sync. Here are the concrete reasons to move to GitHub-based deployment, and what each one unlocks when you’re on managed WordPress hosting.
1. Version Control and One-Click Rollback
Every git commit is a named snapshot of your theme at a specific moment. If a client changes their mind after three rounds of revisions, you can check out any earlier commit and see exactly what the theme looked like. If a PHP version update breaks a template, git log shows you which commit introduced the incompatibility.
On InstaWP, Snapshots add a second layer of protection at the hosting level. Before you push a major theme update, take a Snapshot of the entire staging site from the InstaWP dashboard.
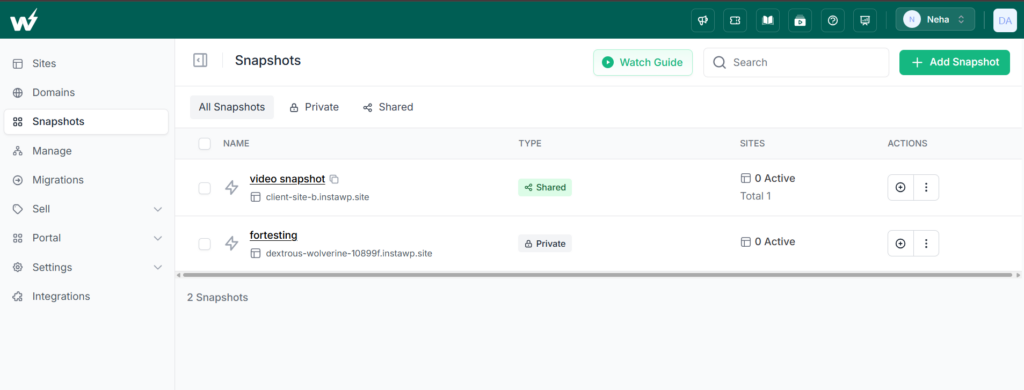
If the deployment breaks something unexpected, clicking Restore Site brings the environment back to the pre-deployment state in seconds, no git commands required.
2. Faster, Consistent Deployments Across Multiple Sites
Manual FTP has two failure modes: missed files and human error. A GitHub push deploys every changed file, in the right directory, every single time. For agencies managing themes across multiple client sites, that consistency eliminates the “it works on my machine” class of deployment bugs entirely.
With InstaWP’s Git Integration, you can connect the same GitHub repository to multiple staging environments and deploy to all of them simultaneously by pushame theme update across a WooCommerce siteeliminates the “it works on my machine” class of deployment bugs entirely.
With InstaWP’s WordPress Git Integration, you can connect the same GitHub repository to multiple staging environments and deploy to all of them simultaneously by pushame theme update across a WooCommerce siteand a blog site no longer means two separate manual uploads.
3. Isolated Staging Before Anything Touch Live Site
InstaWP’s managed hosting creates a full staging copy of your live WordPress site in seconds using the InstaWP Connect plugin. You push theme changes to staging first, test them in a production-identical environment, and only push to live when your client has approved. Hub integration. Your live site is untoucheduntil you decide to sync.
Learn more about creating WordPress staging sites.
This matters most when your client’s live site is running WooCommerce with active orders or a membership plugin with paying users. The 2-Way Sync feature (csh only the files and database tables youchoose, leaving orders and user data exactly where they are.
4. Clean Team Collaboration with Branch-Based Workflows
Git branches let developers work on diffehout overwriting each other’s changes. Whenyour designer is updating the header template on a feature/new-header branch while a developer fixes a PHP notice on fix/checkout-notice, both can push freely. When each branch merges into main, the
deployment runs automatically.
Advanced teams using InstaWP’s API can take this further: spin up a separate staging environment for each branch or pull request, so reviewers preview changes in isolation before any branch merges. More on that in Step 8.
5. A Scalable Foundation for Agency Word
Agencies managing dozens of client themes need a deployment system that works the same way every time, for every client. A GitHub-to-InstaWP workflow is repeatable: the same steps, the same integration, the same review-and-sync process regardless of which client’s theme you’re working on. Onboarding a new client’s theme takes minutes, not an afternoon of server configuration.
Build faster. Deploy smarter.
InstaWP managed WordPress hosting gives every developer native GitHub integration, instant staging, Magic Login, and one-click go-live. Free to start, no credit card required.
Create Your Free Managed Site →What You Need Before You Start
Run through this checklist before openingg everything in place means you’ll have aworking auto-deploy pipeline in one sitting.
Before You Start Checklist
- app.instawp.io
- The InstaWP Connect plugin if you want to clone an existing live site to use as the staging base
- A note of which GitHub branch will be your deployment branch (commonly
mainordevelop)
How to Auto-Deploy WordPress Theme Changes via GitHub (Step by Step)
This walkthrough uses InstaWP’s managed hosting as the deployment target. Steps 1 and 3-onwards also apply if you’re using a VPS with a CI/CD tool, but the InstaWP path skips the server setup, SSH configuration, and scripting entirely.
Step 1: Push Your WordPress Theme to a GitHub Repository
If your theme isn’t on GitHub yet, this step gets it there. If it’s already in a repo, skip to Step 2.
Go to github.com, click New repository.
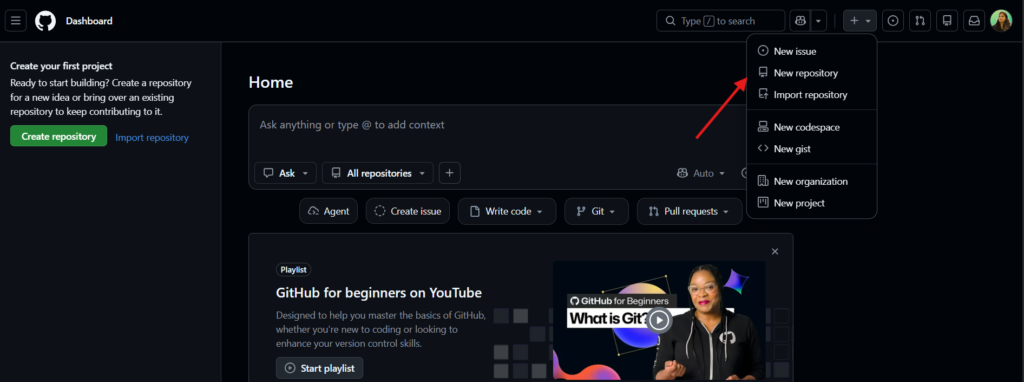
Give it a proper name, description, and choose Public repository.
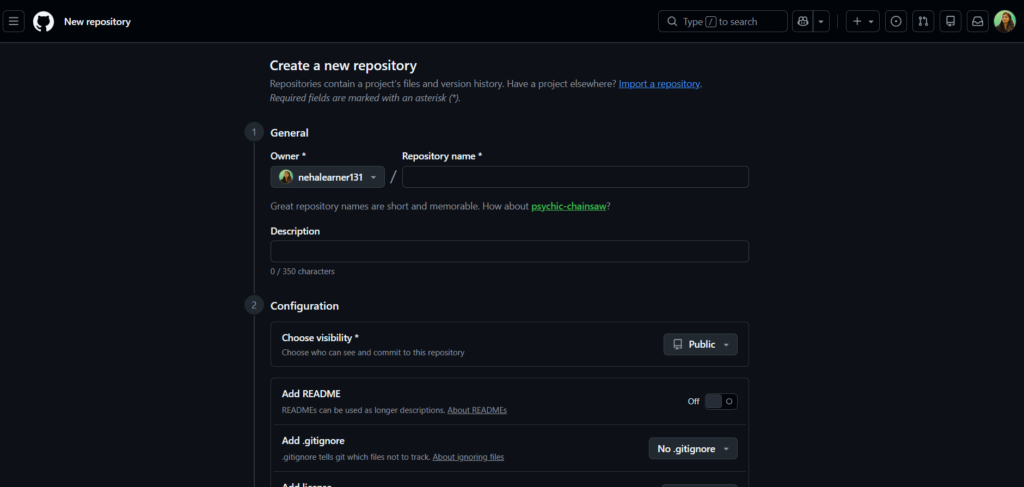
Open Terminal (Mac/Linux) or Git Bash (Windows) and navigate to your local WordPress installation: cd /path/to/wp-content/themes/your-theme.
- Initialize the repo and connect it to Git remote add originhttps://github.com/your-username/client-theme.git
- Create a
.gitignorefile in the theme root to exclude files that shouldn’t be committed:node_modules/
.DS_Store
*.map
*.log - Stage, commit, and push:
git add .
git commit -m "Initial theme commit"
git push -u origin main - Verify the files appear in your GitHub repository before continuing.
Why this matters: InstaWto the repository URL you provide. The repomust exist and be accessible (OAuth or personal access token) before the connection step works.
Step 2: Create a Managed WordPress Site
This is your deployment target: a managed WordPress staging environment that will receive every theme push automatically. InstaWP creates it in under 10 seconds.
- Log into your InstaWP dashboard at app.instawp.io.
- Click + Add New in the top right of the Sites screen.

- Select Create from ScratchCreatefrom Snapshot (after creating a Snapshot of your live site with the Connect plugin first).
- Choose the WordPress version and PHP verct PHP 8.2 and the lateststable WordPress.
- Choose the correct managed hosting plan.
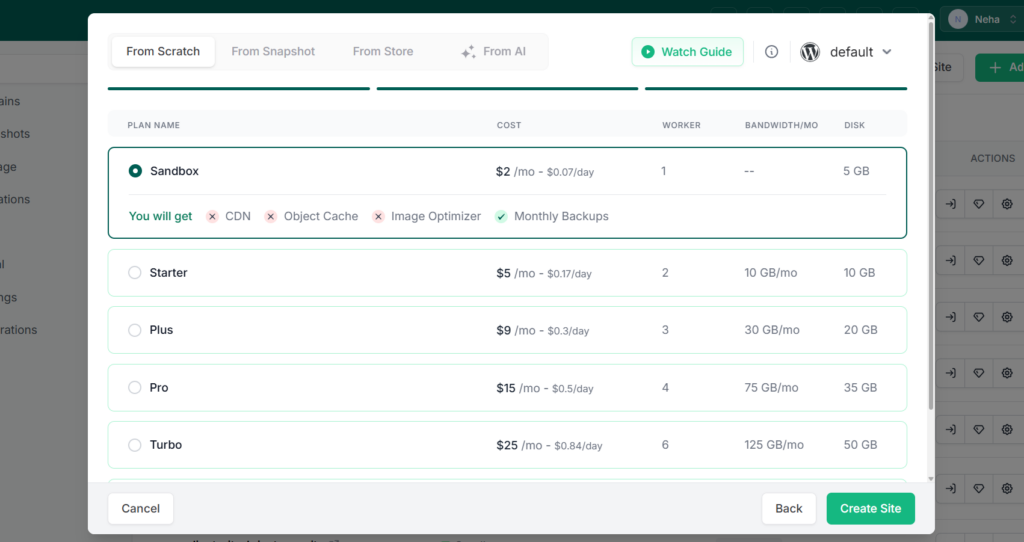
- Click Create Site. InstaWP provisions the full managed WordPress environment and returns you to the dashboard within 10 seconds.
- You’ll see your new site card with its staging URL. Click Magic Login on the site card to enter wp-admin instantly, no password needed.
If you want staging to match your live site exactly: Install the InstaWP Connect plugin on your live site (Plugins → Add New → search “InstaWP Connect”), activate it, go to Tools → InstaWP → Connect, and click Create Staging. InstaWP clones your full database and files to a managed staging environment automatically.
Step 3: Connect Your GitHub Repo via InstaWP’s Git Integration
This is the core step. InstaWP’s Git Integration panel creates the link between your GitHub repository and the staging site so every push triggers an automatic pull.
- On your site card in the InstaWP dashboa/strong> (the wrench icon).
- Scroll down to the Git Integration section and click it to expand the panel.
- Click Connect Repository.
- Choose your authentication method:
Personal Access Token (for private repos where you want granular scope control). For OAuth, click Authorize InstaWP and approve the permissions in the GitHub popup. - In the Repository URL f
https://github.com/your-username/client-theme - In Branch, type the bra
mainfor your primarydeployment branch, ordevelopif you’re following a Gitflow branching strategy. - In Target Directory, enter the path where InstaWP should place the theme files:
wp-content/themes/your-theme-folder-name— use the exact folder name your theme uses. - Click Save and Sync. InstaWP immediately pulls the current branch contents into the target directory and sets up the webhook to listen for future pushes.
You can verify the connection worked by clicking Activity Logs on the site card. The log will show a “Git sync completed” entry with a timestamp and the files that were pulled.
This is what managed WordPress hosting looks like
No server config. No deployment scripts. Just push your code and InstaWP handles the rest. Try it free.
Get Started Free →Step 4: Push a Theme Change and Watch It
Now test the pipeline end-to-end with a small, visible change. This confirms the webhook is firing and InstaWP is pulling correctly before you trust it with a larger deployment.
- Open your theme’s
style.cssin your code editor and change theTheme Namecomment, or make a visible change to a template file (for example, add a temporary comment tofooter.php). - Stage, commit, and push the change:
git add style.css
git commit -m "Test: verify GitHub auto-deploy to InstaWP"
git push origin main - Switch to the InstaWP dashboard. Within a few seconds, the Activity Logs for your site will show a new “Git sync”
entry listing the changed file. - Click Magic Login on the site card to open wp-admin directly, then visit Appearance →
Themes to confirm your theme change
If the Activity Log doesn’t update within 30 seconds, check that the webhook is active: in your GitHub repo go to Settings → Webhooks and con listed with a green checkmark on the lastdelivery.
Step 5: Review Theme Changes in Staging with Magic Login and Performance Scanner
Every deployment should go through a review before you share it with a client. InstaWP’s Magic Login and Performance Scanner are your two primary review tools.
- Click Magic Login on the site card. This opens wp-admin in a new browser tab without requiring a password — no sharing credentials needed.
- Navigate to the front end of the site and review the affected template areas (header, footer, archive pages, single post templates, WooCommerce templates if applicable).
- Check the browser console (F12) for JavaScript errors that might indicate a missing script or stylesheet.
- In the InstaWP dashboard, click Site Tools → Performance Scanner and run a scan. This flags Core Web Vitals issues, render-blocking resources, and oversized images introduced by the theme changes before they reach production.
- Click Site Tools → Activity Logs to confirm the exact files that changed in this deployment. If an unexpected file was modified, investigate before syncing to live.
Step 6: Share the Staging Site with Your Client or QA Team
Client review happens on the staging site, not on a local environment or a screen-share call. InstaWP gives you two ways to grant access without creating WordPress user accounts manually.
- Share the staging URL directly: The staging URL on InstaWP is a public URL your client can open in any browser. Send them the URL and they can view the front end immediately.
- Share a Magic Login link for wp-admin access: If your client or QA reviewer needs wp-admin access, go to Site Tools → User Role Management, create a new user with the Editor or Administrator role, and share the Magic Login link for that user. They get in without a password, and you can revoke access at any time from the dashboard.
- Use InstaWP’s shared Snapshot: If you want to send a point-in-time review environment (for example, after a specific set of changes), create a Snapshot from the site card and share the Snapshot URL. The reviewer sees exactly the state you saved.
Once the client approves the staging version, move to Step 7 to push to live.
Step 7: Push Approved Theme Changes to Your Live Site with 2-Way Sync
This is where InstaWP’s managed hosting does something a VPS with GitHub Actions cannot do easily: push only the theme files from staging to live, leaving yots, users, WooCommerce data) exactly as itis. That’s InstaWP’s 2-Way Sync.
- Before syncing, take a Snapshot of your from the live site card, click SiteTools → Snapshots → Create Snapshot. Label it “Pre-deploy backup — [date]” so it’s identifiable if you need
to restore. - Go to your staging site card and click Site Tools → 2-Way Sync.
- Select the sync direction: Staging to Live.
- Under What to Sync, select Files only and specify the path:
wp-content/themes/your-theme-folder-name. This ensures only the theme files transfer — not the staging database, which may have test content you don’t want on the live site. - Review the sync summary showing which files will be transferred, then click Start Sync.
- InstaWP transfers the files to the live site. Visit the live URL and confirm the theme changes are live.
Result: Your live site now has the updated theme. Orders, posts, and user data were never touched. If anything looks wrong, restore the live site from the Snapshot you created in step 1 of this section.
Step 8 (Advanced): Branch-Based Deployments for Larger Teams
If your team works across multiple featurarate staging environment for each pullrequest, you can automate that with InstaWP’s API and GitHub Webhooks.
The pattern works like this: when a developer opens a pull request on GitHub, a GitHub Actions workflow calls the InstaWP API to create a new managed site, coch, and posts the staging URL back into thepull request as a comment. Reviewers click the link, preview the branch in a real WordPress environment, and approve or request changes. When the PR merges, anot preview environment.
The InstaWP API documentation covers site creation, Git Integration setup, and site deletion endpoints. Your GitHub Actions workflow YAML calls these endpoints (added as a GitHub Actions secret). Thissetup takes around 30 minutes to configure once and runs automatically for every PR after that.
Common Mistakes That Break WordPress GitHub Deployments
These are the issues that cause the auto-deploy to fail silently or break the staging site, along with how to diagnose and fix each one.
1. Wrong Target Directory Path
Symptom: InstaWP shows a successful sync in Activity Logs, but the theme changes don’t appear on the site.
Cause: The target direction doesn’t match the actual theme foldername in wp-content/themes/. A common mistake is using the theme’s display name instead of the folder name (for example, “My Client Theme” instead of my-client-theme).
Fix: In InstaWP, click Magic Login, go to Appearance → Themes → Theme Details, and note the exact folder name shown in the Theme URI field. Update the Target Directory in the Git Integration panel to match it exactly, including case sensitivity.
2. Skipping the Snapshot Before a Major
Symptom: A deployment breaks the site and there’s no quick way to restore it.
Fix: Make Snapshots a marivial push. In InstaWP, click SiteTools → Snapshots → Create Snapshot, label it with the deployment date and what’s changing. If the deployment breaks something, click Restore Site next to that Snapshot and you’re back in under a minute.
3. Committing Compiled Assets or Sensitive Files
Symptom: The GitHub repository grows to hundreds of megabytes, deployments are slow, or a .env file containing API keys ends up in the repo.
Fix: Maintain a thorough .gitignore in your theme root. At minimum, exclude:
node_modules/, any compiled CSShem via a build tool (commit the source, notthe dist), .env files, and OS files like .DS_Store. If sensitive files were already
committed, use git rm --cached filenamtracking without deleting the local file.
4. Using a Personal Access Token with Too-Narrow Scope
Symptom: InstaWP fails to connect to a private GitHub repository, returning an authentication error.
Fix: When creating a GitHub Personal Access Token for private repo access, ensure you include the repo scope (full control of private repositories). Fine-grained tokens need Contents: Read-only permission on the specific repository. Use GitHub OAuth instead of a token where possible — it simplifies permission management.
5. Deploying Directly to the Live Site W
Symptom: A theme update breaks a live client site in front of real users.
Fix: Always set up Instataging site, not the live site. The stagingenvironment absorbs deployment issues — syntax errors, missing files, JavaScript conflicts — before production users see them. Use 2-Way Sync to move approved changes to live, not direct Git deployment to live.
6. Not Verifying the Webhook Delivery Af
Symptom: Manual “Save and Sync” works in InstaWP, but pushing to GitHub doesn’t trigger an automatic deployment.
Fix: Go to your GitHub repository, click Settings → Webhooks, and find the
InstaWP webhook. Click it and scroll to
Why InstaWP Makes This 10x Simpler Than a VPS
The traditional approach to automated Wor like this: provision a VPS or cloud server,install and configure Nginx or Apache, install PHP and MySQL, install WordPress, generate SSH deploy keys, write a GitHub Actions YAML workflow that SSHes into your server on push, write a deploy script that runs git
pull and optionally flushes the objecules to allow the Actions runner’s IP range,and test the entire chain from end to end.
That’s three to four hours of DevOps work for a developer who knows what they’re doing. For a designer or freelancer doing this for the first time, it’s a full day.
InstaWP’s managed WordPress hosting collapses that entire chain into a form with three fields: Repository URL, Branch, and Target Directory. The managed infrastructure handles the server, the webhook listener, the file transfer, and the cache flush. You focus on the theme,
Beyond Git deployment, InstaWP’s managed hosting also gives you built-in tools that a self-managed VPS requires plugins or additional configuration to replicate: the PHP Config panel (adjust WP_MEMORY_LIMIT, MAX_EXECUTION_TIME, and UPLOAD_MAX_FILESIZE from the dashboard without touching php.ini), InstaShield (WAF, DDoS protection, and SSL), the Vulnerability Scanner, and automated daily backups on paid plans.
InstaWP is managed WordPress hosting built for developers
Native GitHub integration, instant staging, 2-Way Sync, Magic Login, Performance Scanner, and PHP Config. Everything in one dashboard, no server setup required.
Start Free, No Credit Card →Automate Theme Deployments with Your AI Assistant via InstaMCP
If you use an AI coding assistant, InstaWP’s InstaMCP feature connects your AI client directly to your managed WordPress sites. With one toggle in the InstaWP dashboard (Site Tools → InstaMCP → Enable), your AI assistant can interact with the site through the Model Context Protocol.
For theme deployment workflows, this means you can hand routine tasks to your AI assistant instead of doing them manually in the dashboard:
- “Check the Activity Logs on my InstaWP sast Git sync completed without errors.”
- “Run the Performance Scanner on my staging site and tell me if any Core Web Vitals scores dropped compared to the last scan.”
- “Create a Snapshot of my staging site labeled ‘pre-deploy 2026-07-15’ before I push the next theme update.”
InstaMCP works with the major AI clients including Claude, Cursor, and ChatGPT. Check the InstaWP documentation for the current list of supported clients and thhis feature is actively expanding.
Preventing Theme Deployment Issues Going Forward
Once the GitHub-to-InstaWP pipeline is rut reliable across the lifetime of a clientproject.
- Use branch protection on main. Require pull request reviews before merging to main so no
individual developer can push directly to thg deployments. In GitHub: Settings →Branches → Add branch protection rule. - Create a Snapshot before every significant deployment. Build this into your team’s definition of “ready to deploy” — not as a manual step you might forget, but as a required step in your PR checklist.
- Review Activity Logs after every deployment. The InstaWP Activity Logs show exactly which files changed and when. A 30-second review after each push catches unexpected file modifications before they propagate to the live site.
- Run the Performance Scanner after template-level changes. Layout changes, new fonts, additional CSS, or new JavaScript blocks can affect Core Web Vitals. Run a scan after any deployment that touches layout
templates before syncing to live. - Keep node_modules and build output out of the repo. If your theme uses a build process (Webpack, Vite, Sass), add a build step before pushing to staging rather than committing compiled files. This keeps the repo
clean and deployments fast. - Rotate GitHub Personal Access Tokens on a schedule. If you’re using a token instead of OAuth, set a calendar reminder to regenerate it before it expires. An expired token silently breaks auto-deploy.
Conclusion
Automatically deploying WordPress theme cvOps project. On InstaWP’s managed WordPresshosting, it’s a ten-minute setup: push your theme to GitHub, create a managed site, connect the repo through the Git Integration panel, and every subsequent push deploys automatically to staging. Your client reviews on a real WordPress environment via a Magic Login link. When they approve, 2-Way Sync moves only the theme files to live.
The traditional alternative, a VPS, SSH d a deploy script, gets you to the same outcome in hours instead of minutes, and requires ongoing maintenance every time GitHub changes its authentication model or your server’s PHP version updates. Managed hosting handles all of that.
Ready to set up your GitHub deployment pipeline?
Create a free InstaWP site, connect your GitHub repo, and have auto-deploy running in under 10 minutes. No credit card required.
Create Your Free Site →FAQs
1. What is Git for WordPress, and why should I use it?
Git for WordPress allows you to track, manage, and revert code changes in your themes or plugins using Git version control. It’s essential for maintaining code quality, collaborating with teams, and avoiding deployment errors. It brings professional-grade development practices to WordPress.
2. Can I deploy both themes and plugins using WordPress Git deployment?
Yes. With InstaWP, you can deploy any part of your WordPress site from GitHub—whether it’s a theme, plugin, or custom code. You simply define the path (e.g., wp-content/themes/your-theme) when setting up the Git integration.
3. Do I need GitHub Actions or a CI/CD tool to use Git with InstaWP?
No. InstaWP provides built-in Git deployment features. However, if you want more advanced workflows like branch-specific sandboxes or auto-archive on PR merge, you can extend it with GitHub Actions and InstaWP’s API.
4. Can I use private GitHub repositories with InstaWP?
Yes. InstaWP supports private repositories. You’ll need to authenticate using OAuth or a GitHub personal access token when connecting your repo during the setup process.
5. Is Git deployment with InstaWP safe for production sites?
InstaWP is primarily used for staging, testing, and QA environments. For production, it’s best to first deploy to an InstaWP sandbox, verify everything works, and then push changes live using a managed deployment strategy—like InstaWP’s Staging to Live migration tool.
6. How do I roll back changes if something goes wrong after a Git deployment?
InstaWP provides a Site Versioning feature. Before each deployment, you can create a snapshot. If anything breaks, simply revert to the previous snapshot with one click—no plugins or manual backups needed.
7. Can I trigger InstaWP site creation automatically for each branch or pull request?
Yes. With InstaWP’s API and GitHub Webhooks, you can automate sandbox creation for every branch or PR. This is ideal for large teams that want to test features independently before merging.
8. Does InstaWP support Git integration for WordPress multisite?
Currently, InstaWP focuses on single-site instances. However, Git deployment will still work on a per-theme or per-plugin basis. Multisite support is on the roadmap—check the InstaWP docs for updates.