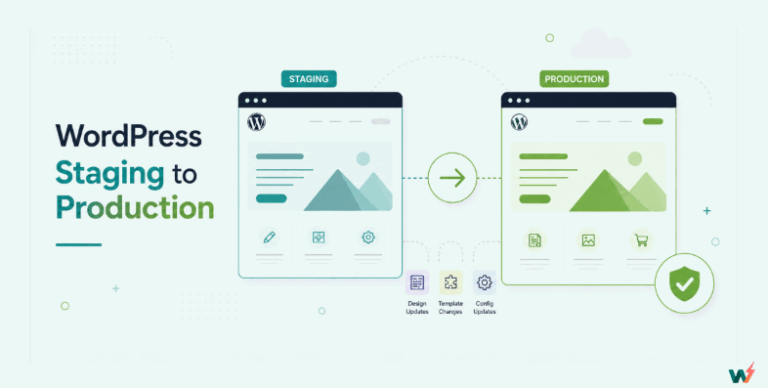
To spin up a free WordPress staging site in seconds, create one on a managed WordPress platform like InstaWP.
Sign up for a free account, then either launch a fresh staging site straight from your dashboard or install the free InstaWP Connect plugin on your existing site to clone it into a staging environment. There is no cPanel, no FTP, and no manual database export, and your live site is never touched.
This guide covers what a staging site is, when you actually need one, and every way to create one, starting with the fastest free methods and ending with the manual routes. It is written for WordPress developers, agencies, and site owners who want a safe place to test changes before they go live.
Key Takeaways
- A WordPress staging site is a private copy of your live site where you test plugin updates, theme changes, and code safely before pushing them live.
- The easiest way to get one is to host it on InstaWP. Start a fresh site on the low-cost Sandbox plan, test freely, then upgrade the plan when you are ready for production.
- Already hosting your live site on InstaWP? Create a staging copy of it in a couple of clicks with InstaWP Connect.
- Site hosted somewhere else? The free InstaWP Connect plugin clones any WordPress site into a staging environment, no matter where it lives.
- 2-Way Sync pushes only your approved changes back to live, so WooCommerce orders and new content are never overwritten.
- Manual methods (local, live server, subdomain, new hosting) also work, but they are slower, can eat storage, and often cost money.
Table of Contents
What is a WordPress Staging Site?
A WordPress staging site is a private copy of your live website where you can safely test plugin updates, theme changes, and custom code before they reach your visitors. It is fully isolated from production, so anything that breaks during testing stays invisible to the public and never affects your live site.
Think of staging as a rehearsal space for your website. You can update a plugin, redesign a page, or try new code, confirm everything works, and only then push the changes live. A staging site can be an exact clone of your live site or a clean, blank install, depending on what you need to test.
Professional sites typically move through three environments: development (where you build), staging (where you test in production-like conditions), and production (the live site). For most WordPress owners, staging is the step that prevents a small change from turning into a public outage.
Do You Need a Staging Site?
If you care about uptime, SEO, and a smooth workflow, then yes. Making changes directly on a live site is risky, since even a small PHP error can take the whole site down and cost you traffic, rankings, and revenue. A WordPress staging site is your safety net, and it earns its place the moment a change goes wrong.
Here is when a staging environment matters most:
- Before any update. Test WordPress core, plugin, and theme updates so a bad release never reaches production.
- Before a redesign or new feature. Build and review major changes privately, then ship them with confidence.
- For client work and QA. Share a private staging link for feedback without exposing half-finished work.
- For WooCommerce stores. Test checkout, shipping, and payment changes safely, since e-commerce downtime costs real money.
- When troubleshooting. Reproduce and fix performance issues or errors away from live traffic.
In short, if you care about keeping your site stable while you keep improving it, a staging site is not optional. The good news is that creating one no longer has to be slow or expensive.
How to Create a Free WordPress Staging Site in Seconds
The fastest way to create a WordPress staging site is to use InstaWP, a managed WordPress hosting platform with built-in one-click staging.
Instead of dealing with cPanel, FTP uploads, database exports, or extra hosting space, InstaWP provisions a fully isolated staging site in the cloud in seconds, complete with configurable PHP versions, pre-installed plugins, and developer tools like WP-CLI, a code editor, and database access.
The right path depends on where your site lives today. Choose Option 1 to build a fresh staging site on InstaWP, Option 2 to stage a site you already host on InstaWP, Option 3 to stage a site hosted with any other provider, or Option 4 for the manual route. To begin, create your free InstaWP account.

Did you know?
InstaWP covers three real situations out of the box: a beginner building a fresh test site, a site owner already hosting on InstaWP, and a developer connecting a site hosted anywhere else. The same one-click staging works across all three, so you never outgrow it.
Option 1: Start Fresh on InstaWP with a Sandbox Plan
The easiest way to get a staging site is to host it on InstaWP from the start. You spin up a fresh WordPress instance in the cloud, do your development and testing on it, and scale the plan up only when you are ready. There is no existing site to connect, no plugins to install, and no server to configure.
At the time of writing it includes 5 GB of storage for $2 per month, and you get $25 in free credits when you add a card. (If you only need a quick, throwaway test, the free plan gives you 3 active sites, though free sites are temporary.)
Watch the video tutorial to create staging site with InstaWP.
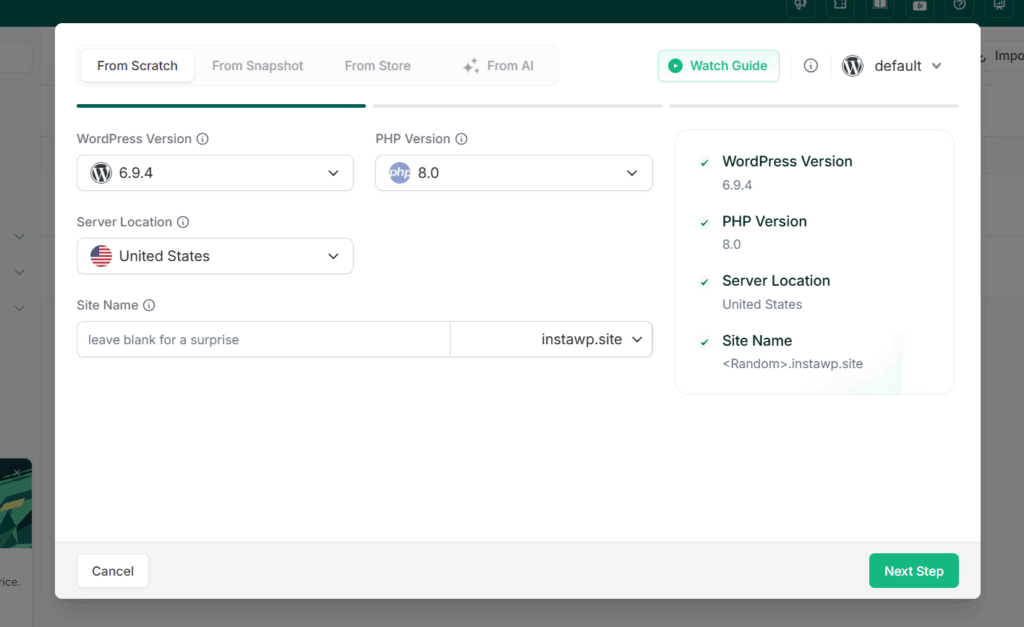
Pick how you want to build the site: From Scratch, From Templates, From Store, or From AI. Set your WordPress and PHP version, choose the Sandbox plan, and select any plugins to pre-install.
For pure testing, the Sandbox plan is the sweet spot. It is InstaWP’s entry-level paid plan, built for exactly this kind of work: a persistent, low-cost environment with enough resources for everyday development and testing.
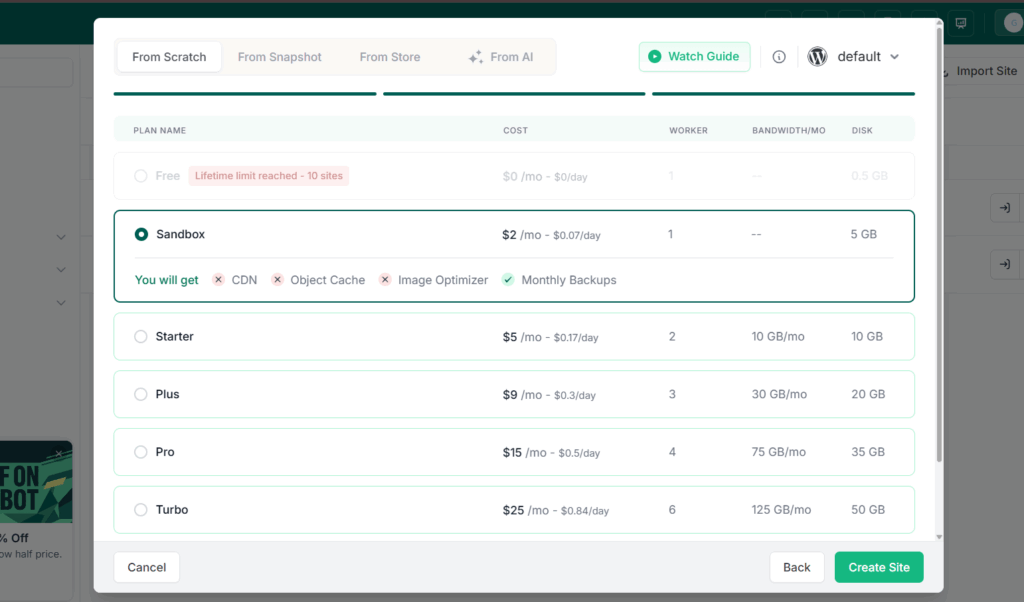
Click Create Site, and in a few seconds your staging site is ready with its own URL, username, and password. Use Magic Login to jump straight into the WordPress admin and start building. For a full breakdown of every creation method, see the Create Site and Create Staging Site documentation.
When your build is ready for real traffic, you do not have to migrate anywhere. Simply upgrade the site plan in place, moving to Starter, Plus, Pro, Turbo, or Elite based on the storage, bandwidth, PHP workers, and backup frequency your project needs.
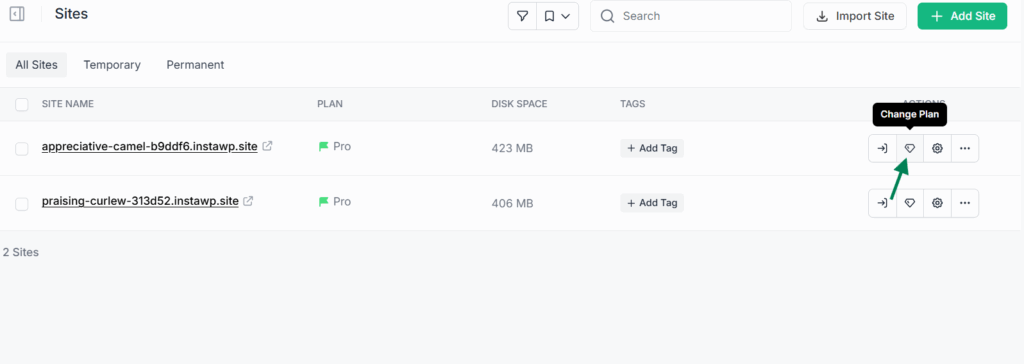
Your tested environment becomes your production site on InstaWP managed hosting, with no rebuild required. Compare the tiers on the site plans page.
Option 2: Stage a Site Already Hosted on InstaWP
Already running your live site on InstaWP managed hosting? Then creating a staging copy of it takes only a couple of clicks. InstaWP hosting works hand in hand with the InstaWP Connect plugin, so you can clone your production site into an isolated staging environment without ever leaving your dashboard.
First, make sure InstaWP Connect is active on your live site. On InstaWP managed hosting it is already available, so you can go straight to creating staging. If for any reason you do not see it, add the free InstaWP Connect plugin to the site first. Then open the staging option and click Create Staging.

Next, choose what to copy. InstaWP Connect gives you three staging types so you only clone what you need:
- Quick staging: copies your site without the media folder, for the fastest setup.
- Full staging: copies everything from your live site for an exact replica.
- Custom staging: lets you skip specific plugins, themes, media, or files.

Confirm your choice and InstaWP builds the staging copy, which appears in your dashboard ready to test with Magic Login. When your changes are tested and approved, push them back to your live site with 2-Way Sync, covered below. For the full process, see the Create Staging Site documentation and the complete guide on how to create staging sites on InstaWP.
Option 3: Stage a Site Hosted Anywhere Else with InstaWP Connect
Your site does not have to be on InstaWP at all. If it is hosted with any other provider, you can still clone it into a staging environment using the free InstaWP Connect plugin. This is the same one-click staging the platform is known for, available to any WordPress site on the internet, with no migration required.
On your live site, go to Plugins > Add New, search for InstaWP, then install and activate InstaWP Connect.

Click Create Staging, then Connect with InstaWP, and approve the connection to link the site to your InstaWP account. Choose Quick, Full, or Custom staging, and confirm.
InstaWP clones your site, and the staging copy appears in your dashboard within a few minutes, ready to test, edit, clone, or log in to with Magic Login. From here you can also map a custom domain, refresh the staging copy, or push your changes back with 2-Way Sync.
Option 4: Use a Standard Method
If you would rather not use a platform, you can build a staging site manually. These methods work, but they take more time and often cost more, so weigh them against the one-click routes above. Here is how the common approaches compare.
| Method | Setup Time | Complexity | Storage | Cost | Best For |
|---|---|---|---|---|---|
| Local (XAMPP, MAMP, LocalWP) | Medium | Moderate to high | Local machine | Free | Offline development |
| Same live server | Medium | Moderate | Shares live storage | Free at first | Budget shared hosting |
| Subdomain (manual via cPanel) | High | High | Uses server space | Free or low | Isolation on the same host |
| New domain plus hosting | High | Moderate | Dedicated space | Around $150 per year | Long-term separate setups |
| InstaWP (one-click cloud staging) | Instant | Very low | Cloud, isolated | Free or low cost | Developers, agencies, testers |
Local environment. Tools like LocalWP, XAMPP, or MAMP let you run WordPress on your own computer for free and offline. The catch is that a local machine rarely matches your live server, so changes can still break in production, and there is no shareable URL for client review.
Same live server. You can clone your site into a subfolder on the same hosting account, but the two then share storage. On a limited plan, the second copy can fill your disk fast and force a costly upgrade, especially with more than one staging site.
Subdomain via cPanel. Setting up staging on a subdomain like staging.yoursite.com means cloning by hand, juggling cPanel and WordPress, and cleaning up the files and database afterward, often with a separate SSL certificate to manage.
New domain and hosting. A fully separate domain and host gives you true isolation, but it is the most expensive option, often around $150 per year for a single test site, and you have to sync data between environments manually.
Push Your Changes Back to Live with 2-Way Sync
Creating a staging site is only half the workflow. The real goal is to move your tested changes back to production safely, and that is exactly what InstaWP’s 2-Way Sync does.
It is a feature of the free InstaWP Connect plugin that merges content changes between two connected WordPress sites, regardless of where they are hosted. One site acts as the staging site where you make changes, and the other as the live site they are pushed to.
What makes it different from a traditional deployment is that it does not overwrite your live database.
Most staging tools push the entire site, which can wipe new orders, registrations, and posts created while you were testing. 2-Way Sync instead records the specific changes you make and replays only those onto the destination, in order. You can push from staging to live or pull from live to staging, so both environments stay current.
It works on the page slug rather than the internal post ID: if a matching slug exists on the destination it is updated, and if it does not, a new item is created.
Sync covers posts, pages, media, users, categories, tags, custom post types, and more. It currently runs in Beta, and it tracks changes made through the WordPress admin only, so edits made directly to files or the database are outside its scope.
Here is how to use it, step by step:
Install and activate InstaWP Connect on both your live and staging sites, and confirm both show as connected in your InstaWP account.
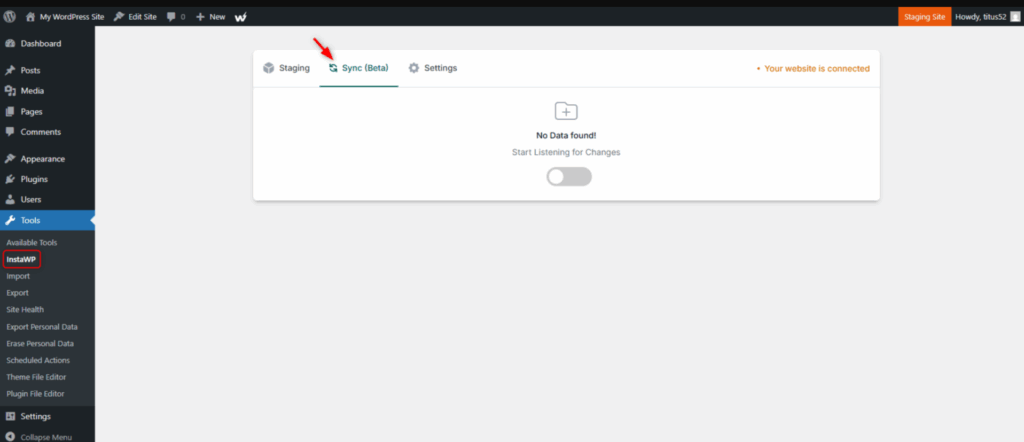
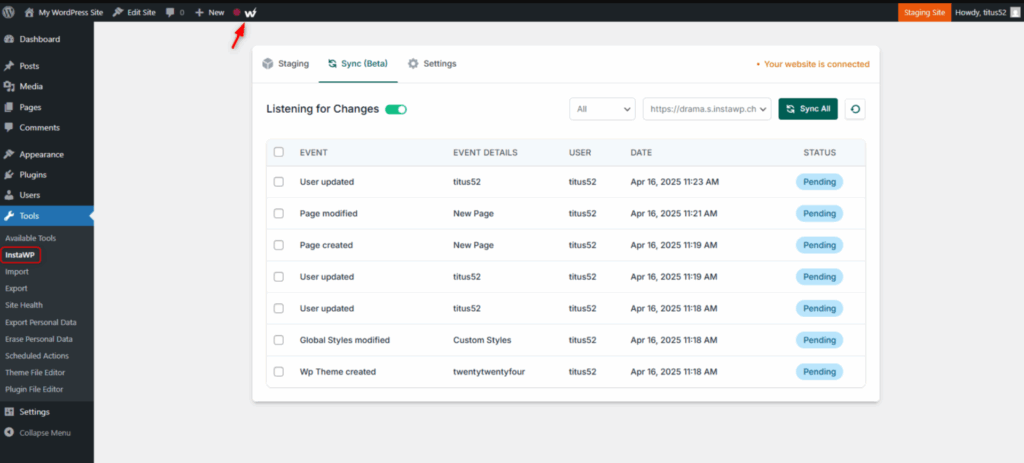
In your staging site, go to Tools > InstaWP > Sync (Beta) and toggle Sync on. A red dot appears in the admin bar to show it is recording.
Make your changes on staging. Each change is logged as an event.
Open the recorded events, click Sync All (or select only the events you want), choose your live site as the destination, and click Sync. Your changes appear on production.
Did you know?
Because 2-Way Sync replays only the changes you select, new WooCommerce orders, user registrations, and blog posts created on your live site while you were testing are never overwritten. You choose exactly what gets pushed, so deployments stop being all-or-nothing.
There are two paths depending on how your staging site was created. If you built it with InstaWP Connect, the two sites are already linked. If your staging site was created by your hosting provider instead, install Connect on both sites and use Link Staging Site to connect them first.
The dedicated guide on 2-Way Sync for non-InstaWP staging users walks through that case, and you can read the full workflow for pushing a WordPress staging site to live.
Why InstaWP Is the Best Way to Create Staging Sites
InstaWP exists to give you a dedicated, safe, fast, and affordable WordPress staging environment, with the tools to manage it all from one dashboard. Wherever you and your clients or testers are located, everyone can reach the same staging site through a shareable link, and you can run a staging push to live without leaving InstaWP.
Here is a short video on the key reasons developers use InstaWP for staging.
A few things make InstaWP stand out for staging work:
- Works with any host. The free InstaWP Connect plugin clones and syncs sites hosted anywhere, so you are not locked into one provider.
- Start small, scale in place. Begin on the low-cost Sandbox plan, then upgrade to Starter, Plus, Pro, Turbo, or Elite when you go to production, with no rebuild or migration.
- Free to try. The free plan gives you 3 active sites for quick testing and client previews, and you get $25 in free credits when you add a card.
- Selective push to live. 2-Way Sync moves only your approved changes back to production, protecting live WooCommerce orders and new content.
Unlike hosts where staging is tied to a fixed, pricey plan, InstaWP gives you a flexible, developer-first workflow: spin up a staging environment in seconds, test freely, and sync changes back to production with zero downtime.
More InstaWP Tools for Developers and Agencies
Staging is just the start. Because InstaWP is a full managed WordPress platform, your staging site comes with a developer toolkit built in, so you can debug, deploy, and scale without bolting on extra services. The tools that pair best with staging include:
- Site Version Manager: test across different PHP and WordPress versions instantly, ideal for compatibility checks.
- Snapshots and Templates: save a site state and roll back in one click, or reuse a configuration to launch new sites in seconds.
- WP-CLI command runner: run WP-CLI commands from your dashboard with no terminal or SSH needed.
- Git deployments: connect GitHub, GitLab, or Bitbucket and auto-deploy to staging or production.
- Code and database editors: edit theme or plugin files and your database from the browser, no FTP required.
- Debug mode and performance scanner: toggle WP_DEBUG, capture errors in real time, and scan for performance issues before going live.
- Clone and map domains: duplicate any site for multi-client testing, and point a custom domain at your staging site in a few clicks.
Whether you are a solo developer testing plugins or an agency managing hundreds of sites, these tools turn WordPress development into a single, streamlined workflow.
Conclusion
A WordPress staging site is the difference between testing safely and gambling with your live site. The manual methods still work, but they are slow, can eat storage, and often cost money.
A managed platform removes all of that friction: with InstaWP you spin up a fresh staging site on a Sandbox plan, stage a site you already host on InstaWP, or clone a site hosted anywhere with the free Connect plugin, then push only your approved changes back to live with 2-Way Sync.
For freelancers and agencies, that means safer launches, happier clients, and hours saved every week. Create your free WordPress staging site and see how simple testing can be.
Spin up your free staging site in seconds
Create a staging site on InstaWP, test safely, and push changes back to live. Add a card and get $25 in free credits to start.
Create My Free Staging SiteFAQs
What is a WordPress staging site?
A WordPress staging site is a private copy of your live website where you can test plugin updates, theme changes, and code safely. It is isolated from production, so anything that breaks during testing never affects your live site or your visitors.
How do I create a free WordPress staging site?
Sign up for a free InstaWP account, then either create a fresh staging site from your dashboard or install the free InstaWP Connect plugin on your existing site to clone it. InstaWP builds the staging site in seconds, with no cPanel, FTP, or database export.
Can I create a staging site if my site is not hosted on InstaWP?
Yes. Install the free InstaWP Connect plugin on your live site, connect it to your InstaWP account, and choose Quick, Full, or Custom staging. InstaWP clones sites hosted anywhere on the internet, not just sites hosted on InstaWP.
How do I push changes from staging to live in WordPress?
Install InstaWP Connect on both your live and staging sites and enable 2-Way Sync. Turn on change recording in staging, then push only the events you select to your live site. It does not overwrite new content like WooCommerce orders.
Is there a free WordPress staging plugin?
Yes. InstaWP Connect is a free WordPress staging plugin available on WordPress.org. It creates one-click Quick, Full, or Custom staging sites for any WordPress site and can sync changes back to live.
How many free staging sites can I create with InstaWP?
The InstaWP free plan includes 3 active sites, so you can run staging or client demos for several projects at no cost. Free sites are temporary; for persistent staging and more sites, paid plans start at $2 per month with the Sandbox plan.
Do I need a staging site for WordPress?
If you update plugins, themes, or code, or run a WooCommerce store, then yes. Testing on a staging site first prevents a small change from crashing your live site and protects your traffic, SEO, and revenue.
What is the difference between a staging site and a local site?
A local site runs on your own computer and is great for offline work, but it rarely matches your live server. A staging site is an online, production-like copy with a shareable URL, so testing is more accurate and easy to share with clients.