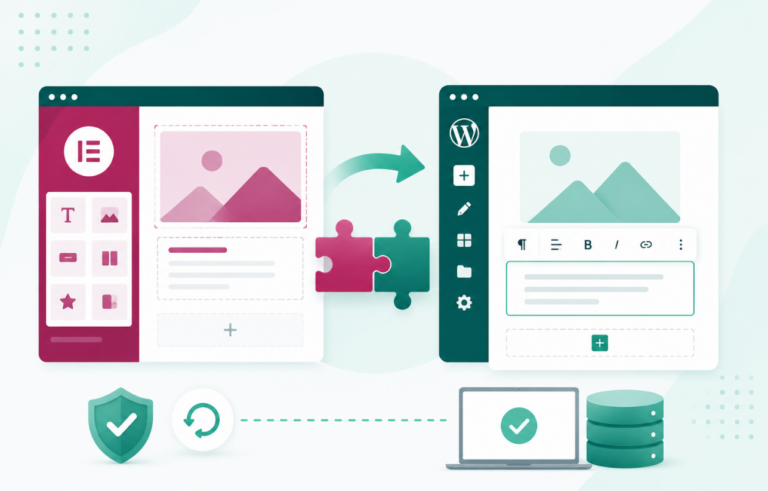
To import a WordPress site, you move three things into a new home: the WordPress core files, your wp-content folder (themes, plugins, and uploads), and your database. That sounds technical, but you do not have to touch any of it by hand.
The fastest way to import a WordPress site is an automated importer like InstaWP, which copies a live site or a backup into a fresh, ready-to-run environment in a few clicks, with no FTP client and no database export.
This guide is a complete, beginner-friendly walkthrough of every realistic way to import a WordPress site. By the end you will know exactly how to import a WordPress site for your situation, whether you have a live URL, a backup file, or just SSH access to an old server.
Table of Contents
? Key Takeaway
There are two fast, no-code ways to import a WordPress site into InstaWP: From a Live website (an AI-assisted importer that connects to your existing site and copies it automatically) and From a Backup (upload a backup made by InstaWP, WP Playground, UpdraftPlus, Duplicator, WordPress Studio, or LocalWP). Both finish in minutes with zero downtime on your original site. Manual methods like FTP plus phpMyAdmin still work, but they are slower and easier to get wrong.
What “importing a WordPress site” actually means
Before you import a WordPress site, it helps to understand what is moving. Every WordPress install is made of three parts, and a clean import accounts for all of them.
1. Core files
The PHP files WordPress itself is built from (the wp-admin and wp-includes folders). These are the same on every install, so a good importer recreates them fresh rather than copying them across.
2. Site files (wp-content)
Your themes, plugins, and media uploads. This is the unique look and functionality of your site, and it must move with the import.
3. Database
Where your posts, pages, settings, and user accounts live. Without the database, you move the shell of a site but none of the content.
The reason manual WordPress import feels hard is that you have to handle each part separately: download files over FTP, export the database from phpMyAdmin, upload everything to the new server, and then edit a configuration file so the new site can find its database. Automated importers do all of that for you. That is why we lead with them.
Did you know? When you import a WordPress site with InstaWP’s live importer, your original site is never modified or taken offline. The importer reads a copy, so there is no downtime and no risk to the site your visitors are using right now.
Quick Comparison of Every WordPress Import Method
Here is every method covered in this guide at a glance. Use it to jump to the WordPress import method that matches your skill level and what you are starting from.
Method 1: Use Host-native Migration Tools
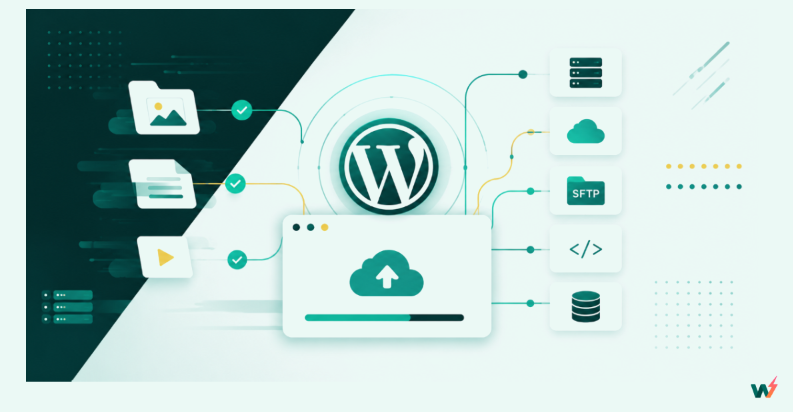
The easiest way to import a WordPress site is to let your host do the heavy lifting. Many managed hosts ship their own migration tool that pulls your site in automatically once you give it the source URL and an admin login. You point the tool at your existing site, and it copies everything across with no FTP client and no database work.
This is exactly where InstaWP stands out. InstaWP is an all-in-one managed WordPress hosting platform, and unlike hosts that lock you into one rigid migration path, it gives you full freedom to import a WordPress site whichever way suits you.
You can do it the automated way (connect a live site and let InstaWP rebuild a working copy for you) or the manual way (upload a backup made by almost any popular tool).
Both land your site inside a dashboard where you can host it, create WP staging copies, manage the WordPress site remotely, and later migrate it back out to any other host if you ever want to. There is no lock-in, and free migration assistance is available if you would rather hand the whole move off.
Option A: The automated way (import from a live website)
This is the simplest route, full stop. If your site is live anywhere on the internet, InstaWP’s one-click importer connects to it, copies everything, and rebuilds a fully working copy inside your dashboard. There is no FileZilla, no database export, and no code.
The process is assisted by AI and overseen by humans, so the import does not stall halfway like older migration scripts can. Here is how to import a WordPress site from a live URL, step by step.
Step 1: Start the import
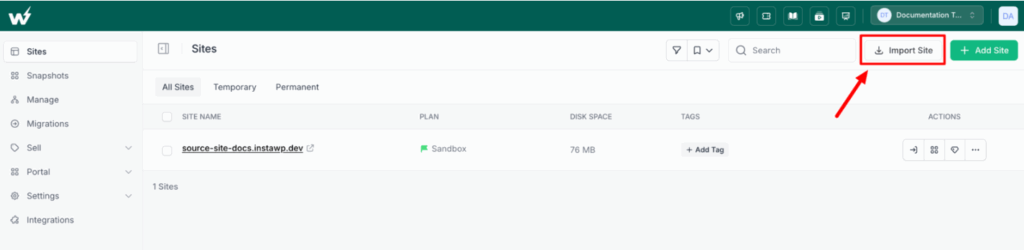
In your InstaWP dashboard, go to the Sites page and click the Import Site button at the top right. A window opens with your import options.
Step 2: Choose the method
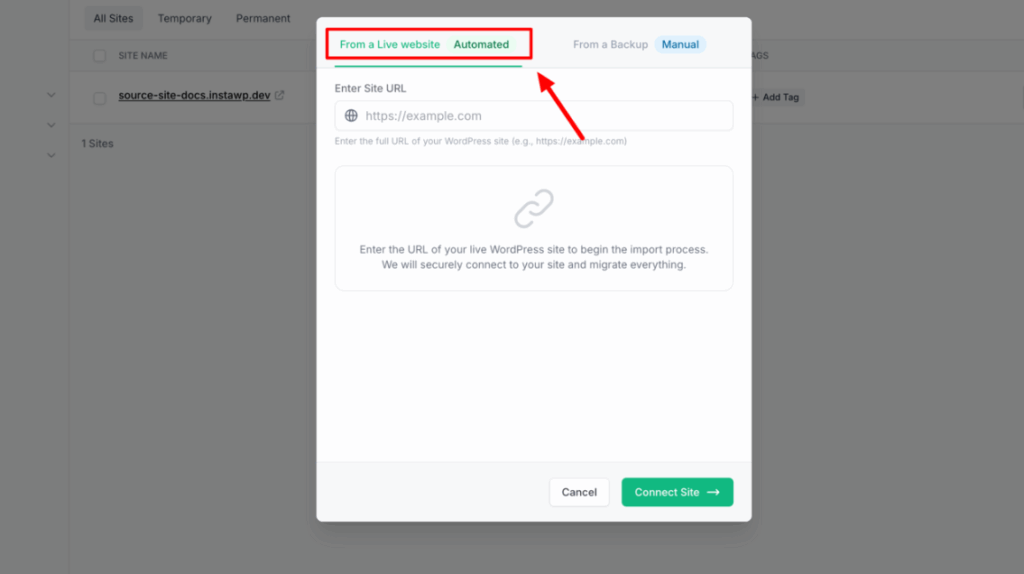
At the top of the window you will see two tabs: From a Live website and From a Backup. Click From a Live website.
Step 3: Enter your live site URL
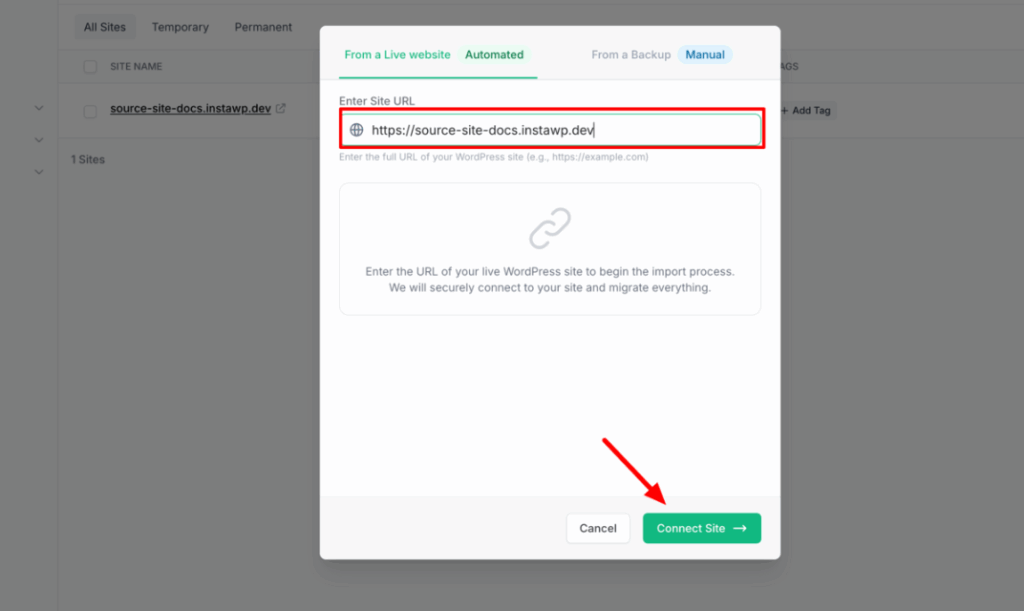
Type the full address into the Enter Site URL field. Include https:// at the front, so https://example.com, not just example.com. Then click the green Connect Site button.
Step 4: Install the InstaMigrate helper plugin
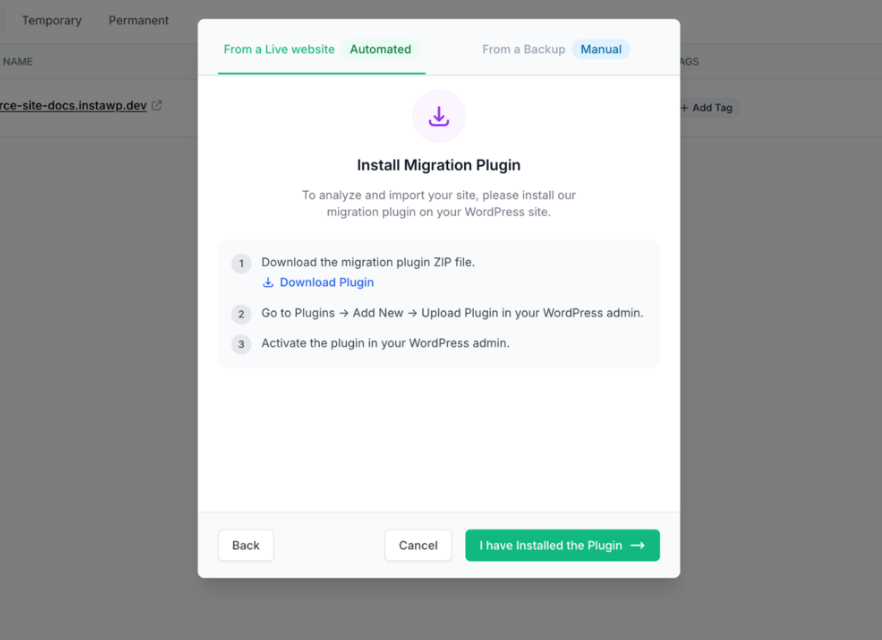
Click Download Plugin to save instamigrate.zip to your computer. Open your live site’s WordPress dashboard in another tab, go to Plugins > Add New > Upload Plugin, choose the zip, click Install Now, then Activate. Back in InstaWP, click the green I have Installed the Plugin button.
Step 5: Authorize access
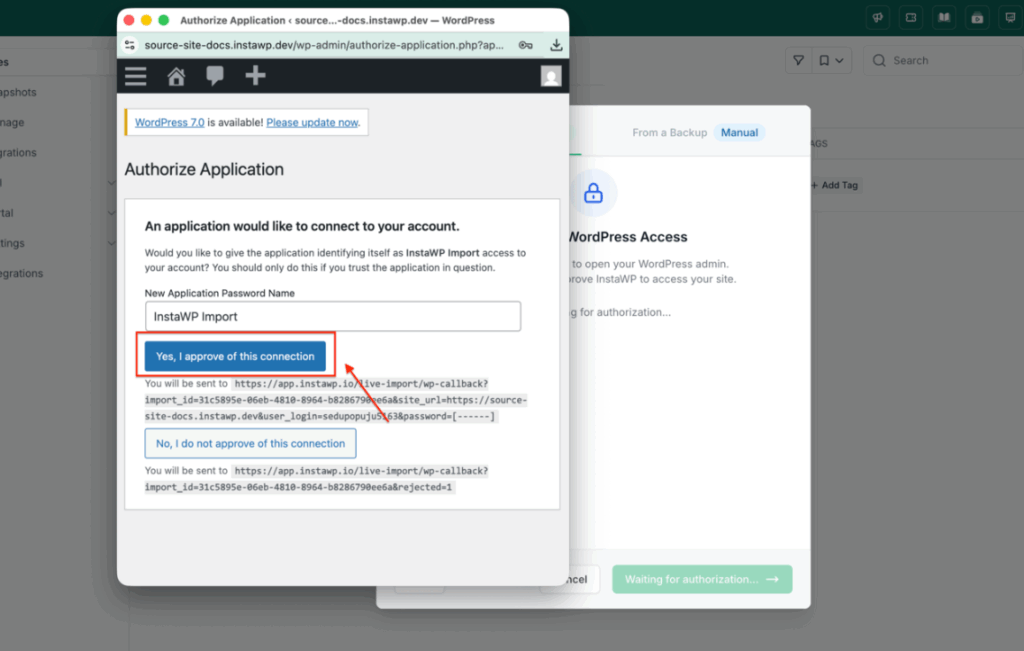
Click Open WordPress Authorization. A new tab opens your live site’s login. Log in with an administrator account (a non-admin account will not work). On the Authorize Application screen, click Yes, I approve of this connection. This uses WordPress Application Passwords, a built-in secure method, so InstaWP never sees or stores your real login, and you can revoke it any time.
Step 6: Review the site analysis
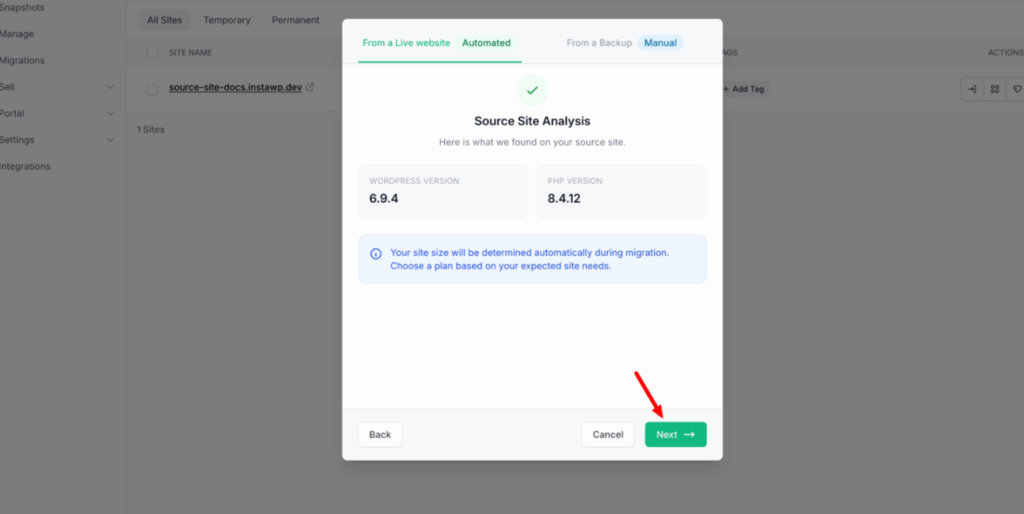
You are redirected back to InstaWP, which scans the site and shows a summary: WordPress version, PHP version, and a note that it will detect your site size automatically. Click the green Next button.
Step 7: Set up the destination
Pick a managed hosting plan (the Sandbox plan is plenty for testing; choose Plus or higher if you need managed hosting), then a server location and a PHP version. Click Start Migration.
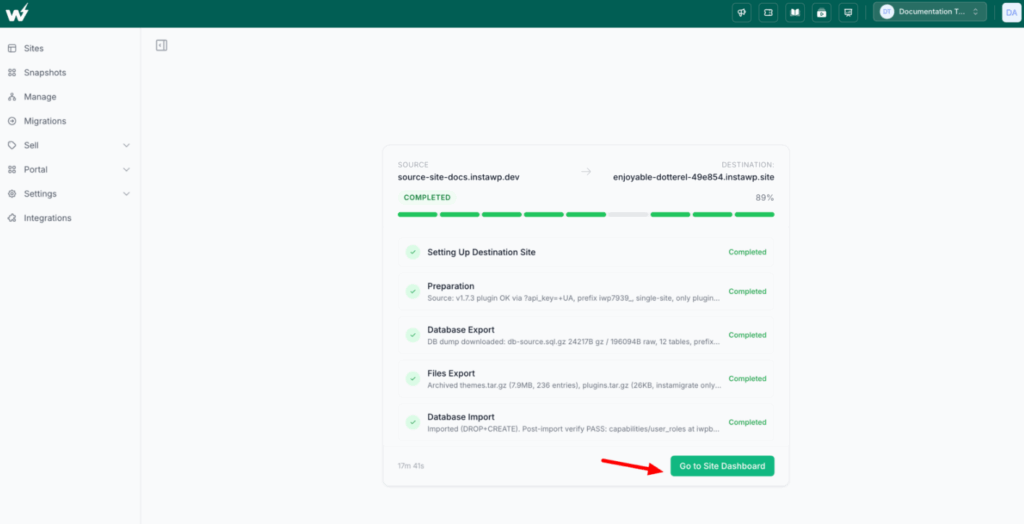
Step 8: Watch it run
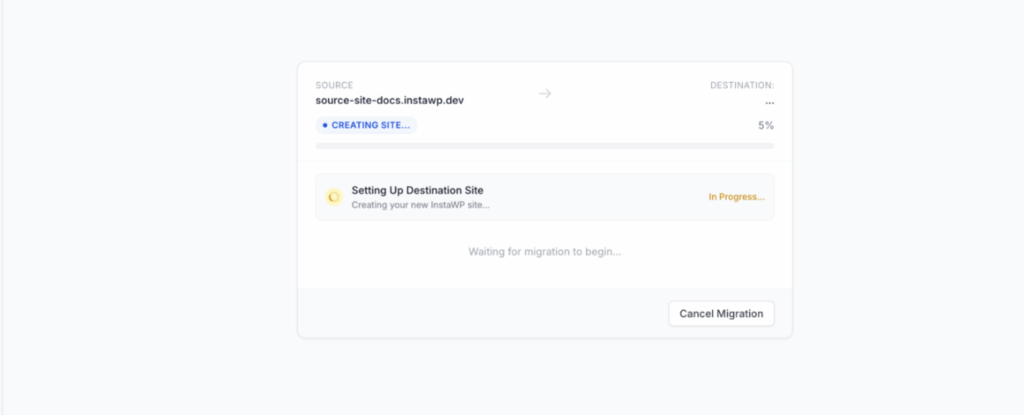
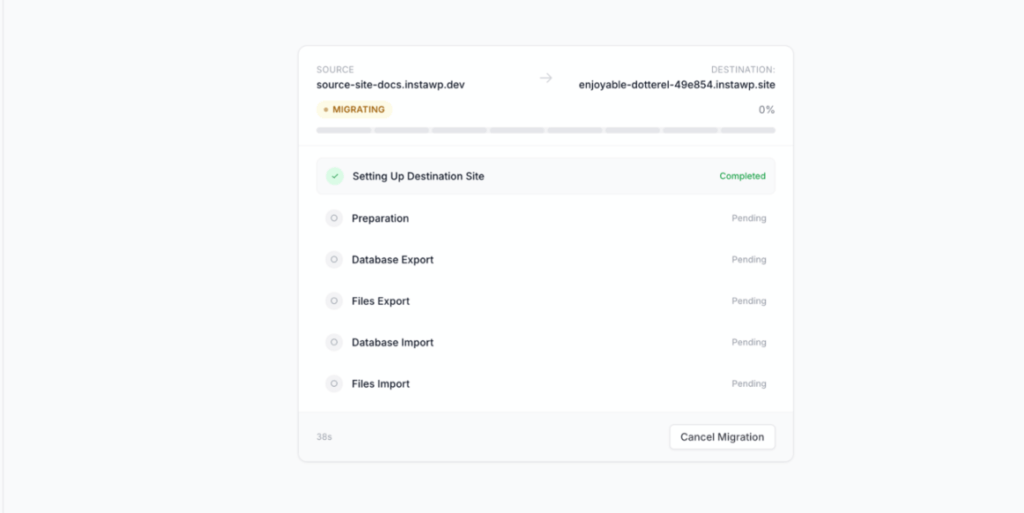
A progress bar shows your source site on one side and the new InstaWP site on the other, with each stage (set up, prep, export database, export files, import) getting a green checkmark. Most sites finish in 5 to 20 minutes depending on size. A Cancel Migration button is there if you ever need it.
When the status reads Completed with all green checkmarks, click Go to Site Dashboard. Your live site is now a fully working copy inside InstaWP, ready to test, redesign, or hand off, with zero risk to the original.
Ready to import your WordPress site the easy way?
Create a free InstaWP account and run your first import in minutes. No card required to start.
Start importing free →Option B: The manual way (import from a backup)
If the original site is already offline, or you simply prefer to upload a file you exported yourself, InstaWP lets you import a WordPress site from backup files instead. This is the manual route, and InstaWP gives you full freedom here too: it accepts backups from almost every popular tool, not just its own.
Supported sources are InstaWP, WP Playground, UpdraftPlus, Duplicator, WordPress Studio, and LocalWP. The flow is the same for each one, export a backup from your tool, then upload it into InstaWP and configure the new site. Here is every manual method, source by source.
Watch the WordPress import through backup tutorial here:
Importing from an InstaWP backup
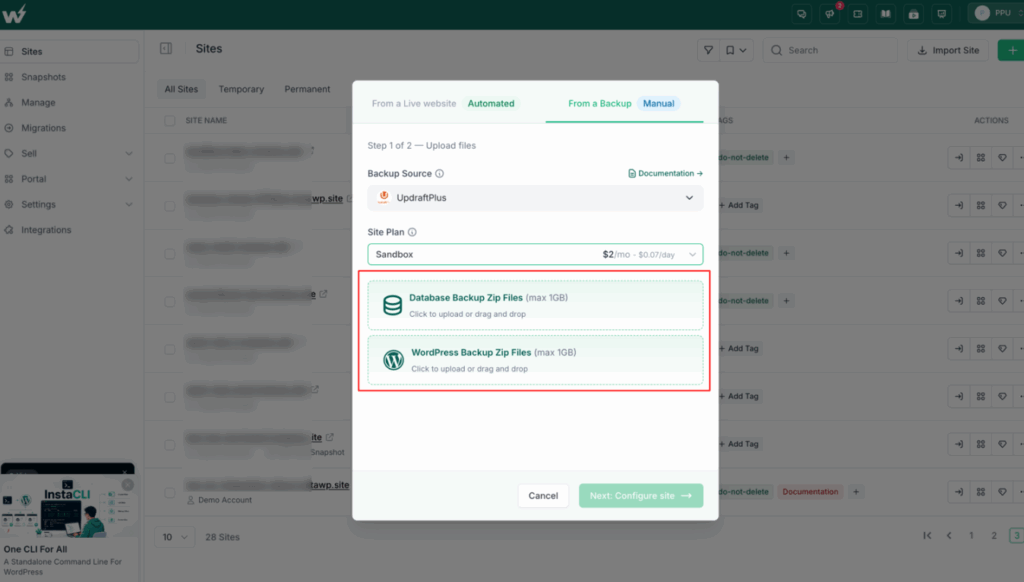
Click Import Site, then open the From a Backup tab.
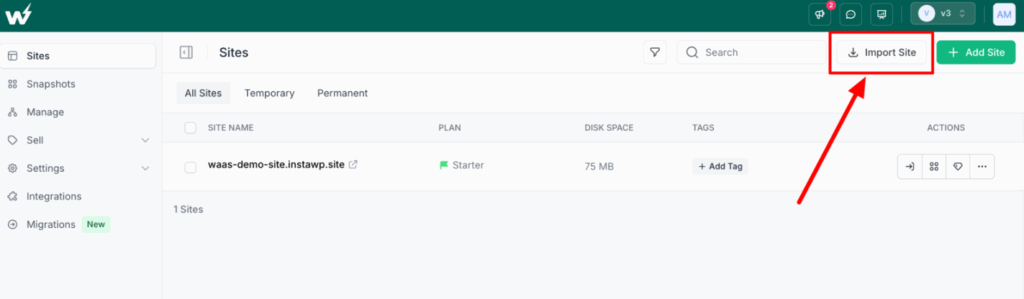
Select InstaWP from the Backup Source dropdown.
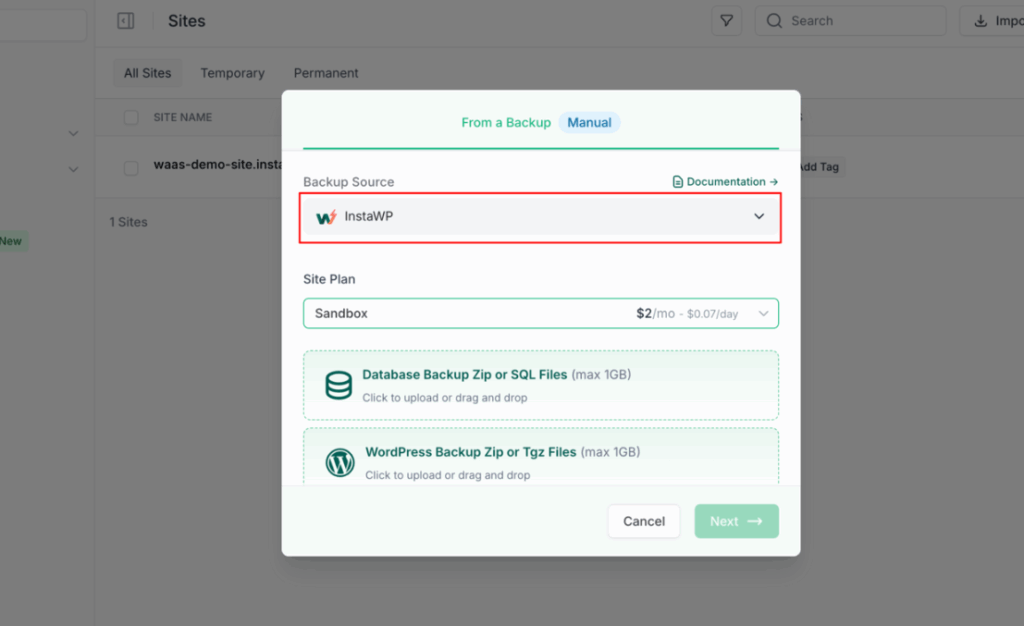
Choose your site plan, which sets the resources the new site gets. Upload your two files into the Database Backup and WordPress Backup boxes.
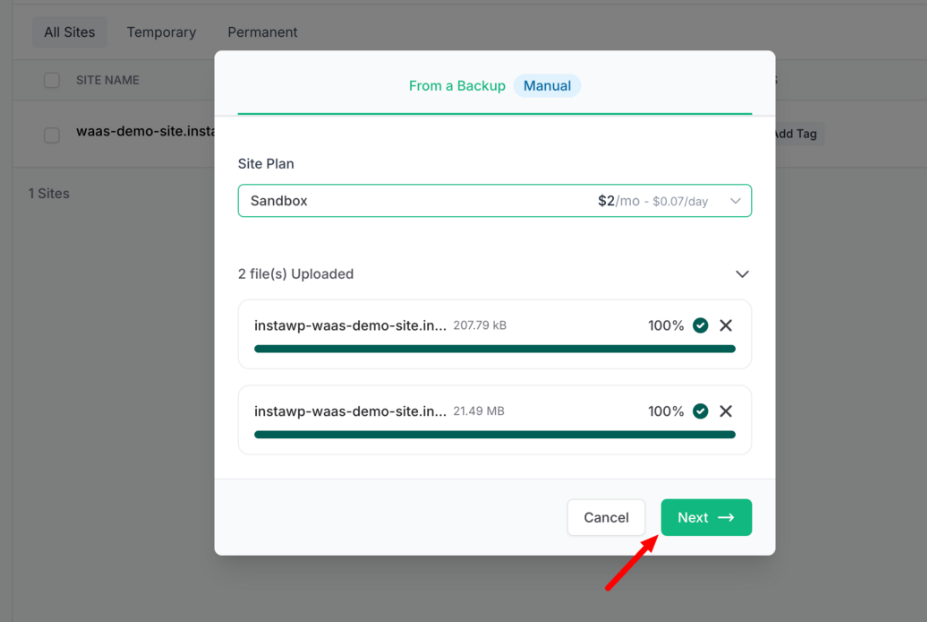
Click Next to configure the site: give it a name (or leave it blank for an auto-generated one), pick a server location (US, UK, Germany, Canada, or Singapore), and select your WordPress and PHP versions.
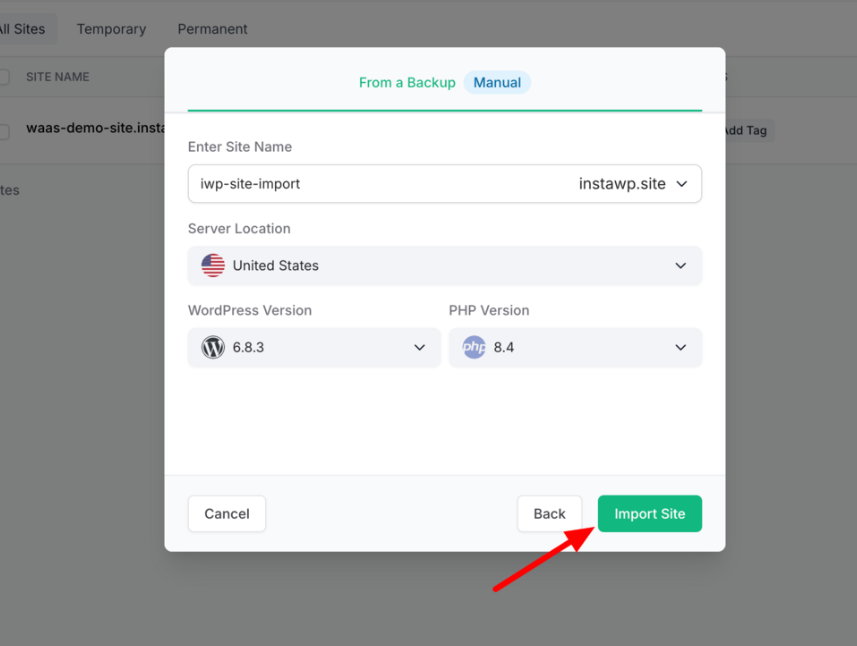
Click Import Site. InstaWP installs everything automatically, and the new site appears under your Sites tab.
Importing from WP Playground
In WP Playground, find the scanner icon, click the three dots beside it, and choose Download as zip.
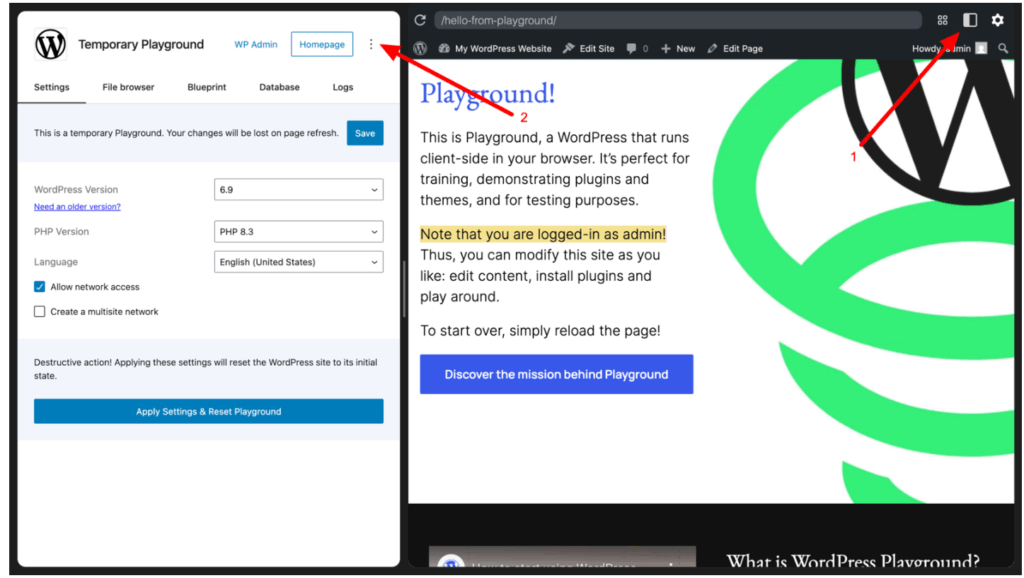
Back in InstaWP, choose WP Playground as your source, pick a plan, upload the zip, and click Next to configure the name, WordPress version, and other settings. The site then appears under your Sites section.
Importing from UpdraftPlus or Duplicator
Make sure the plugin is installed on your WordPress site first. Go to the WP Admin of your site, open UpdraftPlus (or Duplicator), and generate your backups.
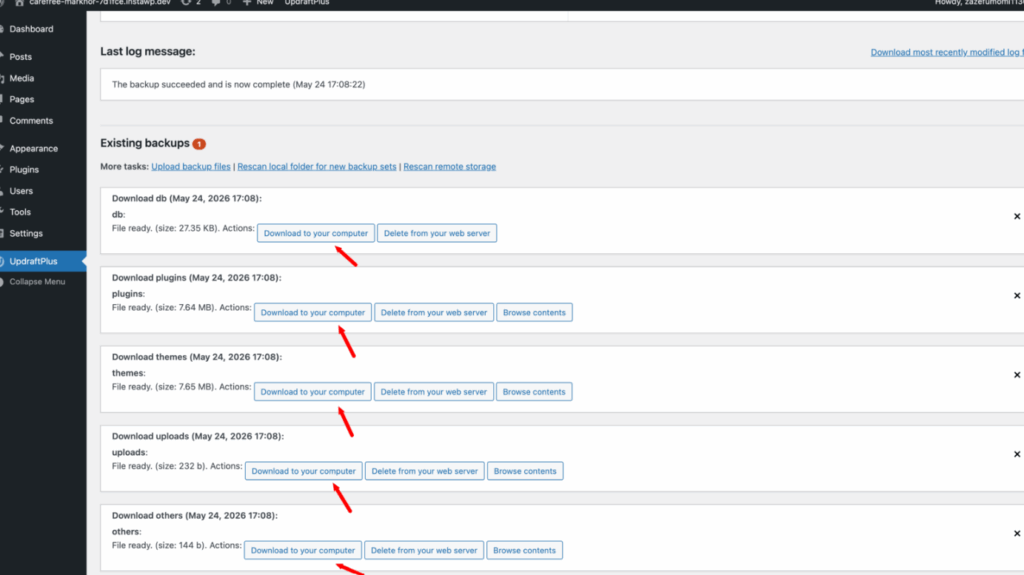
Then in InstaWP choose UpdraftPlus (or Duplicator) in the import options, select your site plan, upload the backups, and configure the site exactly as in the previous methods. The two backup plugins work the same way.
Importing from WordPress Studio or LocalWP
For both WordPress Studio and LocalWP, make sure you have your site’s backup saved on your machine. Once you do, upload it to InstaWP and configure the site like the steps above. Whichever source you pick, your site is ready in a few minutes, fully imported and live inside InstaWP, where you can host it, create a WP staging copy, or manage the WordPress site remotely.
Must Read: Import Site
? Tip: Importing from a backup requires both the database file and the site files. If you only export one, the import will be incomplete. Always confirm you have both before you upload.
Going live: push a local InstaWP site to hosting with the CLI
If you used the InstaWP CLI to run a real WordPress install on your laptop (via WordPress Playground, no Docker required), you can deploy it to a hosted InstaWP site straight from the terminal.
npm install -g @instawp/cli@beta
# Build a real WordPress locally, no Docker
instawp local create –name app
# Provision a cloud site and deploy your local build to it
instawp local push app –with-db
By default local push syncs your files (the wp-content folder, so themes, plugins, and uploads). Add the --with-db flag to also push your local database to the cloud, which is what you want when you are moving a complete site live. The CLI backs up the cloud database first, converts your local data, imports it, and rewrites the local URLs to the live ones automatically.
⚠️ Worth knowing: The CLI works with sites that already live in your InstaWP account or were created locally by the CLI itself. It is not a tool for reaching into a site hosted on a third-party server and pulling it in. To bring an external site into InstaWP, use Method 1 (live import) or Method 2 (backup import) above.
Method 2: Use a backup or migration plugin
If you are moving between two self-hosted WordPress installs, using a WordPress backup plugin is the classic no-code route to import a WordPress site. These plugins bundle your files and database into a single archive on the source site, then let you restore that archive on the destination. You install the same plugin on both ends, export on the old site, and import on the new one.
The most popular plugin for this is All-in-One WP Migration. It exports your entire site, files and database together, into one .wpress file. On the source site you open the plugin, choose Export to file, and download the archive.
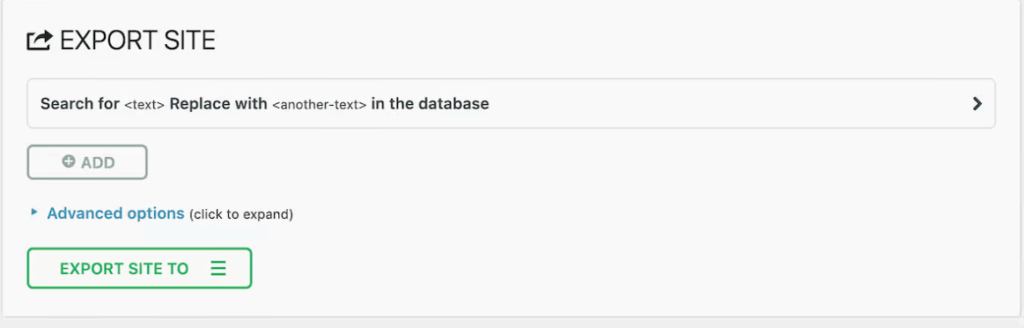
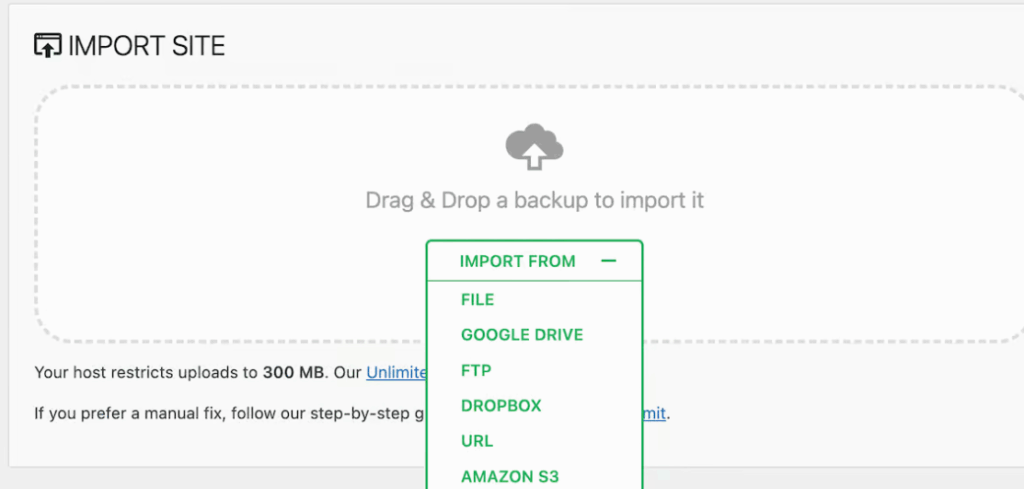
On the destination site you install the same plugin, choose Import, upload the .wpress file, and the plugin rebuilds the whole site for you. It even handles the URL rewrite automatically, so links and images keep working on the new address. Free uploads are capped in size, so very large sites may need the paid extension to lift the limit.
Other plugins do the same job if you prefer them: Migrate Guru is built for large sites and runs the transfer on its own servers so it does not load your host, while Duplicator, UpdraftPlus, WPvivid, and Solid Backups all create a package you can restore elsewhere.
A useful detail is that Duplicator and UpdraftPlus backups also plug straight into InstaWP’s backup importer (Option B in Method 1), so a backup you already made can go either way.
Method 3: WP-CLI, SSH, rsync and mysqldump
For developers and very large sites, the command line is the most reliable way to import a WordPress site because it sidesteps browser upload limits entirely. Nothing passes through an upload form, so file size stops being a problem. There are two common patterns, and both need SSH access to the servers involved.
The catch is that you need SSH access to both servers and comfort with the terminal. InstaWP supports this world too: every paid site gives you SFTP and SSH access and the ability to run WP-CLI and shell commands, so you can use these workflows against an InstaWP-hosted site once it exists.
Pattern A: WP-CLI
WP-CLI is the official command-line tool for WordPress. If both servers have it installed, this is the cleanest route. Here are the steps.
Step 1: Export the database on the source site
SSH into the source server, move into the WordPress folder, and export the database to a single file.
Step 2: Copy the database and files to the destination
Move the SQL file and your wp-content folder across to the new server using scp or rsync (covered in Pattern B).
Step 3: Import the database on the destination site
SSH into the destination server, move into its WordPress folder, and import the file you copied over.
Step 4: Fix the URLs
If the domain changed, update every reference to the old address throughout the database. Always run a dry run first to see what will change.
The search-replace command is serialization safe, which means it updates URLs stored inside theme and plugin settings correctly, something a plain find-and-replace in the database would break.
Pattern B: SSH plus rsync plus mysqldump
If WP-CLI is not available, you can do the same job with standard server tools. This is the fastest route for multi-gigabyte sites because the files move directly server to server. Here are the steps.
Step 1: Dump the database on the source
SSH into the source server and export the database with mysqldump.
Step 2: Copy the files to the destination
Use rsync to sync your wp-content folder straight to the new server. (scp works too, but rsync resumes if the transfer drops, which matters on big sites.)
Step 3: Copy the database file over, then import it
Move backup.sql to the destination (scp or rsync), SSH into the new server, and load it into the new database.
Step 4: Update wp-config.php and the URLs
Edit wp-config.php on the new server so it points at the correct database name, user, and password. Then run a search-replace (with WP-CLI or a SQL query) to swap the old domain for the new one.
⚠️ Heads up: The command line is powerful but unforgiving. A wrong database name in wp-config.php or a skipped URL rewrite will break the site. Always keep the source site untouched until the new one is confirmed working.
Method 4: cPanel or Softaculous clone and staging
If your goal is to duplicate a site within the same host rather than move it elsewhere, cPanel and Softaculous often include a clone or staging tool. Softaculous can create a staging copy of a WordPress install in a subfolder, and some hosts add a one-click clone button.
This is handy for testing, but it keeps the copy on the same server, so it is not a true cross-host import. For a portable staging copy you can spin up anywhere, InstaWP’s one-click WP staging and clone features cover the same need without locking you to one host.
Method 5: Manual import with FTP and phpMyAdmin
This is the fully hands-on method, and it teaches you exactly what an importer does behind the scenes. It is more work and easier to get wrong, so it is best reserved for situations where no plugin or automated tool is available. Here is how to import a WordPress site manually.
- Download your site files. Connect to the old server with an FTP app (FileZilla is a common free choice) and download the
wp-contentfolder. You can leavewp-adminandwp-includesbehind, since the fresh install already has them. - Export your database. Open phpMyAdmin on the old host, select your site’s database, and use Export to download a
.sqlfile. - Upload your site files. Connect to the new server over FTP and upload your
wp-contentfolder into the fresh WordPress install. - Import your database. Open phpMyAdmin on the new host, create or select the target database, and use Import to load your
.sqlfile. - Make final edits. Edit
wp-config.phpwith a plain text editor (Notepad++ works well; never use Microsoft Word) so the new site points at the correct database name, user, and password. If the domain changed, run a search-replace on the database to update old URLs.
? Pros
Total control, no plugins, works with any host, and no upload size limits in the browser.
? Cons
Slow, several manual steps, easy to break the site with a wrong wp-config.php edit or a missed URL replacement.
Method 6: WordPress native content import (Tools > Import)
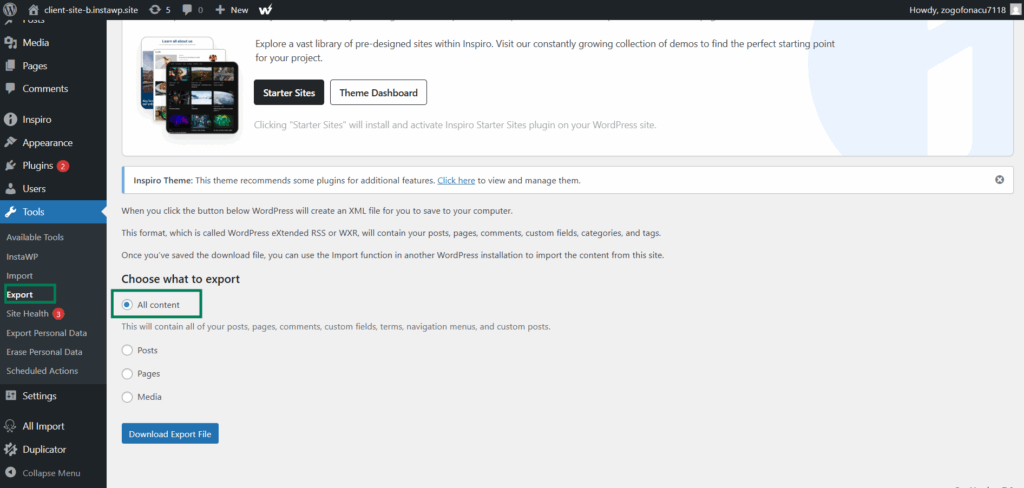
WordPress has a built-in importer, but it is important to understand what it does and does not move. The native WordPress import handles content only: posts, pages, comments, custom fields, categories, tags, and (optionally) media attachments. It does not move your theme, plugins, settings, or users. Use it when you only need to bring content across, not a full clone.
On the source site, go to Tools > Export and download the WXR (XML) file.
On the destination site, go to Tools > Import. Under WordPress, click Install Now to add the WordPress Importer, then click Run Importer.
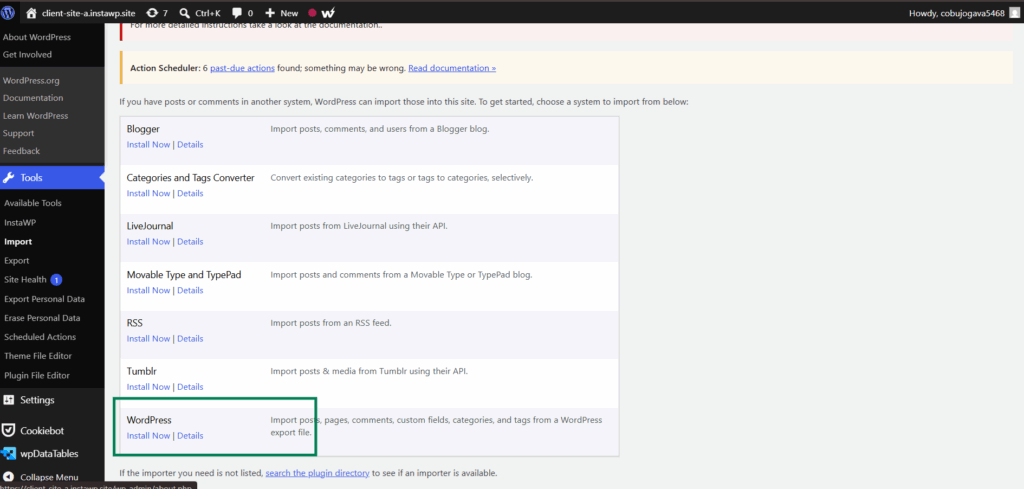
Choose the XML file you exported and click Upload file and import. Reassign author roles if prompted, tick Download and import file attachments to pull in media, then click Submit.
The importer notifies you when it finishes, and your content is now in the new site.
Did you know? The XML method is why many people think a WordPress import “lost” their design. It never moved the theme or plugins in the first place. For a true like-for-like copy, use a full-site method (Methods 1, 2, or 3) instead.
Method 7: Git-based deployment
For development teams running a proper workflow, code can be deployed from a Git repository rather than imported by hand. You keep your theme and custom plugins in GitHub, GitLab, or Bitbucket, and the host pulls the latest version on deploy.
This moves code reliably and supports continuous integration, though the database and uploads are usually handled separately. InstaWP supports this with full Git deployments and CI/CD, so you can connect a repository to a site or template and ship updates automatically.
Which WordPress Import Method Should you Choose?
Your site is live and you want a full copy fast → Method 1 (InstaWP live import).
You already have a backup file → Method 2 (InstaWP from backup).
Moving between two self-hosted installs, comfortable with plugins → Method 3 (full-site migration plugin).
Large site, developer, terminal access → Method 5 (WP-CLI / SSH).
You only need posts and pages, not the design → Method 8 (native XML import).
For most people, especially beginners, the InstaWP methods win because they remove every manual step that usually causes trouble. They also drop you straight into a platform where you can host, stage, and manage your WordPress site from one dashboard. If you run an agency and import client sites regularly, that single workflow matters even more.
Import client sites for a living?
The InstaWP Agency Program is free to join and includes a dedicated account manager, free bulk migration assistance, and tools to resell hosting under your own brand.
Explore the Agency Program →Common Import Errors and How to fix Them
- White screen or “Error establishing a database connection” after a manual import: almost always wrong database details in
wp-config.php. Recheck the database name, user, password, and host. - Broken links, images, or styling: the old domain is still hard-coded in the database. Run a search-replace (via WP-CLI or a plugin) to swap the old URL for the new one.
- Upload size limit exceeded with a migration plugin: the archive is bigger than your host allows. Use a command-line method, a host that handles the transfer server-side, or InstaWP’s importer instead.
- Live import will not connect: confirm you logged in with an administrator account and that the InstaMigrate plugin is active on the source site.
- Content imported but design is missing: you used the XML content-only importer. Redo it with a full-site method to bring the theme and plugins across.
Conclusion
There is no single “right” way to import a WordPress site, only the method that fits what you are starting from and how comfortable you are with the technical steps. If you have a live URL or a backup, the InstaWP importer is the fastest and safest path, and it lands you in a platform built to host, stage, and manage WordPress sites from there.
If you prefer full control, the manual FTP route and command-line tools are always there. Whichever you choose, the key is to move all three parts of your site, the core, the files, and the database, so the copy works exactly like the original.
Frequently asked questions
How do I import a WordPress site without losing data?
Use a full-site method that moves both the database and the files together, such as InstaWP’s live import or a migration plugin. These copy your content, settings, theme, and plugins as one unit. The content-only XML importer is the usual cause of “lost” data, because it never moves the design or settings in the first place.
How do I import a WordPress site from a backup?
If you import a WordPress site from backup files in InstaWP, open Import Site, switch to the From a Backup tab, pick your backup source (InstaWP, WP Playground, UpdraftPlus, Duplicator, WordPress Studio, or LocalWP), upload both the database and site files, and configure the new site. The full steps are in Method 2 above.
Does importing a WordPress site cause downtime on the original?
No. A proper WordPress import reads a copy of your source site, so the original keeps serving visitors the whole time. InstaWP’s live importer is designed for zero downtime on the source.
How long does it take to import a WordPress site?
With an automated importer, a typical site takes 5 to 20 minutes depending on its size. Manual FTP and database methods take longer because each step is done by hand.
Can I import a WordPress site to a new domain?
Yes. After the import, run a search-replace on the database to change every reference to the old domain into the new one. Automated importers handle URL rewriting for you; with a manual import you do this step yourself with WP-CLI or a search-replace plugin.
What is the easiest way to import a WordPress site for a beginner?
The easiest way to import a WordPress site is the InstaWP live website importer (Method 1). You enter your site URL, install a small helper plugin, approve a secure connection, and the platform rebuilds a working copy for you. No FTP, no database export, and no code.
Import your first WordPress site today
Spin up a free InstaWP account, run the one-click importer, and have a working copy of your site in minutes.
Get started free →