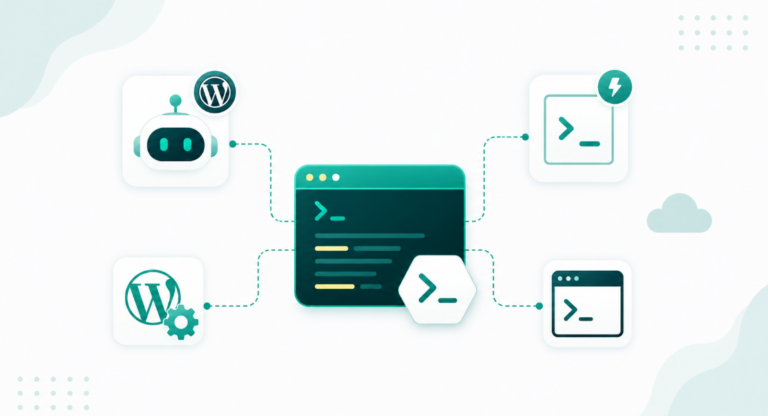
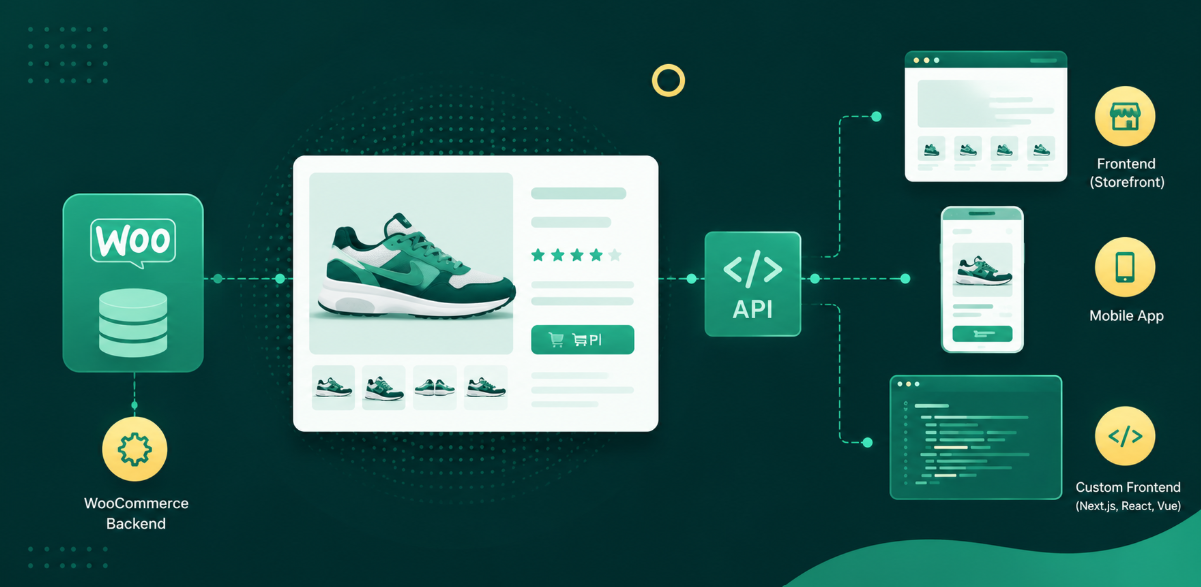
WordPress GitHub integration means connecting a Git repository to a WordPress site so code moves between the two automatically instead of by hand over FTP. Set it up once and every push updates the site, every change has a history, and a bad release can be undone.
This guide covers all four directions people need: what the integration is, how to connect WordPress to GitHub, how to deploy from GitHub to WordPress, and how to push an existing site up to a repository. The InstaWP method comes first because the deployment layer is part of the host. Four other methods follow.
Key takeaways
- The integration has two halves: the repository where your code lives, and a deployment layer that pulls commits into WordPress.
- To connect the two with InstaWP: add a Deployment, attach it to a site or template, paste the webhook URL into your repository. Four steps, no FTP client.
- GitHub, GitLab and Bitbucket all work, public or private. Private repos authenticate with an SSH deploy key.
- Post-deployment commands (
composer install,wp plugin activate) are gated to a paid tier. Check the plan before building a workflow around them. - Attach a Deployment to a template rather than a site and every pull request gets its own throwaway WordPress site.
What is WordPress GitHub integration?
WordPress GitHub integration is the practice of keeping your theme, plugin or site code in a GitHub repository and moving it into a live WordPress site through Git rather than manual file transfer. Every change is committed and version controlled, and a deployment tool pulls the latest code into the right folder on the WordPress server.
It always has two halves, and most confusion about it comes from conflating them.
- The repository. Where your code lives and where branches, pull requests and review happen. GitHub, GitLab and Bitbucket all do this job.
- The deployment layer. The piece that listens for new commits and puts the files into
wp-content. A plugin, a CI pipeline or your host provides it, and it is the half people usually have to build themselves.
What it is not: hosting WordPress on GitHub. GitHub Pages serves static files, and WordPress needs PHP and MySQL. GitHub holds the code, something else has to run it.
With InstaWP Git Deployments the second half comes with the hosting account. Register a repository once as a Deployment and the platform handles cloning, branch tracking, the destination folder and any commands that run afterwards.
How a push becomes a live change
Why connect WordPress to GitHub?
Connecting WordPress to GitHub replaces a slow, error-prone manual process with one that is automated, version controlled and reversible. FTP and cPanel uploads give you no record of what changed, no clean way to collaborate, and no undo. Git fixes all three.
- Track every change to your codebase, with a full history of who changed what and when.
- Work in branches to build and test features without touching production.
- Collaborate without conflicts using pull requests and code review.
- Undo a bad release by reverting the commit and redeploying, or by restoring a snapshot taken before the deploy.
Picture building a new WooCommerce feature while a teammate tweaks SEO settings. With Git you each work in isolation, merge cleanly, and never overwrite each other. Here is how the traditional approach compares to a Git-based one.
| Step | Traditional FTP deployment | Git-based deployment with InstaWP |
|---|---|---|
| Make changes | Edit files locally with no history | Commit to a branch with full version control |
| Test | Test manually, hope nothing breaks | Auto-deploy to a staging site and test in a real environment |
| Deploy | Drag files into FileZilla or cPanel | Push to GitHub, InstaWP pulls the code automatically |
| Recover | No rollback button, restore from a backup if you have one | Revert the commit and redeploy, or restore a snapshot |
| Collaborate | Risk of overwriting a teammate’s work | Branches and pull requests keep work isolated |
What you need before you start
Three things, and only the first two are required.
A Git repository
A GitHub, GitLab or Bitbucket repo holding your plugin, theme or site code.
An InstaWP account
Where Deployments and webhook URLs live. A sandbox site is enough to follow along.
GitHub Actions (optional)
Only if you want a fresh test site created on every pull request.
If you want something to deploy without writing a plugin first, InstaWP keeps a minimal public repository you can fork: InstaWP/sample-wordpress-plugin. It is a single plugin.php and a README, which is exactly enough to watch a deployment land in wp-content/plugins and see the plugin appear in WP Admin.
InstaWP Academy: creating the site you will deploy into.
How to connect WordPress to GitHub
Four steps: create the repository, register it in InstaWP as a Deployment, attach that Deployment to a site, and paste the InstaWP webhook URL into your repository settings. After that the connection is live and every push is picked up.
A note on who is writing this: InstaWP is our own product, and the walkthrough below is the InstaWP method. It is first because the deployment layer comes with the hosting account, so it needs no pipeline of its own. Four alternatives follow, including the cases where one of them is the better call.
Step 1: Create your GitHub repository
If you do not already have one, go to GitHub and create a new repository. Name it after the thing it holds, such as sample-wordpress-plugin or client-theme, because that name is what you will recognise in the Deployments list later.

- Initialize with a README.md and a .gitignore file (optional).
- Clone it to your local machine using GitHub Desktop or the terminal.
Then add some code. A plugin needs only a header comment to be recognised by WordPress, which the Plugin Handbook header requirements set out in full. This is enough:
<?php
/*
Plugin Name: Hello World
Description: A simple Hello World plugin.
Version: 1.0
Author: Your Name
*/

function hello_world_footer() {
    echo '<p>Hello World from GitHub!</p>';
}
add_action( 'wp_footer', 'hello_world_footer' );
Commit and push it to your GitHub repository.
Step 2: Add a Deployment in InstaWP
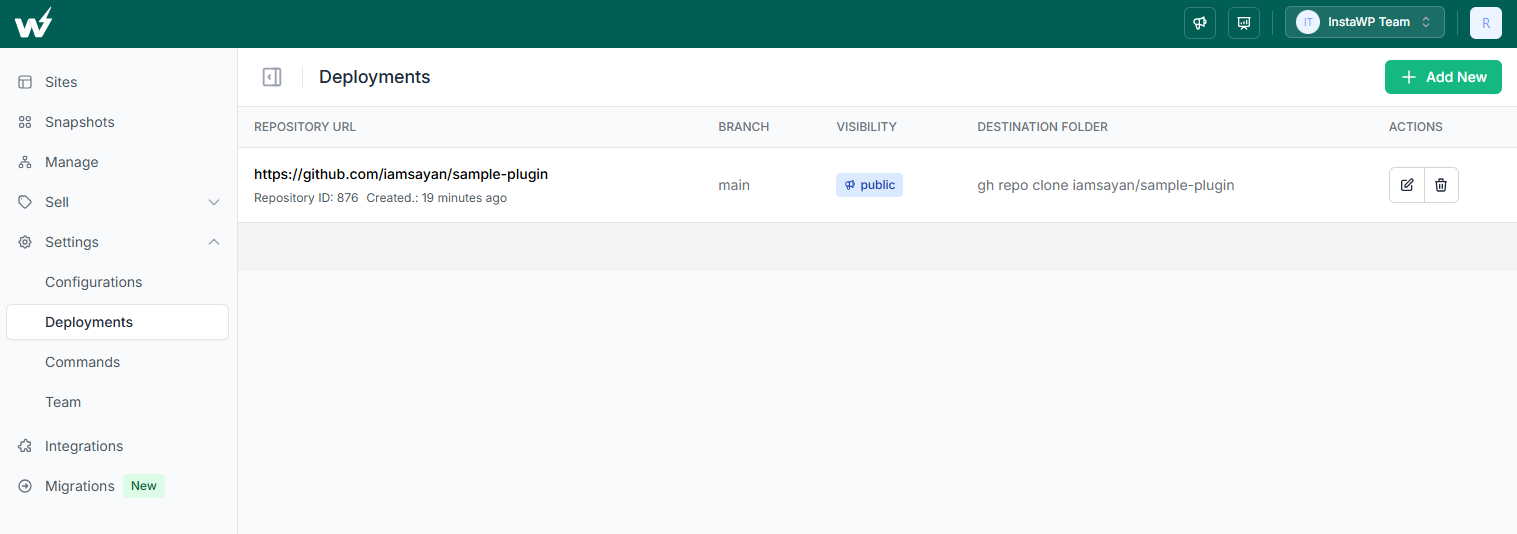
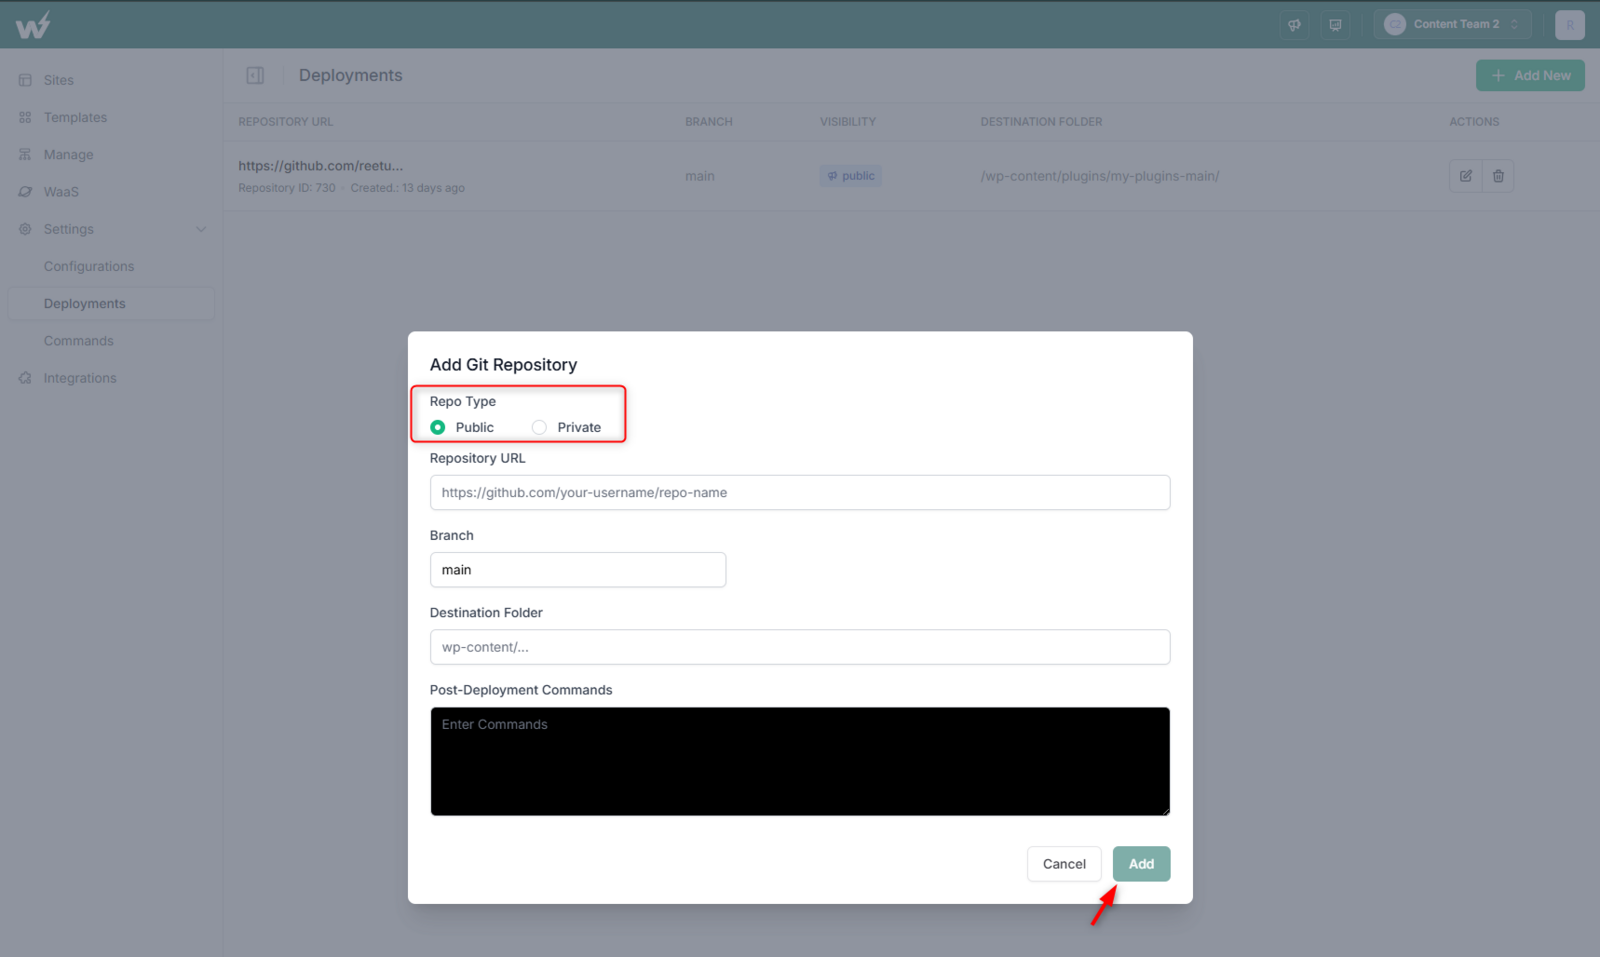
A Deployment is a saved connection between InstaWP and your Git repository. In your InstaWP dashboard, go to Settings, open Deployments, then click Add New in the top right.

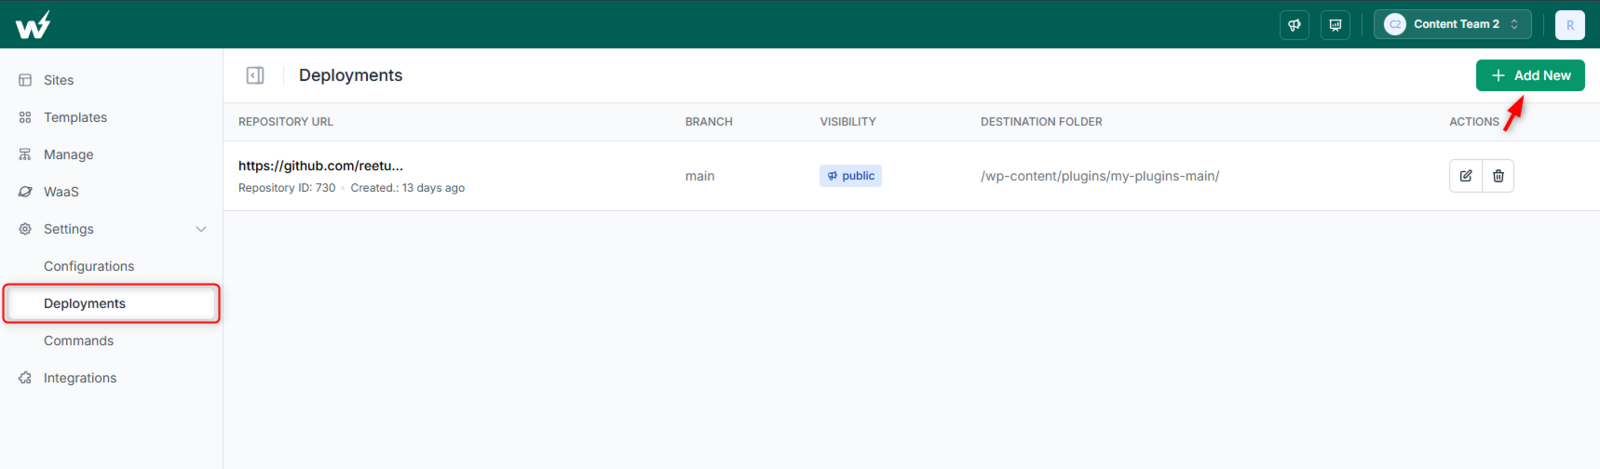
A modal opens asking for a few fields. Here is what each one does.
| Field | What to enter |
|---|---|
| Repo type | Public for open repos, or Private for repos that need authentication. |
| Repo URL | For a public repo, the HTTPS URL (https://github.com/yourname/yourplugin.git). For a private repo, the SSH URL (git@github.com:yourname/yourplugin.git). The two are not interchangeable. |
| Branch | The branch this deployment tracks, such as main, develop or staging. A specific tag or commit SHA also works. |
| Destination folder | Where the files land, such as /wp-content/plugins/hello-world-plugin. Point it at the plugin or theme folder, not the site root. |
| Post-deployment commands | Shell commands run after the clone, such as composer install, npm run build or wp plugin activate hello-world. Paid tiers only, see the note below. |
| SSH key pair | Private repos only. Select an existing key pair or generate one, then add the public half to GitHub as a deploy key. |
Check your plan before you rely on post-deployment commands
Git deployment itself is available on every InstaWP hosting plan. The Post Deployment Commands field is not: the Add Deployment documentation states it is available on the Professional plan and above. If your workflow depends on composer install or wp plugin activate running automatically, confirm the tier on the pricing page first. Everything else in this walkthrough works without it, you just activate the plugin by hand the first time.
Click Add and the repository is registered. Full field reference is in the docs on how to add a Deployment.
InstaWP Academy: running commands, which is what post-deployment commands do automatically after each pull.
Step 3: Connect the Deployment to your WordPress site
Now attach the Deployment so the code has somewhere to land. Open a site from the Sites page, choose Git Deployment, select the repository you just added, and click Save. Then click the copy icon to grab the webhook URL, which is the one thing you need in the next step.
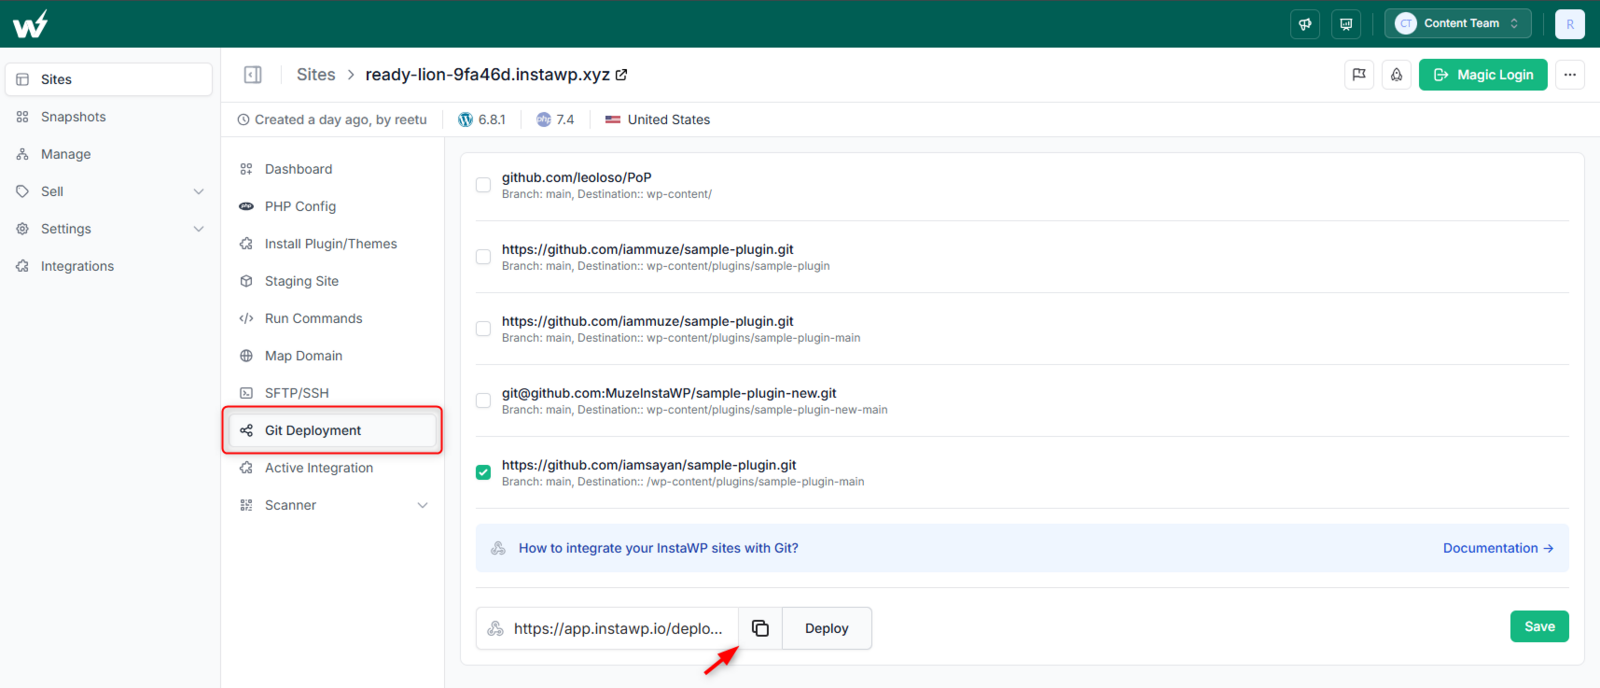

Full steps are in the docs on how to connect a Deployment to a site.
Step 4: Set up the webhook in your repository
The webhook is what tells your Git host to notify InstaWP whenever you push. In GitHub, go to Settings, then Webhooks, and click Add webhook.
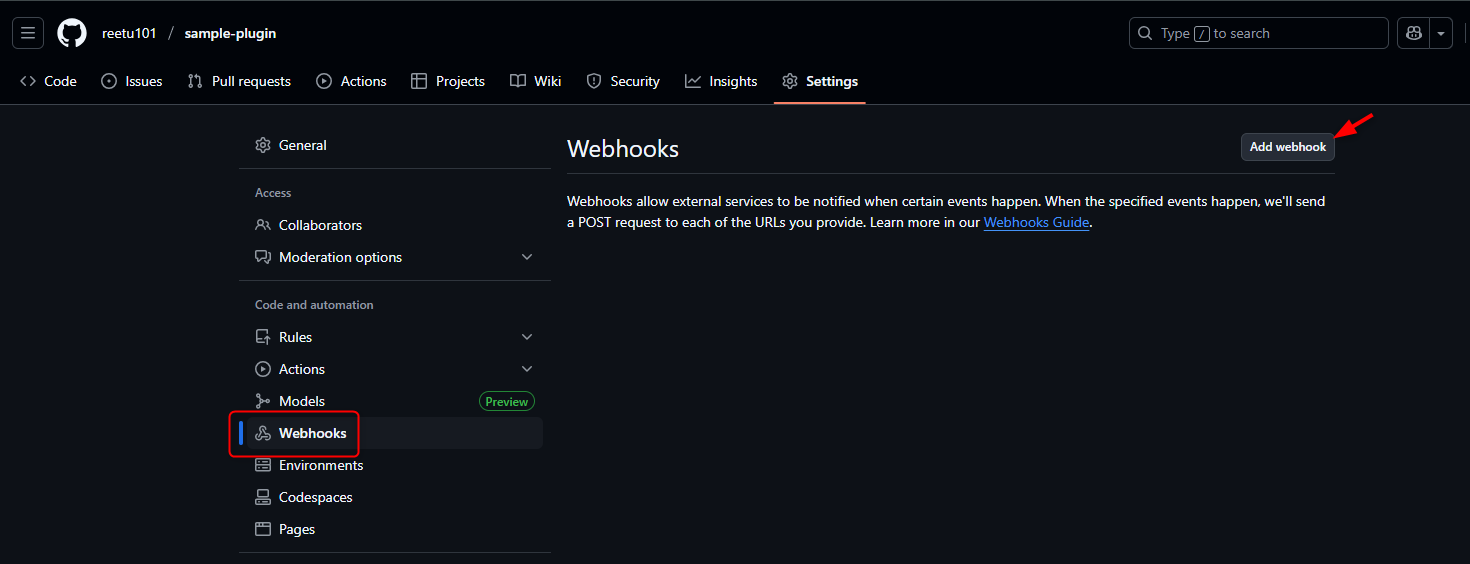
- Paste the webhook URL you copied from InstaWP into the Payload URL field.
- Set Content type to application/json.
- Choose to trigger on push events.
- Click Add webhook.

GitHub’s webhooks documentation covers the fields in more depth, including the Recent Deliveries tab. That tab is the first place to look if a push does not trigger anything.
The same step on GitLab and Bitbucket
The Add Deployment documentation names GitHub, GitLab and Bitbucket explicitly. The InstaWP half never changes: paste a repo URL, copy a webhook URL. Only the provider’s webhook screen differs.
| Provider | Where the webhook lives | What to set |
|---|---|---|
| GitHub | Settings, then Webhooks, then Add webhook | Payload URL, content type application/json, the push event |
| GitLab | Settings, then Webhooks (see the GitLab webhooks docs) | URL, and tick the Push events trigger |
| Bitbucket Cloud | Repository settings, then Webhooks, then Add webhook (see the Bitbucket webhook docs) | Title and URL, with the Repository push trigger |
One caveat worth stating plainly: the InstaWP deployment docs walk the GitHub screens only. GitLab and Bitbucket work the same way and the InstaWP side is identical, but for the webhook screen you are following your provider’s docs rather than an InstaWP screenshot.
Connect your first repository
Spin up a WordPress site on managed hosting, register your repo as a Deployment, and paste one webhook URL. Start free, no card needed.
Create Your First SiteHow to deploy from GitHub to WordPress
The connection is made, so deploying is mostly a matter of pushing code. Three things are worth knowing: how to trigger a deploy without a push, where the logs are, and how to change a deployment later.
Step 5: Push your code and watch it land
- Open your local code.
- Change something, for example bump the plugin version to 1.1.
- Commit and push to the branch the Deployment tracks.
GitHub fires the webhook, InstaWP pulls the commit into the destination folder, and any post-deployment commands run. Log into WP Admin with Magic Login to check. One detail the docs call out and it is easy to trip on: the first time a plugin arrives you still activate it once by hand. After that, pushes update the files in place with no further activation.
Step 6: Run a deployment manually when you need to
You can also deploy on demand: when you need the current commit without making a new one, or to re-run a deploy after fixing a failed post-deployment command. Open the Git Deployment panel for the site, select the repository, and trigger it.
For a Deployment attached to a template the flow differs. Push, open the template from the Templates page, confirm the Git Deployment and click Save, then create a new site from that template. The docs on how to run a deployment walk both paths with screenshots.
Step 7: Read the deployment and command logs
Every deployment, and every post-deployment command it runs, writes to a log inside InstaWP. Open the site, go to Site Tools, and view the logs. This is where the output of composer install, npm run build or a WP-CLI command appears, which is the difference between debugging a failed deploy and guessing at it.
The run command documentation covers the same log view from the commands side, and the WP-CLI command reference is where to check what a wp subcommand does before you wire it into a deploy.
Step 8: Edit or remove a deployment later
From Settings, then Deployments, the edit icon on any deployment lets you change the repository URL, switch the branch, repoint the destination folder or update the post-deployment commands.
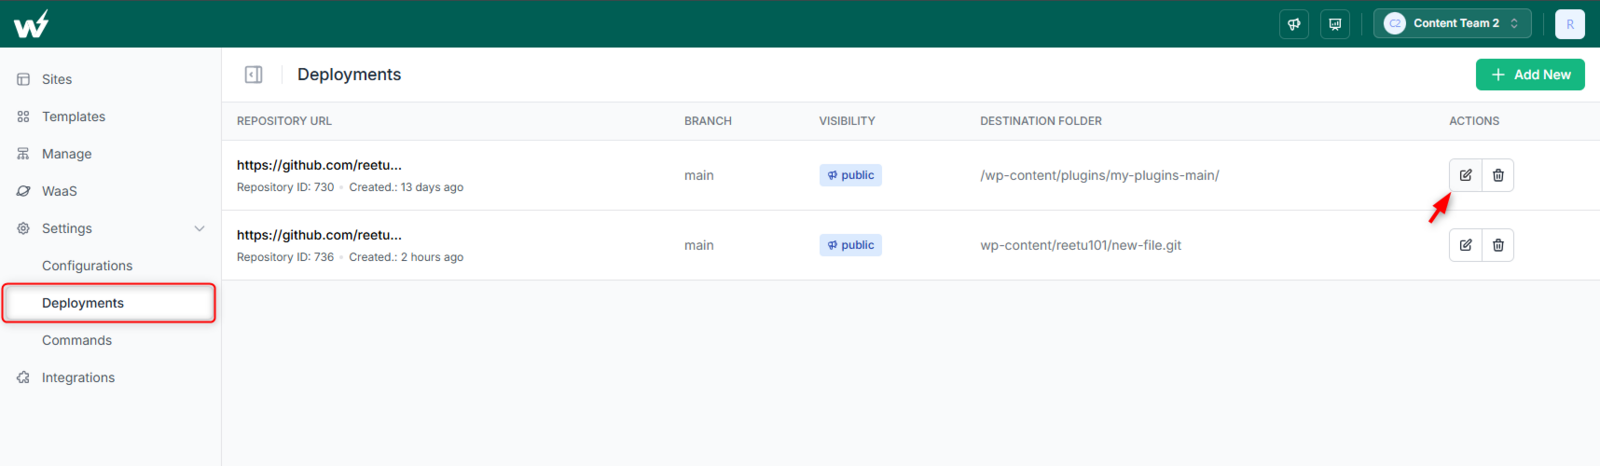
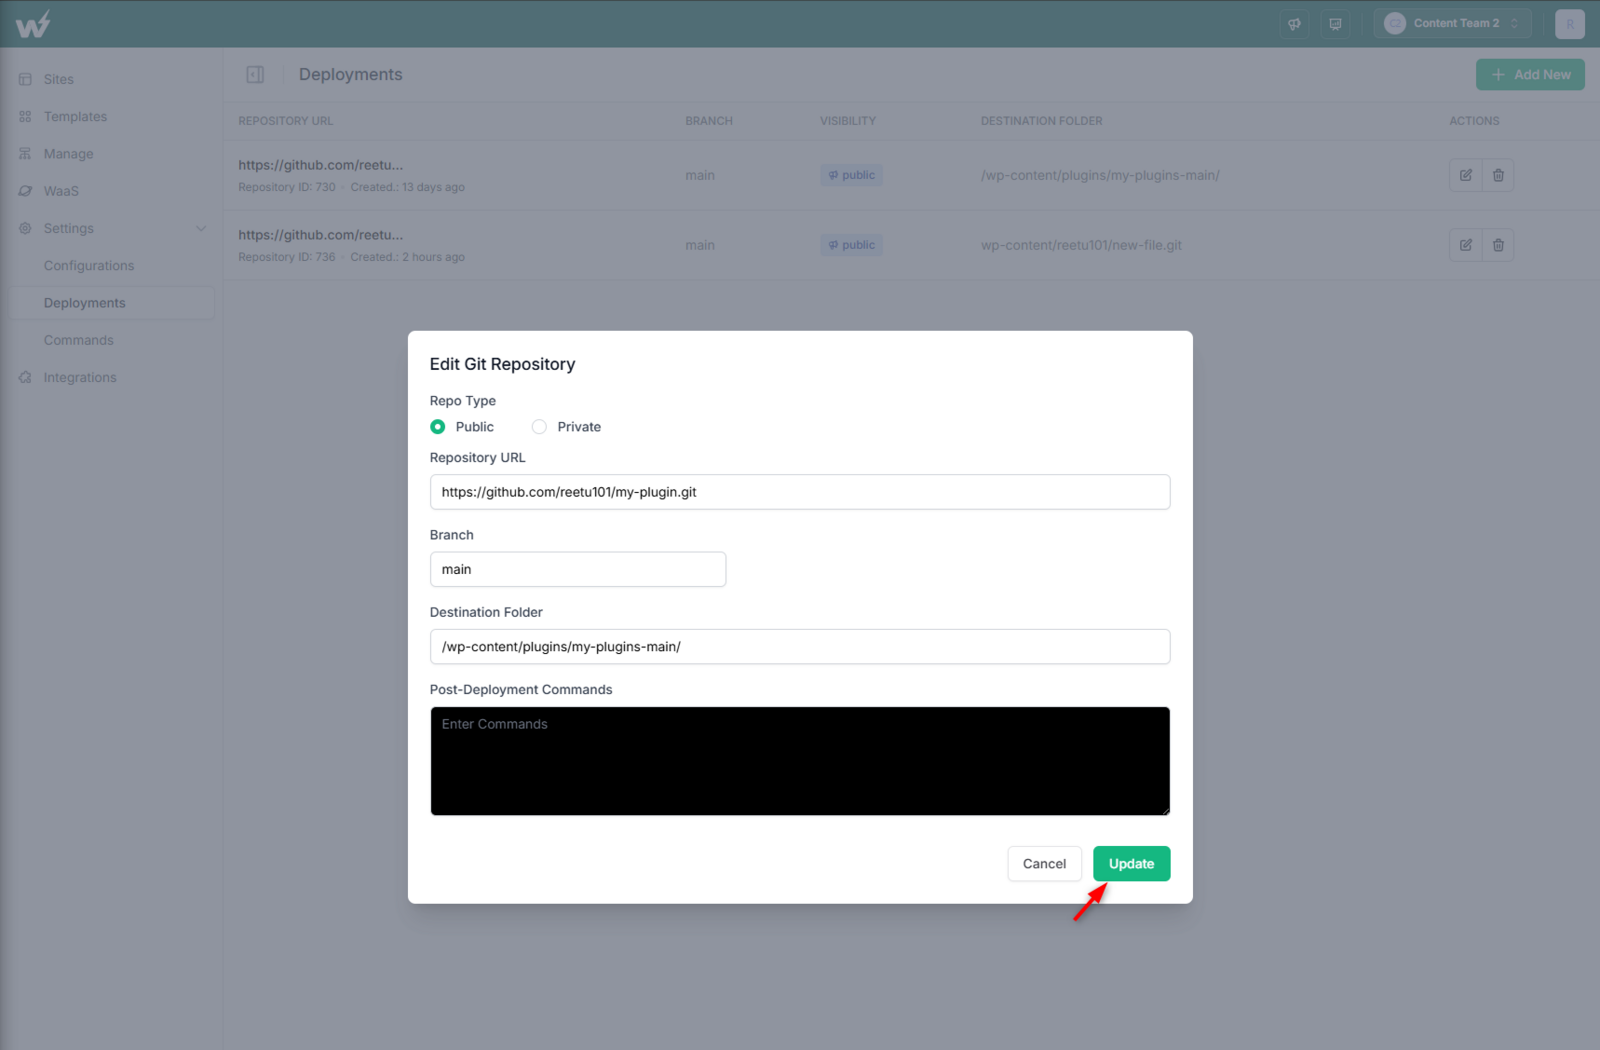
Edit rather than rebuild when you rename a repo, cut over from develop to main for a release, or repoint at a different plugin folder. You can create as many deployments as you need across different sites and templates. Full reference: manage a deployment.
Four other ways to deploy WordPress from GitHub
Method 1 above is the InstaWP route. These four cover everything else, and they differ in setup time, automation and how much you maintain yourself.
| Method | Best for | Effort |
|---|---|---|
| 1. Git deployment plugin WP Pusher, Git Updater |
Deploying and updating individual WordPress themes or plugins | Low |
| 2. GitHub Actions with SSH or rsync | Building custom CI/CD workflows for your own server or hosting environment | High |
| 3. Manual deployment over SSH | One-off deployments, troubleshooting, or developers who want full server control | Manual |
| 4. Third-party deployment service DeployHQ, Buddy |
Managing automated deployment pipelines across multiple servers or hosting providers | Medium |
Method 2: Use a Git deployment plugin
You can use the best Git deployment plugins for WordPress git integration as these plugins can pull a single theme or plugin from a repository into the site. Simple to start with, works on most hosts. The limits are real: one theme or plugin at a time, no multi-environment workflow, no pull-request previews, and one more plugin to keep updated.
For the sake of this guide, we using Deployer for Git plugin. Install and activate the plugin on your WordPress site.
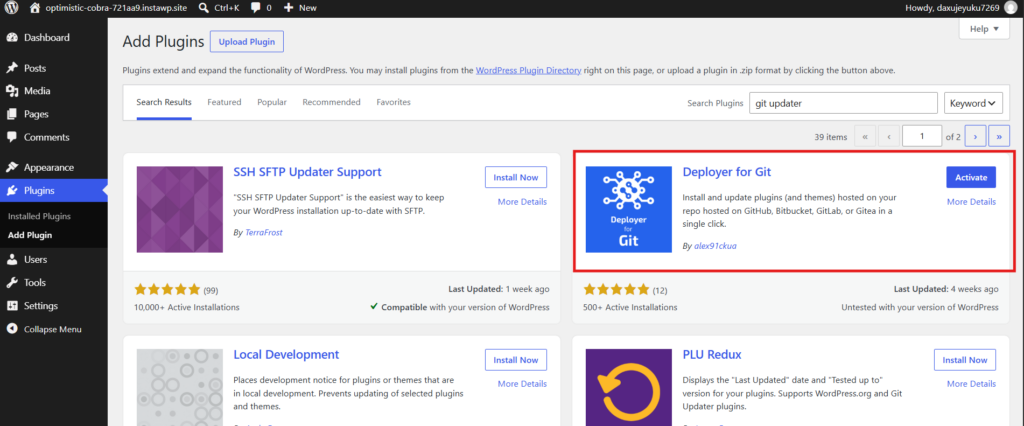
In its settings, connect your GitHub account or paste a repository URL, adding a personal access token for private repos. Choose theme or plugin, then select the repository and branch.
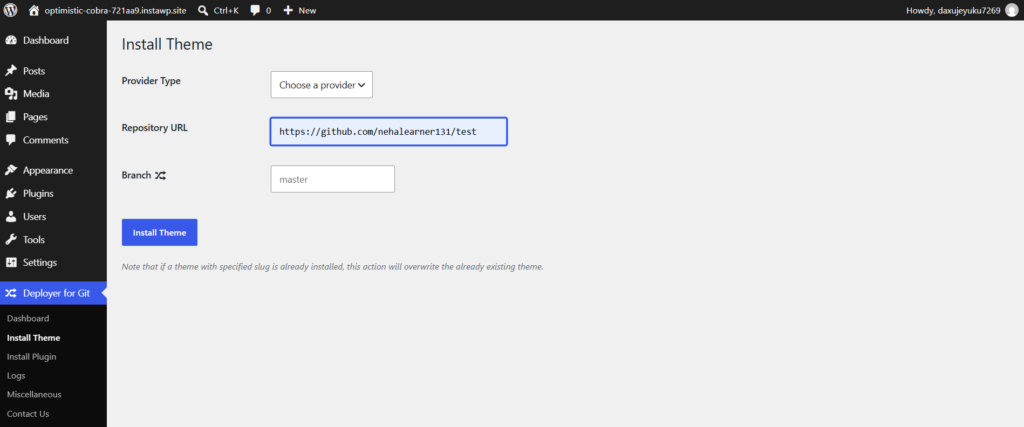
Click Install, and enable push-to-deploy so a webhook updates it on each push. Activate the theme or plugin in WordPress as normal.
Method 3: Deploy with GitHub Actions and SSH or rsync
Write your own workflow that connects to your server over SSH and runs rsync or git pull on push. Total control, and you own every part of it: the pipeline, the SSH keys and secrets, and rollback. This suits teams with DevOps capacity and their own infrastructure.
Add your server’s SSH private key and host details to repository secrets, under Settings, then Secrets and variables, then Actions.
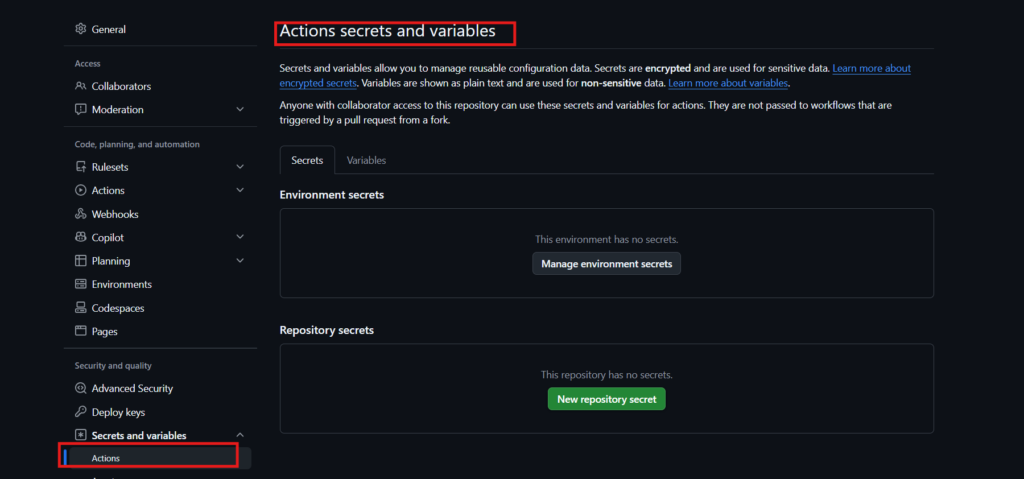
- Create
.github/workflows/deploy.ymltriggered on push to your main branch. - In the job, check out the code, then use an SSH or rsync action to copy files to your server’s wp-content path, or run
git pullon the server. - Add any build steps, such as
composer install(see the Composer documentation) ornpm run build. - Commit the workflow. Every push now deploys over SSH, and rollback is yours to handle.
Method 4: Deploy manually over SSH
SSH into the server, clone the repository once, and run git pull when you want to update. Free and dependency-light, but manual, easy to forget, and with no automation, previews or safety net beyond your own discipline.
- Enable SSH on your host and connect from your terminal.
- Navigate to the target folder, for example
wp-content/themes, andgit cloneyour repository the first time. - On each update, SSH in and run
git pull. - Run any follow-up commands by hand, such as
wp plugin activateorcomposer install. - Repeat on every change. No webhook, no preview, no automated rollback.
Method 5: Use a third-party deployment service
DeployHQ and Buddy connect to GitHub and deploy to your host over SSH or FTP. Both are capable, and both are an extra paid tool to configure on top of hosting, neither WordPress-specific. Their strength is deploying to several different hosts from one place, which is exactly the case a single host’s built-in deployment cannot serve.
- Create an account with the service and connect your GitHub repository.
- Add your server’s SSH or SFTP credentials as a deployment target.
- Map the repository path to your server’s wp-content path and choose the branch.
- Configure build or post-deploy commands if the service supports them.
- Enable automatic deployments so each push to that branch triggers a deploy.
When InstaWP is not the right choice
Three cases where one of the methods above beats Method 1.
- One plugin or theme on a host you cannot move. The client is on a host with a contract and all you want is for one theme to update from a repo. Installing WP Pusher or Git Updater is a smaller change than migrating the site. Method 2.
- You already have a working CI/CD pipeline and people who run it. If your team has Actions deploying to infrastructure you control, with your own test and rollback stages, changing the deploy target buys you little. Method 3.
- You deploy the same code to several unrelated hosts. A deployment layer built into one host cannot push to a different provider’s server. That is what DeployHQ and Buddy are for. Method 5.
The case for Method 1 is narrower than “always” and stronger for it: you want the deployment layer, hosting, staging and backups in one account rather than four tools you integrate yourself.
Public vs private repositories
InstaWP deploys from both. The connection steps are the same either way, including the webhook. The difference is entirely in how the Deployment itself is configured: a private repo needs the SSH URL and an SSH key so InstaWP can read the code.
| Setting | Public repository | Private repository |
|---|---|---|
| Repo URL | HTTPS URL | SSH URL only |
| Authentication | Not required | SSH key pair, generated in InstaWP |
| Extra step on GitHub | None | Add the public key under Settings, then Deploy keys |
| Webhook | Required | Required, identical setup |
| Deploy to a template | Supported | Supported |
| Best for | Open-source plugins and themes | Premium products, client projects, agency repos |
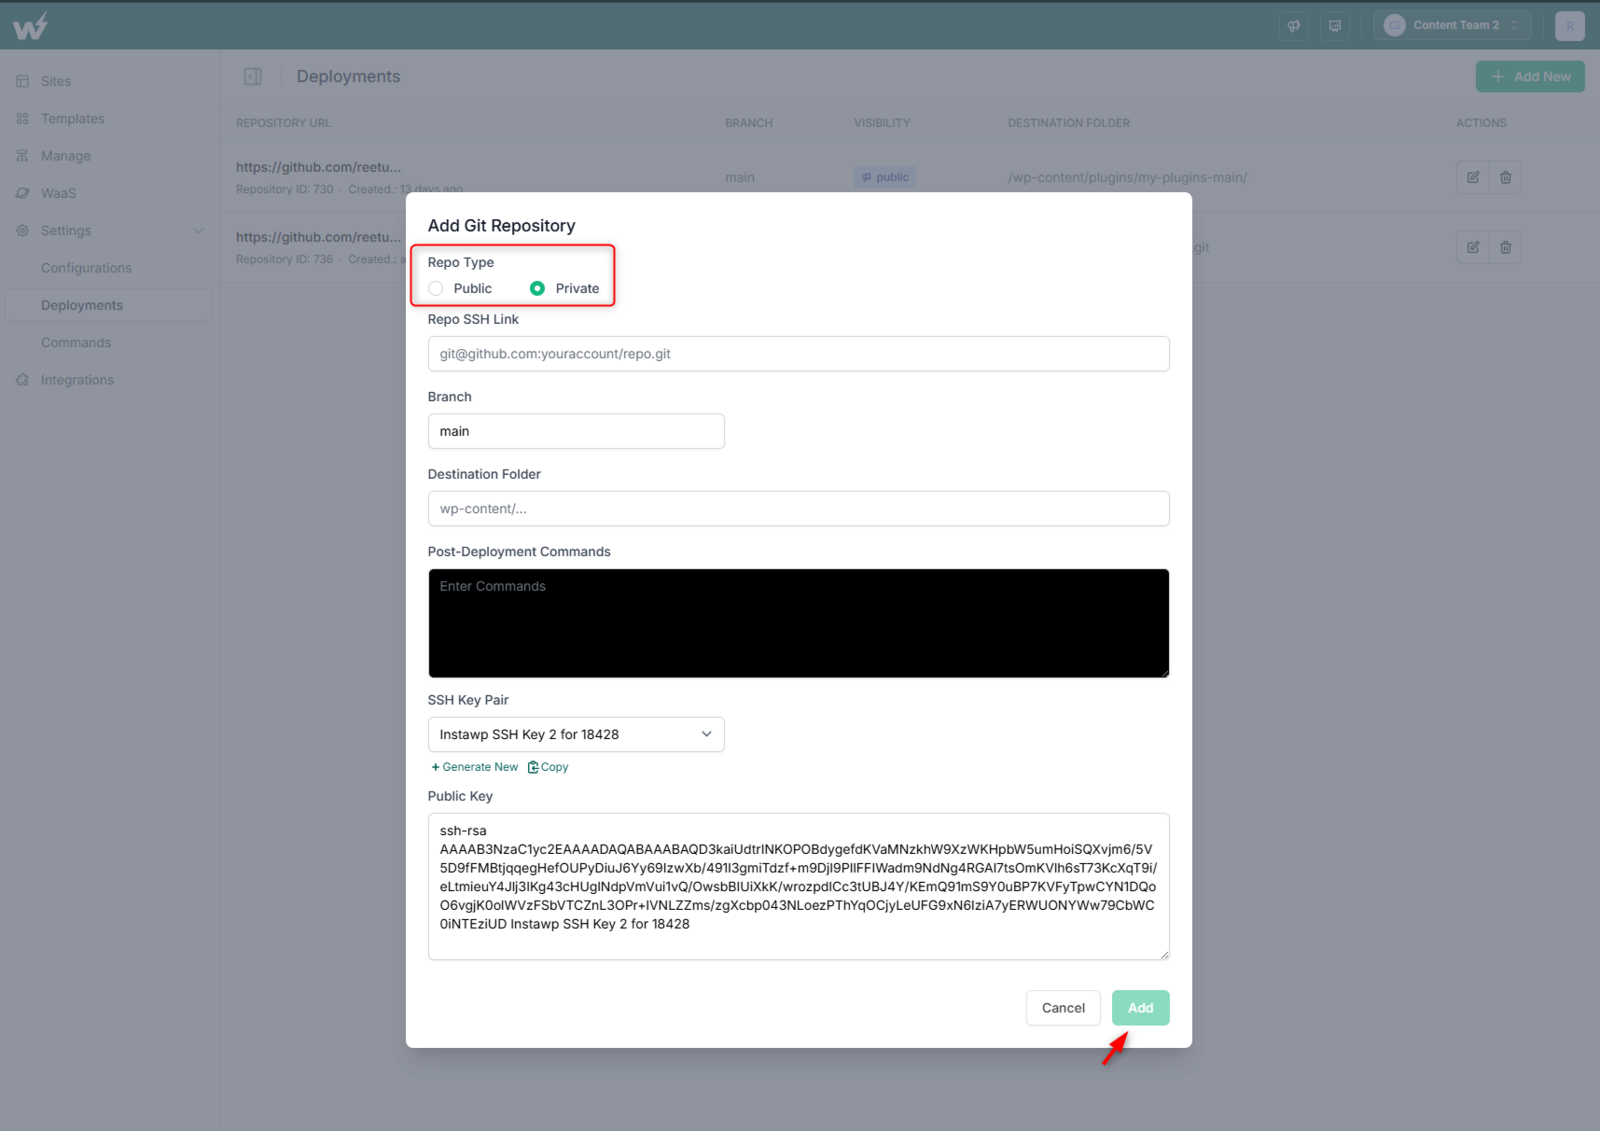
Copy the public half of that key pair into your repository under Settings, then Deploy keys. GitHub’s guide to managing deploy keys explains why a deploy key is the right credential here: it grants access to one repository rather than to your whole account.
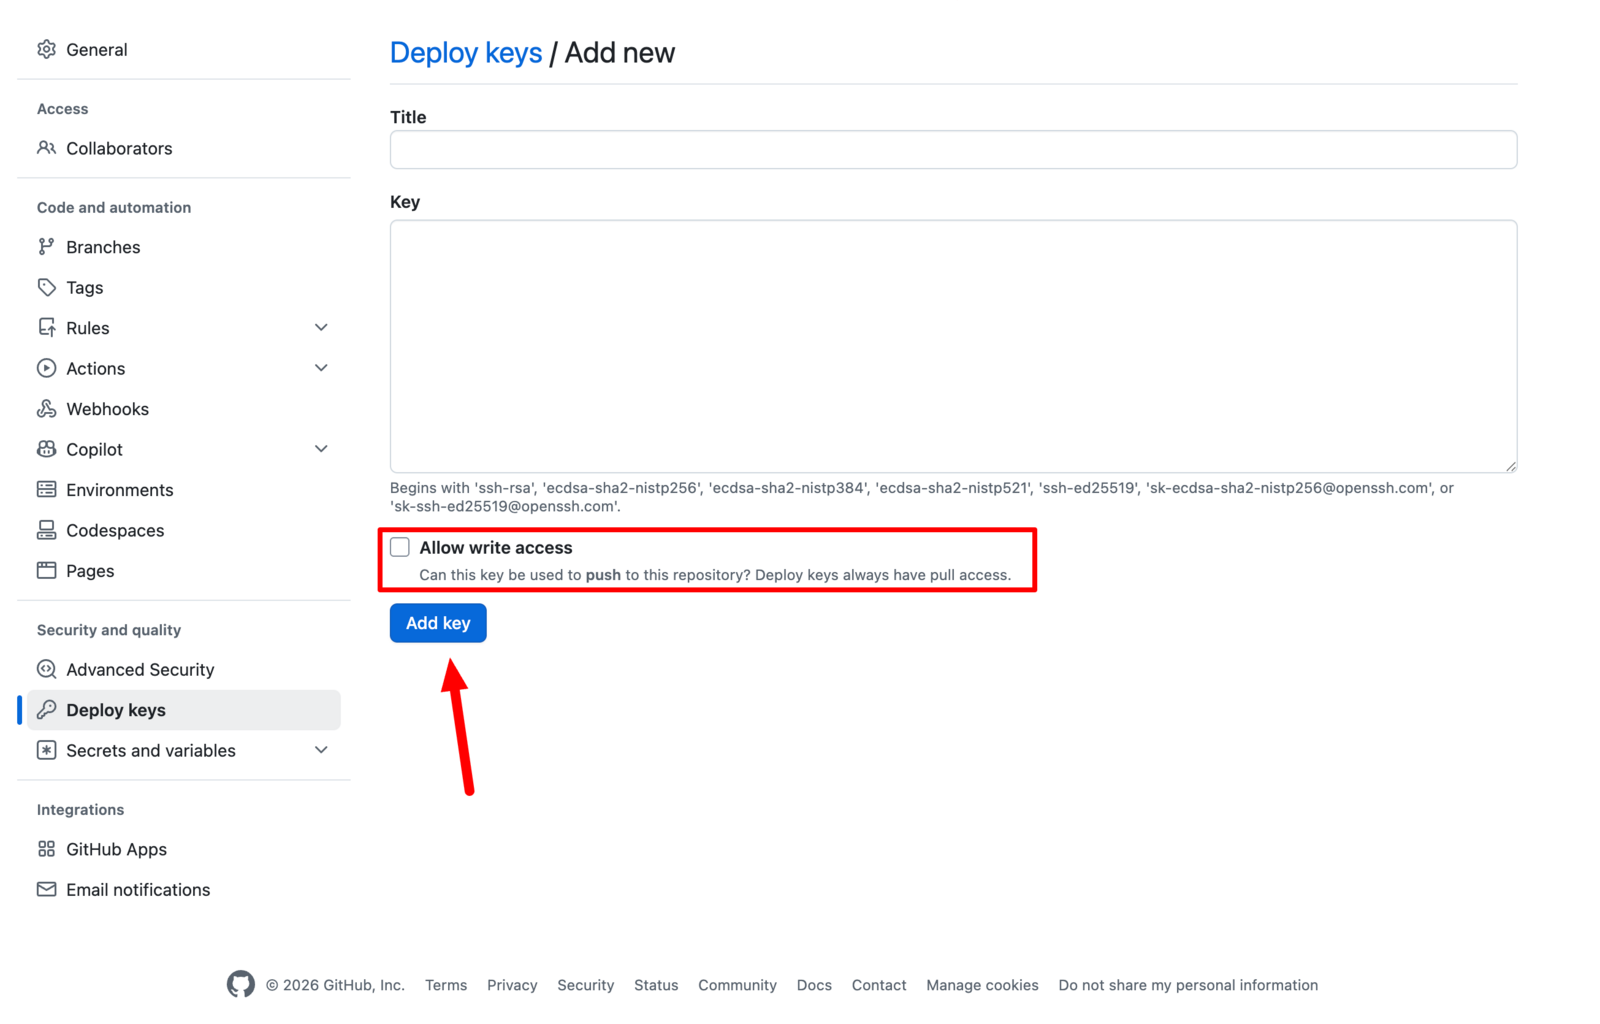
Full walkthrough: the private repository section of add a Deployment.
How to roll back a bad deployment
“Roll back instantly” only means something once you have seen the steps, so here they are. Two routes, and they undo different things.
Route 1: revert the commit and redeploy (code only)
Use this when the deploy delivered exactly what you committed and the commit was wrong. Because your Deployment tracks a branch, putting the branch back puts the site back.
# find the commit that broke it
git log --oneline -5

# undo it as a new commit, keeping history intact
git revert <bad-commit-sha>
git push origin main
The push fires the same webhook as any other, so the previous code is pulled back into the destination folder. If there is no webhook on that branch, trigger the deployment manually (Step 6 above). Prefer git revert over git reset: a revert is a new commit that undoes the old one, so history other people have already pulled stays valid.
Route 2: restore a snapshot or backup (the whole site)
Reverting a commit puts the files back, not the database. So it will not help if the deploy ran a migration, a plugin wrote options on activation, or content changed. For that you need a point-in-time copy of the whole site.
- Before a risky deploy, save the site as a snapshot. The docs on how to create snapshots cover the options, and snapshots overview explains what a snapshot contains.
- If the deploy goes wrong, restore the site from that snapshot, or from an automatic backup if one covers the window.
- Fix the code in the repository, then deploy again.
The habit worth building: snapshot first, deploy second. Taking the snapshot is the cheap step and the one people skip. Restoring without one is not a rollback, it is a rebuild.
InstaWP Academy: creating the snapshot you will restore from.
Preview every pull request on a fresh WordPress site
This is the part worth reading even if you skim the rest. A Deployment does not have to point at a site. Point it at a template and the relationship inverts: rather than a push updating one existing site, a push means the next site built from that template already contains your latest code.
Combined with GitHub Actions, every pull request gets its own disposable WordPress install carrying the branch code, torn down when the PR closes. A reviewer opens a URL instead of pulling a branch and setting up locally.
Site-attached vs template-attached deployments
Setting it up is three moves. Save a site as a template (the docs cover how to create a template), attach the Deployment to it, then paste the template’s webhook URL into your repository the same way you did for a site.
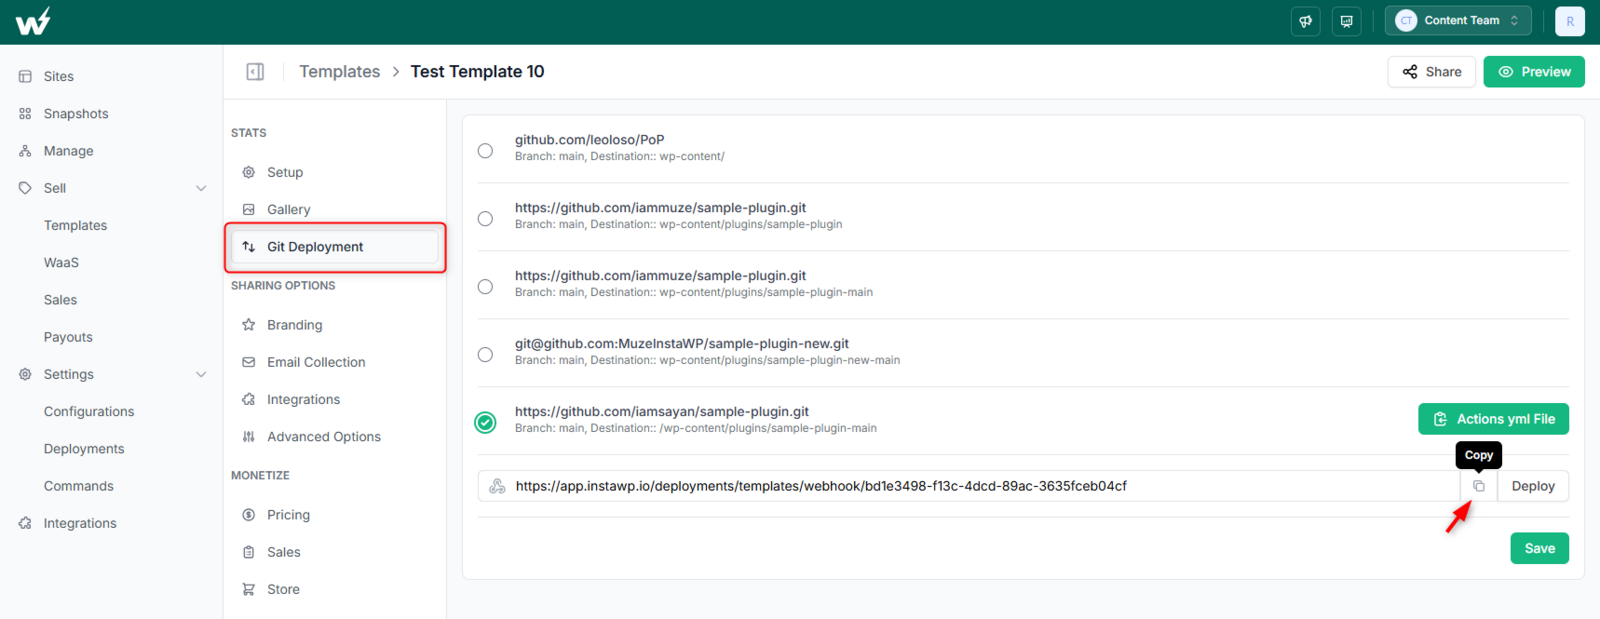

Then create a site from the template, temporary or reserved, and it comes up with your latest commit already in place.
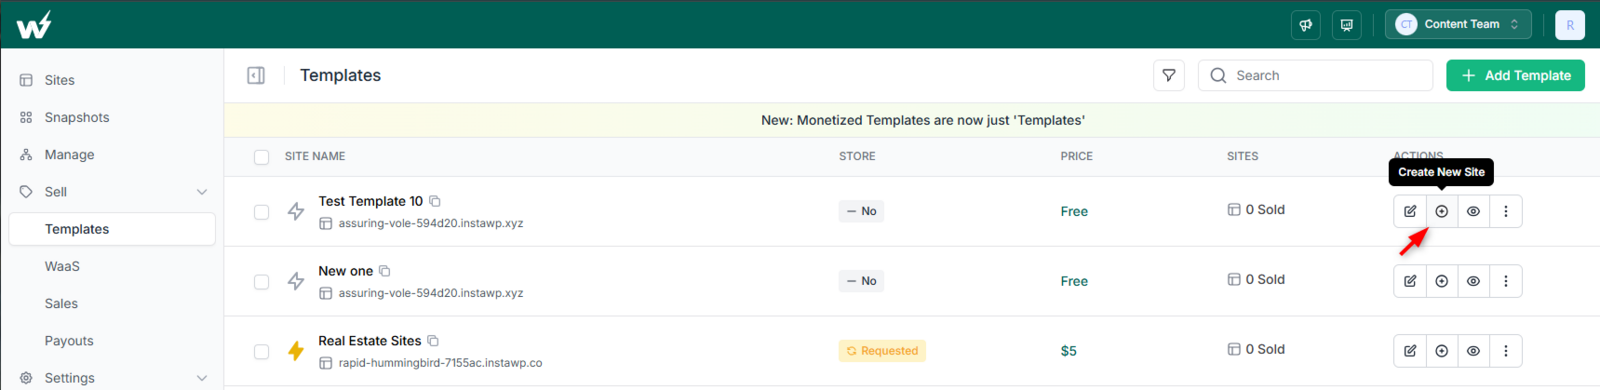
Public and private repositories both work here. The connect to template documentation states the connection steps are identical for both, and only the Deployment’s own configuration differs. Full walkthrough there.
Concretely, this is what lets you review a pull request on a real site instead of a screenshot, demo an unmerged feature to a client, test a plugin against a specific WordPress and PHP version, and run QA on a clean install every time rather than one that has drifted. It is also the mechanism behind plugin and theme demos and a WaaS workflow.
InstaWP Academy: creating the template a Deployment attaches to.
Building this for clients?
Manage multiple client sites, give every pull request its own review site, and resell hosting under your own brand. The InstaWP Agency Program is free to join.
See the Agency ProgramAutomate deployments with GitHub Actions
GitHub Actions turns the template setup above into something that runs without anybody clicking: a fresh site when a pull request opens, login details posted as a PR comment, and the site deleted when the PR closes.
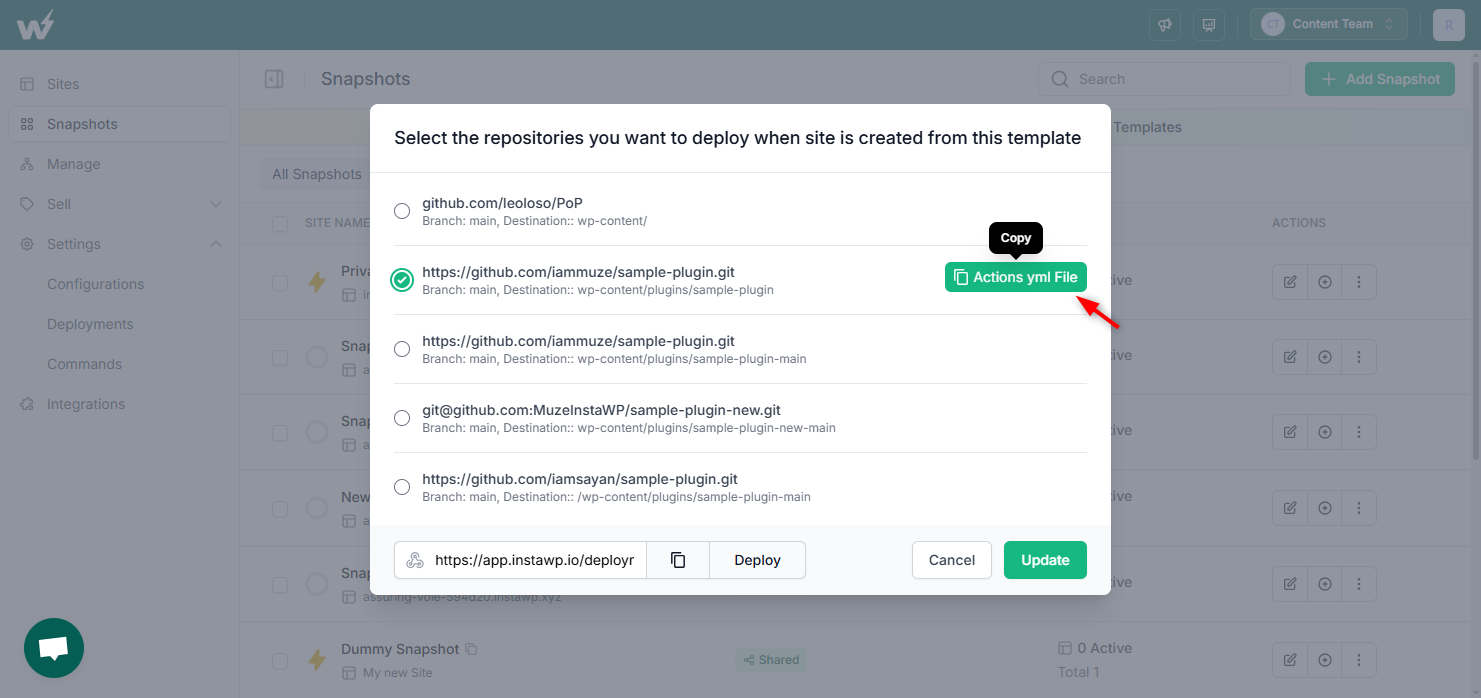
Four parts: a site saved as a private snapshot, a Deployment pointed at it, an InstaWP API token stored as a repository secret, and a workflow file. InstaWP generates the workflow from the snapshot, so you copy rather than write it.
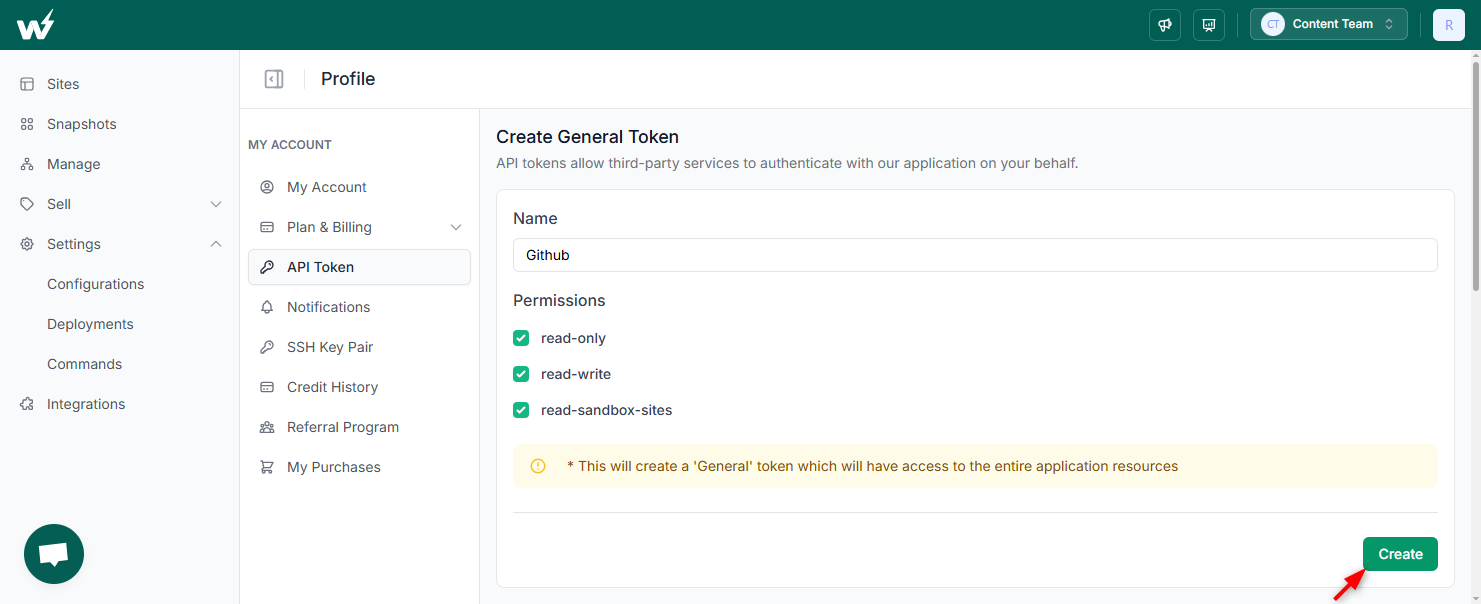
The token comes from Profile, then Account, then API Token. Store it in the repository as a secret named INSTAWP_TOKEN, never in the workflow file itself.
The workflow itself is short:
name: InstaWP WordPress Testing

on:
  pull_request:
    types: [opened]

jobs:
  create-wp-for-testing:
    runs-on: ubuntu-latest
    steps:
      - uses: instawp/wordpress-testing-automation@main
        with:
          GITHUB_TOKEN: ${{ secrets.GITHUB_TOKEN }}
          INSTAWP_TOKEN: ${{ secrets.INSTAWP_TOKEN }}
          INSTAWP_TEMPLATE_SLUG: github-template-demo
          REPO_ID: 3
          INSTAWP_ACTION: create-site-template
That creates a WordPress instance from the named template and comments the access details on the pull request. Set INSTAWP_ACTION to destroy-site-template in a second job triggered on closed to clean up. The action is open source at instawp/wordpress-testing-automation, so you can read exactly what it does before granting it a token.
Reference: the InstaWP docs on GitHub Actions, and GitHub’s own Actions documentation for workflow syntax.
If you would rather not use the action, the InstaWP CLI does the same job in two lines of any pipeline:
- run: npm i -g @instawp/cli@beta
- run: instawp create --name pr-${{ github.event.number }} --json
  env:
    INSTAWP_TOKEN: ${{ secrets.INSTAWP_TOKEN }}
The --json output includes the live URL to post back on the pull request. The CLI in CI/CD documentation covers the rest of the flags. No SSH keys to rotate, and no runner waiting on Docker to boot.
WordPress Git workflows and CI/CD
Connecting a repo is the mechanism. The workflow around it decides whether Git makes your WordPress work calmer or just adds a step. Three decisions carry most of the weight.
Map branches to environments
For most WordPress teams, trunk-based with short-lived feature branches beats a heavy GitFlow setup: one long-lived main, and feature branches measured in days. Long-running branches and WordPress mix badly, because plugin and content state drifts underneath them. And because a Deployment tracks a specific branch, mapping branches to environments is just a matter of creating more than one.
| Branch | Deployment target | Who looks at it |
|---|---|---|
| feature/* | A site built from a template, one per pull request | Reviewers, and the client if the feature is client-facing |
| develop or staging | A long-lived staging site | The team, for integration testing |
| main | Production | Everyone. Deploy here deliberately, not on every merge |
Decide what belongs in Git, and what does not
This is where WordPress differs from most stacks, and where most WordPress Git setups go wrong. WordPress keeps configuration and content in a database and user uploads on disk. Neither belongs in a repository. What belongs in Git is the code you write and the dependencies you declare.
The practical consequence: point each Deployment at a specific plugin or theme folder rather than the site root. A deployment scoped to /wp-content/plugins/my-plugin cannot clobber another plugin, an upload or wp-config.php, however wrong the commit.
Split the checks between CI and a real site
Linting, PHP syntax checks, unit tests and a Composer install belong in GitHub Actions, where they are fast and need no database. Anything that needs a real WordPress, an activation hook, a migration, a block that only breaks in the editor, a theme regression, needs an actual site. That is the split the template workflow exists to serve. A persistent staging site is still worth having alongside per-PR ones, because some bugs only appear on a site with real content and history.
InstaWP Academy: the staging site the develop branch deploys into.
When staging is approved, the last hop is staging to production. The docs cover syncing changes from staging to live without overwriting live edits, which is the case Git alone does not solve because the database is involved.
How to push an existing WordPress site to GitHub
Everything so far moves code from GitHub into WordPress. The reverse is just as common: you have inherited a site whose code has never been in version control. To push a WordPress site to GitHub you pull the files down, decide what to track, commit, and push to an empty repository. The decision in the middle is the one that matters.
What to commit, and what to leave out
Do not commit a whole WordPress install. Track the code you wrote and let WordPress and Composer supply the rest.
| What | Commit it? | Why |
|---|---|---|
| Your custom theme or plugin | Yes | The code that only exists on this site. It is the whole point. |
| WordPress core | No | Thousands of files you never edit, replaced wholesale on every update. |
wp-content/uploads |
No | User content, not code. It grows without limit and Git handles binaries poorly. |
wp-config.php |
No | It holds your database credentials and authentication salts, so committing it exposes them. |
| Third-party plugins | Usually not | Manage them through WordPress or Composer. Commit one only if you have patched it. |
Cache, logs, node_modules, vendor |
No | Generated output. Rebuild it in a post-deployment command instead. |
A starting .gitignore for a site-level repository:
# secrets and environment
wp-config.php
.env

# user content
wp-content/uploads/
wp-content/upgrade/
wp-content/cache/

# build output and dependencies
node_modules/
vendor/
*.log

# editor and OS noise
.DS_Store
.idea/
If you are versioning one plugin or theme, the simpler move is to make the repository the plugin folder itself. The ignore list gets shorter and the Deployment’s destination folder maps one to one with the repo. The Plugin Handbook and Theme Handbook describe the folder structures WordPress expects.
What about the database?
It does not go in Git, and this is the most common misunderstanding of the whole workflow. Git versions code. The database holds content, settings and most plugin configuration, and it changes every time someone publishes a post.
So the workflow has two lanes that never merge. Code moves through Git in one direction, repository to site. Database and uploads move through snapshots, backups and staging sync tools in the other, live site to staging. Trying to make Git carry the database is how people overwrite a client’s content with a two-week-old copy.
The steps
- Enable SFTP or SSH access and download the folder you want to track. The InstaWP CLI addresses sites by name if you would rather stay in the terminal (see the CLI overview).
- Work on a copy. If the site is live, clone it or snapshot it first and pull the files from the copy, so nothing you do can touch production.
- Add the
.gitignorebefore the first commit. A committedwp-config.phpstays in the history even after you delete it. - Run
git init, thengit add ., thengit commit -m "Import existing site code". - Create an empty GitHub repository, then
git remote add origin <url>andgit push -u origin main. - Open the repository and confirm there is no
wp-config.php, no uploads folder and novendordirectory. Ten seconds, and it catches the mistake that matters.
From here you can close the loop: register that repository as a Deployment and future changes flow back into WordPress using the four steps at the top of this guide.
Managed WordPress hosting with Git built in
What decides whether this workflow is pleasant is what sits underneath it. If the host gives you no staging environment, no shell access and nothing to restore from, a deploy pipeline only delivers code faster to a place you cannot debug.
On InstaWP managed WordPress hosting, the developer access this workflow depends on is not a higher tier. SSH, WP-CLI, SFTP, a web terminal, Git deploy and PHP version switching are on every plan. That matters more than it sounds: a post-deployment command is a shell command, and a host that gives you no shell cannot run one.
Edge caching and CDN
InstaCDN serves static responses from a global edge network with Brotli-compressed CSS and JS, and a one-click purge for after a deploy.
Security you do not configure
InstaShield adds a managed WAF on OWASP rules, DDoS mitigation, bot filtering and rate limiting, plus auto-SSL that renews itself.
Off-site backups
Automatic off-site backups, daily on Plus and above, plus on-demand backups to take as a restore point right before a deploy.
Priced per site, billed daily
Starter at 5 dollars a month up to Elite at 45, billed daily with no annual contract, plus a 2 dollar sandbox tier for development.
Each of those is a step your pipeline would otherwise own. Staging is where the develop branch deploys. A snapshot is your rollback. The CDN purge is a post-deploy step. Uptime and SSL monitoring is how you learn a deploy broke something before the client does. Assembling that from a cheap host plus four services is possible, and it is four more things to keep working. Full tier breakdown: managed WordPress hosting and the pricing page.
When a deployment fails
A deployment that silently does nothing is the frustrating case, because there is no error on the site to read. Start with the logs in Site Tools, then work through these.
Permission denied (publickey)on a private repo. The InstaWP docs flag one specific cause, and it is worth knowing before you touch a working deployment: recreating a deployment mints a new SSH key pair, which invalidates the deploy key already in your GitHub settings. Pulls then stop, quietly. The fix is not to recreate it again, it is to copy the deployment’s current public key and re-add it under Settings, then Deploy keys. Both the connect to site and connect to template docs call this out, which is a fair signal of how often it happens. It is also why you edit a deployment rather than rebuild it when you only need a different branch.- The wrong URL type. Public deployments take the HTTPS URL. Private deployments take the SSH URL and only the SSH URL. Pasting HTTPS into a private deployment gives an authentication failure that looks like a key problem but is not.
- The webhook never fired. If nothing appears in the deployment log at all, the notification never arrived. Check Recent Deliveries on the webhook in your repository settings, which shows every attempt and its response. Usual culprits: an event other than push, a content type other than
application/json, or a push to a branch the Deployment does not track. - The files arrived but nothing happened. Either the destination folder is wrong, so the code is on the server but not where WordPress looks, or a post-deployment command failed and the command log has the output. Also remember from Step 5: a plugin arriving for the first time still needs one manual activation. That is expected, not a failed deploy.
Best practices to avoid breakage
- Snapshot before you deploy. The cheapest step and the one most often skipped. Without it, a rollback is a rebuild.
- Use branches for development and testing. Test feature branches on WordPress staging sites and merge to main only after QA. Different branches can feed different sites for parallel work.
- Limit deployment scope with folder targeting. Deploy to
/wp-content/themes/my-themerather than the site root, so other plugins, uploads and configuration stay untouched. - Automate the finishing steps. Post-deployment commands mean nothing is forgotten after a deploy. See run a command, and check your plan includes the field.
- Separate dev, staging and production. Keep production untouched until staging is signed off, then sync staging to live without overwriting live edits. Create a staging site for the develop branch.
- Trigger Actions deliberately. Fire on specific events such as
pull_request: opened, keep credentials in repository secrets, and avoid deploying to production on every push. - Never commit secrets.
wp-config.phpand.envgo in.gitignorebefore the first commit. Anything committed once stays in the history.
Start with the connection, then automate
WordPress GitHub integration is not one feature, it is a connection you make once and then build on. Register the repository, attach it to a site, add the webhook, and you have version history and an undo path where you previously had an FTP client. Per-pull-request sites, branch-to-environment mapping and commands that run themselves all layer on those same four steps.
If you are still dragging plugin files into FileZilla, the first hour is the whole cost. Create a site, connect a repository, push once.
FAQs
What is WordPress GitHub integration?
It is the practice of keeping your WordPress theme, plugin or site code in a Git repository and moving it into the live site through Git rather than by uploading files. It has two halves: the repository, where code and collaboration live, and a deployment layer that pulls new commits into wp-content. With InstaWP, the deployment layer is part of the hosting account.
Can you host a WordPress site on GitHub?
No. GitHub Pages only serves static files, and WordPress needs PHP and a MySQL database to run. You keep your code in GitHub and deploy it to WordPress hosting that provides PHP and MySQL, such as InstaWP managed WordPress hosting.
How do I connect WordPress to GitHub?
In InstaWP, add a Deployment with your repo URL and branch, attach it to your site, then add a webhook in your GitHub repository settings pointing at the InstaWP webhook URL. That is four steps and no FTP client. After that, every push to the tracked branch deploys automatically.
How do I deploy WordPress from GitHub automatically?
Set the webhook to trigger on push events. When you push to the connected branch, GitHub notifies InstaWP, which pulls the latest code into the destination folder on your site and runs any post-deployment commands you configured.
Can I deploy from GitLab or Bitbucket instead of GitHub?
Yes. The InstaWP deployment documentation states that Deployments work with repositories from any Git provider, naming GitHub, GitLab and Bitbucket, for both public and private repos. The InstaWP side is identical, you paste a repo URL and copy a webhook URL. Only your provider’s webhook screen differs, and the InstaWP docs walk the GitHub screens specifically.
How do I push my existing WordPress site to GitHub?
Download the theme or plugin folder over SSH or SFTP, add a .gitignore that excludes wp-config.php, uploads, vendor and node_modules, then run git init, commit, and push to an empty GitHub repository. Add the .gitignore before the first commit, because anything committed once remains in the history.
Should the WordPress database go in Git?
No. Git versions code. The database holds content, settings and plugin configuration, and it changes on a live site independently of your commits. Code travels through Git from repository to site, while the database and uploads travel through snapshots, backups and staging sync tools in the other direction.
How do I roll back a bad WordPress deployment?
Two routes. For a code-only problem, run git revert on the bad commit and push, which fires the webhook and pulls the previous code back. If the deploy also changed the database, revert the commit and restore a snapshot or backup taken before the deploy, because Git does not version the database.
What are post-deployment commands and which plan includes them?
They are shell commands, such as composer install, npm run build or wp plugin activate, that run automatically after each deploy. Git deployment itself is available on every InstaWP hosting plan, but the InstaWP documentation states post-deployment commands require the Professional plan or above, so check the current pricing page before building a workflow that depends on them.
Does Git deployment work with private repositories?
Yes. Select Private as the repo type, paste the SSH URL, and add an SSH key pair that InstaWP can generate for you. Then add the public half to your repository as a deploy key. Your source code stays private, and a deploy key grants access to that one repository rather than your whole account.
Is GitHub deployment good for agencies managing many sites?
Yes, and the template workflow is the reason. You can link different branches to different sites, give every pull request a disposable site for review or client sign-off, and manage all of it from one dashboard, which suits agencies and freelancers shipping client work.
Connect WordPress to GitHub free
Spin up a WordPress site on managed hosting, register your repo as a Deployment, and push your first deploy. No card required.
Start Building Free