You built a full-stack app with Cursor, Claude Code, or Lovable in about five minutes. Now it works perfectly on localhost and goes absolutely nowhere on the internet. That is the deployment gap, and it stops more vibe-coded projects than bad code ever does.
This guide covers every deployment option for vibe-coded apps in 2026, with prices captured in August 2026: what works, what does not, how to identify your stack in sixty seconds, and the fastest path from localhost to live URL for each type of app.
Table of Contents
Key Takeaway

Identify your stack first. Know whether the app is static, full-stack Node.js, Python, or mixed before choosing a hosting platform. Deploying to the wrong platform can cost you an hour of troubleshooting.
Static apps are the easiest to deploy. React SPAs and plain HTML, CSS, or JavaScript apps can go live on Vercel, Netlify, or Cloudflare Pages in under two minutes.
Backend apps need a real runtime. Full-stack applications need an environment that can run server-side code. SQLite and persistent file storage can also be unsuitable for serverless deployments.
Check AI-generated code before production. Common deployment issues include hardcoded localhost URLs, missing environment variables, and incorrect CORS configuration.
Where Should You Deploy a Vibe-Coded App?
Deploy a static or frontend-only app (a React SPA, Vue, or plain HTML) to Vercel, Netlify, or Cloudflare Pages on their free tiers. Deploy a full-stack app with a Node.js or Python backend to a platform that gives you a real server, such as InstaPods, Railway, or Render. If the AI wrote SQLite into your app, you need persistent disk, which rules out Vercel and Netlify entirely. Everything below is the detail behind that answer.
index.html, or a React, Vue, or Svelte app with no backend
Express, Fastify, or Next.js with real API routes
Flask, FastAPI, or Django
Anything writing to a SQLite file on disk
Separate frontend/ and backend/ folders
A WordPress site, headless WordPress backend, or WP plugin or theme
What Vibe-Coded Apps Look Like
Before picking a hosting platform, it helps to know what AI coding tools typically produce. The output depends on which tool you used.

Cursor and Claude Code generate code locally on your machine. The typical output is:
- React or Next.js frontends – single-page apps, dashboards, landing pages
- Node.js backends – Express or Fastify APIs, sometimes with SQLite or PostgreSQL
- Python backends – Flask or FastAPI services, data dashboards with Streamlit
Lovable and Bolt.new generate apps in the browser and usually produce:
- React + Vite frontends – often connected to Supabase for auth and database
- Full-stack prototypes – frontend + API routes, ready to demo but often needing cleanup before production (hardcoded URLs, missing error handling)
The key difference from WordPress: these apps need a runtime. WordPress runs on PHP and MySQL, and managed WordPress hosting from a host like InstaWP gets a site live in under a minute with SSL, a CDN, and a WAF already configured. But a Next.js app needs Node.js. A FastAPI app needs Python. A React SPA needs a static file server. The hosting requirements depend entirely on what the AI generated.
This is where most vibe coders get stuck. WordPress has a thousand one-click hosting options. A Node.js app with SQLite? The options get thin fast.
How to Deploy a Vibe-Coded App, Step by Step
This is the full walkthrough, from a folder on your laptop to a custom domain with SSL. It uses InstaPods, because a CLI deploy is the shortest route for an app you are still changing every few minutes, and because the same nine steps work for Node.js, Python, Go, PHP, and static builds. Every other platform is covered in the next section.
Step 1: Figure Out What You Have
This is the step most guides skip, and skipping it is why developers end up trying to deploy a full-stack app on a static hosting platform. Look at your project structure and match it to one of these patterns:
- Static or frontend-only (no server needed) You have an
index.htmlfile, or a React/Vue/Svelte app with only client-side code. No API routes, no database calls from a backend, no server-side rendering. Look for avite.config.jswith no SSR config, or a plain HTML/CSS/JS folder. - Full-stack Node.js You have a
package.jsonwith a start script that runs a server, Express, Fastify, or Next.js with API routes. Possibly aprisma/folder or direct database calls. Look forserver.js,app.js,next.config.jswith API routes, or asrc/server/directory. - Full-stack Python You have a
requirements.txtorpyproject.tomlwith Flask, FastAPI, or Django. Amain.pyorapp.pythat starts a web server. Database operations, background tasks, or file processing. - Mixed (frontend and separate backend) Two directories, something like
frontend/andbackend/orclient/andserver/. The frontend is static, the backend is Node.js or Python. This is common with Cursor-generated apps.
Your stack determines everything else. Get this right before you read another word.
Step 2: Install the InstaPods CLI and Log In
We are using InstaPods for the main walkthrough, because it is the shortest path from a folder on your laptop to a live HTTPS URL, and it works the same way for Node.js, Python, Go, PHP, and static apps. Every other option is covered further down. Install the CLI:
curl -fsSL https://instapods.com/install.sh | shThen log in. This opens your browser for an OAuth flow and saves the token to ~/.instapods/config.json, so you only do it once per machine.
instapods login
instapods whoami
instapods whoami prints your email, user ID, and current team, which is the quickest way to confirm the login worked before you start debugging a deploy that was never authenticated. On a headless box, use instapods login --no-browser and authorise the printed URL elsewhere.
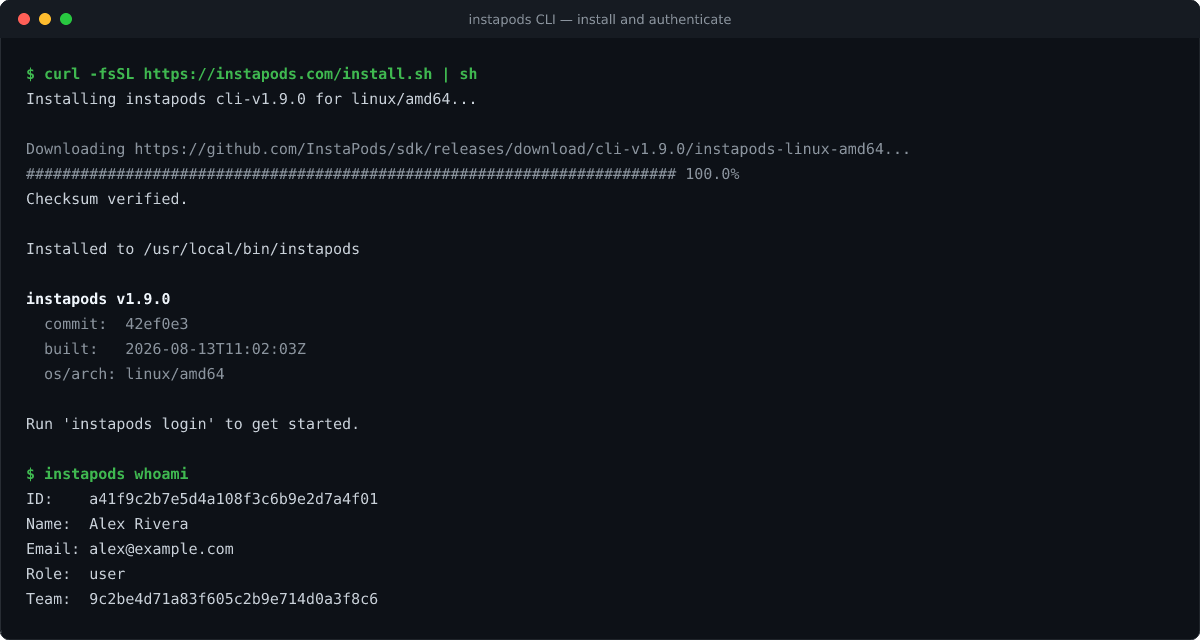
instapods whoami before anything else. It is the fastest way to rule out an authentication problem later.Step 3: Deploy With One Command
Change into your project directory and run the deploy, passing the pod name you want. There is no config file to write, no Dockerfile, and no GitHub repo required at this point.
cd my-vibe-coded-app
instapods deploy my-vibe-coded-app
The pod name is required. Running instapods deploy on its own returns Error: pod NAME is required, which is a two-second mistake that reads like a broken install.
That single command does four things in order. It creates the pod if one does not already exist and waits for it to run. It syncs your local directory, skipping unchanged files. It installs dependencies and runs the build step for Node.js and Go projects. Then it reloads the app service and reports whether it came back healthy. When it finishes you get a live URL on *.instapods.app with SSL already in place.
The runtime is detected from signature files in your project, checked in this order: PHP markers, Hugo, Go, Node.js, Composer, Python, then raw HTML. If it guesses wrong, say so on the command line:
instapods deploy --preset nodejs

# valid presets: static, php, nodejs, python, go
Two behaviours are worth knowing before your first deploy. The sync excludes node_modules, vendor, .git, .env, __pycache__, .venv, venv, .next and .DS_Store by default, and it also honours your top level .gitignore. That is why your secrets do not travel with the code, and why the next step exists. Redeploying is the same command again: instapods deploy my-vibe-coded-app skips pod creation and only pushes what changed. A second deploy of the same four-file app finished in 7.8 seconds.
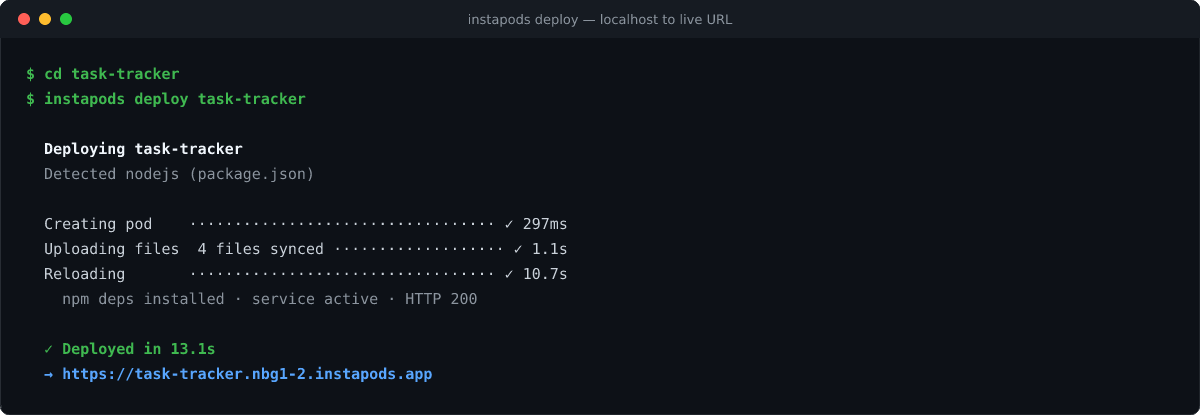
The Same Deploy Without a Terminal
If you would rather not install a CLI at all, the dashboard does the same job. Create a new pod and InstaPods asks What would you like to deploy?, with four routes to choose from.
1-Click Apps
Pick this when you want a ready-made application installed for you instead of deploying your own code.
Custom Code
The standard route for a vibe-coded app. Choose a runtime, create an empty pod, then push your files using the CLI, web IDE, or SFTP.
From GitHub
Connect a repository and let the platform build it. You can also enable automatic deployments whenever new code is pushed.
Upload ZIP
Use this when you already have a build output or builder export but no Git repository. Upload the archive directly.
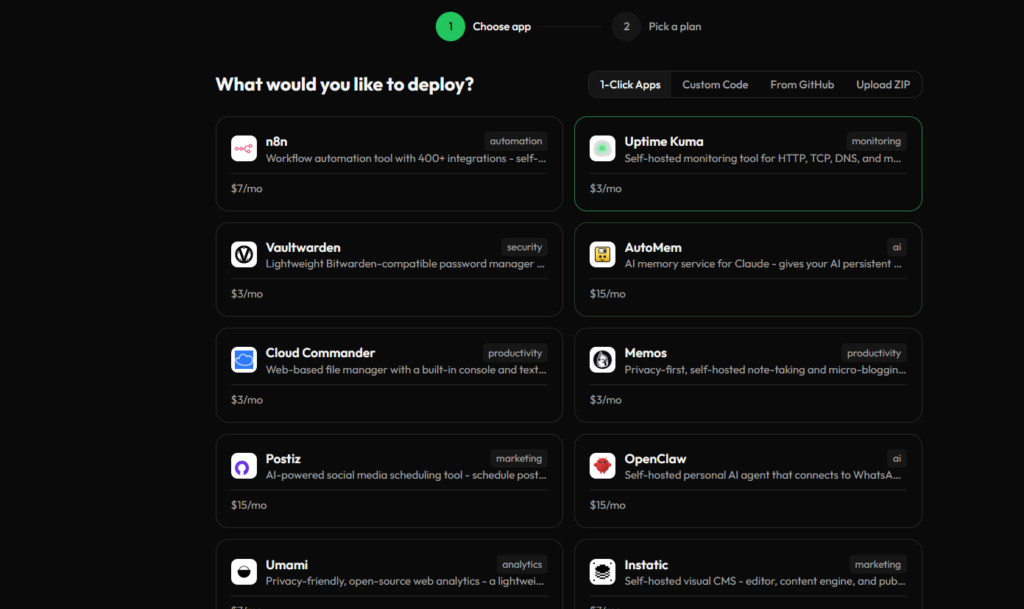
Choosing Custom Code shows five runtime cards, and every one of them starts at the same price:
- Static Site, static HTML, CSS and JS served by nginx, from $3/mo
- Node.js, a Node.js 22 application with npm, from $3/mo
- PHP, a PHP application with nginx, PHP-FPM and Composer, from $3/mo
- Python, a Python 3 application with pip and venv, from $3/mo
- Go, a Go application compiled and run as a service, from $3/mo
Pick one and click Continue. The flat pricing is the useful part here: whichever language your AI tool happened to reach for does not change what the app costs to run, which is not true of most platforms. This is the same catalogue the CLI prints, so you can check it either way.
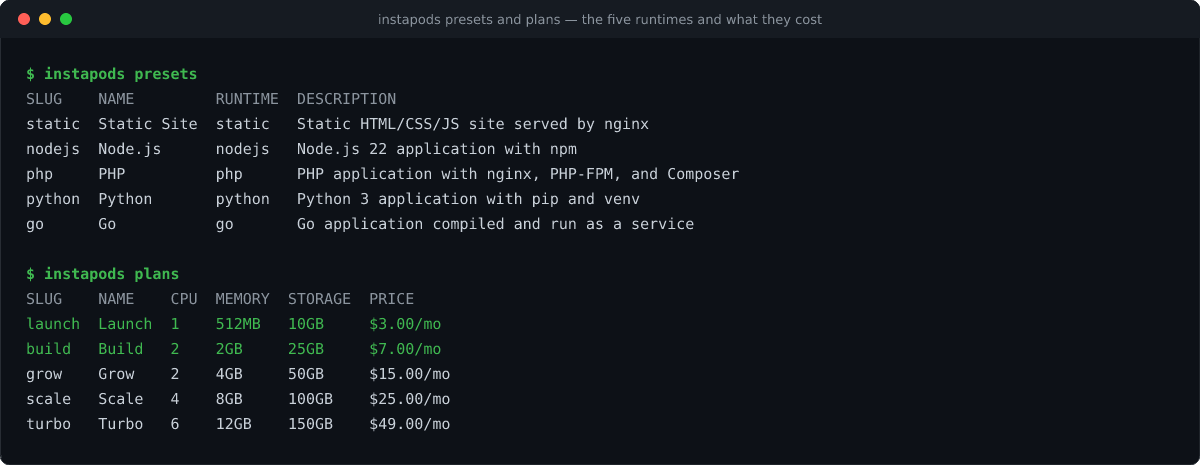
Whichever route you take, everything from here on is identical. The remaining steps apply to a pod created in the dashboard exactly as they do to one created by instapods deploy.
Step 4: Set Your Environment Variables
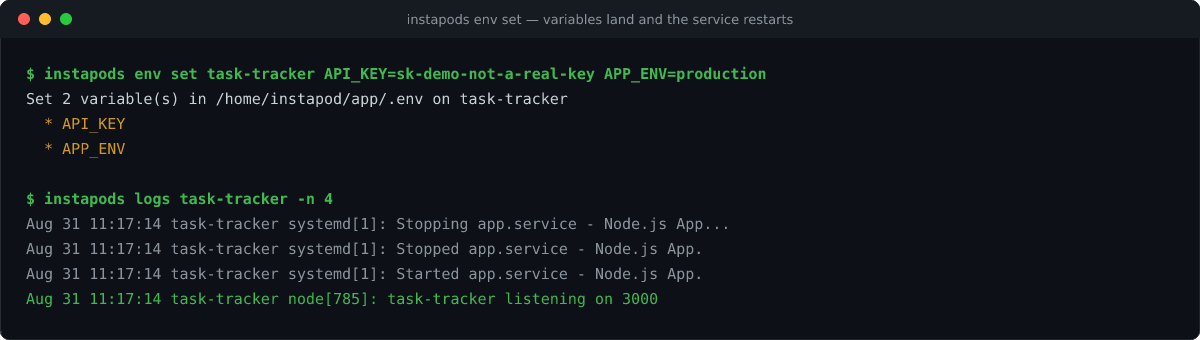
Your .env was deliberately not uploaded, so anything the app reads from the environment is missing right now. This is the number one reason a first deploy returns a 500 when it worked on localhost. Set them from the CLI:
instapods env set my-app
  DATABASE_URL=postgres://instapod:secret@localhost:5432/instapod
  API_KEY=sk-your-api-key-here
For a custom-code pod this writes to /home/instapod/app/.env and restarts the app service for you, so there is no reload to remember. Prefer it over hand-writing the file over SSH, because env set quotes the value so it reads back exactly as typed, which matters for keys containing $ or &. If you do write the file yourself, run instapods pods reload my-app afterwards, because nothing restarts on its own.
Step 5: Add a Database
If the AI wrote SQLite into your app, you can skip this step entirely. The file lives on the pod’s own disk and it survives redeploys, which is the whole reason serverless platforms cannot run these apps. If your app wants MySQL, PostgreSQL, or Redis, add it to the same pod:
instapods services add my-app -s postgresql
instapods services creds my-app -s postgresql
Swap postgresql for mysql or redis. The creds command prints the host, port, username, password, and database name, plus a ready-to-use connection command. Copy the connection string into an environment variable with the command from Step 4 rather than pasting it into your source.
One constraint to plan around: services require the Build plan or higher, and a Launch plan pod cannot install them. If you started on Launch, resize first.
instapods pods resize my-app --plan build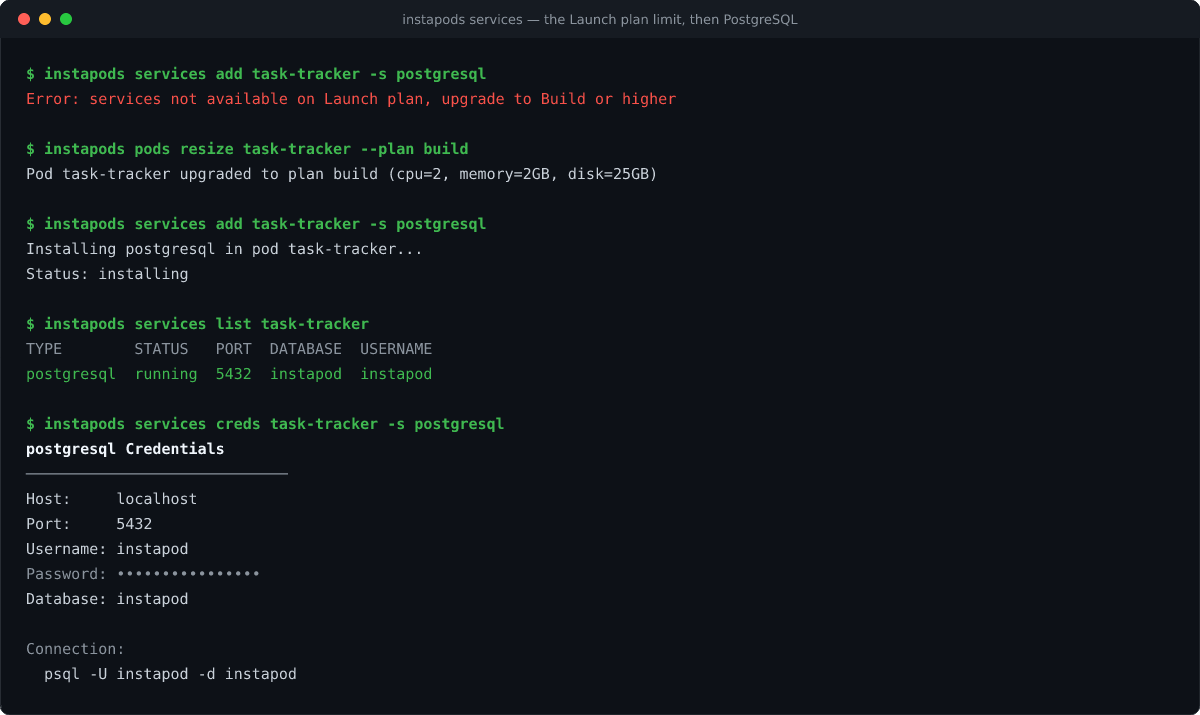
services list is how you know it is ready.Step 6: Connect GitHub So Every Push Deploys
The CLI deploy is the fast loop while you are still iterating with Cursor or Claude Code. Once the app settles down, wire it to the repo so you stop thinking about deploys at all:
instapods git connect my-app
  --repo https://github.com/yourname/my-app --branch main
From then on, every push to that branch deploys itself. Add --deploy to trigger the first one immediately, --auth-token ghp_... for a private repo, or --no-auto-deploy if you would rather push the button yourself. instapods git deployments lists the history and instapods git rollback undoes a bad one. You can keep using instapods deploy for quick local experiments in between.
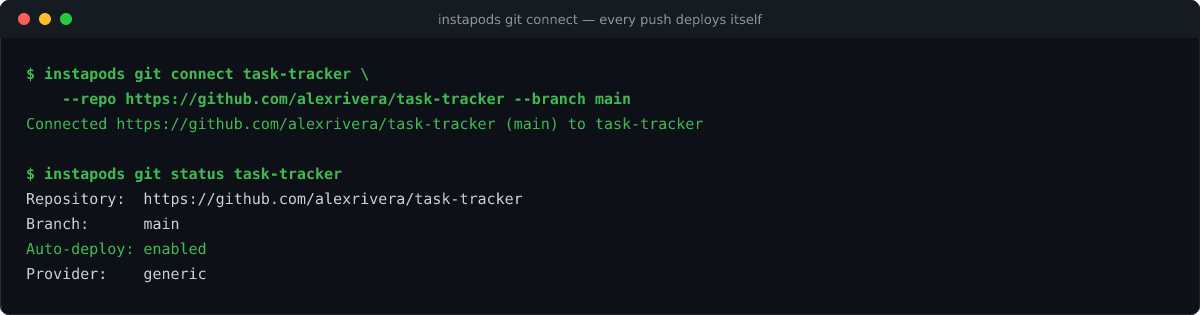
--auth-token for a private repo, or --github to authorise through the GitHub App instead.Step 7: Point a Custom Domain at It
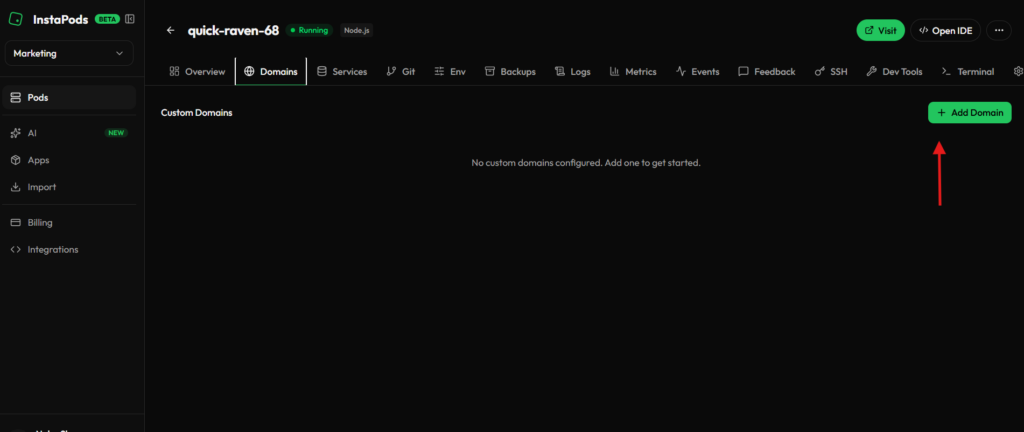
The *.instapods.app URL is fine for testing and wrong for anything you send a client. In the dashboard, open your pod’s Domains tab, click Add Domain, enter the domain such as app.example.com, and choose a verification method.
- CNAME, the preferred route: point your domain at the pod’s default subdomain.
- TXT, when you cannot use a CNAME: add a TXT record at
_instapods.app.example.comwith the value shown in the dashboard.
Give DNS a few minutes to propagate, though it can take up to 48 hours in bad cases, then click verify. SSL is issued automatically through Let’s Encrypt and renewed for you. You can attach up to five custom domains to one pod, which covers the usual apex plus www plus a staging hostname.
Step 8: Read the Logs When It Breaks
Something will break on the first deploy, and it is almost always one of the mistakes listed further down this page. The logs tell you which one:
instapods logs my-app
instapods logs my-app -n 300
instapods logs my-app -s app
instapods logs my-app -g "cors"
-n sets how many lines to return and defaults to 100. -s filters to one service. -g takes a regex and returns the last matching entries however far back they are, which is how you find an error that already scrolled off the tail. An all-lowercase pattern matches case-insensitively, and a single uppercase character makes it case-sensitive.
Which services exist depends on the preset. Node.js and Python pods expose app and system. Static pods expose nginx and system. PHP adds php-fpm. Any database you added shows up as its own service. When the logs are not enough, get a shell:
instapods ssh my-appStep 9: Hand the Deploy to Your AI Assistant
The assistant that wrote the app can also run it. InstaPods exposes an MCP server at https://app.instapods.com/api/mcp, so Claude.ai, Claude Desktop, or any MCP-compatible client can list your pods, read one, and create a new one without you leaving the conversation. If you have been building in Cursor or Claude Code, this closes the last loop where you still had to switch to a dashboard.
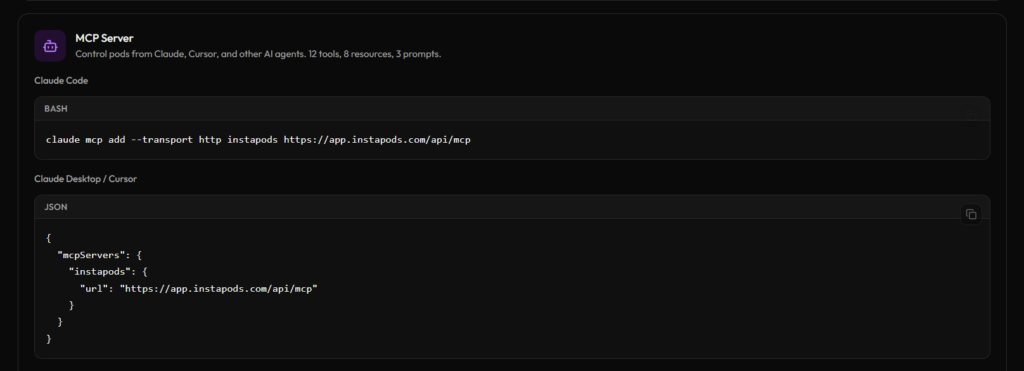
Must Read: MCP Overview
Shortcut: Import Straight From Claude or ChatGPT
If the thing you want online is a Claude artifact or a ChatGPT canvas rather than a repo, you can skip the local project entirely:
instapods import https://claude.ai/public/artifacts/<id>
instapods import https://chatgpt.com/canvas/shared/<id>

# paste mode, for anything else
instapods import --paste --from-file ./component.jsx --title "My Component" --type react
The dashboard has the same flow under Import: paste the URL, click Preview to check what was parsed, then Deploy. Add --dry-run to the CLI version to parse without creating a pod. For a full-stack Lovable app, use the GitHub route in Step 6 instead, because pasting source only carries the frontend.
Other Ways to Deploy a Vibe-Coded App
The walkthrough above is one route. Here is every other option worth considering, what each is genuinely good at, and where it will bite you.
Vercel, Netlify, and Cloudflare Pages (static apps only)
If your vibe-coded app is purely client-side, React, Vue, or plain HTML, you are in the easy case. Multiple platforms handle this well, most with free tiers, and all of them deploy in under two minutes.
Option A: Vercel
Vercel is the best choice for Next.js apps (they built Next.js) and React SPAs. Use the command below to deploy a static-only app using Vercel.
npm i -g vercel
cd my-app
vercel
Vercel auto-detects your framework, builds it, and gives you a live URL. The free tier is generous for static sites.
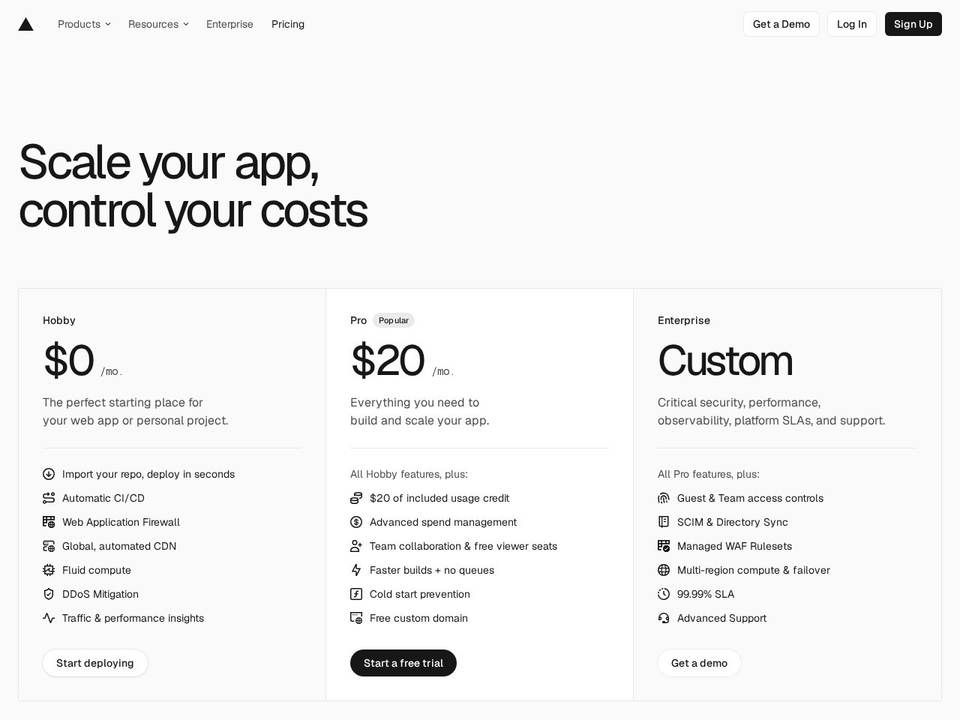
One important gotcha: if your Next.js app has API routes with database calls or file system access, Vercel converts them to serverless functions. SQLite will not work. Persistent file storage will not work. If your app does either of those things, you need a platform with a real server: InstaPods, Railway, or Render.
Option B: Netlify
Similar to Vercel but more framework-agnostic, and slightly more flexible for non-Next.js projects.
npm i -g netlify-cli
cd my-app
netlify deploy --prod
Free tier, automatic HTTPS, and preview deploys for pull requests. Same serverless limitations as Vercel for anything beyond static files.
Option C: Cloudflare Pages
Free, fast, and runs on Cloudflare’s edge network.
npm i -g wrangler
cd my-app
npm run build
wrangler pages deploy dist
Best raw performance for static sites. The Workers platform can handle some backend logic, but it uses a different programming model than what most AI tools generate, so expect friction if you go that route.
All three options work for static apps. Pick whichever you already have an account with. Deploy time is under two minutes for all of them.
Railway, Render, and a Raw VPS
This is where the deployment gap lives. Your AI-generated app has a backend, an Express API, a FastAPI service, or a Next.js app with server-side rendering and real database calls. The static hosting platforms above cannot run it. You need a platform that provides an actual server runtime.
Option A: Railway
Railway detects your stack from your repo and deploys it. It is the closest experience to static hosting simplicity, but for full-stack apps.
- Push your code to GitHub
- Connect Railway to the repo
- Railway detects Node.js or Python, builds, and deploys
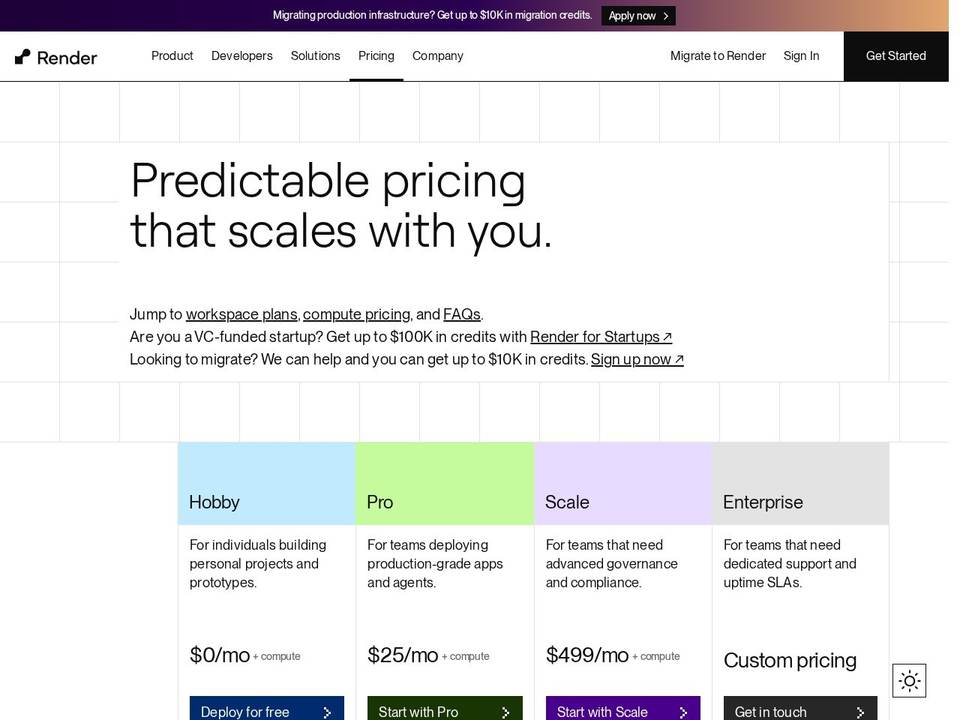
Pricing: Railway lists a Free plan, a Hobby plan at $5/month, and Pro at $20/month, with per-second billing for the CPU, memory, and disk your services actually use on top. A small app typically runs $5 to $10/month. A busier app can climb to $30 to $40/month. New accounts get a one-time $5 trial credit that expires after 30 days.
Limitation: No SSH access. Usage-based pricing can surprise you. The database is a separate add-on billed by usage.
Option B: Render
Similar to Railway with a more traditional dashboard interface.
- Push to GitHub
- Connect Render, select “Web Service”
- Render builds and deploys
Pricing: Render spins down a free web service that goes 15 minutes without inbound traffic, and it takes about a minute to spin back up, so your app cold-starts for the first visitor. Paid plans start at $7/month per service. Managed PostgreSQL starts at $7/month extra, and free Postgres databases expire 30 days after creation. The sleeping behaviour is a dealbreaker for anything you want to demo to a client or share publicly.
Option C: A raw VPS (the honest option)
You rent a virtual server from DigitalOcean ($6/month), Hetzner ($4/month), or AWS Lightsail ($3.50/month) and configure it yourself. This means SSH-ing into the server, installing Node.js or Python, uploading your code, installing dependencies, configuring a process manager, setting up nginx as a reverse proxy, provisioning an SSL certificate, and configuring the firewall.
The first-time setup runs one to four hours depending on experience. Each step has real gotchas. Nginx config alone has derailed more side projects than bad product ideas.
When this makes sense: if you need full control, want to learn Linux ops, or plan to run multiple apps on one server with shared infrastructure. It is not worth it for a side project you built in five minutes with Cursor.
Deployment Comparison for Vibe-Coded Apps
| Platform | Best For | Deploy Time | Starting Price | Database | SSH Access |
|---|---|---|---|---|---|
|
1
InstaPods
Top Pick
|
Full-stack apps, CLI deploys, and AI-built applications | Seconds | Launch $3/mo flat | MySQL, PostgreSQL, Redis on Build $7/mo and up | Yes, all plans |
| Vercel | Static sites and Next.js frontends | ~60s | Free | Add-on options such as KV and Postgres | No |
| Netlify | Static sites and JAMstack projects | ~60s | Free | No built-in relational database | No |
| Cloudflare Pages | Static sites and edge-focused deployments | ~90s | Free | D1 available with platform limits | No |
| Railway | Full-stack apps and GitHub-first workflows | ~2–3 min | Hobby $5/mo + usage | Usage-based database add-ons | No |
| Render | Full-stack applications and managed PaaS | ~3–5 min | $7/mo | $7/mo extra; free database tier expires after 30 days | Paid plans only |
| InstaWP | WordPress sites, headless WP backends, plugins, and themes | Under 60s | $5/mo per site, billed daily | MySQL included | Yes, all plans |
| Raw VPS | Full server control and multiple applications | 1–4 hours | ~$4/mo | Self-managed | Yes |
Databases and the SQLite Trap
AI coding tools have a strong preference for SQLite. Cursor and Claude Code generate SQLite-backed apps constantly because it is the simplest option, no external database server, just one file on disk. This works fine on your machine and causes real problems on certain hosting platforms.
The core issue: serverless platforms like Vercel and Netlify have ephemeral file systems. Your SQLite database file disappears on every deploy. If you are on one of those platforms with a SQLite-backed app, you need to either migrate to a hosted database or move to a platform with persistent file storage.
Here is the simplest decision path:
- If the AI used SQLite, deploy to any platform with persistent storage, a VPS, Railway with a persistent volume, or Render with a mounted disk. Do not migrate to Postgres unless you have a specific reason to.
- If the AI used Prisma or another ORM, check the connection string. Switching from SQLite to Postgres usually means changing one line in your config.
- If you need a hosted Postgres, Supabase’s free tier is the most popular choice among vibe coders. Neon is another strong option.
One trap that catches people on free tiers: Render’s free PostgreSQL databases expire 30 days after creation, with a 14-day grace period to upgrade before deletion. A demo you built in March is simply gone in May unless you moved it. Supabase and Neon free tiers do not expire on a fixed clock, which is part of why vibe coders default to them.
What It Actually Costs to Keep a Vibe-Coded App Online
Deploy prices and running prices are different numbers. A free tier that sleeps, expires, or bills by usage is not free once the app has users. Here is what a small full-stack app with one database costs per month, and what actually stops working if you stay on the free option.
| Setup | Cheapest Working Monthly Cost | What Breaks on the Free Tier |
|---|---|---|
| Static frontend only | $0 on Vercel, Netlify, or Cloudflare Pages | Genuinely free Nothing essential for this use case. |
| Full-stack, SQLite on disk | $3/mo on InstaPods Launch | Storage issue Vercel and Netlify do not provide the persistent local disk this setup needs. |
| Full-stack with MySQL, PostgreSQL, or Redis | $7/mo on InstaPods Build | Not applicable |
| Full-stack on Railway | $5/mo Hobby plan plus usage-based compute and egress | Trial only The initial credit is temporary rather than an ongoing free hosting tier. |
| Full-stack on Render | $14/mo $7 web service + $7 PostgreSQL | Free-tier limits Free services can sleep when idle, while free database availability is limited. |
| WordPress or headless WordPress backend | $5/mo per site on InstaWP managed hosting , billed daily | Not applicable No permanent free hosting tier. |
| Self-managed VPS | ~$4/mo plus setup time and ongoing maintenance | No platform restriction You manage provisioning, security, patches, and maintenance yourself. |
The number that catches people is Render’s, because the free tier feels like the answer until you send a client a link and they hit a one-minute cold start. If the app is going to be shown to anyone, budget for the paid tier from day one.
Deploying Code Exported From Lovable, Bolt, Replit, and v0
Browser-based builders host your app for you while you are building it. The moment you export the code, or connect a custom domain, or outgrow the plan, you are back in the same deployment problem as everyone else. Three things reliably need attention on export.
The environment variables do not come with it
Lovable projects usually talk to Supabase for auth and database. The keys were injected by the builder and are not in the exported repo, or they sit in a .env that was never committed. Open the Supabase dashboard, copy the project URL and the anon key, and set them on your new host before the first deploy. If the app also uses a service role key, keep it server-side only.
The build command is assumed, not written down
Bolt and v0 export Vite projects that build with npm run build into dist/. Replit exports often keep the run command in Replit’s own config rather than in package.json. Check that package.json has both a build script and a start script before you push, because most platforms look for exactly those two.
Auth redirect URLs still point at the builder’s domain
Login works in the builder preview and fails on your own URL. The fix is in the auth provider, not the code: add your production domain to the allowed redirect URLs in Supabase, Clerk, or Auth0. This is the most common “it worked yesterday” report after moving off a builder.
If what you are shipping is a website rather than an application, the calculation is different again, and our guide to how to vibe code a website covers that path end to end.
The WordPress Developer’s Cheat Sheet
If you are coming from WordPress development (maybe you have been using InstaWP for staging sites) and vibe coding your first non-WordPress app, here is the mental model:
Shared hosting
SiteGround, Bluehost
Vercel or Netlify
for static apps
Managed WordPress
InstaWP, WP Engine, Kinsta
Railway, Render, or InstaPods
for full-stack apps
VPS with cPanel
VPS with nginx
no direct cPanel equivalent
FTP upload
CLI deploy or git push
wp-config.php
Environment variables
.env file
MySQL database
SQLite, PostgreSQL, or Supabase
PHP runtime
Node.js or Python runtime
Plugins for features
npm packages or pip packages
The biggest shift: WordPress hosting abstracts the server completely. With Node.js and Python apps, you are closer to the metal. That is why the deployment step feels harder, there is no one-click install equivalent for a custom Express API.
The platforms listed above exist to close that gap. Pick the one that matches your stack and budget. And if part of what you are building is still WordPress, that half does not have to get harder: InstaWP managed WordPress hosting keeps the one-click side one-click, with SSH and WP-CLI on every plan for the times you want to drop to a shell.
When Your Vibe-Coded App Needs WordPress Behind It
A large share of vibe-coded frontends are not standalone apps. They are a React or Next.js interface that needs somewhere to store content, run a shop, or handle logins for non-technical people. AI tools will happily generate a custom admin panel for that, and then you own it forever. Putting WordPress behind the frontend is usually the cheaper answer, because the client gets an editor they already know and you get a REST and GraphQL API for free.
That backend still has to be hosted, and it has different requirements from your Node app: PHP, MySQL, persistent uploads, a cache, and a WAF, because a public WordPress install is scanned within hours of going live. This is what managed WordPress hosting is for, and it is what InstaWP does on its own infrastructure, priced per site and billed by the day rather than as one plan for everything.
01 A PHP runtime you can pin
PHP 7.4 to 8.5, switchable independently for each site.
02 Shell access for WP-CLI
SSH and SFTP on every plan, plus a browser-based web terminal.
03 Deploy from a repo
Git deployment from GitHub, GitLab, or Bitbucket, with webhook-based auto-deploy.
04 A safe place to test
One-click staging, then move to production without a manual export-import workflow.
05 Protection from bots
Managed WAF, DDoS mitigation, bot filtering, and automatic SSL renewal.
06 Speed for logged-in and cart pages
Global edge CDN with one-click cache purge, plus object cache on Plus and above.
07 A way back after a bad deploy
Daily backups on Plus and above, 30-day retention, and one-click restore.
08 A region near your users
Hosting regions in the US, UK, Germany, Singapore, and Australia.
Step by Step: Put a WordPress Backend Behind Your App
This takes about ten minutes end to end. You need an InstaWP account and the repo or content you want on the site.
1. Create the site
From the dashboard, create a new WordPress site and pick your PHP version and server region on the way in. The site is up in under a minute on a temporary InstaWP URL, so you can start wiring your frontend to it before you have decided on a domain.
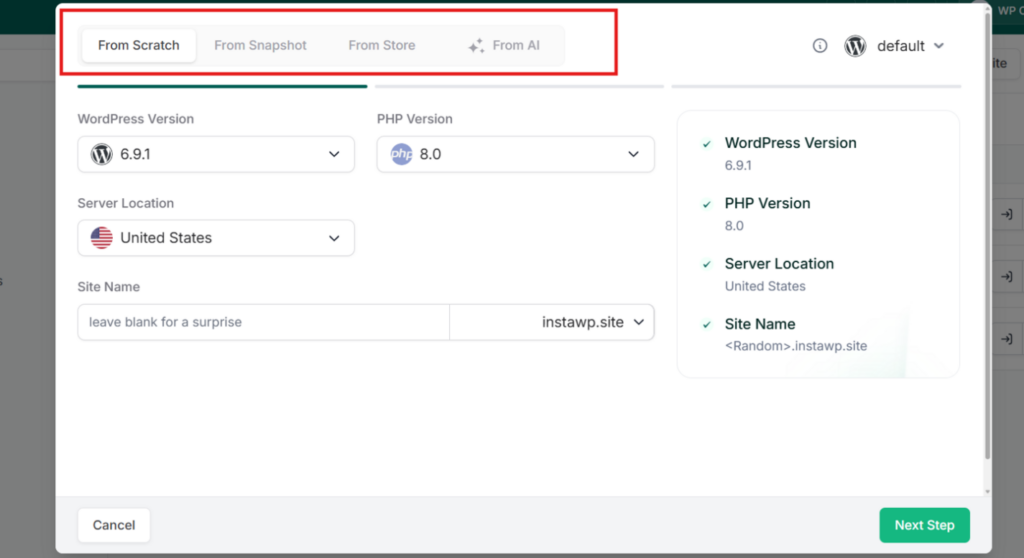
Must Read: Create Site
2. Turn on SSH so you can use WP-CLI
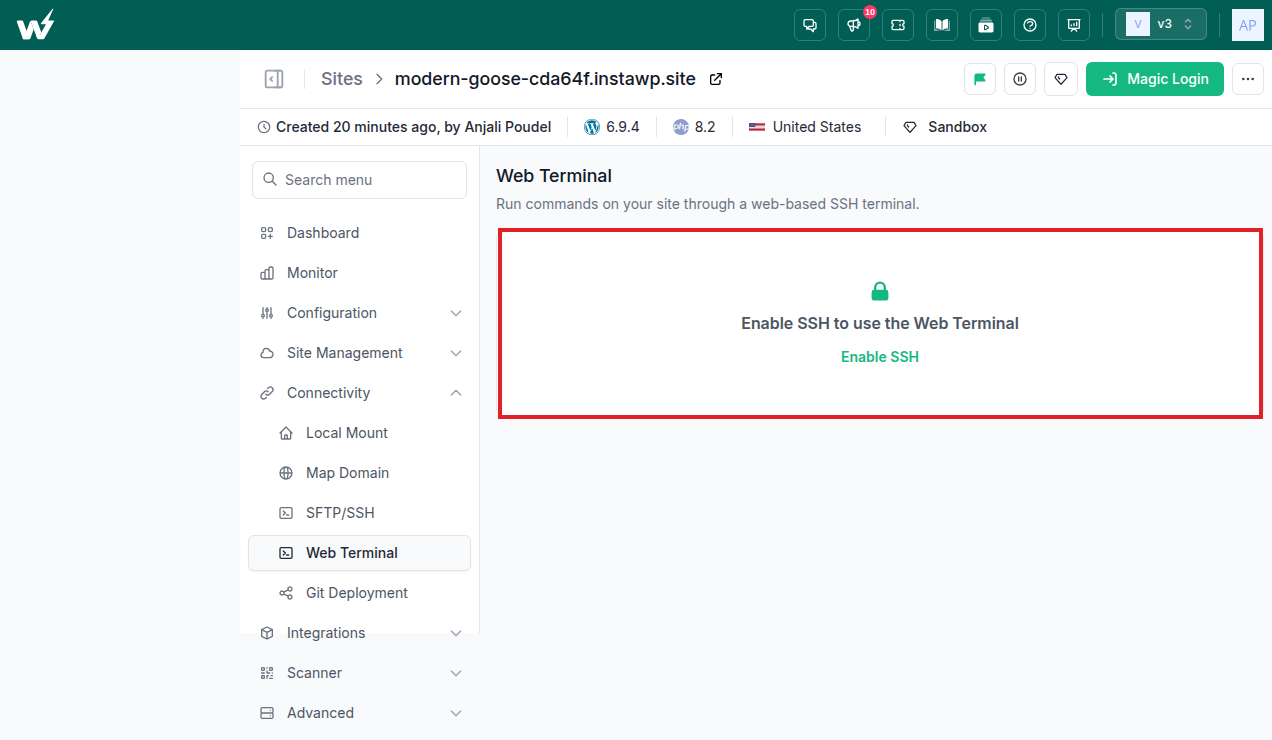
Open the site, go to the Web Terminal, and enable SSH. You now have WP-CLI in the browser, which is how you will install plugins, run search-replace on URLs, and flush caches without clicking through wp-admin.
3. Connect the repo that holds your theme or plugin code
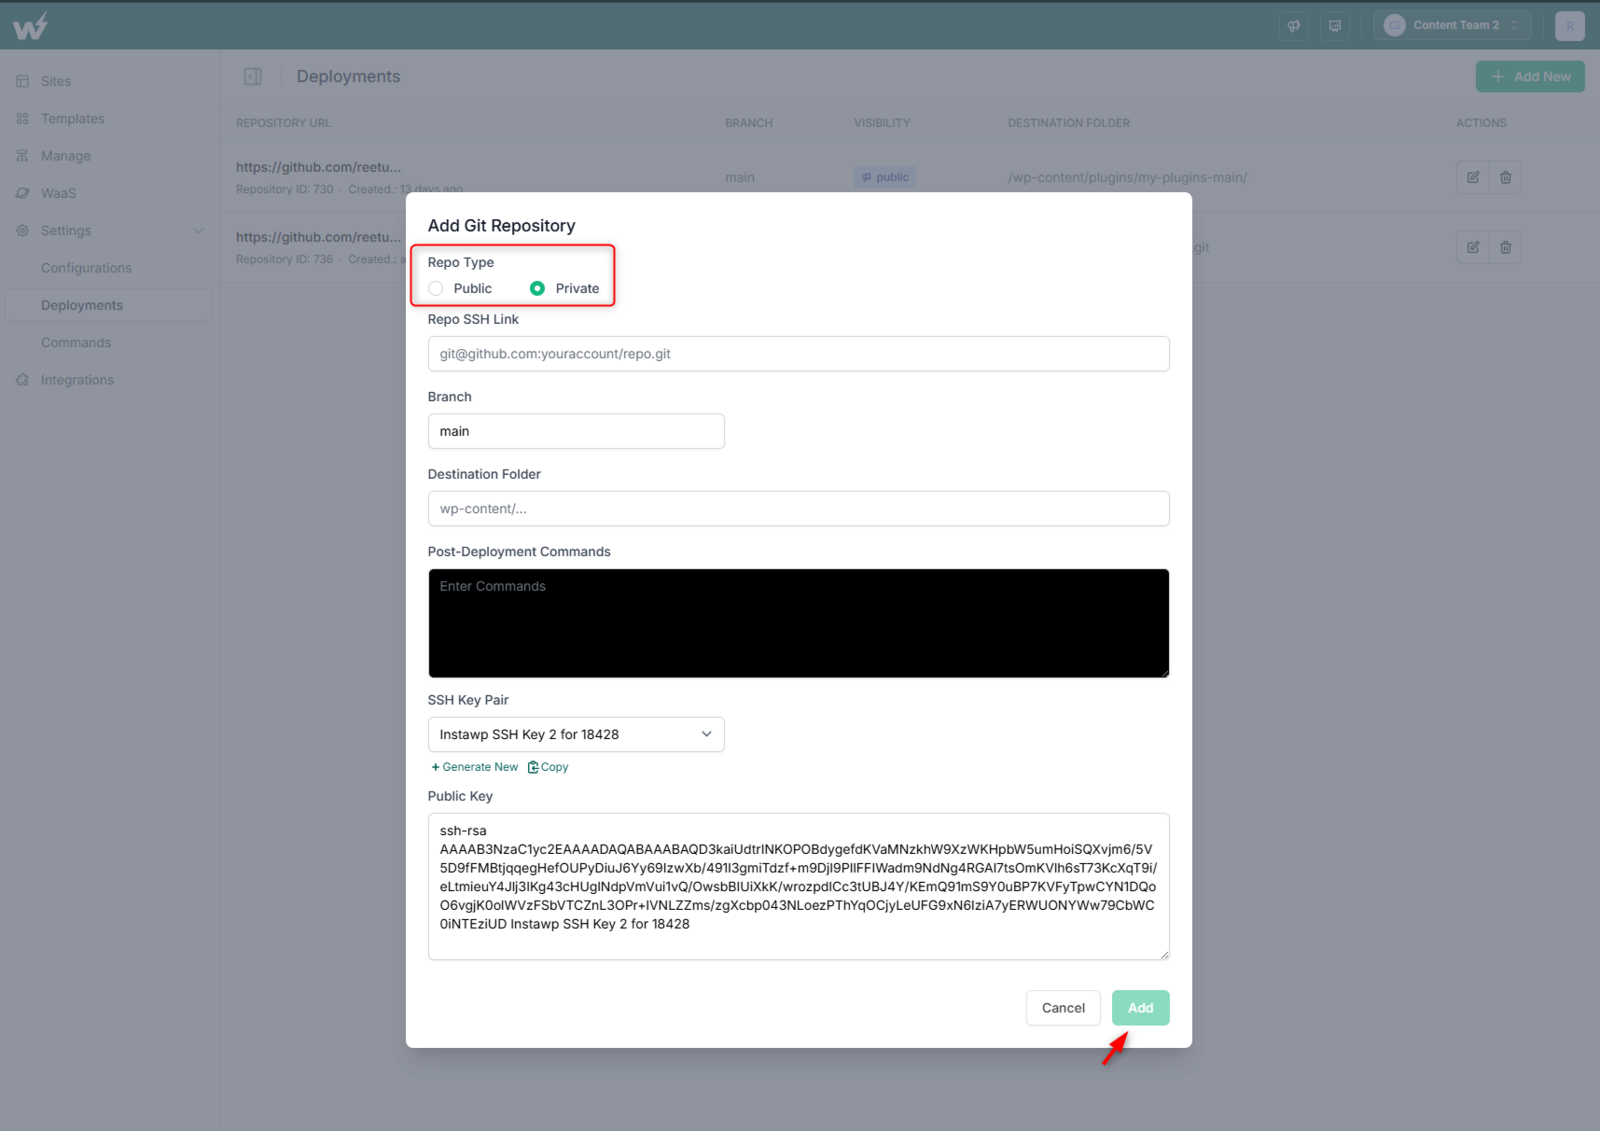
Go to Deployments and click Add New. Set Repo Type to Public or Private, paste the repository URL, and set the branch and the destination folder, which is usually your theme or plugin directory. For a private repo, InstaWP generates an SSH public key that you add to the repository as a deploy key.
4. Add the webhook so every push deploys
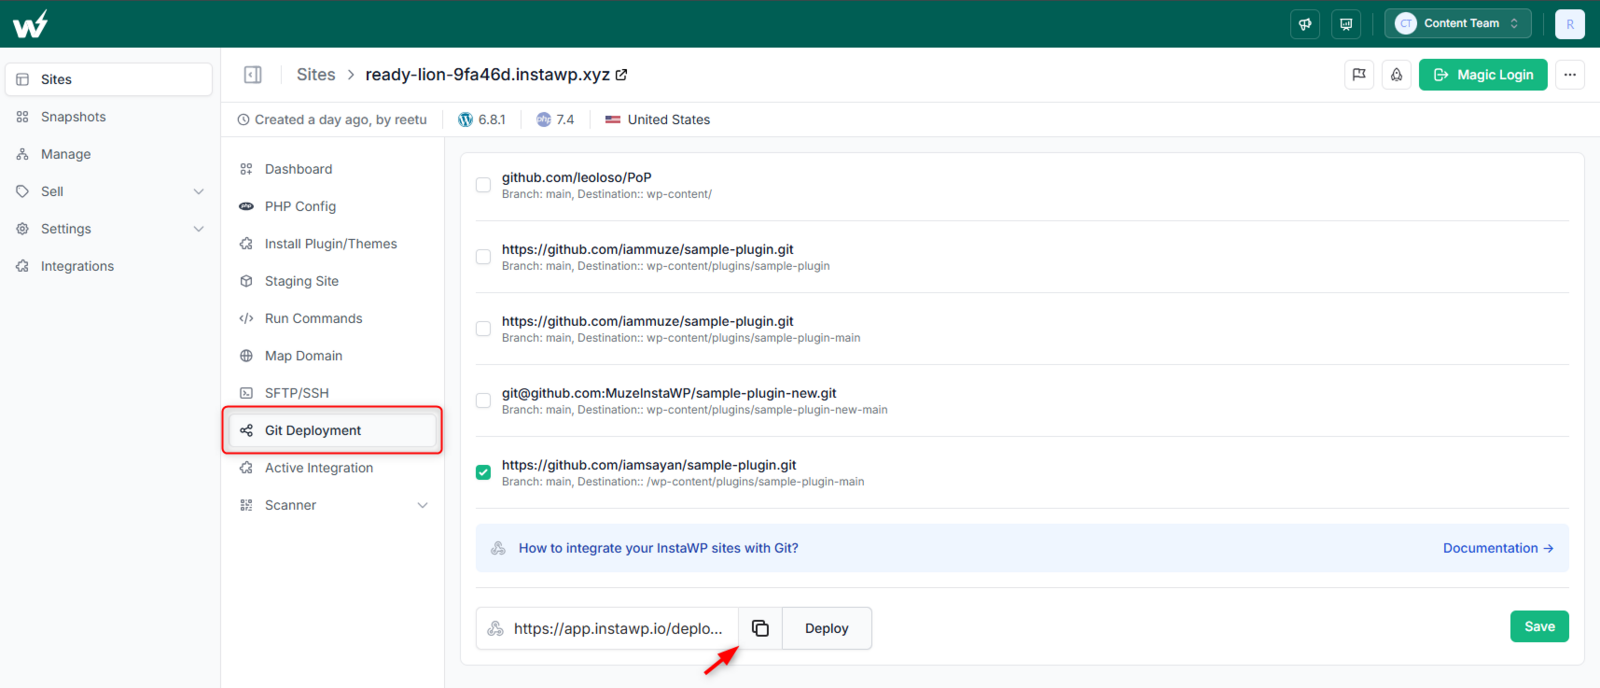
Copy the webhook URL from the Git Deployment panel, then in your repository settings click Add webhook, paste it into Payload URL, set the content type to application/json, and save. From here every push to the branch you nominated deploys itself, which is the same loop you already have on Vercel.
5. Point your frontend at the WordPress REST API
Your posts are already available at /wp-json/wp/v2/posts. Put that base URL in an environment variable rather than hardcoding it, because you are going to change it when you map the real domain. Add your frontend’s production origin to the site’s CORS allowlist at the same time, or you will hit exactly the error described further down this page.
6. Map the domain and go live
Add your domain, point the DNS records, and SSL is issued and renewed for you. If you built on a staging site first, going live keeps the same URL and the same data, so there is no export and import step to get wrong at the worst possible moment.
7. Let your AI assistant manage the site directly
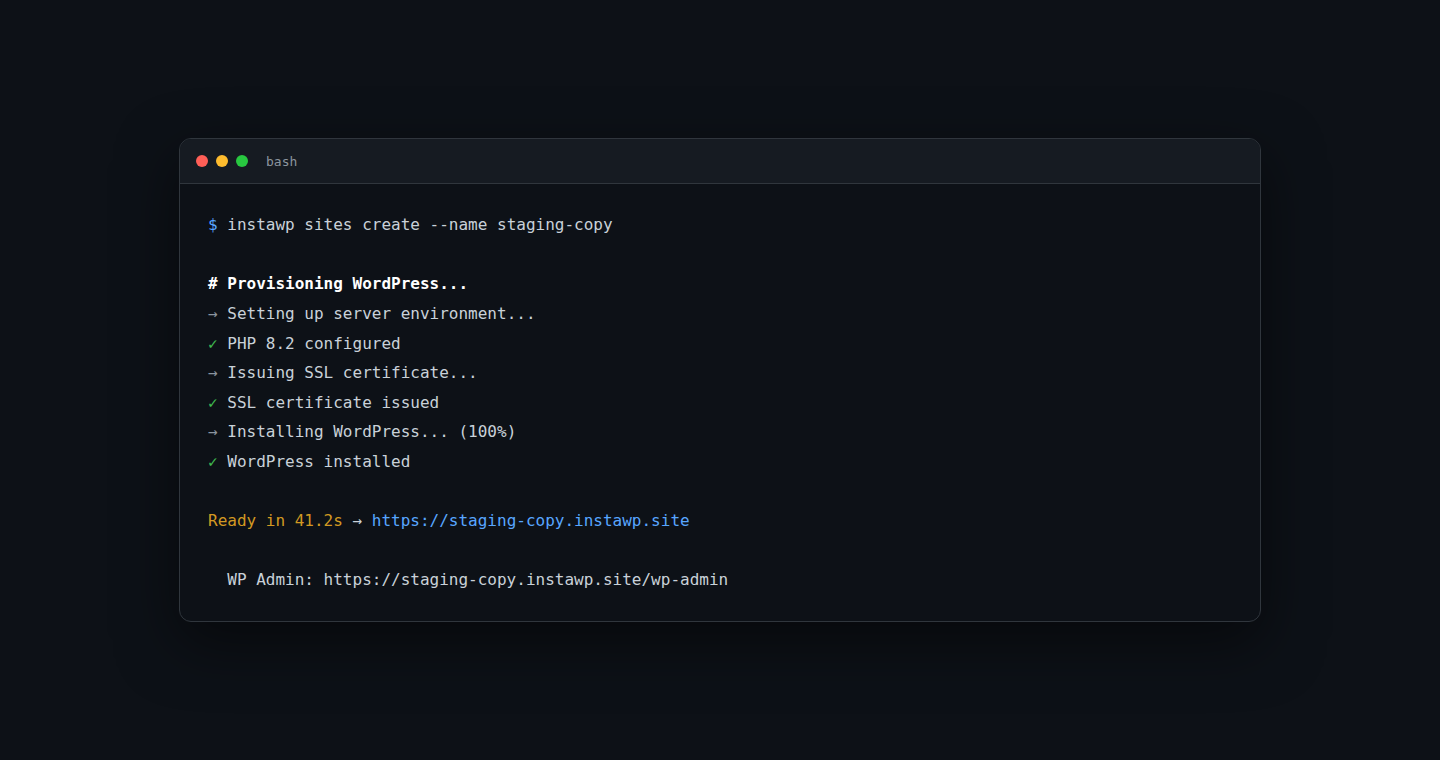
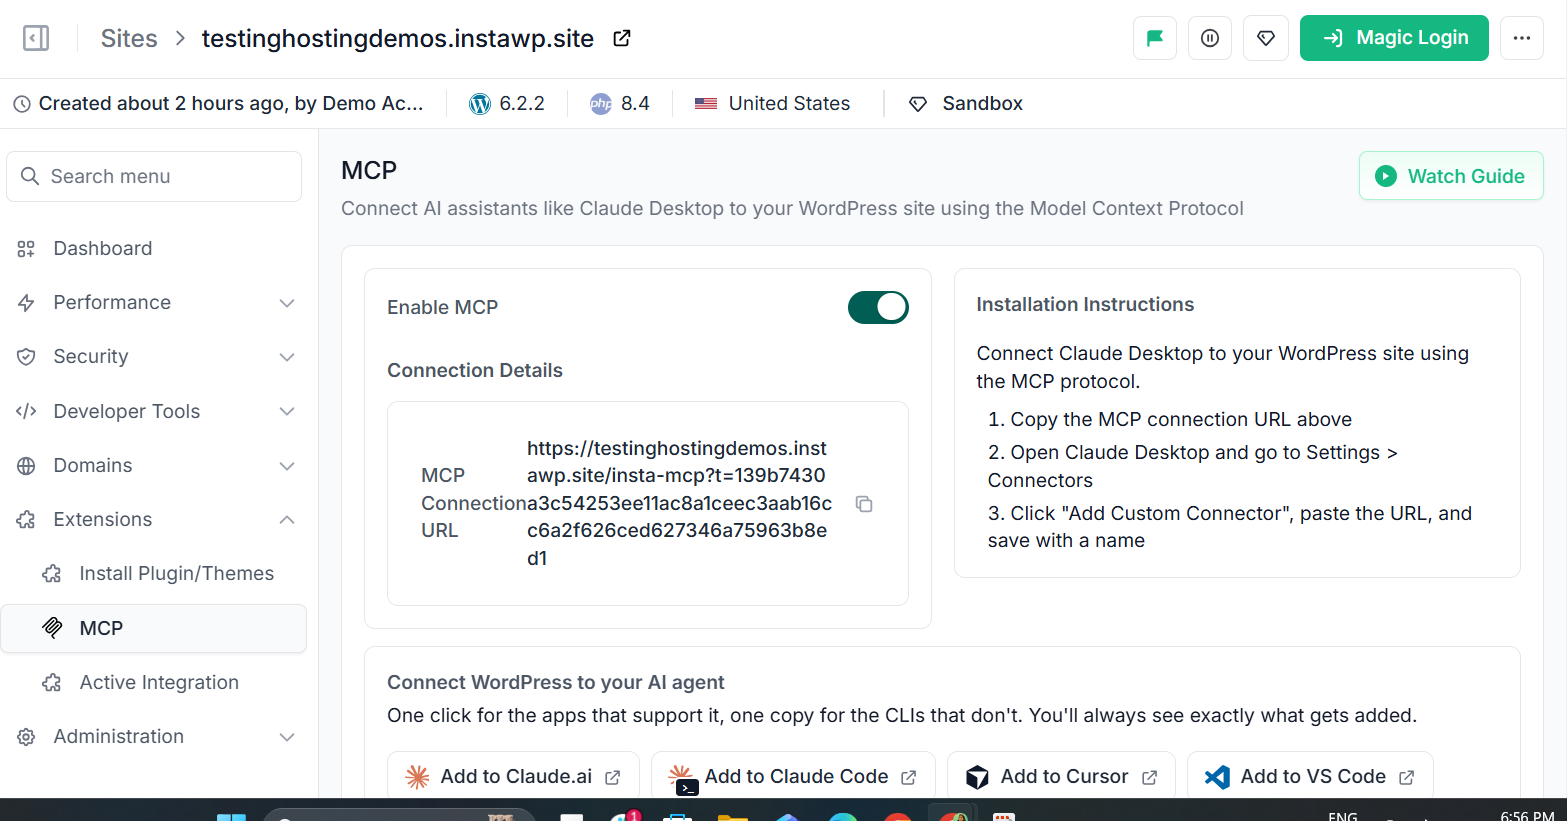
If you built the frontend in Cursor or Claude Code, you can keep the backend in the same conversation. Turning on InstaMCP, the best WordPress MCP server, makes the site available to your AI client over the Model Context Protocol, so the assistant can create pages, upload media, and manage plugins without you switching to wp-admin. There is a per-site version and an account-level version, and the difference between account MCP and site MCP matters once you are running more than one site.
When this is the wrong answer
If your app has no content, no editors, and no shop, do not add WordPress to it. A React dashboard that reads from your own Postgres does not need a CMS, and bolting one on gives you a second thing to patch. This path is for apps where a non-developer has to change something.
Which Deploy Path Should You Pick for Your Vibe-Coded App?
- Your app is static (React SPA, HTML/CSS/JS): Use Vercel or Netlify. They are free and deploy in under a minute.
- Your app is full-stack Node.js or Python, and you want the fastest path: Use a CLI deploy tool. One command, live URL, done.
- Your app needs a database: Check if it is SQLite (deploy anywhere with persistent storage) or Postgres (add Supabase or use a platform with built-in databases).
- Your app needs a CMS, a shop, or client logins: Put WordPress behind it on managed WordPress hosting and read from the REST API, rather than having the AI write you an admin panel you have to maintain.
- You want full control and do not mind the setup time: Rent a VPS and configure it yourself. Budget 2 to 4 hours for the first time.
- You are prototyping and do not want to pay anything yet: Vercel free tier for frontends, Railway’s $5 credit for full-stack, or Render’s free tier if you accept the cold start tradeoff.
The vibe coding workflow is build fast, deploy fast, iterate fast. If deployment takes longer than building the app, you have picked the wrong platform. Pick the deploy option that keeps the loop tight, your next idea is already waiting.
The Most Common Deployment Mistakes with AI-Generated Code
AI coding tools generate working code for localhost. They do not always generate code that works in production. Security is one of the most common gaps, because AI tools routinely skip input validation, leave auth checks incomplete, and hardcode secrets. These are the six patterns that cause the most trouble.
1. Hardcoded localhost URLs
AI tools generate code that talks to http://localhost:3000 or http://localhost:8080. This works in development but breaks immediately in production where your API lives at a different URL. Search your codebase for “localhost” and replace every hardcoded URL with an environment variable:
// Before, breaks in production
const API_URL = 'http://localhost:3000/api';

// After, works everywhere
const API_URL = process.env.NEXT_PUBLIC_API_URL || 'http://localhost:3000/api';
2. Missing start scripts
Cursor sometimes generates a package.json without a proper start script. The app runs fine with npm run dev locally but has no production entry point. Make sure your package.json includes:
{
  "scripts": {
    "start": "node server.js",
    "build": "next build"
  }
}
For Python, ensure you have a clear entry point. Most hosting platforms look for main.py, app.py, or a Procfile.
3. Secrets in the code
AI-generated code often includes placeholder API keys or hardcoded secrets. These need to be set as environment variables on your hosting platform, not committed to your repo. Common ones to check: database URLs, API keys for Stripe or OpenAI, JWT secrets, and SMTP credentials.
4. Building in development mode
React and Next.js apps need a production build. Deploying the dev server is slow and leaks debug information. Run npm run build before deploying, or confirm your hosting platform runs it automatically, which most do.
5. Wrong Node.js version
Your local machine might run Node 22 but the hosting platform defaults to Node 18. If the AI used newer syntax or APIs, the app crashes silently. Add an engines field to package.json to lock the version:
{
  "engines": {
    "node": ">=20.0.0"
  }
}
6. CORS errors after deployment
Works on localhost, breaks in production. Classic. The AI probably set CORS to allow localhost origins only. Update your CORS config to include your production domain:
app.use(cors({
  origin: [
    'http://localhost:3000',
    'https://my-app.example.com'
  ]
}));
The Pre-Flight Check Before You Deploy
Run these eight checks in your project directory before the first deploy. Together they catch almost every failure described above, and they take about ten minutes.
- Grep for localhost. Run
grep -rn "localhost" src/and replace every hit with an environment variable. - Confirm a start script. package.json needs
start, not justdev. Python needs main.py, app.py, or a Procfile. - Pin the Node version. Add an
enginesfield so the host does not silently give you Node 18. - Move every secret out of the code. API keys, database URLs, JWT secrets, SMTP credentials.
- Check .gitignore covers .env. Then check git history, because a committed key stays in history after you delete the file.
- Add your production domain to CORS. And to your auth provider’s redirect allowlist.
- Find where the app writes to disk. Uploads and SQLite files both need persistent storage.
- Build locally first. If
npm run buildfails on your machine, it fails on theirs.
AI tools also routinely skip input validation and leave auth checks incomplete, which no deploy checklist catches. Run a vibe coding security checklist alongside this one before anything handles real user data.
Did You Know?
InstaWP lets you create WordPress staging sites that mirror your production environment, and the same idea applies to any app you are testing before launch. Catching CORS errors, broken environment variables, and missing start scripts in a staging environment is far faster than debugging them on a live URL. On InstaWP managed hosting, staging goes live on the same URL with the same data, so there is no export and import step to get wrong.
Test Before You Ship
One thing most deployment guides do not mention: the fastest way to catch the common mistakes above, hardcoded URLs, CORS errors, and missing environment variables, is to test your app in a clean environment before pushing it to a public URL.
For WordPress-connected apps and WordPress-adjacent tooling, InstaWP gives you instant sandbox environments where you can spin up a clean site, test integrations, and verify your setup without touching production. When the site is ready, the same dashboard runs it on managed WordPress hosting, priced per site and billed by the day. Get started with $25 in credits, unlocked when you add a card.
Keep Reading
- Best AI Coding Tools for WordPress Developers in 2026
- Headless WordPress Frontend – Build and Deploy Guide
- How to Vibe Code a Website
- Account MCP vs Site MCP on InstaWP
Frequently Asked Questions
Can you deploy a vibe-coded app for free?
Yes, for static or frontend-only apps. Vercel, Netlify, and Cloudflare Pages all offer free tiers that handle React SPAs and HTML, CSS, and JS sites. For full-stack apps with a backend in Node.js or Python, free options are limited: Render’s free tier spins down after 15 minutes and Railway gives a one-time $5 credit that expires in 30 days. For persistent full-stack hosting, expect to pay $3 to $7 a month minimum.
How long does it take to deploy an AI-generated app?
It depends on the platform. Static hosting on Vercel or Netlify takes about 60 seconds. PaaS platforms like Railway and Render take 2 to 5 minutes including build time. CLI deploy tools get a full-stack app live in seconds. A manual VPS setup takes 1 to 4 hours for someone doing it the first time.
Do I need Docker to deploy a vibe-coded app?
No. Most hosting platforms, including Vercel, Railway, Render, and InstaPods, detect your stack automatically from package.json or requirements.txt and handle the build. Docker is optional and only useful if you need a custom environment, or you are deploying to a raw VPS and want reproducible builds.
What is the cheapest way to deploy a full-stack app with a database?
For apps using SQLite, which is common with AI-generated code, any platform with persistent file storage works and there is no separate database cost. InstaPods Launch is $3 a month flat, and its Build plan at $7 a month adds MySQL, PostgreSQL, and Redis. Railway’s Hobby plan is $5 a month plus per-second usage. Render’s cheapest full-stack setup, a web service plus managed Postgres, runs $14 a month. A raw VPS from Hetzner costs around $4 a month but requires manual setup.
Why does my SQLite database keep resetting after I deploy?
Because your host has an ephemeral filesystem. Vercel and Netlify rebuild the container on every deploy and discard anything written to disk, so the .db file goes with it. Move the app to a platform with persistent storage such as InstaPods, Railway with a volume, or Render with a mounted disk, or migrate to a hosted Postgres like Supabase or Neon.
Can I deploy a Lovable or Bolt app on my own hosting?
Yes. Export the code and treat it as a normal Vite or Next.js project. Three things need attention: the environment variables were injected by the builder and are not in the export, the build and start scripts may be missing from package.json, and your auth provider still lists the builder’s domain in its allowed redirect URLs.
Can I use WordPress as the backend for my vibe-coded app?
Yes, and it is often the cheapest way to give a client an editor they already understand. Host the WordPress install on managed WordPress hosting, then read from the REST API at /wp-json/wp/v2/ in your React or Next.js frontend. InstaWP runs that side on its own infrastructure with PHP 7.4 to 8.5, SSH and WP-CLI on every plan, Git deployment, one-click staging, a managed WAF, and daily backups on Plus and above, priced per site from $5 a month and billed daily.
Do I need to know Linux to deploy a vibe-coded app?
No, unless you choose a raw VPS. Vercel, Netlify, Cloudflare Pages, Railway, Render, InstaPods, and InstaWP all detect your stack and manage the server for you. A VPS gives you full control for around $4 a month, but budget 1 to 4 hours for the first setup: the Node or Python install, a process manager, an nginx reverse proxy, an SSL certificate, and the firewall.