Enterprises that build WordPress products often run into the same wall: setting up a reliable WordPress demo environment is harder than it should be. Traditional approaches like WordPress multisite, manual server scripts, or fragile WordPress staging setups create friction for both teams and prospects.
This is where InstaDemos steps in. Built on InstaWP’s WordPress sandbox functionalities, InstaDemos makes it simple to launch a fully functional WordPress demo site in seconds.
In this guide, we’ll break down what InstaDemos is, why it matters for enterprises, and how you can use it to create your own WordPress demo sandbox. You’ll also see how leading product companies and agencies already use InstaDemos to accelerate sales, reduce support overhead, and deliver better customer experiences.
Table of Contents
What is InstaDemos?
InstaDemos is InstaWP’s dedicated WordPress product demo site set-up functionality that allows enterprises, product companies, and hosting providers to spin up fully functional WordPress demo sites in seconds. Instead of maintaining complex multisite setups or fragile in-house scripts, InstaDemos uses isolated WordPress sandbox environments that are reliable, scalable, and easy to brand.
At the core of InstaDemos is the Shared Snapshot. A Snapshot is a saved blueprint of your WordPress site, including themes, plugins, content, and settings. When marked as Shared, this snapshot can generate unlimited demo instances, each running independently so that users can test your product without affecting others.
Where it gets powerful for enterprises is in the customization:
- Branding controls: Add your own domain, logo, privacy policy, and CSS for a seamless experience.
- Advanced demo options: Set site lifetime, enable site cloning, auto-login with Magic Links, or redirect users straight into specific admin pages.
- Migration helpers for hosts: Use the IWP Demo Helper or IWP Migration Helper plugins to turn a demo into a live site, with support team hand-off or automated flows.
- Sync and updates: Keep demos fresh by syncing snapshots after every update — no need to rebuild from scratch.
- Lead capture and analytics: Collect emails, integrate with CRMs, and track how demos are used at scale.
For enterprises, this solves two critical problems: scale and control. You can generate thousands of demo environments automatically, while still governing how long they last, where they’re hosted, and how they look.
From the outside, customers only see your branded demo experience. On the backend, your team gets analytics, CRM integration, and sync tools to keep everything consistent.
In other words, InstaDemos is more than a WordPress demo sandbox. For enterprises, it becomes a self-serve growth engine. Product companies use it to shorten evaluation cycles.
Hosting providers use it to show off infrastructure and migrate demos into paid plans. Agencies use it to present client work in secure environments. All of it runs on InstaWP’s instant sandboxing technology, designed to support thousands of demos without the overhead.
Why Enterprises Need InstaDemos
For enterprise teams, the challenge isn’t spinning up one WordPress demo site. It’s creating hundreds or thousands of demo environments that are fast, reliable, and consistent, without draining developer time or breaking workflows.
Traditional approaches like multisite networks or custom scripts simply don’t scale. They’re fragile, hard to brand, and nearly impossible to govern at enterprise standards.
Here’s how InstaDemos closes those gaps.
1. Scalability at Speed
Most enterprise prospects don’t want to “book a demo” and wait. They want to try the product right away. InstaDemos can generate a new WordPress sandbox site in seconds from a preconfigured snapshot.
Whether it’s ten demos for an internal training or ten thousand demos for a global campaign, the infrastructure is already in place to handle it.
2. Security and Governance
Enterprises can’t risk demo environments being misused or left unattended. InstaDemos lets you control site lifetimes (auto-delete after hours, days, or weeks), enable or disable site cloning, and enforce redirect URLs.
Each demo is isolated in its own WordPress sandbox, so there’s no risk of one user breaking another’s environment.
3. Global Reach and Performance
Latency kills demos. If a prospect in Europe has to connect to a server in North America, their first impression is lag. InstaDemos solves this by letting you pick server regions closest to your target audience, ensuring fast load times worldwide. For enterprise teams selling across multiple regions, this improves conversions and user satisfaction.
4. Enterprise Branding
Consistency matters. Every demo can carry your domain, logo, brand colors, and policies. You can even inject custom CSS or add galleries to landing pages. For a prospect, it feels like they’re inside your product experience, not a generic sandbox. For enterprises, it means brand governance is never compromised.
5. Actionable Insights and Lead Capture
A demo is wasted if you don’t know who launched it or how it was used. InstaDemos includes email capture and webhook integrations that let you connect data directly to CRMs like HubSpot or Salesforce. This gives sales teams actionable leads, while marketing teams can analyze usage patterns to refine campaigns.
6. Sales-to-Production Flow
The real enterprise unlock is connecting demos to paid usage. For hosting companies, InstaDemos integrates with the IWP Demo Helper (semi-automated migrations) and IWP Migration Helper (fully automated). That means a customer can start in a demo, explore freely, and with one click move into your production environment, reducing friction in the sales funnel.
This makes InstaDemos not just a WordPress demo sandbox, but a full enterprise demo lifecycle tool: from instant trial, to branded experience, to data capture, to live migration.
The comparison below will help you understand how Insta|Demos are key to success for hosting companies and plugins/theme developers.
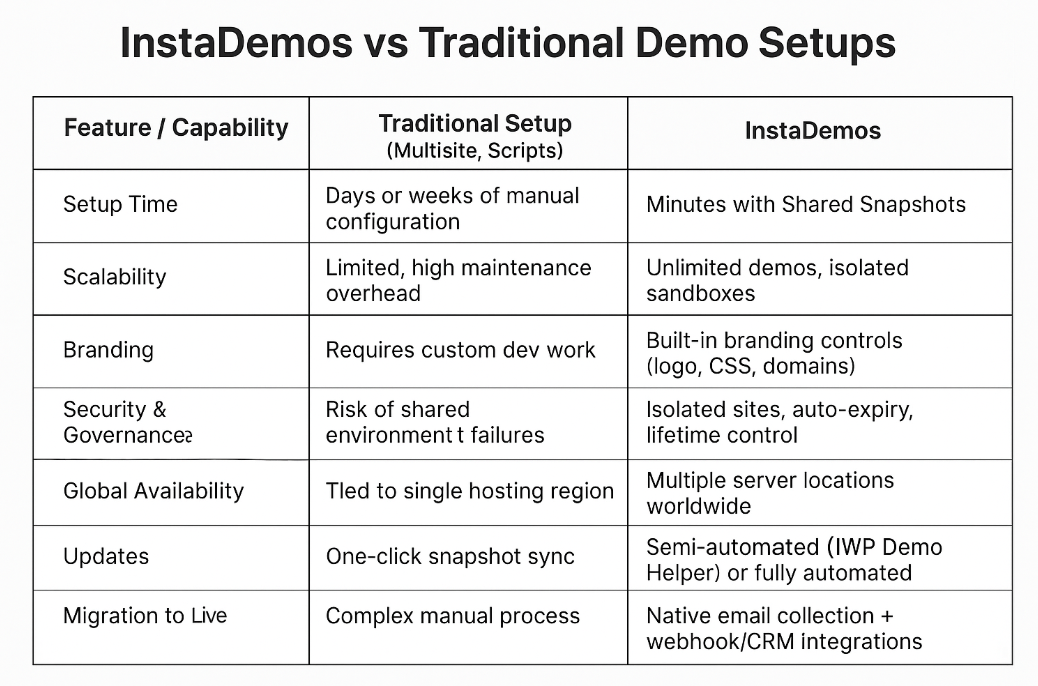
For enterprises, the difference is clear: InstaDemos reduces the cost and complexity of running demos while giving teams powerful tools to engage customers faster and smarter.
How to Create a WordPress Demo Site with InstaDemos
Enterprises usually approach demos from two different angles. Some are plugin and theme developers who need to showcase how their product works inside WordPress. Others are hosting companies that want to let prospects test their infrastructure before committing to a plan. Both face similar challenges, speed, scale, branding, and control, but the execution details vary.
InstaDemos is flexible enough to serve both needs. It uses the same underlying sandbox technology, but gives each type of business specialized options:
- Plugin/Theme developers can build product-focused demos with guided content, branding, and redirects to specific admin pages.
- Hosting companies can build platform demos that include migration helpers, so trial users can seamlessly move from demo to paid hosting environments.
In the sections below, we’ll walk through both scenarios step by step, covering every detail, from site creation and snapshot sharing to advanced customization, URL parameters, and sync workflows. By the end, you’ll see how to create a WordPress demo site tailored to your enterprise use case.
How WordPress Themes/Plugins Developers Can Use InstaDemos
If you’re a freelance WordPress theme/plugin developer or an enterprise selling different kinds of WordPress plugins and themes to the masses, you need InstaDemos to make sure your prospects can view the key features of your products before committing.
Here is how you can get started with the process.
Step 1: Create a New WordPress Site
Every great demo starts with a solid foundation. In InstaWP, that foundation is a new WordPress site created directly from your dashboard. This site will become the base for your plugin or WordPress theme demo, so it’s worth spending a few extra minutes fine-tuning the setup.
Here is how you can get started with creating a site on InstaWP.
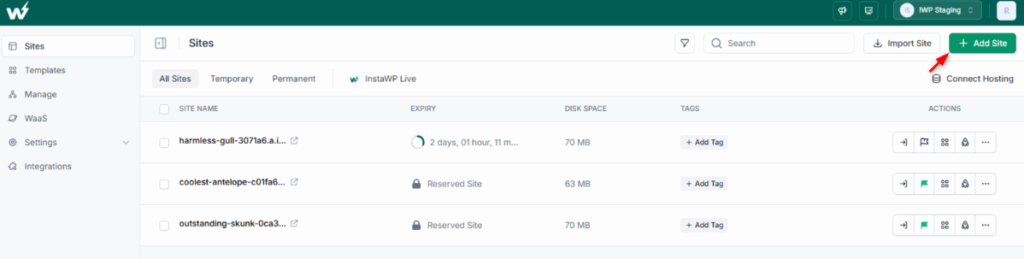
Log in to your InstaWP dashboard and click Add New.
A configuration modal will appear where you can choose how to build a site and what its site parameters are. You can create a site using |AI, from a store, from scratch, and using Snapshots.
Once you have made up your mind in this regard, next you have to decide the site parameters.
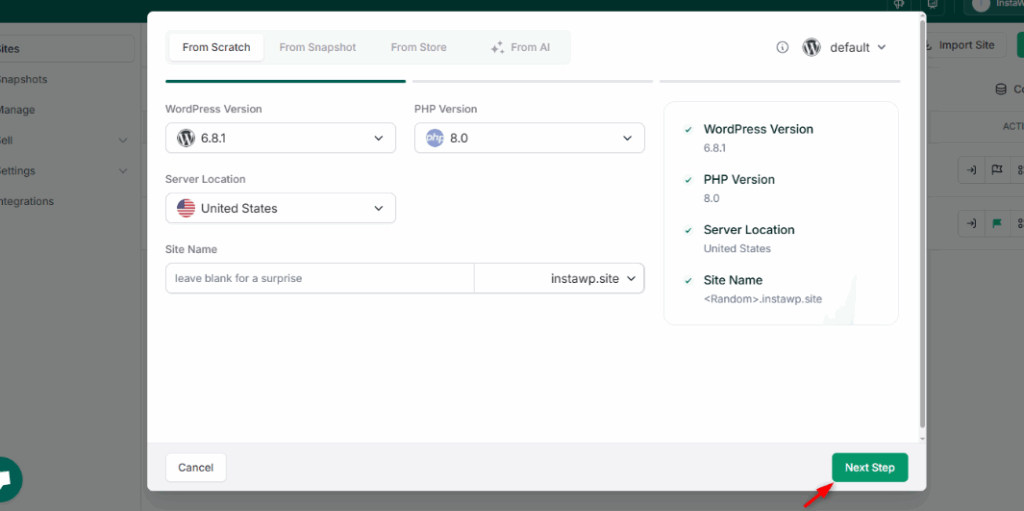
1. Server Location
Always select the data center closest to your target audience. A user in New York testing your plugin on a server in Frankfurt will experience delays that reflect poorly on your product.
Enterprises with global customers often maintain multiple WordPress demo sandboxes across regions (US, EU, Asia) to ensure consistent performance worldwide.
Did you know? According to internal benchmarks, reducing server distance can cut demo load time by 50%, dramatically improving trial engagement.
2. Site Labeling for Enterprise Teams
Use descriptive labels like Plugin-Demo-US or Theme-Sandbox-APAC. Labels make it easier for large sales and engineering teams to instantly identify the right WordPress demo site for a campaign or customer segment.
3. Temporary vs Permanent Sites
For most product trials, a temporary WordPress sandbox is sufficient, since it can be auto-deleted after a fixed time. Enterprise workflows often keep at least one permanent WordPress sandbox as a “master build.” This becomes the blueprint for snapshots that generate unlimited demo sites later.
4. PHP Version and Site Settings
Choose the PHP version your product supports. If you’re showcasing a plugin that requires PHP 8.1, set it here so prospects don’t run into compatibility issues. Add optional site labels or tags to categorize demos by product line, version, or region.
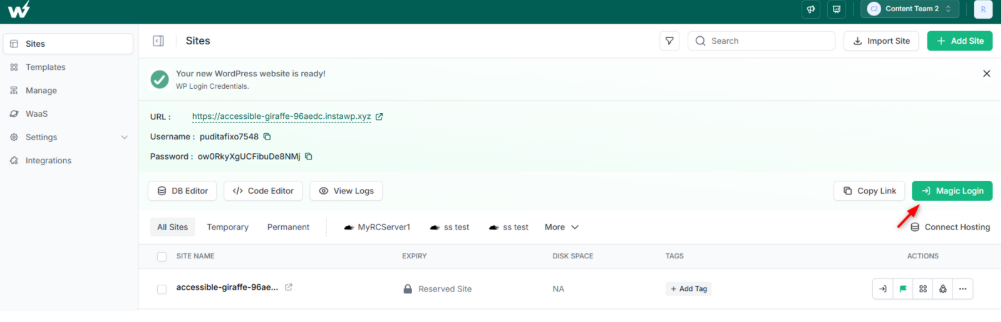
As you do and click on ‘ F, the WordPress demo site will be ready in no time. The “Magic Login” will grant direct access to the WP Admin without using the credentials.
Step 3: Prepare the WordPress Product Demo Environment
Creating a WordPress demo site is only the first step. What convinces enterprise prospects is the experience inside the demo, how quickly they can see your plugin or WordPress theme demo in action.
With InstaWP, you can fully control this environment so users focus on your product’s value, not on setup hurdles.
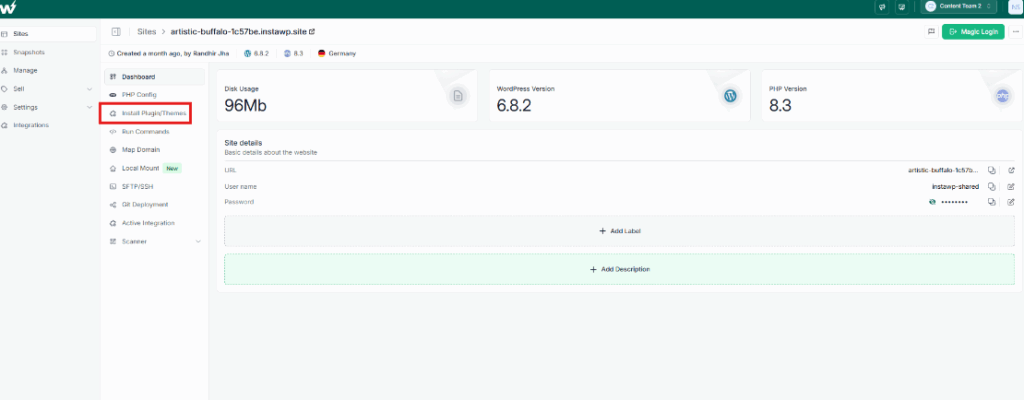
You can upload multiple custom themes and plugins using the .zip files without using the WP Admin with its bulk Plugin/Theme installation feature.
Just click on this option and upload your plugin/themes .zip files. If those are already on the WordPress repository, you can also upload them using the slugs. Enter multiple slugs, separated by commas.
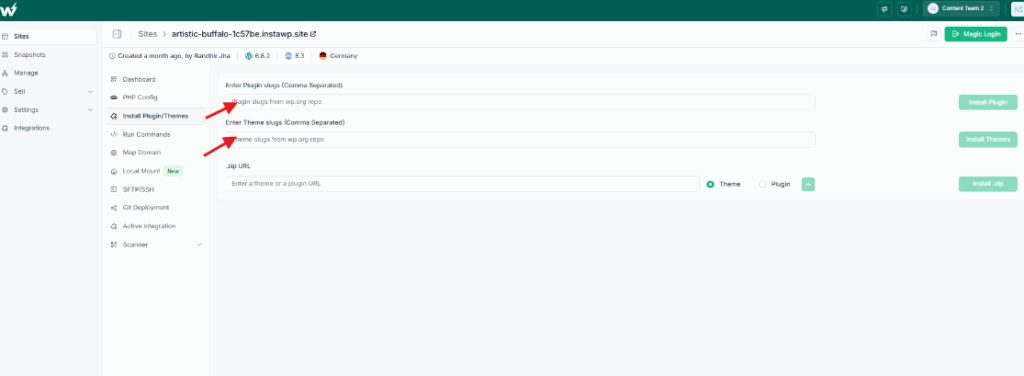
If you’re creating a WordPress theme demo, don’t forget to configure a homepage or landing page to showcase key design elements after installing it.
In addition, populate your WordPress demo content with sample data so users see your plugin or theme in action:
- Posts and pages with placeholder content
- WooCommerce products for e-commerce flows
- Sample forms for form builder plugins
- Dummy user accounts for membership or LMS demos
At last, create a dashboard message for your prospect to guide them inside the WP-Admin with a simple dashboard notice or widget.
You can use a lightweight plugin to display a custom welcome message or add custom code inside your theme’s functions.php. To add the custom code, you can use the built-in Code Editor of InstaWP.
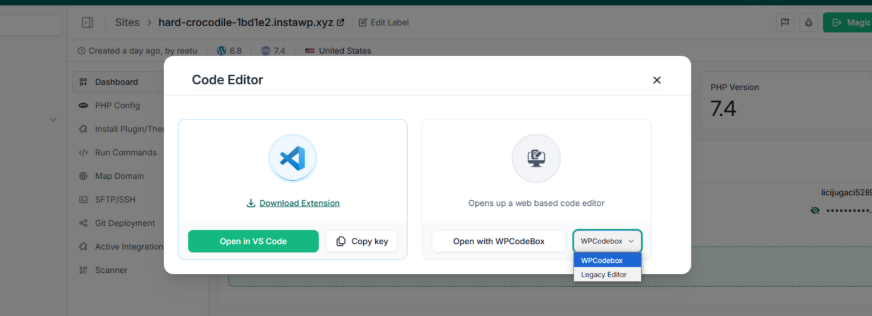
Choose the option of your choice to access the functions.php file and add a welcome message, something like this:
“Welcome! Click on ‘Forms → Add New’ to start building your first form.”
This prevents confusion and reduces support tickets from demo users who don’t know where to start.
Finally, polish the small details that make a demo feel professional:
- Settings > General: Update site title, tagline, and timezone.
- Add your company name so screenshots or recordings from the demo carry your brand.
- Ensure permalinks are set to a clean structure for a more natural experience.
With these steps, your base WordPress demo site is now a branded, guided sandbox environment where prospects can immediately test your plugin or theme.
Step 4: Save, Customize, and Share the Demo Snapshot
Once your product environment is ready, the next step is to convert it into a Shared Snapshot. This is what powers InstaDemos: a blueprint of your demo site that can be launched again and again, each time creating a fresh WordPress sandbox for every prospect.
To do this:
Go to your WordPress demo site and click the Save Template/Snapshot icon.
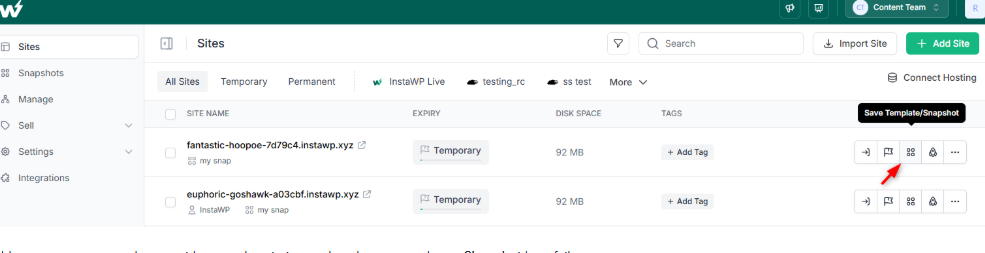
Add a clear Name and Description; both will be visible to users (and even indexed by search engines).
Tick the Shared box so the snapshot is publicly available.
(Optional) Enable Instant Snapshot. These are pre-warmed in InstaWP’s pool, so they load almost instantly.
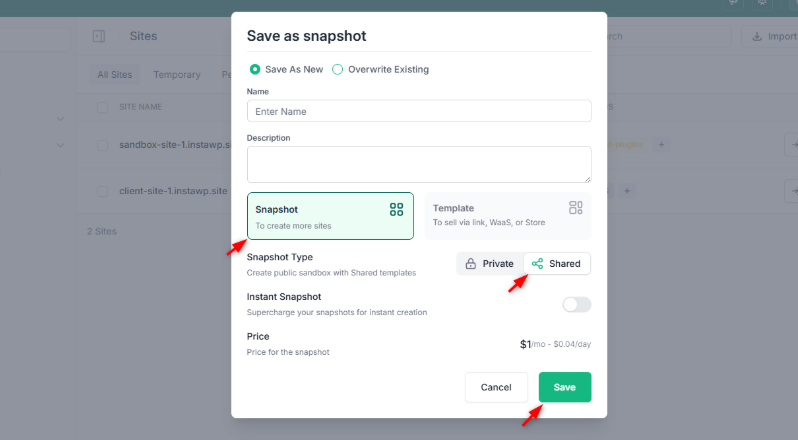
Did you know? With InstaWP’s Instant Snapshots, you can cut demo launch times from 30 seconds to under 2 seconds; a massive improvement that makes prospects more likely to explore your product.
Once saved, your snapshot generates a unique link like: https://app.instawp.com/launch?t=your-snapshot
A professional WordPress demo site shouldn’t look generic. InstaDemos gives you full control over how prospects see your demo before launch.
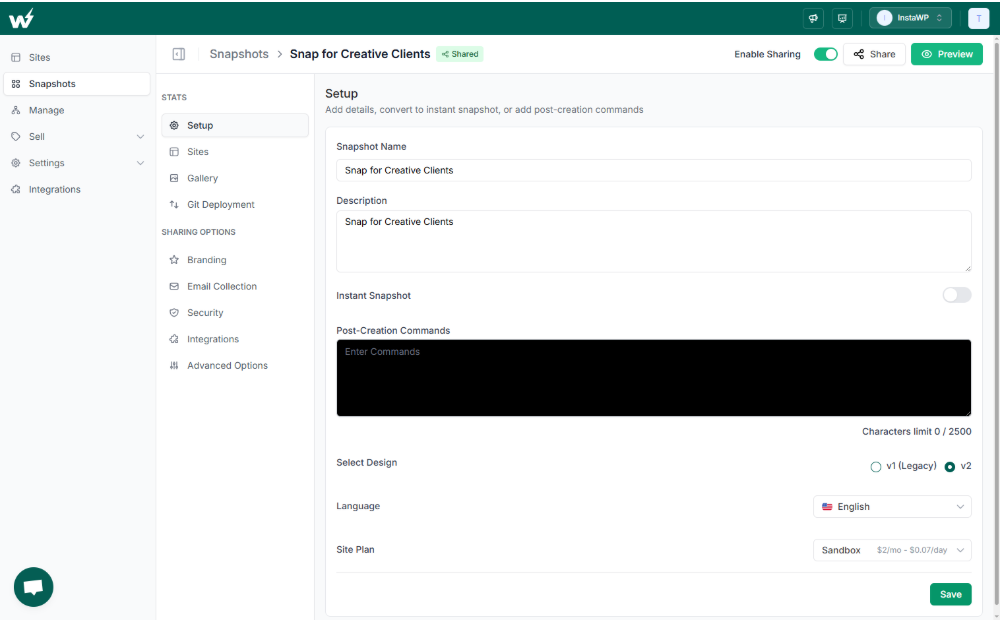
- Setup Tab: Modify snapshot metadata (name, description, categories).
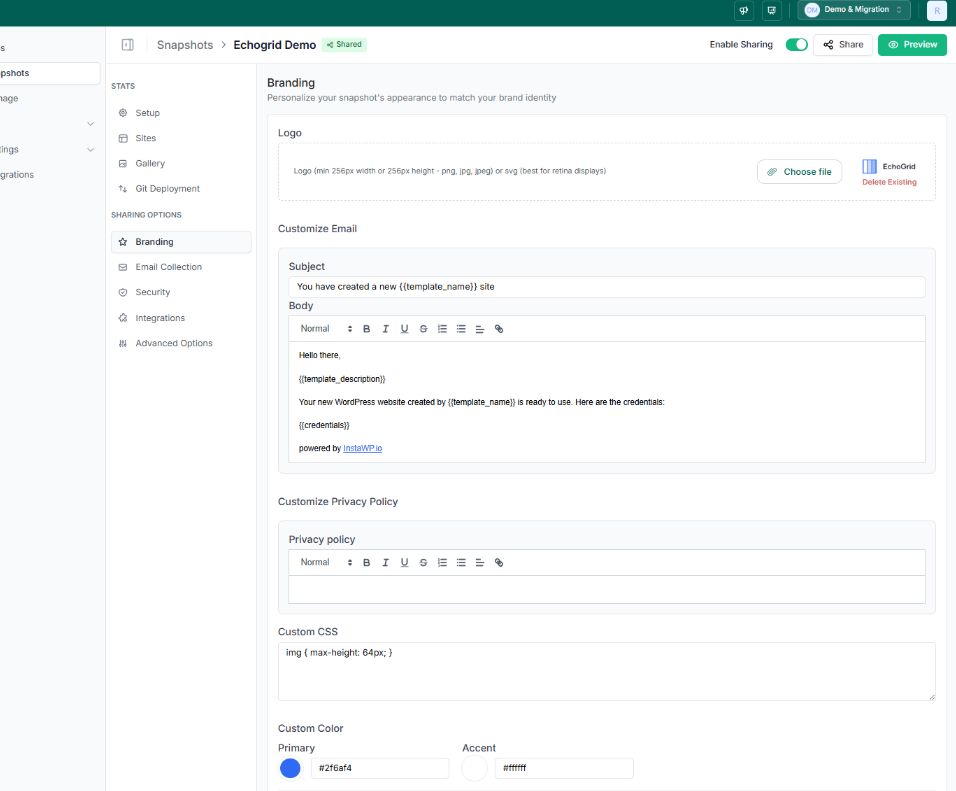
- Branding Tab: Upload logo, set brand colors, add privacy policy, and even inject custom CSS for a seamless enterprise look.
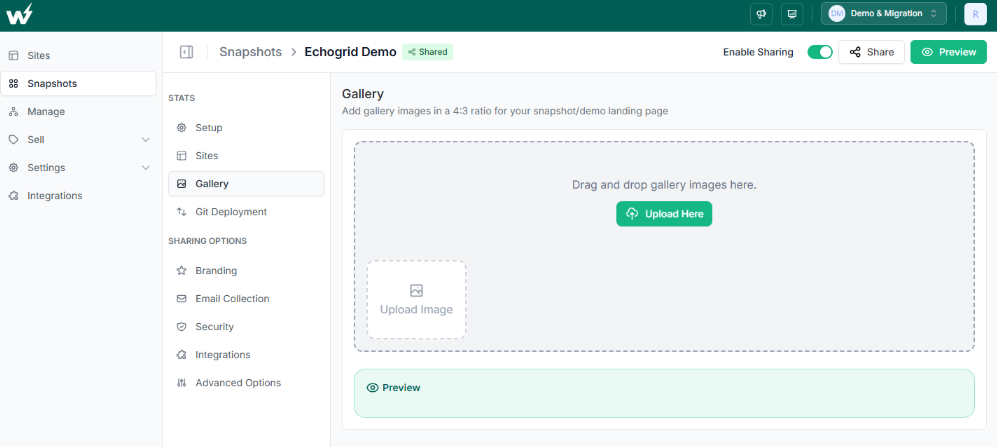
- Gallery Tab: Add product screenshots or theme previews, so users know what to expect.
- Email Templates: Customize confirmation or lead-capture emails with your brand voice.
Learn more about how to edit the Snapshots on InstaWP.
After the full customization, your WordPress product demo site will look like this.
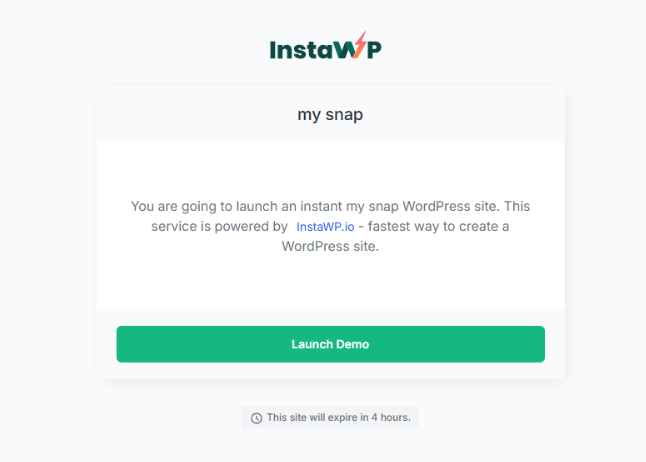
From here, your prospects will click on the Launch Demo option, and they get to enter their email address.
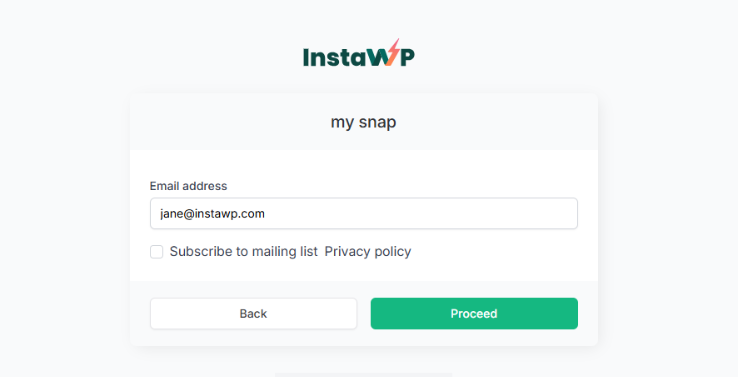
As they click on ‘Proceed’, their demo account will be activated. They only need to click on ‘Magic Login’ to access the demo website.
? Pro Tip: Enterprises can white-label their InstaDemos using custom domains. Instead of sending users to an app.instawp.com link, you can deliver demos under your own brand domain, building trust from the first click.
Read about how to map a domain on InstaWP.
Enterprises often need more control than a simple one-time demo. InstaDemos supports advanced options to match those needs:
- Site Lifetime: Automatically delete demo sites after a set time (e.g., 2 hours, 7 days).
- Extend Lifetime: Allow users to extend trials themselves via webhook links.
- Enable Cloning: Let users duplicate the demo if they want to test variations.
- Auto-Login: Skip the credential screen and drop users directly into the wp-admin.
- Redirect URL: Send users to a specific page (like your plugin’s settings screen) after login, instead of the WordPress dashboard.
? Did you know? Auto-login and redirect URLs are two of the most-used InstaWP demo functions. For example, a plugin company can send prospects directly into its setup wizard, while a theme company can drop users inside the Customizer page, eliminating guesswork.
InstaDemos also supports URL parameters that customize the experience further:
- Redirect to Specific Pages: &redir=/wp-admin/pluginpage.php → sends users straight to your plugin page.
- WooCommerce Order Pages: &post_cmd_var[post]=15403 → opens a specific order edit page.
- Custom Settings Pages: &redir=/wp-admin/options-general.php?page=custom-settings.
- Multiple Parameters: Pass values like post IDs, meta keys, or custom query strings to pre-load specific states.
? Pro Tip: Smart enterprises use URL parameters to create a role-based WordPress demo site. For example, redirect marketers to the analytics dashboard, redirect developers to code settings, and redirect admins to configuration pages, all from the same snapshot.
With InstaWP’s demo functionality, your WordPress demo sandbox is live, branded, and optimized. Users can launch it instantly, explore your plugin or theme without friction, and you can capture every interaction for insights and conversions.
How Hosting Companies Can Use InstaDemos
For hosting providers, the hardest part of winning new customers is giving them a safe, frictionless way to try the platform. A static sales page or feature list rarely convinces a technical buyer. They want to launch a site, test performance, and see how migration works before they commit.
Traditionally, this meant building custom trial environments or running multisite setups that were slow, fragile, and expensive to maintain. These demos often broke, left users stuck in shared environments, or required manual intervention to move a test site into production.
InstaDemos changes that. With its sandbox-powered approach, hosting companies can spin up isolated WordPress demo sites that mirror their production environment. Prospects can explore the hosting stack instantly, while providers retain full control over branding, trial duration, and the migration flow into paid plans.
Step 1: Create a New Site for Hosting Demos
Unlike plugin/theme demos, hosting companies need to pay special attention to performance, server configuration, and migration readiness, because these WordPress demos don’t just show features; they represent the backbone of your hosting infrastructure.
Follow the steps that we’ve already explained in step 1 of the “How WordPress Themes/Plugins Developers Can Use InstaDemos” section.
Step 2: Setting Up the Hosting Demo
Once the base WordPress demo site is created, hosting providers need to configure it so prospects can actually explore the hosting platform, test workflows, and smoothly migrate into a paid plan when ready. Unlike plugin or theme demos, hosting demos are about proving performance, reliability, and ease of onboarding.
Add your preferred default theme (Astra, Hello Elementor, or your custom starter). Install any essential plugins you want to showcase as part of your hosting stack. You can use the Install plugin/themes of your choice using their slugs or .zip file.
You need to install some hosting-specific options, such as IWP Demo Helper & IWP Migration Helper.
Once you’ve installed the IWP Demo Helper on your WordPress demo site,
Adds a Migrate button inside the demo site’s WP-Admin panel.
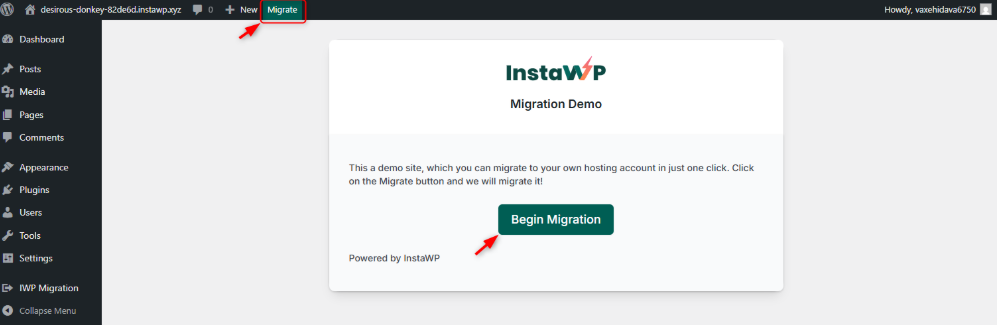
When a user clicks it, a migration request is sent to your support team. Your team can then complete the process using InstaWP’s migration tools or your own system.
This plugin is useful for semi-automated migrations where you want control before moving a trial site into production.
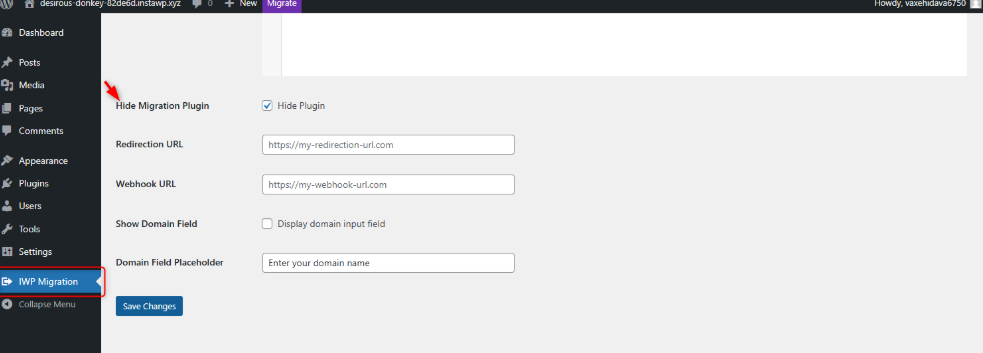
? Pro Tip: Hosting providers can hide the Demo Helper plugin from end users after setup. The Migrate button stays visible, but the plugin UI disappears, keeping the demo clean.
IWP Migration Helper is designed for fully automated migrations. It detects the WordPress demo site based on the user’s email or a config variable.
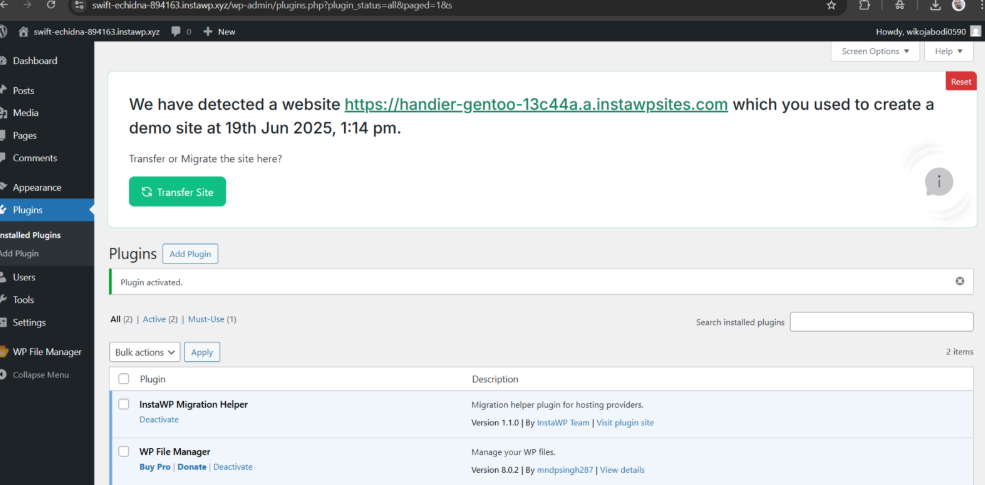
Install it on your WordPress hosting demo site and click on the ‘Transfer’ option so that it can migrate the demo site’s data to a live site.
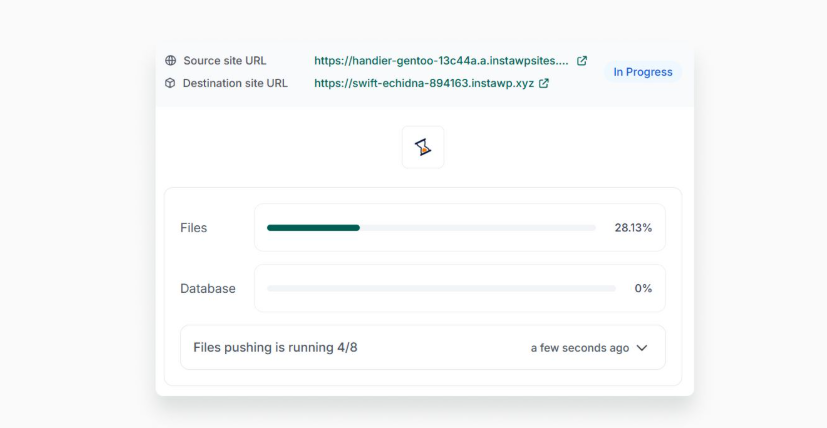
? Did you know? With Migration Helper, hosting demos can flow directly into your sales funnel:
- User explores demo site.
- User signs up for hosting (chooses domain, plan, etc.).
- Migration Helper auto-transfers the demo into their live account.
This bridges the gap between “try it free” and “go live” without needing human intervention.
Once the migration is complete, you’ll have this message on your screen.
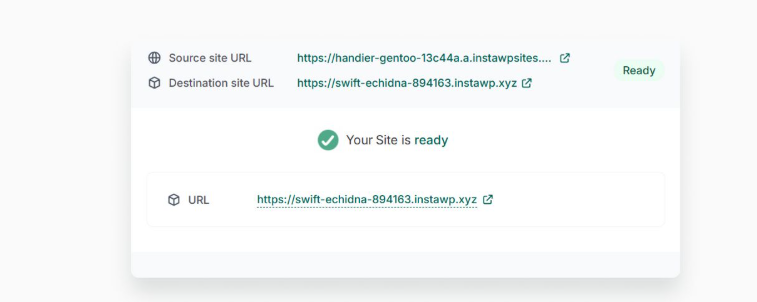
Preconfigure settings like permalinks, timezone, and site title for a professional feel. Also, creating a custom landing page can explain how to explore the hosting demo. Include clear CTAs like “Test performance by installing a plugin” or “Try migrating this site to production.”
This reduces guesswork and keeps prospects focused on what makes your hosting unique.
Did you know? Hosting companies using InstaDemos often add small touches like preloaded analytics dashboards or speed test widgets, so users instantly see performance benefits.
Optional: Use Your Own Domain
Hosting providers can go one step further by mapping demos to a white-labeled suffix domain, such as demo.yourhost.com. This builds brand trust and makes the entire flow look like it’s running on your infrastructure.
With your site configured, landing page ready, and migration plugins installed, you now have a WordPress demo sandbox that not only shows off your hosting but also funnels prospects into live environments seamlessly.
Step 3: Save Your Hosting Demo as a Shared Snapshot
Once your hosting demo environment is configured, the next step is to package it into a Shared Snapshot. This snapshot becomes the reusable blueprint for launching unlimited WordPress demo sites, each isolated in its own sandbox. For hosting companies, snapshots are the engine that powers free trials at scale.
Go to the Staging page of your demo site and click on Save as Template/Snapshot.
Add a Name (clear and branded, e.g., “Starter Hosting Demo”). Provide a Description, keep it professional and customer-friendly, since this text is visible on the demo landing page.
Tick Shared to make it public. (Optional) Select Instant Snapshot for faster load times.
? Did you know? Hosting companies that switch to Instant Snapshots report up to 40% higher trial engagement. A near-instant load makes users more likely to explore the demo instead of abandoning it.
With InstaDemos, the landing page is more than just a “launch screen”; it’s your first impression. You can customize it for brand alignment and enterprise-grade presentation.
- Setup: Change snapshot metadata, categories, and visibility settings.
- Branding: Add your logo, company colors, privacy policy, and even inject custom CSS.
- Gallery: Showcase server dashboards, speed test screenshots, or customer logos to build confidence.
- Email Templates: Personalize trial confirmation emails with your own branding and Reply-To addresses.
? Pro Tip: White-label the demo domain so that your users see demo.yourhost.com/launch?t=hosting-demo instead of an InstaWP link. This makes the trial feel fully integrated into your hosting ecosystem.
Step 4: Customize Your Hosting Demo Site
A hosting demo isn’t just about spinning up a WordPress demo site; it’s about delivering an experience that feels professional, branded, and ready to convert prospects into paying customers. InstaDemos gives hosting companies multiple layers of customization so every trial looks like it’s running directly on your infrastructure.
1. Setup Customization
Edit the name, description, and snapshot metadata. Organize demos into categories for different use cases (e.g., Managed Hosting Demo, WooCommerce Optimized Demo).
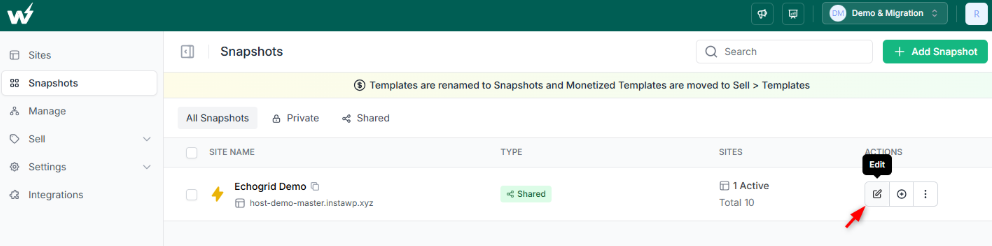
Add precise descriptions that explain what the demo showcases; these are visible on the landing page and can even get indexed by search engines.
? Pro Tip: Keep demo names simple and brand-consistent, like Starter Hosting Demo or Enterprise WordPress Sandbox, so sales teams and prospects know exactly what to expect.
Next, you need to edit the branding of your hosting WordPress demo site. Add your company logo so the demo is instantly recognizable. Set brand colors and custom CSS to make the demo landing page align with your enterprise identity. Include your privacy policy for compliance.
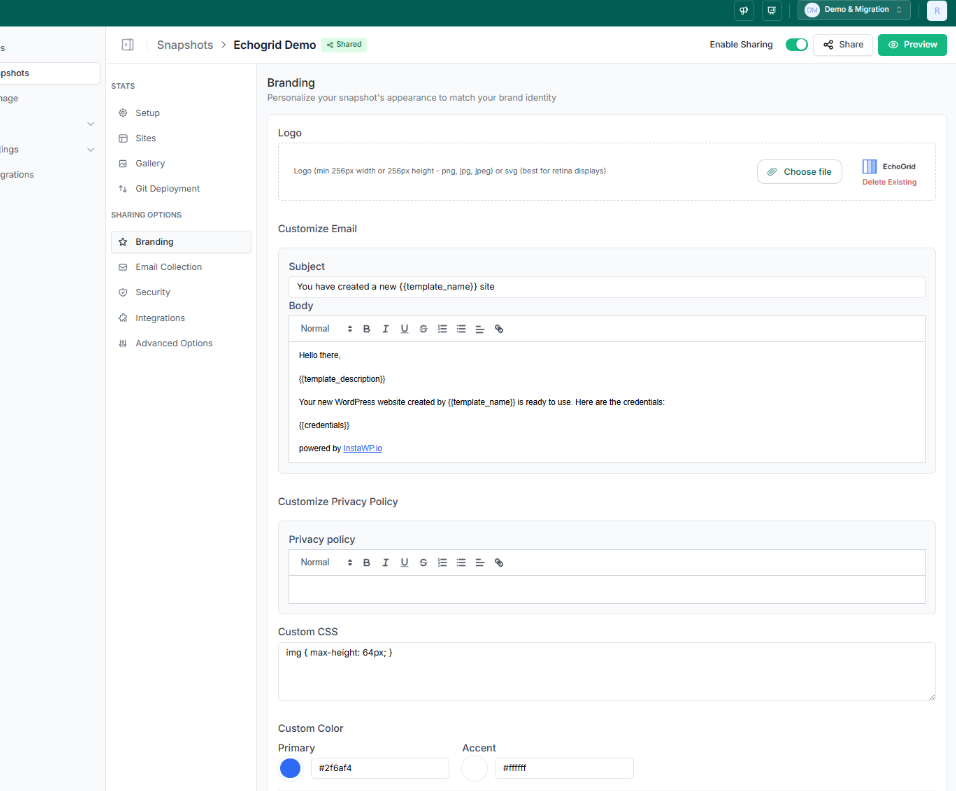
Customize email templates with your tone and Reply-To fields, so replies go directly to your sales or support team.
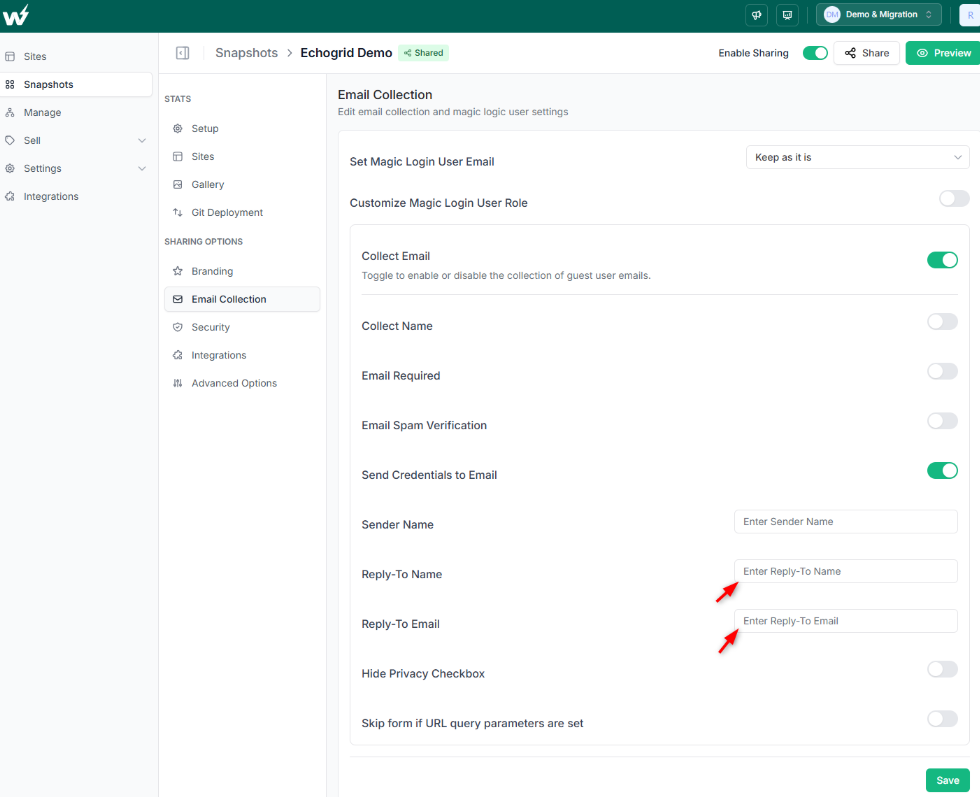
? Did you know? Hosting companies can white-label InstaDemos with their own domain (e.g., demo.yourhost.com). This builds trust by keeping users in your ecosystem.
Upload product screenshots, performance benchmarks, or infrastructure diagrams. Use images to show real-world speed tests, dashboards, or customer success stories.
Prospects see these visuals before launching the demo, which primes them for what they’ll experience inside the WordPress demo sandbox.
? Pro Tip: Redirect URLs are powerful in hosting demos. For example, you can send developers straight to Tools → Site Health to test stability, while sending business users to a sample WooCommerce store to see performance.
? Did you know? Enterprises that personalize demo confirmation emails (with clear branding and Reply-To fields) report higher engagement after trials, since prospects know exactly who to reply to.
The final landing page of your hosting demo site will look like this:
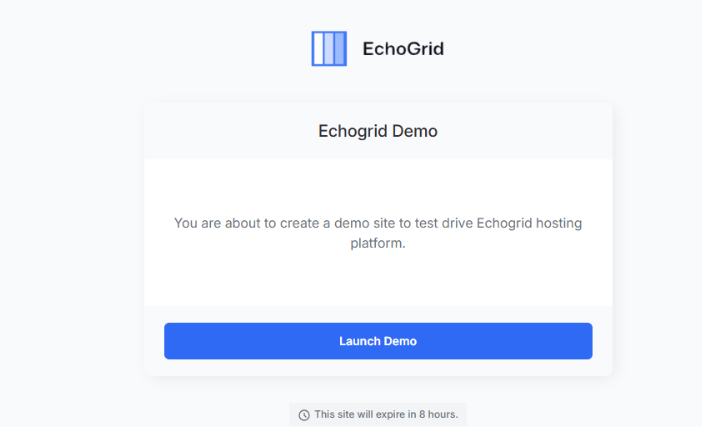
Your prospects will have to click on Launch Demo, enter their email address, and they will get access to the WP Admin of the WordPress demo website.
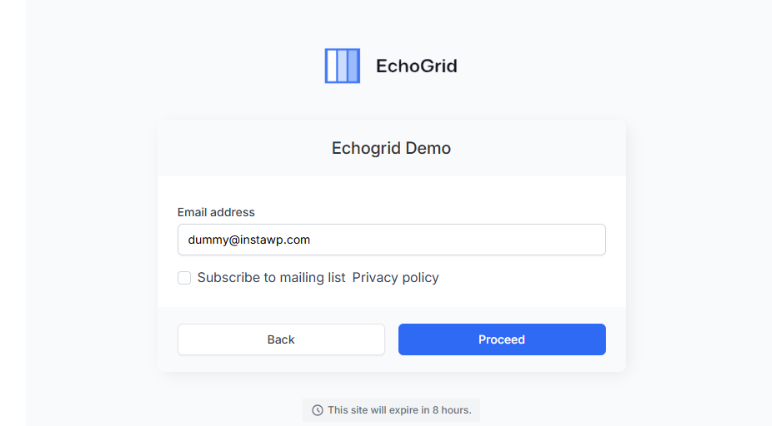
Step 5: Keep Hosting Demos Updated and Sync to Snapshots
One of the biggest challenges with hosting demos is maintenance. A demo that looks outdated, runs on an old PHP version, or is missing your latest features will hurt credibility. InstaDemos solves this with sync and lifecycle management tools that make updates simple and repeatable.
- Go to the Sites page in your InstaWP dashboard.
- Find your demo site and click the horizontal ellipsis (…) menu.
- Select Tools → Code Editor.
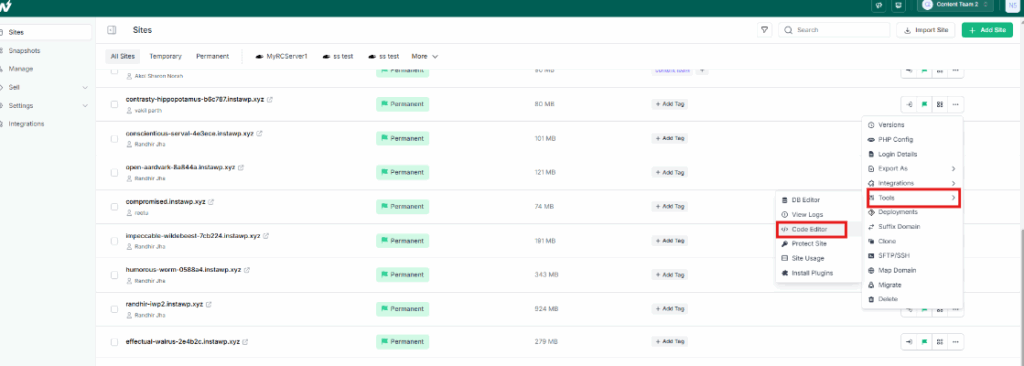
- Choose your preferred editor and update theme files, plugin configurations, or server settings directly.
- Save changes and reload the demo site to verify updates.
? Did you know? Many hosting providers preload caching, security, or performance plugins into their demo environments. By updating them in one master site, you can roll out new features across every trial in minutes.
Once updates are made on your demo master site, you’ll want all future trials to reflect these changes. That’s where syncing comes in.
- Go to the Snapshots page.
- Find your shared hosting demo snapshot.
- Click the vertical ellipsis (…) menu.
- Choose Sync from Site.
- A modal window appears — click Sync Now.
This aligns the snapshot blueprint with the latest version of your demo site. From that point forward, every new WordPress demo sandbox launched will use the updated setup.
? Pro Tip: Use scheduled auto-sync if you frequently update your hosting stack (e.g., weekly security patches). This ensures demos never fall out of date without manual work.
Conclusion: InstaDemos as the Enterprise Standard for WordPress Demos
Whether you’re a plugin or theme developer building a guided WordPress theme demo, or a hosting company offering full trial sandboxes, InstaDemos gives you the tools to spin up polished, branded, and secure WordPress demo sites in seconds.
Shared Snapshots, Instant Snapshots, Magic Login, Redirect URLs, and migration helpers all work together to make the demo experience smooth for prospects and easy for your team to maintain.
For enterprises, the value goes beyond simple trials. With InstaDemos, you can capture leads, integrate with your CRM, control lifetimes, and sync updates across thousands of WordPress demo sandboxes worldwide. That means faster sales cycles, lower support costs, and demos that always reflect the best version of your product or platform.
? Ready to create your first WordPress demo site? Start building with InstaDemos today and give your prospects the experience they’ve been waiting for.
Wondering how InstaDemos work? Request a demo today.
FAQs
1. What is InstaDemos in WordPress?
InstaDemos is a feature inside InstaWP that lets you create instant WordPress demo sites or sandboxes. Each demo is isolated, branded, and customizable, making it ideal for enterprises, plugin/theme developers, and hosting providers.
2. How is a WordPress demo site different from a sandbox?
A WordPress demo site is the front-facing trial a user interacts with, while a WordPress sandbox is the underlying isolated environment. InstaDemos connects both, giving each prospect their own sandbox demo site without interfering with others.
3. Can I create a WordPress theme demo with InstaDemos?
Yes. Theme developers can set up a WordPress theme demo that showcases multiple layouts, sample content, and customizer settings. Using Shared Snapshots, you can share a link that generates a fresh demo site for every prospect.
4. How do hosting companies use InstaDemos?
Hosting providers use InstaDemos to let users test their infrastructure. With tools like IWP Demo Helper and IWP Migration Helper, a trial WordPress demo sandbox can migrate directly into a paid hosting account, streamlining the conversion process.
5. Is there a limit on how many demo sites can be created?
Yes. Demo sites created from Shared Snapshots count against your active site limits in InstaWP. Enterprises typically choose higher plans to support large demo volumes across regions.
6. How secure are InstaDemos for enterprise use?
Every WordPress demo sandbox is isolated, with site lifetimes and auto-deletion rules you control. This ensures users cannot affect each other’s demos, and sensitive environments are automatically cleaned up.
7. Can I brand InstaDemos for my enterprise?
Absolutely. You can add your own logo, custom domain, brand colors, and CSS to ensure every demo reflects your enterprise identity.
8. How do I keep WordPress demo sites updated?
Update your master demo site in InstaWP, then use the Sync to Snapshot feature. This ensures that every new create WordPress demo site launch reflects the latest updates without rebuilding from scratch.