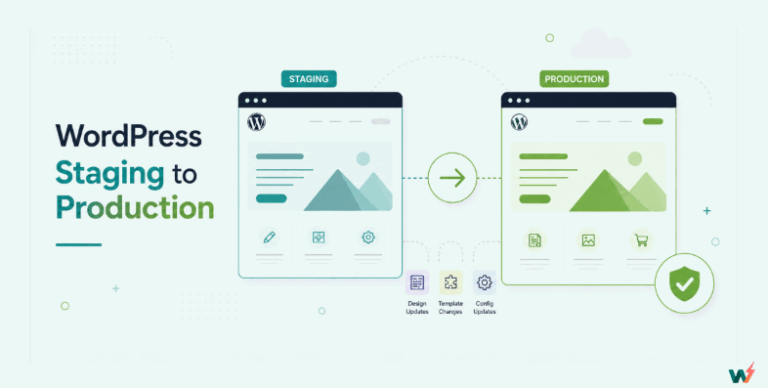
Obviously, we are not talking about the people hosting with InstaWP, as this WordPress hosting service allocates separate CPUs to your live site (and utilizes separate servers for staging). 🙂
In many cases hosting companies make available the feature to create staging of your live site, albeit with existential drawbacks that could prove fatal to your development flow and productivity. These drawbacks are why you should not create staging with your current hosting provider.
There’s a better and more efficient way of creating staging by using a dedicated staging environment with all the features that encapsulate testing, staging WordPress plugins, troubleshooting, and so much more.
InstaWP, with its dedicated staging toolset, is the first among many tools that get the job done. Let us look at how this works.
Table of Contents
What is a WordPress Staging Site
A WordPress staging site is an exact copy of a live site that is not visible to the public. It can be created from either an existing live site or from scratch in a safe environment.
This staging environment, as it’s known, allows you to safely test every part of your WordPress site, like plugins, themes, and functions.
By this, you can avoid conflicts and downtime.
Drawbacks of Staging with Your Current Hosting Provider
No matter the hosting provider that you currently have, there are known drawbacks to staging on those platforms.
To begin with, unlike InstaWP hosting (WordPress hosting service), these platforms do not give you separate space for hosting and staging.
Here are some that you should critically consider.
Staging Site occupies Space
Storage space is the defining characteristic of WordPress hosting. Consider storage space in WordPress hosting as where all your website files, codes, plugins, themes, photos, videos, database, and everything else you add or delete occupies.
When you create a staging site, you essentially duplicate all these files. This duplication is going to require that your hosting plan has a large storage, you may encounter issues when attempting to create a staging if your server storage is limited.
Affects your Site’s Performance
If your staging is taking so much of the space that your live website needs to smoothly perform, it becomes a problem. Below are a couple of things that happened:
1. Both the live website and the staging environment share the same server resources, including storage space, processing power, and memory means competition. This means slower loading times, and overall slower performance.
2. Storage Capacity Limits: When the server’s storage capacity is near or at its limit, it can struggle to handle incoming requests, process data, and serve website content efficiently.
3. Delays in Backup and Restore: If there needs to be more storage available to create backups or store backup data, it can lead to delays in backup processes and longer recovery times in the event of a website issue or data loss.
Risk of Impacting Your Live Site Fatally
You risk fatally impacting your live site when you rely on a hosting provider for your staging site creation and needs. For instance, if there’s an issue in the project, like a faulty piece of code causing an endless loop, it could bring down the entire server, thus affecting the live site too.
Vulnerabilities
Creating a staging environment directly within your current hosting infrastructure poses significant risks, especially concerning security vulnerabilities. If a hacker were to deploy sophisticated malware like a worm or a rootkit on your server, it could clandestinely spread through the hardware, infecting other sites and projects hosted on the same server.
Inability to Rollback Attacks and Damages
This is an important aspect to consider because once the staging site and its associated backups become compromised, the situation escalates rapidly.
With both the staging site, backups and live site compromised, your ability to mitigate the damage and recover your website diminishes substantially. You may find yourself with limited options for repair and recovery, as the compromised environment could potentially be impossible
Everyday Human Errors
In most cases, your development process will have one or two errors that you may not have been able to catch instantly. What happens when your WordPress staging site is in the same environment as your live site provided by your current hosting?
1. Testing Impact on Live Site
If these errors affect critical functionalities or configurations, they could inadvertently impact the live site when changes are pushed from staging to production.
2. Configuration Mishaps
Human errors can also occur in the configuration settings of the staging environment. For example, misconfigurations in plugins, server settings, or security configurations could inadvertently affect the live site’s performance, security, or functionality.
3. Data Integrity Risks
Staging sites often require access to the same database as the live site for testing purposes. If developers or administrators inadvertently make changes to the staging database that impact data integrity or disrupt the live site’s functionality, it can result in unintended consequences for users and business operations.
4. Changes Rollback Challenges
In the event of an error or issue arising from changes made on the staging site, rolling back those changes can become more complex when the staging and live environments share the same infrastructure. A rollback may inadvertently revert changes on the live site that were intended to remain unaffected.
WordPress Staging Best Practices
Let us look at some of the WordPress staging best practices.
1. Use Staging Environment
Rather than relying on your hosting and messing up your live site, create your staging site in a staging environment.
A staging environment serves as a duplicate version of your live website, providing a safe space to test alterations without impacting the live site. Here, you can experiment with updates to plugins or themes, ensuring that any changes are thoroughly vetted before going live.
2. Update Staging Site Regularly
Regularly updating your staging site is crucial for maintaining its functionality and security within your staging environment.
This involves keeping all components of your staging site up to date, including themes, plugins, and any other extensions or customizations. This helps identify any compatibility issues or conflicts that may arise when updates are eventually applied to the live site.
3. Test All Changes Made
It is paramount that you test every change you make in your staging site before going live. Remember that developers often release updates to address vulnerabilities or bugs. These vulnerabilities may be associated with themes and plugins.
4. Use a Secured Staging Environment
You want to be sure that the staging environment you are using enables strong passwords with restrictions to your data along with other security options.
5. The Staging Site Must Be Excluded From the Search Engine
Excluding your staging site from search engines is essential to prevent it from being indexed and appearing in search results. This ensures that your testing environment remains private and inaccessible to users who might stumble upon it through search queries.
By configuring your staging site to be excluded from search engine indexing, you can maintain confidentiality and prevent any potential confusion or disruption to your live website’s search presence.
6. Ensure Continuous Syncing of Staging Site To Live Site
Regularly syncing changes from your staging site to your live site is crucial for ensuring that any updates, modifications, or improvements made in the staging environment are accurately reflected on the live website.
This process involves carefully transferring and implementing changes from the staging environment to the live environment to maintain consistency and coherence across both versions of the site.
How to Create a Staging with InstaWP?
Staging environments are important for WordPress site development and maintenance. Creating a staging with InstaWP is straightforward. With a few clicks, you are there.
Step 1: Log into your InstaWP dashboard. If you don’t have an account yet, go ahead and sign up for an account.
So let’s check out how to create staging with InstaWP:
Step 2: After signing up or logging in, you will see your user dashboard that looks like this:
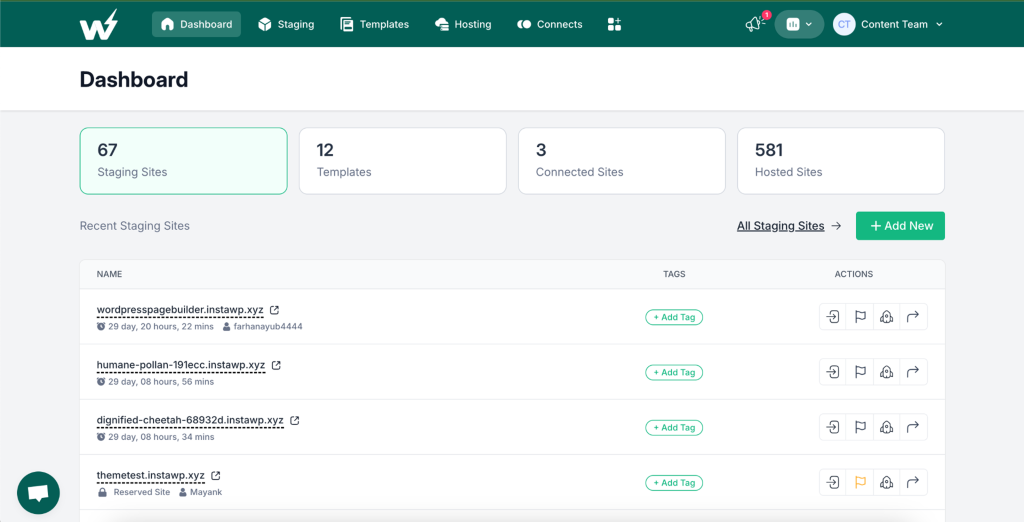
The user dashboard is where you can refer to and navigate the numerous features provided by InstaWP for efficient WordPress site staging to live.
Step 3: Click on the Add New button to start the simple process of creating a staging site from scratch. Mind you, this is one of the 2 ways in which you can create a WordPress staging site with InstaWP.
Let us continue to the next step:
Step 4: When you click on the Add New button it will generate a pop-up component with a number of settings that you can use in creating your staging site. But here are 3 great options to start with:
Option1
You can create from scratch. The idea is that you will have 100% control and will be able to choose which plugins or themes to install.
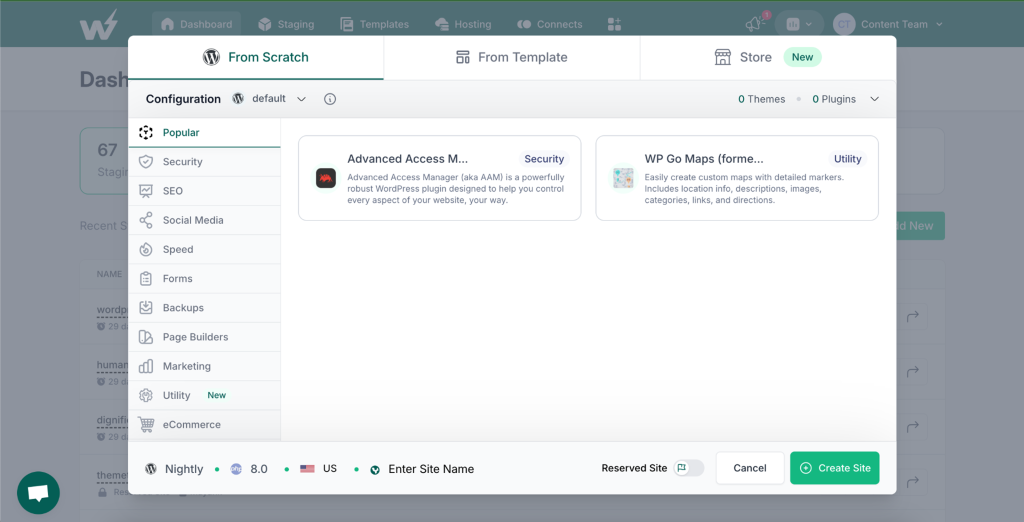
Don’t be shy about exploring all the options you have. The good thing about InstaWP is that you can create as many staging sites as you want.
Option 2: Create From a template
Creating from a template will save you some time. Go ahead and choose the option that says From Template.
Select one of the templates and click on the Create Site button. In a few seconds, your staging site will be created.
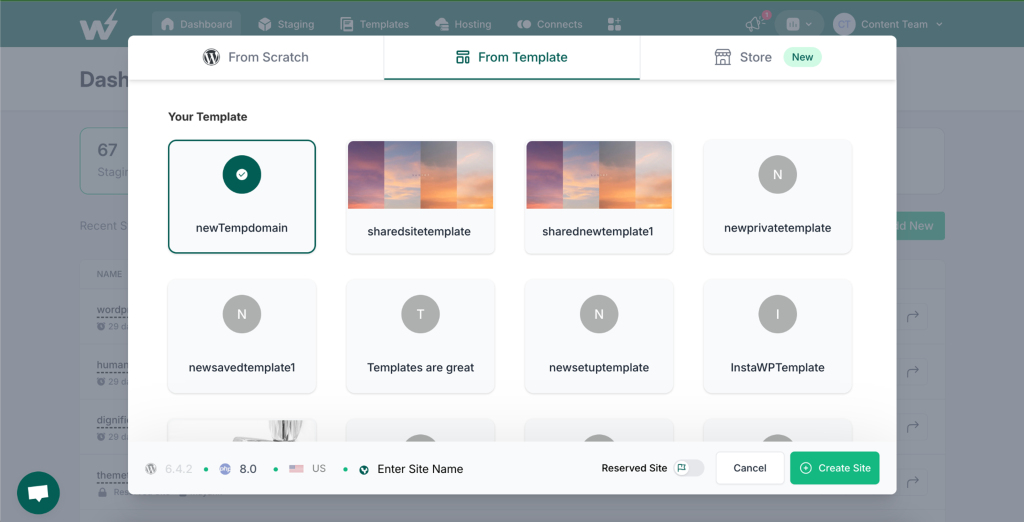
Option 3: Create From Store
The InstaWP store consists of expert prebuilt templates of different niches. Find the one that best suits your needs and install it.
Click on the Store menu option. To save some time, apply a filter by Page Builder and Category.
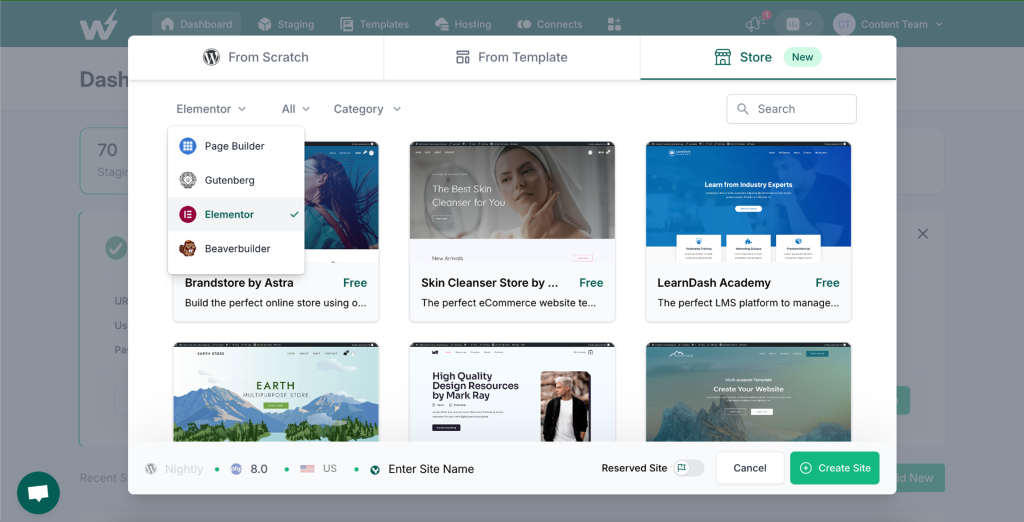
You can preview any of the templates. To do that, hover over the template, and you will see a preview button.
Click on the Preview button to see the template build and how your website will look and feel if you decide to use that template. Remember you can make changes to the template from your WordPress dashboard.
Select your choice template, and click on the Create Site button. Watch your staging site with pre-built components and pre-populated data come to live.
Create Staging Of Your Live Site
Another exciting way of creating a staging In InstaWP is to create a staging of your live site from your WordPress dashboard with the InstaWP ConnectPlugin.
Here are the steps:
Step 1: Install InstaWP’s staging plugin on your website.
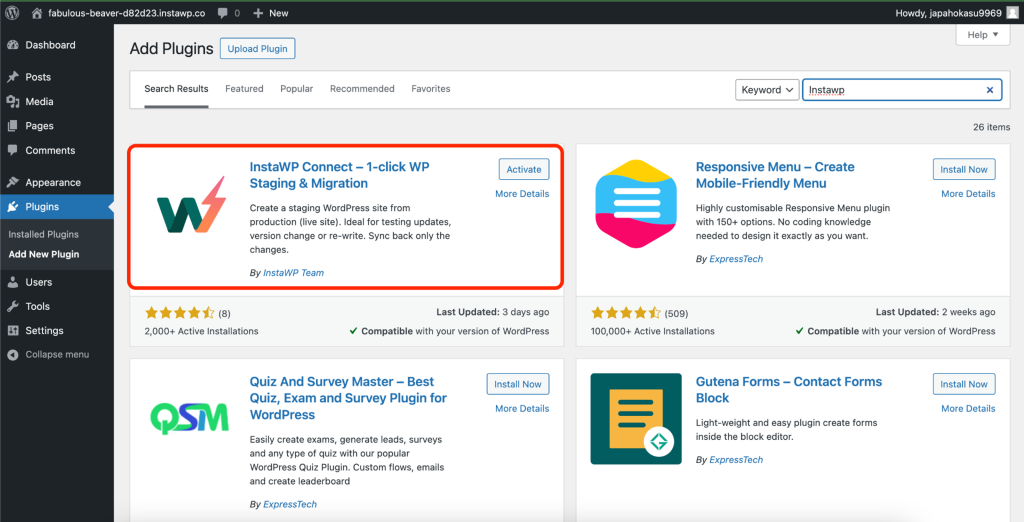
Step 2: Activate the plugin
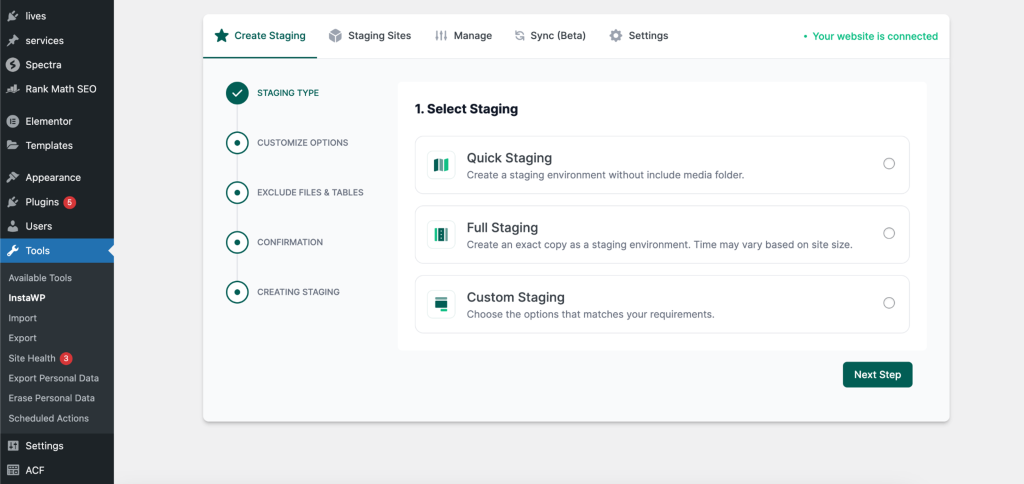
Step 3: Click on Create Staging. That will take you to a page where you must connect your live site to InstaWP if you haven’t already done that.
Step 4: Click on the Connect button. This will attempt a link to your InstaWP. Click the Approve button, and your site will connect and redirect you back to your live site WordPress
dashboard.
Step 5: Back in your dashboard, click the Create Staging Site Button.
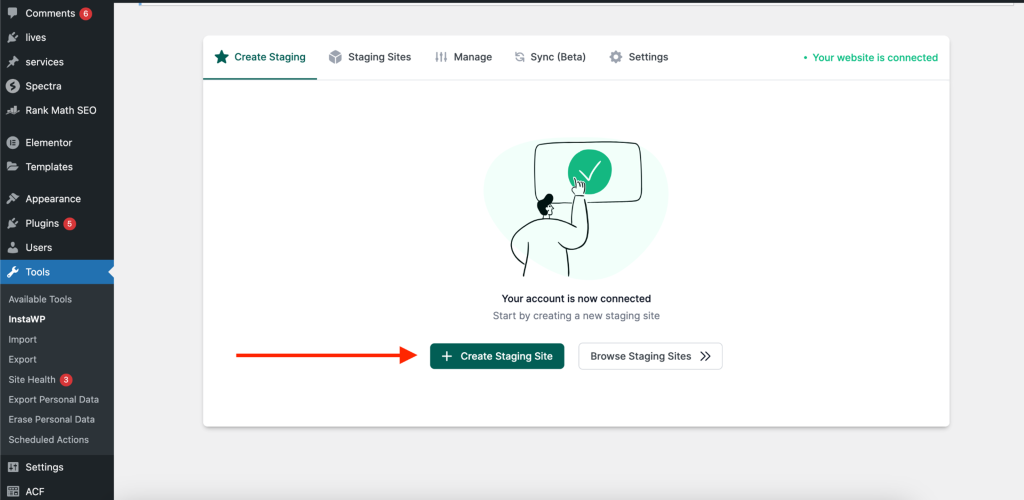
Step 6: Choose your desired staging settings and continue till you have successfully created a staging of your live site.
Benefits Of Creating Staging With InstaWP
Efficiency and Simplicity
InstaWP simplifies the process of creating staging environments with its intuitive interface and straightforward setup.
Flexibility in Staging Creation
InstaWP offers multiple options for creating staging sites, allowing you to start from scratch, use prebuilt templates, or select from the InstaWP store’s expertly crafted designs.
Cost-Effectiveness
By using InstaWP’s staging environment, you can avoid the need to invest in additional hosting or infrastructure for staging purposes.
Scalability
Whether you’re a solo developer or an agency managing multiple projects, InstaWP scales to meet your needs. You can create and manage multiple staging environments effortlessly, accommodating your growing development workload with ease.
Reliable Support
InstaWP offers reliable support and assistance to help you make the most of its staging solution.
Conclusion
Choosing InstaWP to create staging environments offers a superior alternative to relying on your current hosting provider.
By utilizing InstaWP, you can save time, enhance productivity, and ensure the success of your WordPress projects, all while enjoying reliable support and scalable solutions tailored to your needs.
FAQs
1. Should I create staging with my current hosting provider?
Answer: No! Sharing the same hosting environment for both staging and live sites can lead to performance issues, security vulnerabilities, and limited flexibility.
2. Is InstaWP a Secure Staging for WordPress?
Yes! Security is a top priority for InstaWP. It implements robust security measures to safeguard your WordPress staging environments from potential threats and vulnerabilities.
3. Is InstaWP suitable for both beginners and experienced developers?
Absolutely! InstaWP caters to the needs of both beginners and experienced developers.
4. Can InstaWP help me save costs?
Yes, InstaWP can help save costs in several ways. Firstly, by providing a WordPress staging environment separate from your live site, InstaWP prevents potential disruptions to your live website during testing, which could incur costly downtime or loss of revenue.