Key Takeaways
- There are two supported ways to move a LocalWP site to InstaWP. Push it with the InstaWP Connect plugin, or export a ZIP from LocalWP and upload it in the InstaWP dashboard.
- Your local site never needs a public URL. Both methods start from your own machine and send the site outwards, so localhost and .local addresses are not a problem.
- The push method suits sites of any size. It runs one command from the LocalWP site shell and uploads files and database together.
- The ZIP import is the no terminal option. It is a dashboard upload, and the archive needs to be within the 1 GB upload limit.
- Both methods create a brand new InstaWP site. Nothing existing is overwritten, so you can test before you commit to anything.
- Once the site is on InstaWP you are no longer stuck locally. Share it, add staging, map a domain, host it there, or move it on to another host.
- AI Migration (InstaMigrate) is a different tool. It connects two reachable WordPress sites by URL, so it is not the tool for a site that only exists on your laptop.
- New InstaWP accounts start with $25 in credits, which is enough to move a local build up and try it properly before you spend anything.
To migrate a LocalWP site to InstaWP, either install the InstaWP Connect plugin on the local site, connect it to your InstaWP account, and run the push command it gives you inside the LocalWP site shell, or export the site from LocalWP as a ZIP and upload that archive through Sites, Import Site in the InstaWP dashboard with Local WP selected as the backup source. Both methods copy files and database, rewrite the URLs for you, and finish with a live WordPress site in your account.
That is the short version. The reason this deserves a full guide is that a local site is not like any other site you migrate. It has no public address, no SSH, no host control panel and no way for an outside service to reach in and fetch it. Every classic migration route assumes at least one of those things exists. The two methods below are the ones that work precisely because they start from your machine and push outwards, rather than waiting for something on the internet to reach in.
This guide covers both, step by step, along with the checks worth running afterwards and what to do with the site once it is up.
Why a Local Site Is Different From Every Other Migration
A site built in LocalWP, XAMPP, MAMP or WAMP lives at an address only your computer understands, such as mysite.local or localhost:10003. Nothing outside your machine can resolve it. There is no hosting account behind it, no SSH login, no cPanel and no public REST endpoint.
That single fact rules out most of the migration advice you will find. Tools that ask for a source URL cannot reach your site. Tools that ask for FTP or SSH credentials have nothing to connect to. Even the manual route, exporting a database and uploading files by hand, leaves you fixing serialised URLs and file paths afterwards.
What does work is any method that runs on your machine and sends the site out. That is exactly what the two methods below do. The push method runs a command inside your local install and uploads the site to your account. The ZIP method packages the site into a file that you upload from your browser. In both cases the traffic flows outwards, which is why neither one needs your local site to be reachable from the internet.
Which Method Should You Use
Both methods produce the same result: a real WordPress site running on InstaWP. They differ in how you drive them and how big a site they suit.
| Comparison | Method 1 Push with InstaWP Connect | Method 2 LocalWP ZIP Import |
|---|---|---|
| How you run it | Run one command in the LocalWP site shell. | Complete the entire process from the InstaWP dashboard. |
| Terminal needed | Yes, but you only need to paste a command. | No. |
| Plugin needed on the local site | Yes, the InstaWP Connect plugin. | No. |
| Size limit | Suitable for sites of any size. | The archive must remain within the 1 GB upload limit. |
| Works with | LocalWP, XAMPP, MAMP, and WAMP. | LocalWP exports. |
| Best for | Repeat pushes and larger WordPress builds. | A one-off migration without using the command line. |
If you are unsure, start with the push method. It is the one InstaWP builds around local development, it handles bigger sites comfortably, and once the plugin is connected repeating it later takes seconds. Choose the ZIP import when you would rather not touch a terminal at all, or when the local environment is not LocalWP but you already have an export in hand.
What You Need Before You Start
Five minutes of preparation prevents the most common migration problems. Before either method, do the following on the local site.
- Start the site and confirm it loads. Open the front end and the WordPress dashboard. A site that is broken locally will be broken after the move too.
- Finish any pending updates. Update WordPress core, plugins and themes now, so you are not carrying known issues across.
- Take a local backup. Keep a copy of the site as it stands, so you always have something to fall back on.
- Tidy up what you do not need. Removing abandoned plugins, unused themes and large debug logs makes the transfer faster and the new site cleaner.
- Have an InstaWP account ready. You can create one here. New accounts start with $25 in credits, so you can move a site up and test it before deciding on a plan.
Method 1: Push Your Local Site With InstaWP Connect
This is the method built for local development. You install the InstaWP Connect plugin on the local site, connect it to your account, then run the command the plugin generates inside the LocalWP site shell. The command uploads the whole site and creates a matching site in your InstaWP account.
Step 1: Open the Local Site’s WordPress Dashboard
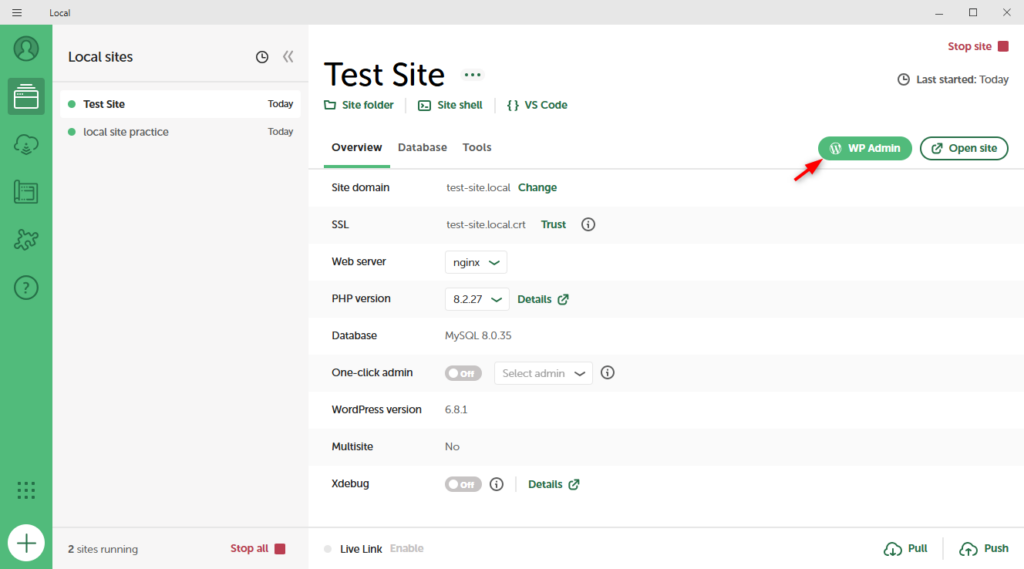
Open the LocalWP application, select the site you want to move, and make sure it is running. Click WP Admin to open its dashboard, then log in with your local admin credentials.
Step 2: Install the InstaWP Connect Plugin
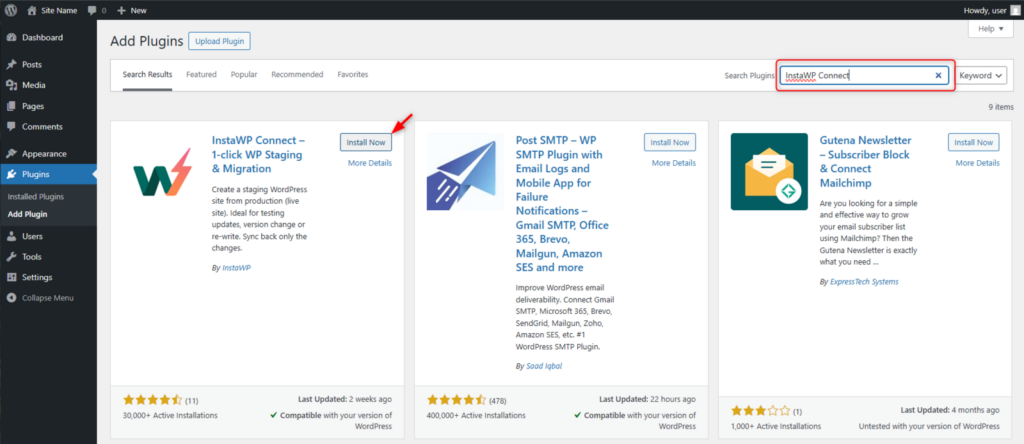
In the local dashboard go to Plugins, Add New Plugin, search for InstaWP Connect, then click Install Now and Activate. The plugin appears under Tools once it is active.
Step 3: Connect the Site to Your InstaWP Account
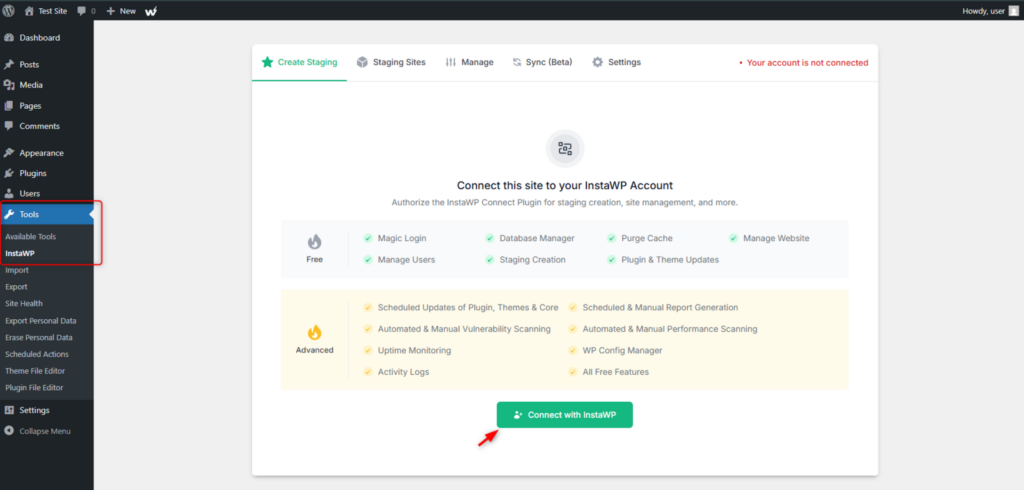
Go to Tools, InstaWP and click Connect with InstaWP. If you are not signed in, sign in to your InstaWP account when prompted.
Review the requested access and click Approve. You are returned to the local site with the connection in place. There is no API key to copy or paste by hand.

Step 4: Copy the Push Command
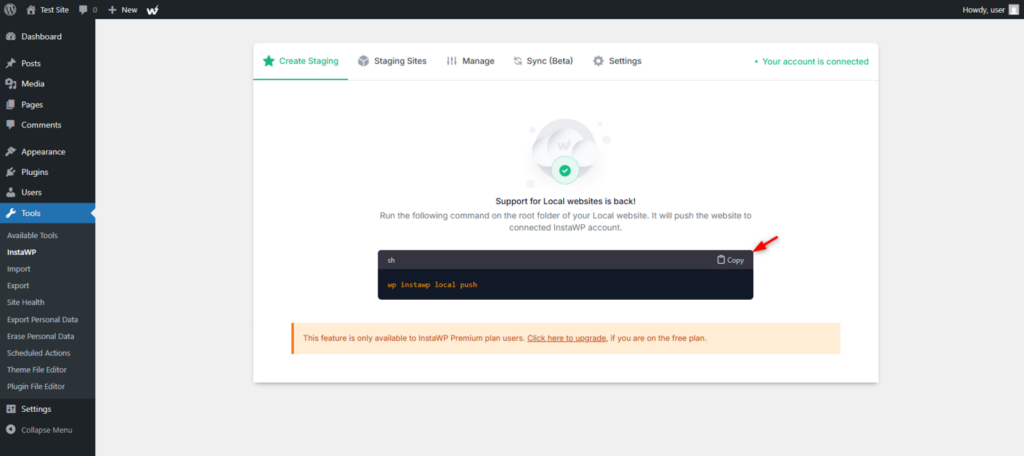
Back on Tools, InstaWP, the plugin now shows a command for pushing this site to InstaWP. Click the copy button to take the whole thing.
Do not edit the command. It carries the details that tie this local installation to your account, and changing any part of it will stop the push from working.
Step 5: Open the Site Shell
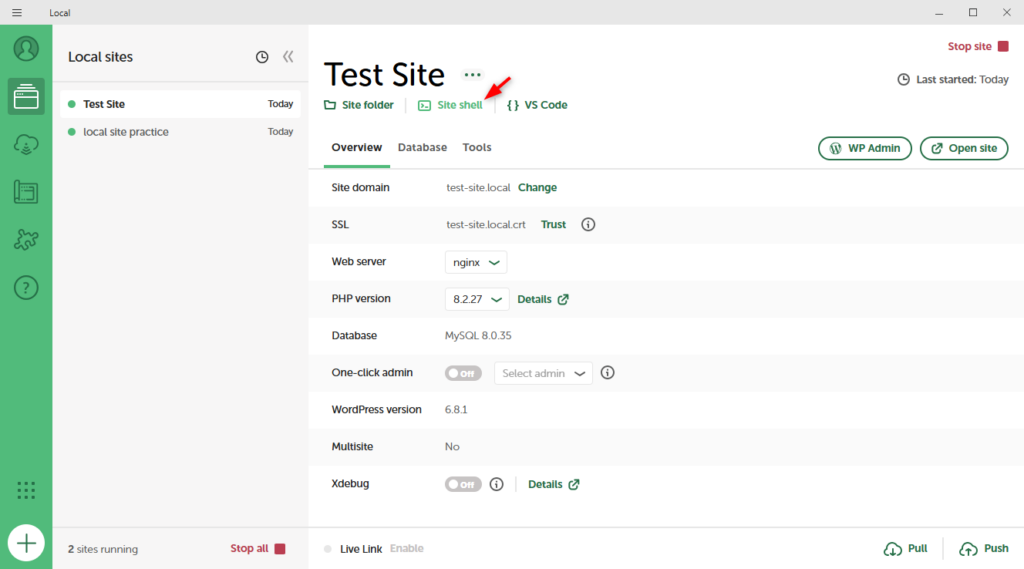
Switch back to the LocalWP application, select the same site, check that it is still running, and click Site Shell. LocalWP opens a terminal already pointed at that WordPress installation. On Windows this usually opens in PowerShell.
Using XAMPP, MAMP or WAMP instead? Open your own terminal and change directory into the folder that holds the local WordPress install before you run the command.
Step 6: Run the Command
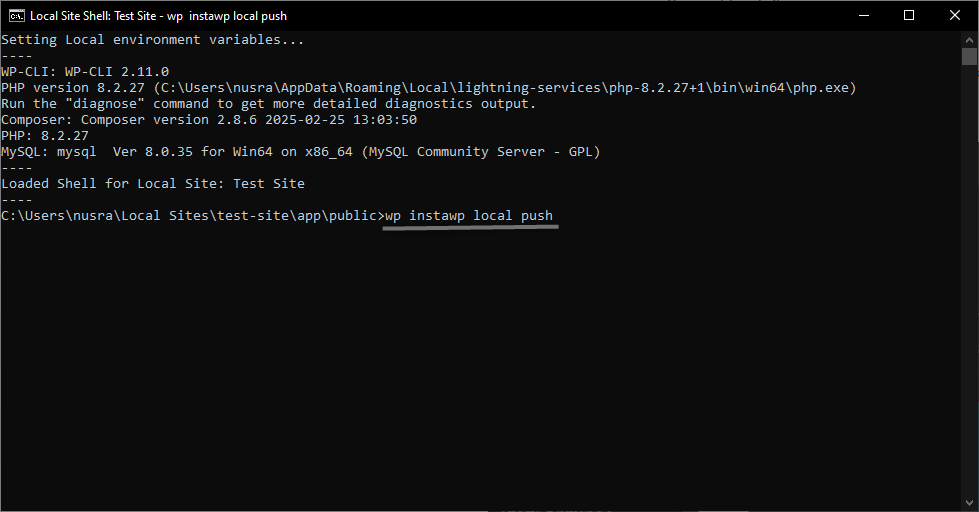
Paste the copied command into the shell and press Enter. The upload starts immediately and a new site is created in your InstaWP account as it runs.
Leave everything running while it works: the local application, the local site, the terminal window and your internet connection. How long it takes depends on the size of the site, the number of files, the size of the database and your upload speed.
Step 7: Open the New Site in Your Dashboard
When the command confirms it has finished, sign in to your InstaWP dashboard and open Sites. The new site is listed there. Wait until its status shows that it is ready, then open the front end or use Magic Login to go straight into its WordPress dashboard without typing a password.
The push always creates a new site. It does not overwrite an existing destination, so nothing you already have in your account is at risk.
Full steps are also in the InstaWP documentation: Push the local WordPress site to InstaWP and How to build locally and then push to InstaWP.
Method 2: Import a LocalWP ZIP Export
This method moves the site entirely through your browser. You export the site from LocalWP as a ZIP archive, then upload that archive in the InstaWP dashboard. It needs no plugin, no terminal command, no SSH access and no public URL for the local site.
Before you begin, check that the exported archive is within InstaWP’s 1 GB upload limit. If it is larger, use the push method above instead.
Step 1: Export the Site From LocalWP
Open the LocalWP application and select the site you want to move. Click Start Site and wait for it to be running. Right click the site name, or use the three dot menu beside it, and choose Export. Pick where to save the file and wait for LocalWP to build the archive.
LocalWP packages the database, media, plugins, themes and the rest of the site into that one ZIP. Leave it compressed, because the ZIP is exactly what you upload next.
Step 2: Open Import Site in InstaWP
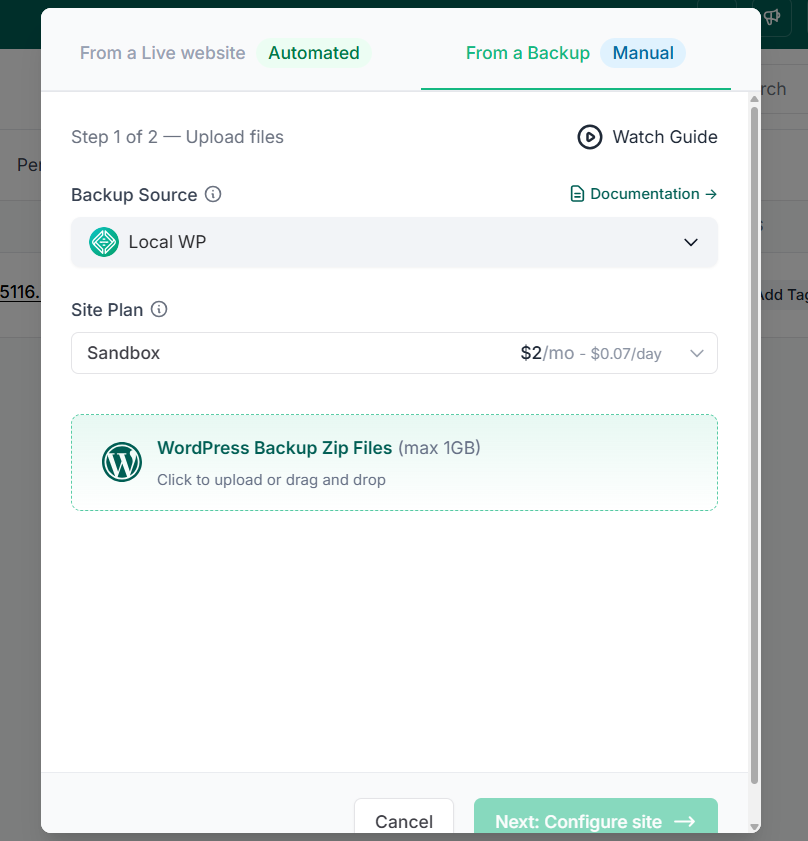
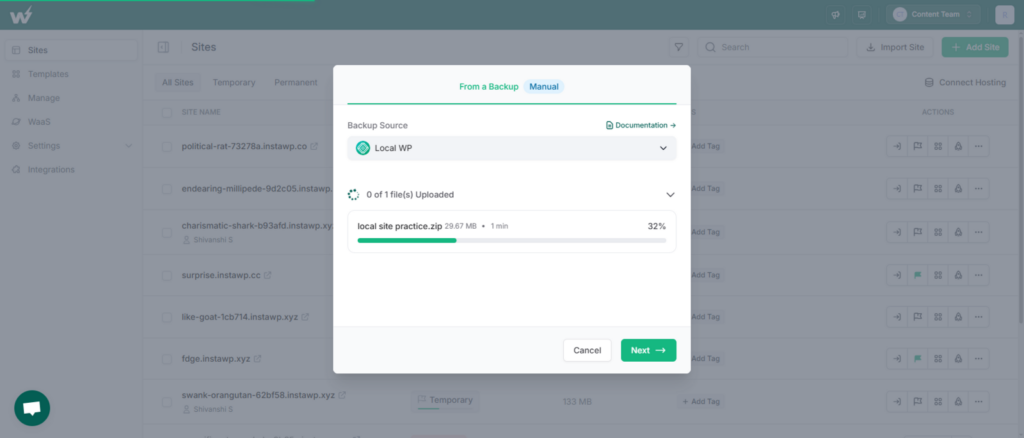
Sign in to InstaWP and open the Sites page, then click Import Site. In the import modal, open the backup source drop-down and choose Local WP. This tells InstaWP how the archive was created and how to unpack it.
Also, you need to select the site plan for your new hosted site.
Step 3: Upload the ZIP File
Click the upload area and select the ZIP you exported, or drag and drop it in. Let the upload finish completely before you continue, and do not close or refresh the tab while it runs. When the file is ready, click Next.
Step 4: Configure the New Site
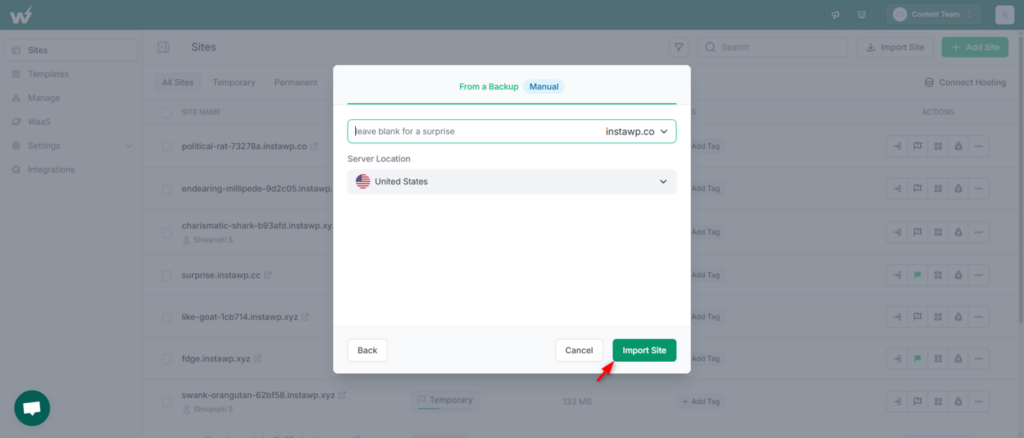
Give the site a name you will recognise later in your dashboard, and choose a server location close to the audience or client this site is for. Review the remaining site and plan settings, then click Import Site.
Step 5: Wait for the Site to Install
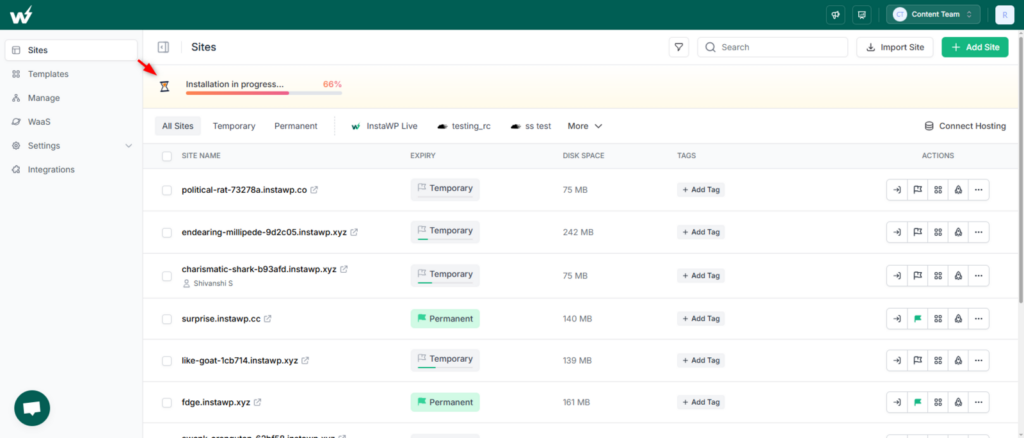
Installation starts automatically as soon as you submit the import. InstaWP creates the new WordPress site and restores your files and database into it. Keep the dashboard open until the status confirms the site is ready. How long it takes depends on the size of the archive and your connection.
Step 6: Open the Imported Site
Go back to the Sites page, find the newly imported site and open the front end to confirm it loads. Use Magic Login to get into the WordPress dashboard. Keep the original LocalWP site and the exported ZIP until you have finished checking the new copy.
The full list of supported backup sources, including Local WP, is in the Import Site documentation.
Verify the Migrated Site
Whichever method you used, check the site properly before you share it with a client or point a domain at it. Work through the front end and the dashboard together.
- Homepage and your most important landing pages
- Posts, pages and any custom post types
- Images and other media, including anything in galleries and sliders
- Themes and plugins, and that they are all still active
- Navigation menus, internal links and buttons
- Forms and email delivery
- WooCommerce products, settings and the full checkout flow
- User accounts, roles and permissions
- Permalink structure
- Custom code and third party integrations
Open the site once in an incognito window as well. Browsing while logged in hides caching problems and anything that only behaves correctly for an administrator.
Post-Migration Housekeeping
A handful of small jobs inside the migrated dashboard clear up the issues that show up a day or two later.
- Flush the permalinks. Go to Settings, Permalinks, confirm the structure is right, and click Save Changes without changing anything. This rewrites the rules on the new environment and fixes most unexpected 404s.
- Clear any caches. Both plugin caches and server caches, so you are looking at the migrated site and not a stale copy.
- Reconnect anything tied to the old address. Licences, API keys, SMTP, payment gateways, webhooks and analytics often key on the site URL and need re-authorising.
- Remove development only tools. Debug plugins, query monitors and test data do not belong on a site a client is about to see.
- Send a test through every form. Contact forms and checkout emails are the things most likely to fail quietly after a move.
What You Can Do Once the Site Is on InstaWP
Getting off your laptop is the point of the exercise. Once the site is in your account, it can become several different things.
| Use it as | What that gives you |
|---|---|
| A shareable preview | A real URL you can send to a client or colleague, with no local tunnel to keep open. |
| A staging site | A safe place to test changes, with 2-way sync between staging and the live site. |
| A reusable starting point | Save the site as a template or snapshot and spin up new WordPress sites from it in seconds. |
| A hosted production site | Host the site on InstaWP and map your own custom domain to it. |
| A site you move again | Use the migration tools to move it to another host when the project requires it. |
One thing worth doing before any of that: test thoroughly first, and only map the production domain once you are happy with what you see.
If you prefer to work from the terminal, the InstaWP CLI covers the same ground with instawp local push and instawp local pull, and can also mirror an existing WordPress folder on disk straight into a new hosted site.puter, use one of the two methods in this guide.
Common Problems and How to Fix Them
| What you see | Likely cause | What to do |
|---|---|---|
| The push command fails immediately | The command was edited, or the site is no longer connected. | Reconnect the site from Tools → InstaWP and copy a fresh command without changing it. |
| The upload stops partway | The local site or terminal was closed, or the internet connection dropped. | Keep the local app, site, shell, and internet connection running, then start the push again. |
| The ZIP file will not upload | The archive exceeds the 1 GB upload limit. | Use the push method instead, which is not restricted by the ZIP upload limit. |
| Pages return 404 errors after the move | The WordPress permalink rules were not rebuilt. | Open Settings → Permalinks in WordPress and click Save Changes. |
| Images or links still point to the local address | Cached pages or a hardcoded URL in the theme or custom code. | Clear all caches first. Then search the theme and custom code for references to the old local URL. |
| Forms or payments stop working | API keys, licences, or integrations are tied to the old site URL. | Re-authorise SMTP services, payment gateways, plugin licences, and webhooks on the new address. |
Frequently Asked Questions
Does my local site need a public URL to migrate it?
No. Both methods in this guide start on your machine and send the site outwards, so a .local or localhost address is fine. Nothing has to reach in to your computer.
Does this work on Windows?
Yes. On Windows, LocalWP’s Site Shell normally opens in PowerShell, and you paste the same command there. The ZIP import method runs entirely in the browser, so the operating system makes no difference at all.
Does it work with XAMPP, MAMP or WAMP as well as LocalWP?
Yes, for the push method. Instead of using LocalWP’s site shell, open your own terminal, change into the folder containing the local WordPress install, and run the copied command there.
Will migrating overwrite a site I already have on InstaWP?
No. Both methods create a brand new site in your account. Overwriting a destination is what the separate AI Migration tool does, and that is a deliberate choice you make there.
How big a site can I move?
The ZIP import is bound by the 1 GB upload limit. The push method is the one to use for anything larger, since it uploads from your machine rather than through a browser upload.
Are my URLs and file paths fixed automatically?
Yes. The site is reconfigured to run on its new address as part of the transfer, so you are not left doing a manual search and replace across the database. Hardcoded addresses inside custom code are the one thing worth checking by hand.
Can I keep working locally after I push?
Yes. Your local site is untouched by the move. If you want the two to stay in step afterwards, look at 2-way sync, or work from the terminal with the InstaWP CLI and push changes up when you are ready.
Can I move the site on to a different host afterwards?
Yes. Once the site is live on InstaWP it is an ordinary, reachable WordPress site, so the usual migration routes are all open to you, including InstaWP’s own migration tools. You are not locked in.
Move your local build somewhere people can see it
A site that only runs on your laptop cannot be shared, reviewed or launched. Both methods in this guide take minutes, need no server access, and end with a real WordPress site you can send to a client, put behind your own domain, or host outright. New accounts start with $25 in credits, so you can move a build up and try the whole thing before you commit to a plan.