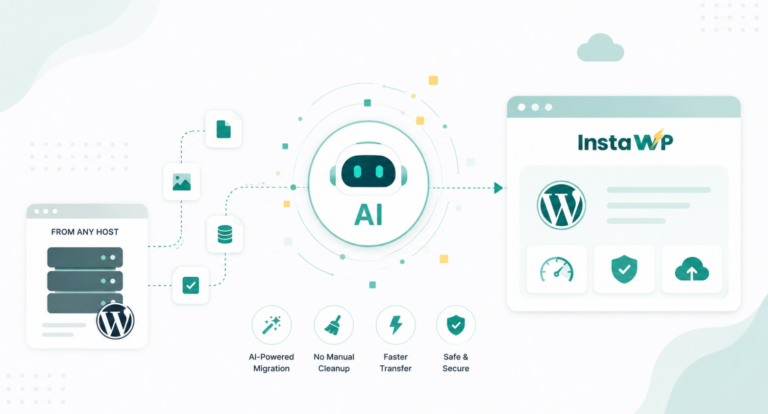
Migrating from Webflow to WordPress is one of the most common platform switches in the web development world. Maybe you have outgrown Webflow’s CMS item limits or its escalating pricing. Maybe your ecommerce needs have expanded beyond what Webflow’s native store can handle. Or maybe you just want the freedom that comes with an open-source platform backed by 60,000+ plugins.
Whatever your reason, this guide walks you through the entire migration process in clear, actionable steps. We are writing this from the perspective of InstaWP, because we believe the fastest and safest way to migrate from Webflow to WordPress is to build your new site in a staging environment first, test everything thoroughly, and then go live with confidence.
Table of Contents
Key Takeaway

Webflow lets you export content as CSV files, but not your design, custom code, or hosting configuration. The migration is a content transfer, not a site clone.
The safest approach is to build your WordPress site on InstaWP’s staging environment first, import your Webflow content, customize your design, and go live only when everything is tested.
InstaWP handles the go-live process with one click. You can migrate to InstaWP’s managed hosting (with CDN, WAF, and backups included) or push to any external host.
Your Webflow site stays untouched during the entire process. Nothing is deleted or modified on Webflow until you are ready to switch your domain.
What You Need Before Starting the Webflow to WordPress Migration
Before you touch any export buttons, get these pieces in place. A little preparation upfront saves hours of troubleshooting later.
A WordPress Hosting Environment
You need a place to build your new WordPress site. This is where InstaWP makes the process dramatically easier than the traditional approach.
Instead of buying hosting first, configuring a server, installing WordPress manually, and then starting your Webflow to WordPress migration, you can create a WordPress site on InstaWP in seconds. It is free to start, and you do not need to commit to a hosting plan until you are ready to go live.
A Content Inventory
Before exporting anything, take stock of what you have on Webflow. Open your CMS Collections panel and note every collection type: blog posts, team members, portfolio items, product listings, testimonials, case studies, or whatever custom collections you have created.
Also document any static pages (About, Contact, Services) that are not part of a CMS collection, since those will need to be recreated manually in WordPress.
Make a simple spreadsheet listing every page and collection on your Webflow site, along with its URL slug. You will use this later to set up redirects and verify that nothing was missed during the import.
A Backup of Your Webflow Site
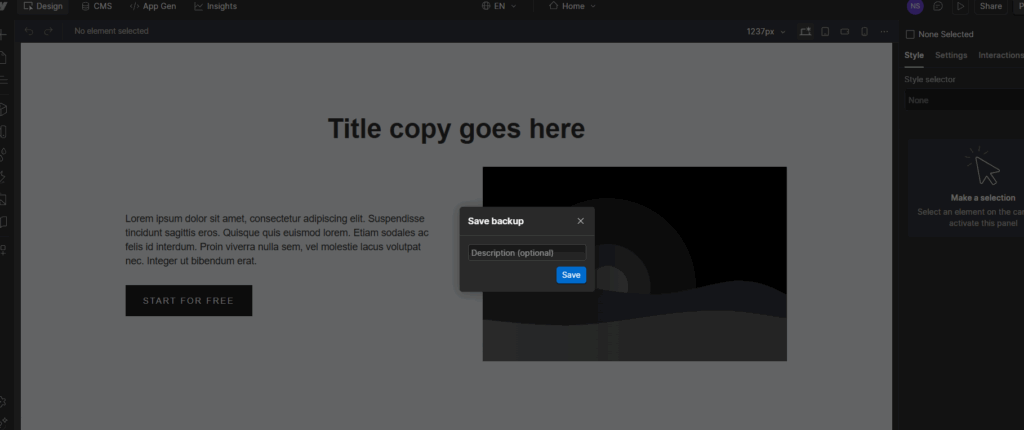
Your Webflow site is not going anywhere during this migration. You are downloading copies of your content, not moving files. But it is still good practice to save a backup. In the Webflow designer, press Command + Shift + S (Mac) or Control + Shift + S (Windows), add a description, and save. You can verify it under Settings > Backups.
Your SEO Data
Before migrating, export or screenshot the following for every important page: the URL slug, meta title, meta description, and any custom Open Graph settings. You will need to recreate these in WordPress to preserve your search rankings. If you use Google Search Console, also note your top-performing pages and queries so you can prioritize those during the migration.
How to Migrate From Webflow to WordPress Using InstaWP (Step by Step)
This is the core of the guide. Follow these steps in order, and you will have your new WordPress site built, tested, and live without any downtime on your current Webflow site.

Step 1: Create Your WordPress Site on InstaWP
The first step to starr the Webflow to WordPress migration is to set up a fresh WordPress environment where you will build your new site. With InstaWP, this takes less than a minute.
Go to instawp.com and sign up for a free account (email or social login). From your InstaWP dashboard, click “Add New” to create a new site.
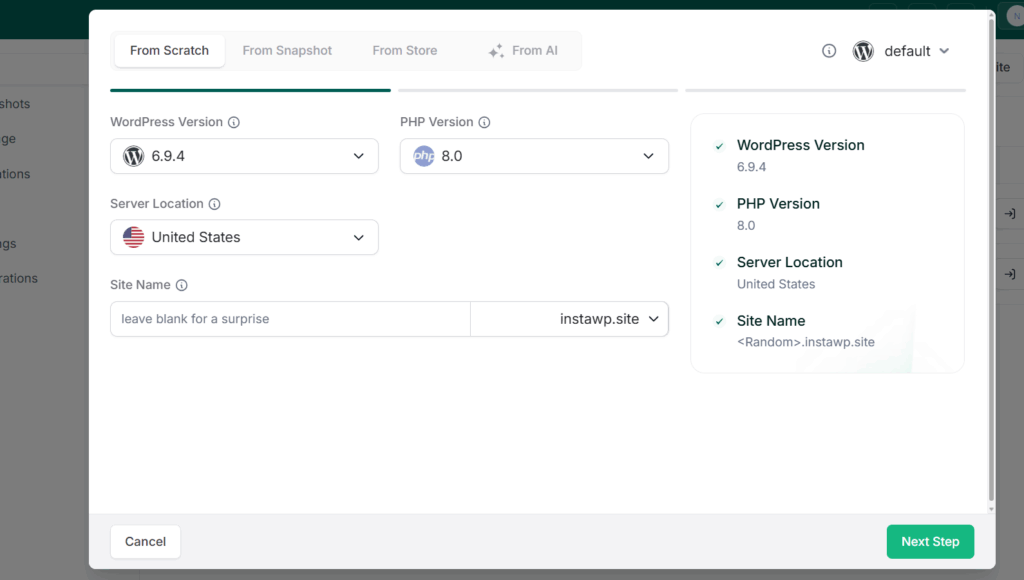
Choose how you want to start: build from scratch, select a pre-made template from the InstaWP Store, or use an AI builder like ZipWP to generate a starting layout from a text description.
Configure your setup: choose a PHP version (8.1 or higher recommended), WordPress version, and server location closest to your target audience. Choose the site plan. You get to choose from various pay-as-you-go hosting plans.
Must Read: Create Site | InstaWP Docs
Click “Create Site” and wait a few seconds. Your WordPress site is ready.
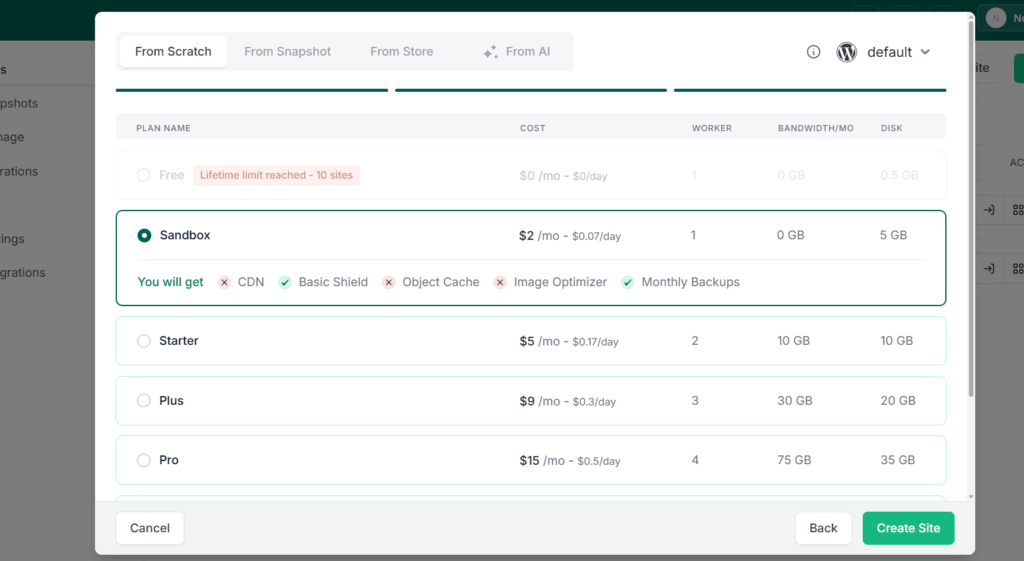
At this point, you have a live WordPress site with a InstaWP URL. This is your workspace. You can access the WordPress admin panel using InstaWP’s Magic Login feature (no passwords to manage) and start building.
| Pro Tip: If you are migrating multiple Webflow sites (common for agencies), you can create separate InstaWP sites for each one and manage them all from a single dashboard. |
Step 2: Install Essential Plugins and Choose a Theme
You cannot transfer your Webflow design to WordPress directly. The visual layout, animations, and interactions will need to be recreated using WordPress themes and builders. This is actually an opportunity to upgrade your design with access to WordPress’s massive theme ecosystem.
For most Webflow to WordPress migration projects, we recommend starting with a flexible theme like Astra, Kadence, or GeneratePress, paired with a page builder like Elementor, Bricks, or the native Gutenberg block editor with Full Site Editing. These combinations give you the design control to recreate (and often improve upon) your Webflow layouts.
If you used InstaWP’s AI builder (ZipWP or Kadence AI) to generate your site in Step 1, you already have a design foundation in place. You can refine it from here.
Install Migration and Content Plugins
Install these plugins from the WordPress dashboard (Plugins > Add New):
WP All Import: This is the key plugin for importing Webflow’s CSV exports into WordPress. It has a drag-and-drop interface that maps CSV columns to WordPress fields (title, content, featured image, categories, etc.).
Auto Upload Images: Webflow exports reference image URLs but does not include the actual image files. This plugin automatically downloads images from those URLs and uploads them to your WordPress media library.
Yoast SEO or Rank Math: Install your preferred WordPress SEO plugin early so you can set meta titles, descriptions, and schema markup as you import content.
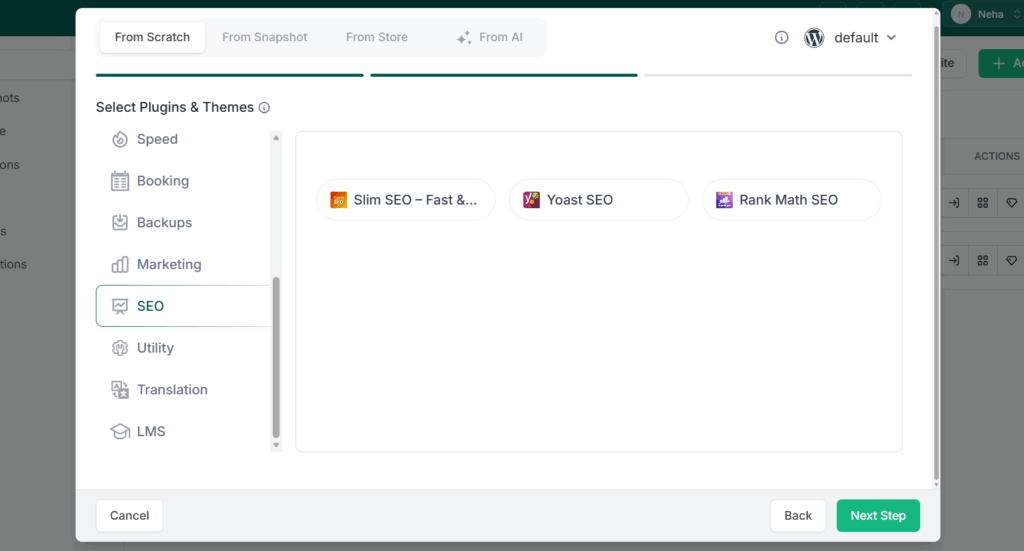
Redirection (or a similar plugin): You will use this to set up 301 redirects from old Webflow URL patterns to your new WordPress URL structure.
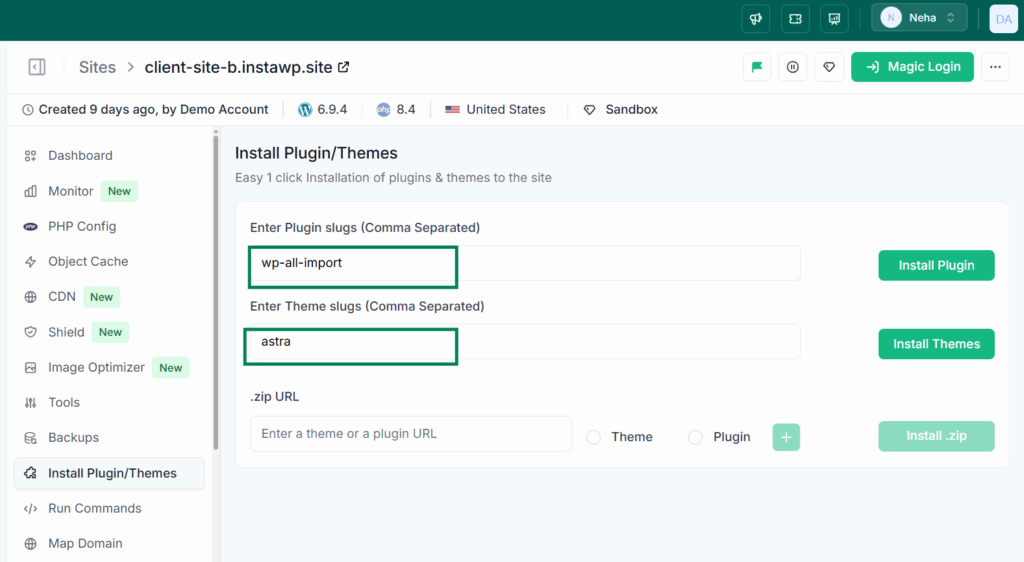
You can also use the Install Plugin/Theme functionality of InstaWP to install desired themes and plugins without accessing the WP Admin. This makes things way to sorted for agencies and developers handling multiple Webflow to WordPress migration process. All you need to do it is to enter the slug of the desired plugins and themes.
Step 3: Export Your Content From Webflow
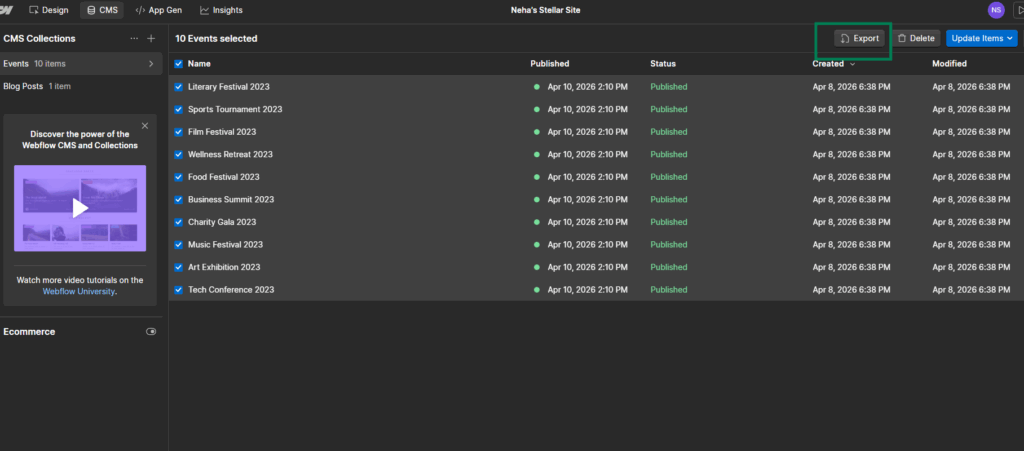
Webflow allows you to export CMS collection data as CSV files. This is the primary method for getting your content out of the platform. Webflow’s export covers CMS collection items, which includes blog posts, portfolio entries, team members, and any other collections you have created.
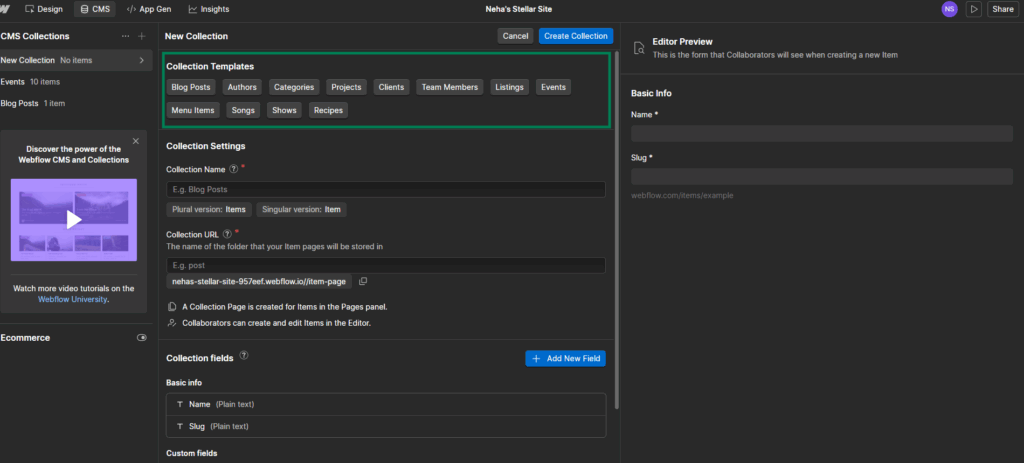
Each collection exports as a separate CSV file containing all the fields you defined (title, body content, images, dates, categories, tags, custom fields, etc.).
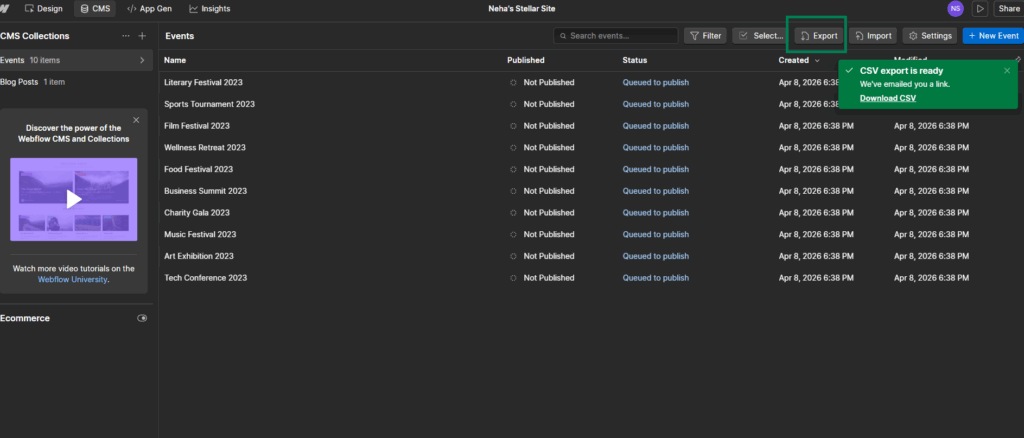
Static pages (pages not built from CMS collections) are not included in the export. This means your homepage, About page, Contact page, and any other standalone pages will need to be manually recreated in WordPress. Webflow also does not export your site’s design, custom CSS, JavaScript interactions, or form submissions.
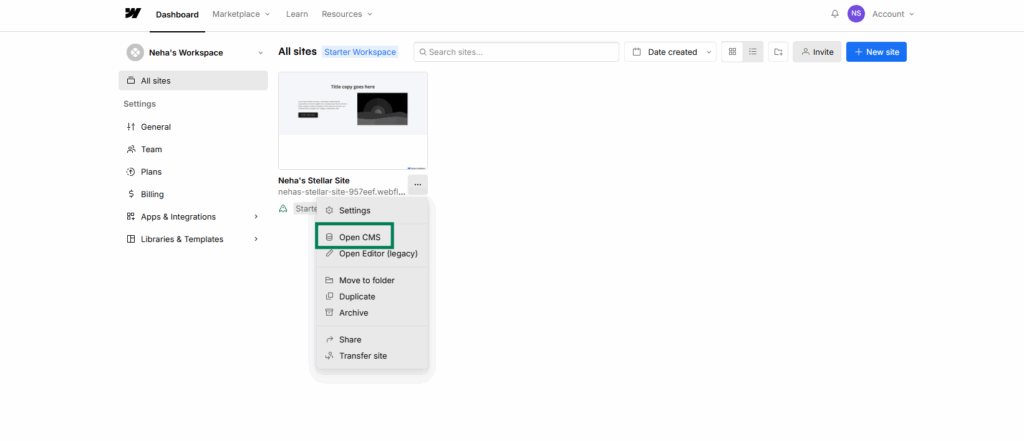
Open your Webflow project in the Designer. and cllick on the Open CMS panel.
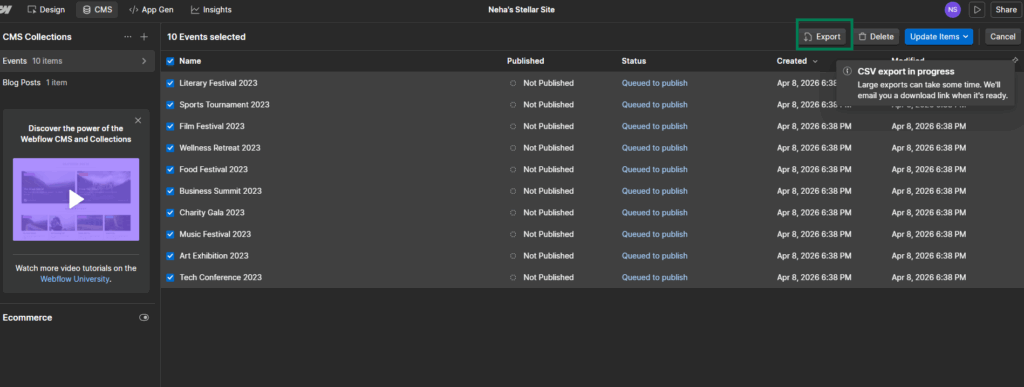
Select the collection you want to export (for example, Blog Posts) and click the Export button near the top of the screen.
A CSV file will download to your computer. Repeat for every CMS collection you want to migrate.
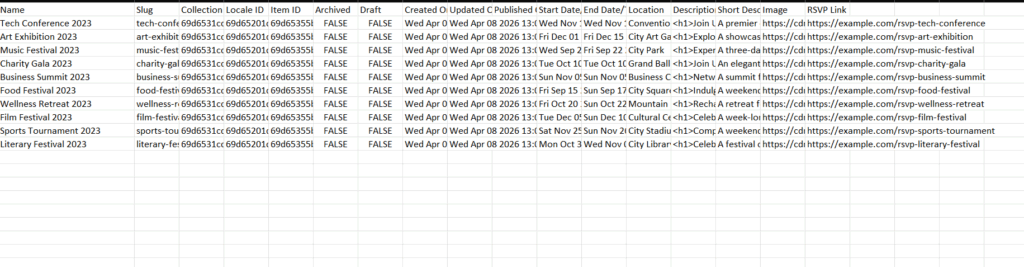
Open each CSV file in a spreadsheet application and review the data. Check that all your content is present, fields are correctly labeled, and there are no encoding issues with special characters. Fix any problems in the CSV before importing into WordPress, as it is much easier to clean data in a spreadsheet than after import.
Important: Webflow exports image references as URLs pointing to Webflow’s CDN. These URLs will work temporarily, but you should plan to download and host the images on your own server (the Auto Upload Images plugin handles this automatically).
Step 4: Migrate From Webflow to WordPress
Once you have all the basic prepartions storted, it’s time to start the Webflow to WordPress migration.
Import Blog Posts (or Any CMS Collection)
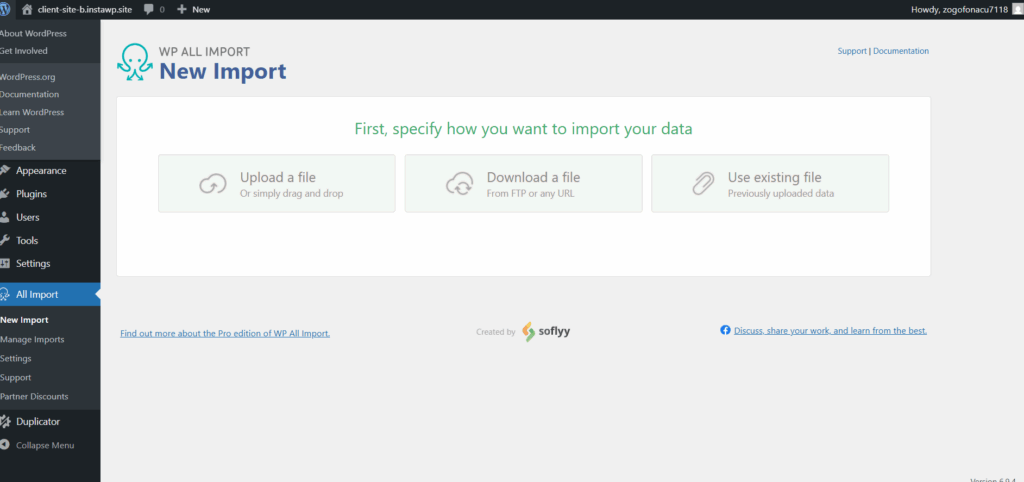
In your WordPress admin, go to All Import > New Import. Click “Upload a file” and select the CSV you exported from Webflow.
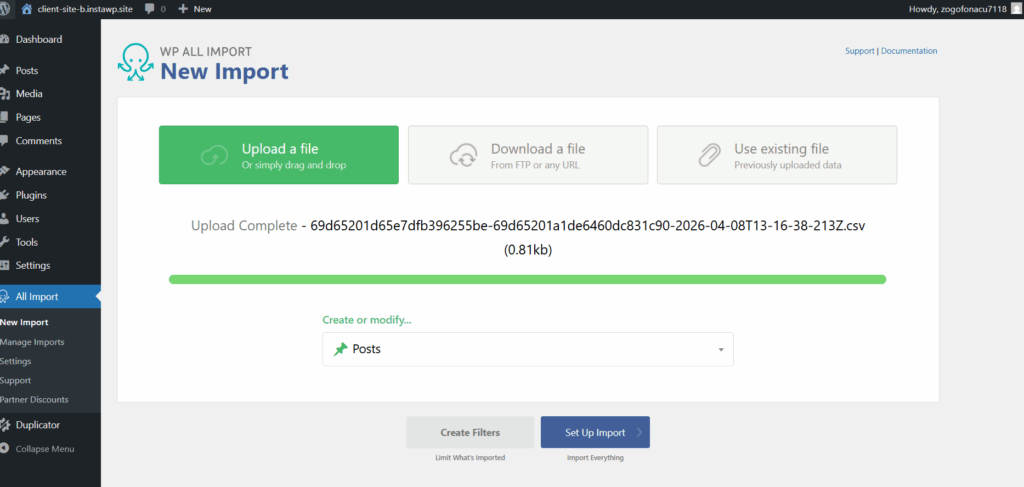
Choose the content type you are importing (Posts, Pages, or a Custom Post Type if you have created one for a specific collection like Portfolio or Team Members).
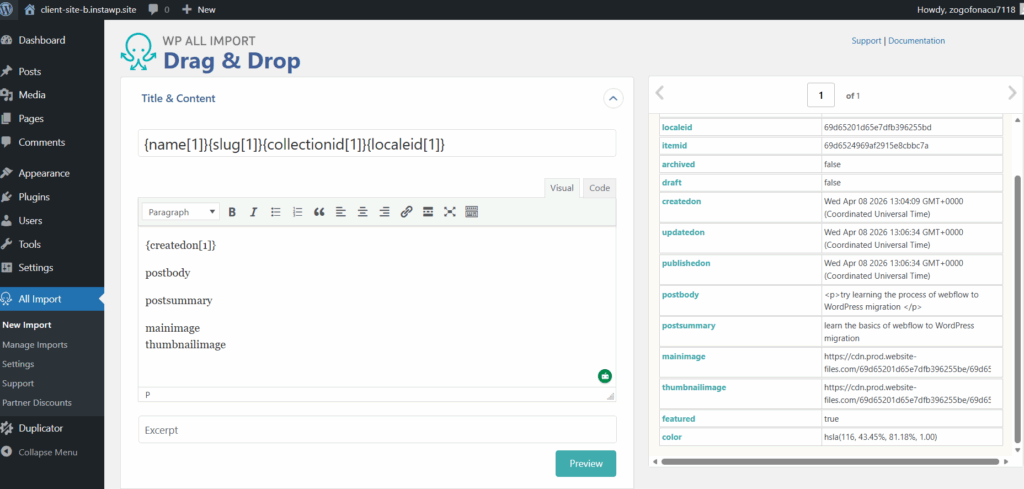
WP All Import will display a preview of your CSV data. Verify it looks correct.
On the mapping screen, drag fields from your CSV to the corresponding WordPress fields. Map your post title to the Title field, your post body content to the Content field, your publication date to the Date field, and any images to the Featured Image field.
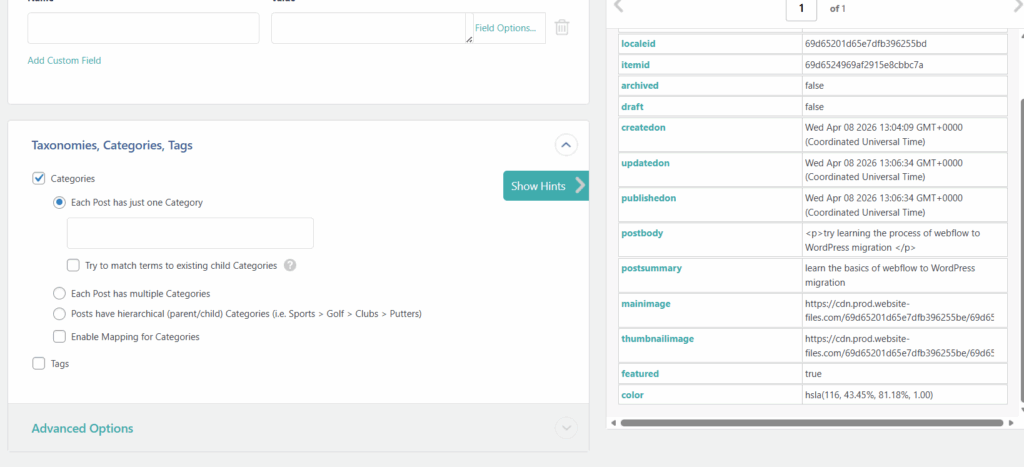
Configure taxonomy settings. If your Webflow blog used categories or tags, map those CSV columns to WordPress categories or tags. Set a unique identifier for each record (WP All Import can auto-detect this).
Click “Confirm & Run Import” and let the plugin process your data.
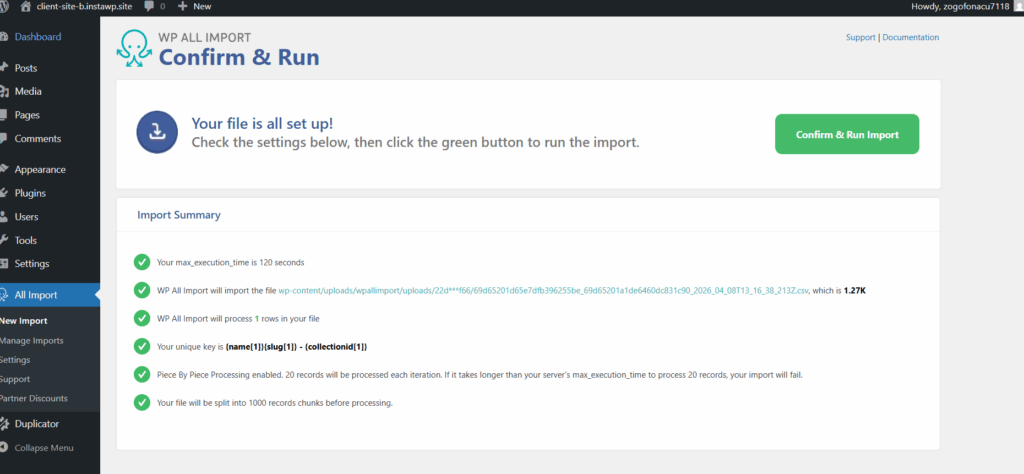
Repeat this process for each CSV file you exported from Webflow.
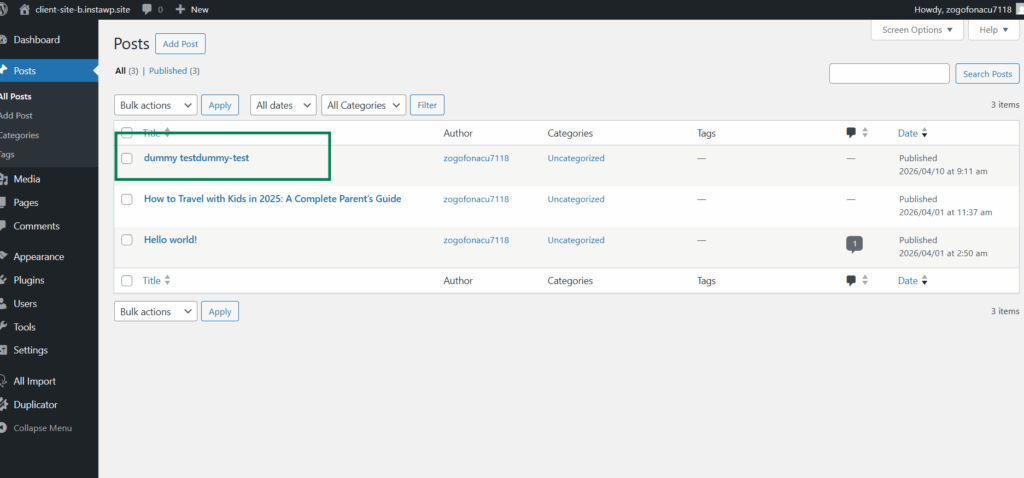
Each CMS collection maps to a content type in WordPress: blog posts become Posts, portfolio items might become a Custom Post Type, team members can be another Custom Post Type, and so on.
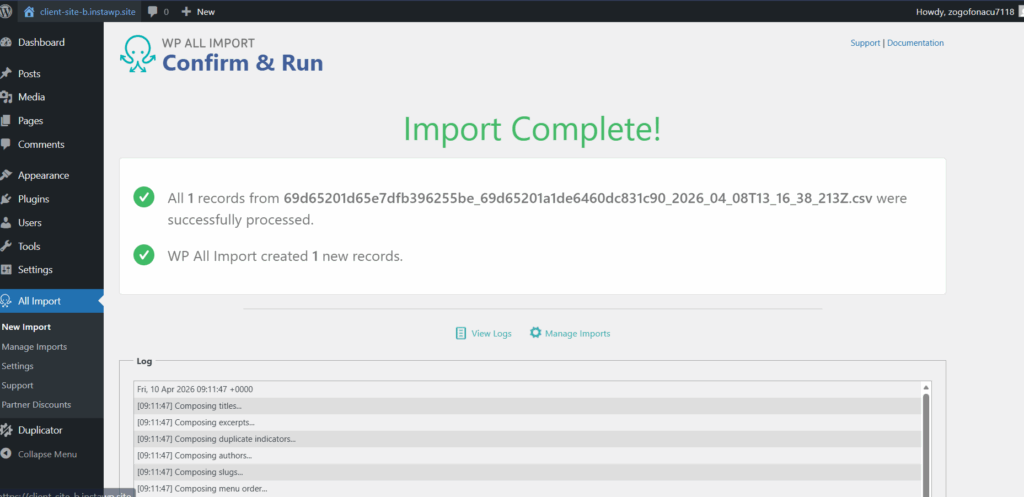
Download and Replace Images
After importing your content, activate the Auto Upload Images plugin and run it. The plugin scans your posts and pages for external image URLs (the Webflow CDN links), downloads each image, uploads it to your WordPress media library, and replaces the external URLs with local ones.
This ensures your images are hosted on your own server and will not break if Webflow changes or deletes the original files.
To run the plugin, go to your Posts list, select all posts, and choose “Update” from the Bulk Actions dropdown. This triggers Auto Upload Images to process the external image URLs.
Recreate Static Pages
For your static pages (homepage, about, contact, services, etc.), you will need to recreate them manually in WordPress using your chosen theme and page builder. Reference your original Webflow pages for content and layout, but take this opportunity to optimize the design and structure for WordPress.
This is actually one of the benefits of migrating. Your page builder in WordPress (Elementor, Bricks, Gutenberg) gives you access to widgets, blocks, and design patterns that may not have been available in Webflow. Many teams find that their WordPress version ends up looking better than the original.
| Pro Tip: Use InstaWP’s built-in code editor and database editor to quickly troubleshoot any import issues without leaving the dashboard. You can also use the activity logs to track what changed during each import. |
Step 5: Configure SEO, Permalinks, and Redirects
This step is critical for preserving your search rankings during the migration. Skip it, and you risk losing organic traffic that took months or years to build.
Set Your Permalink Structure
Go to Settings > Permalinks in your WordPress dashboard. Select “Post name” as your permalink structure. This creates clean URLs like yourdomain.com/your-post-title, which is both SEO-friendly and closest to how Webflow structures its blog URLs.
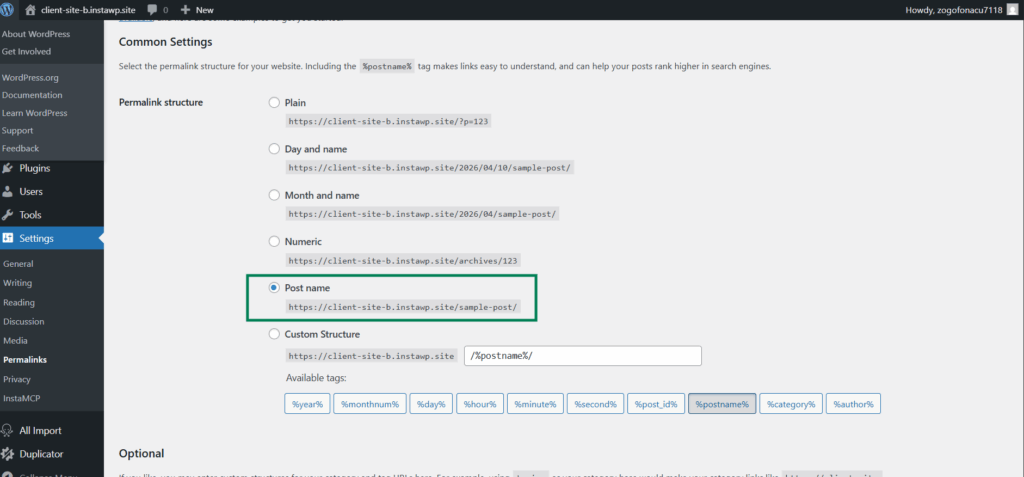
If your Webflow blog posts lived under a /blog/ prefix (like yourdomain.com/blog/your-post-title), you may want to set a custom structure with /blog/ as the base. In Permalink Settings, choose “Custom Structure” and enter /blog/%postname%/.
Restore Meta Titles and Descriptions
Using your SEO plugin (Yoast or Rank Math), go through each imported post and page and set the meta title, meta description, and focus keyword. Reference the SEO data you documented before the migration. This is tedious but essential. Your meta information directly affects your click-through rate from search results.
If you have a large number of pages, consider using WP All Import’s integration with Yoast or Rank Math to map meta fields directly from your CSV during the import step. This can save significant time.
Set Up 301 Redirects
If any of your URL slugs changed during the migration (even slightly), you need 301 redirects to tell search engines that the old URL permanently points to the new one. Install the Redirection plugin and create redirect rules for every changed URL.
Common URL changes to watch for include: blog posts moving from /blog/post-name to /post-name (or vice versa), collection items with different slug formats, and pages that were renamed or restructured. Use the content inventory spreadsheet you created earlier to map old URLs to new ones.
Submit Your Updated Sitemap
Once your WordPress site is live with the correct domain (after Step 6), generate a new XML sitemap using your SEO plugin and submit it to Google Search Console. This tells Google to recrawl your site and index the new URLs. Also check for any crawl errors in Search Console over the following weeks and fix them promptly.
| Important: Do not skip the redirect step. Without 301 redirects, any backlinks pointing to your old Webflow URLs will lead to 404 errors on your new WordPress site. This hurts your domain authority and user experience. |
Why Move From Webflow to WordPress?
Webflow is a great platform for designers who want pixel-perfect visual control. But as your site grows, you start bumping into the walls of a closed ecosystem. Here are the most common reasons developers and agencies make the switch.
Pricing That Scales Against You
Webflow’s pricing adds up fast. A CMS site plan costs $23/month, but that is just the beginning. You also need a Workspace plan ($19-$35/month) for team collaboration.
Add-ons like Localization ($9-$29 per locale), Analyze ($9/month), and Optimize (starting at $299/month) stack on top. Per-seat charges for team members add another $15-$39/month per person. For an agency managing multiple client sites, these costs become significant.
WordPress is free and open-source. With InstaWP, managed hosting starts at just $5/month for a production-ready site with CDN, SSL, WAF, automated backups, and image optimization included. There are no workspace fees, no per-seat charges, and no surprise bandwidth overages.
CMS Limitations
Webflow’s CMS plan caps you at 2,000 items across 20 collections. If your blog, product catalog, or resource library outgrows that limit, you are forced to upgrade to the Business plan at $39/month (which starts at 10,000 items). WordPress has no such limits. You can create as many posts, pages, products, and custom content types as your hosting can handle.
Plugin and Integration Freedom
Webflow’s App Marketplace has around 100 apps. WordPress has over 60,000 plugins on WordPress.org alone, plus thousands more from third-party developers.
Whether you need a membership system, LMS, booking engine, advanced forms, or a specific CRM integration, WordPress almost certainly has a plugin for it. With Webflow, you are limited to what the marketplace offers or what you can build with custom code.
Ecommerce Flexibility
Webflow charges a 2% transaction fee on its Standard ecommerce plan, on top of payment processor fees. WooCommerce charges zero platform fees. For a store doing $10,000/month in sales, that is $200/month you are losing to Webflow. WooCommerce also offers far more product types, payment gateways, shipping options, and extensions than Webflow’s built-in store.
Full Code Access
WordPress gives you complete access to the codebase. You can write custom themes, build custom plugins, modify core behavior through hooks and filters, access the database directly, and use WP-CLI for command-line management. Webflow lets you inject custom code, but you are working within the boundaries of their platform. For developers who need full control, WordPress is the clear choice.
with confidence.If you are still deciding whether the switch makes sense for your project, read our detailed Webflow vs WordPress comparison guide to understand where each platform excels and where it falls short.
Common Webflow to WordPress Migration Mistakes to Avoid
Having helped thousands of WordPress developers through the InstaWP platform, we have seen the same migration mistakes come up again and again. Avoid these and your migration will go smoothly.
- Skipping the staging step. The number one mistake is building your WordPress site directly on a live domain. If something goes wrong, your visitors see a half-finished site. Always build in staging first. InstaWP makes this effortless.
- Forgetting 301 redirects. If any URL changes during migration (even a single character), you need a redirect. Without it, you lose link equity and send visitors to 404 pages.
- Leaving images on Webflow’s CDN. If you do not download and rehost your images, they will break when you cancel your Webflow plan. Always run the Auto Upload Images plugin after importing content.
- Not testing on mobile. Your Webflow site’s responsive design does not transfer. You need to test and adjust the WordPress version on every breakpoint.
- Rushing the DNS switch. Do not point your domain to the new host until everything is tested and confirmed working. Once DNS propagates, there is no quick undo.
- Ignoring page speed. A freshly migrated WordPress site might not be optimized yet. Use InstaWP’s built-in CDN, image optimizer, and object cache to match or exceed your Webflow site’s performance.
Wrapping Up
Migrating from Webflow to WordPress is a big decision, but it does not have to be a stressful one. The process boils down to: export your Webflow content, build your new WordPress site on InstaWP, import and configure everything in a safe staging environment, test thoroughly, and go live with one click.
The staging-first approach that InstaWP enables is what makes this migration safe and predictable. You never risk breaking a live site. You never commit to hosting before you are ready. And once you go live, you have a WordPress site backed by managed hosting with CDN, security, backups, and performance optimization all built in.
If you are still weighing the Webflow vs WordPress decision, our detailed comparison guide covers every angle. And if you are ready to start your migration, the best next step is to create a free InstaWP account and spin up your first WordPress staging site. You will be surprised how fast you can have your new site ready.
Ready to make the switch? Get started with InstaWP and claim $25 in free credits.
FAQs
How long does it take to migrate from Webflow to WordPress?
For a typical blog or business site with under 100 pages, the technical migration (export, import, basic configuration) can be completed in a few hours. Recreating your design in WordPress takes longer, usually 1-3 days depending on complexity.
Will I lose my SEO rankings when I migrate?
Not if you follow the steps in this guide. The key factors are keeping your URL structure the same (or setting up proper 301 redirects), preserving your meta titles and descriptions, and submitting an updated sitemap to Google Search Console. Most sites see minimal ranking fluctuation during a well-executed migration.
Can I keep my domain name when switching from Webflow to WordPress?
Yes. Your domain name is managed by your domain registrar, not by Webflow. You simply update the DNS settings to point to your new WordPress host instead of Webflow’s servers. Your domain stays the same.
Can I migrate a Webflow ecommerce store to WooCommerce?
Yes, but ecommerce migrations are more complex than content-only migrations. You will need to export your product data from Webflow, import it into WooCommerce (using WP All Import with the WooCommerce add-on), recreate your checkout flow, and set up payment gateways. InstaWP’s staging environment is especially valuable here, since you can test the full purchase flow before going live.
What happens to my Webflow site during the migration?
Nothing. Your Webflow site remains fully functional throughout the entire migration process. You are downloading copies of your content, not moving files. Your Webflow site stays live until you point your domain to the new WordPress host.