While deploying changes and seeing them go live on your website may seem straightforward, there is always a risk that modifications can inadvertently crash your entire live site. This can result in significant losses and compromise the functionality of your website. Therefore, having a comprehensive staging process in place becomes a lifesaver.
Staging websites act as replicas of your live site, allowing you to conveniently test new features, plugins, themes, and other functionalities without affecting the live user experience. For those involved in WordPress development, having a staging environment is crucial and shouldn’t be overlooked.
Once you have thoroughly tested these changes, they can be easily pushed to the live website.
In this regard, InstaWP emerges as an excellent WordPress plugin for creating a WP staging site. If you’ve ever wondered how to set up a staging site for WordPress with InstaWP, worry no more. This article will guide you through the process step by step, exploring InstaWP’s functionality and implementation in detail.
Table of Contents
Key Takeaways
- Staging sites let you test changes without affecting your live site.
- InstaWP Connect is an excellent WordPress staging plugin.
- It simplifies the process of creating staging sites.
- With InstaWP, you can create staging sites from live websites or templates, making it easy to set up new sites quickly.
What is a staging site or staging environment in WordPress?
A staging environment in WordPress is a clone of your live websites. Think of staging in WordPress as having a testing environment for the changes you want to make to your WordPress site—a safe place to see how they work before you make them public.
The staging site makes it easy and safe to change anything about the site, from the theme to the layout. Setting up a WordPress staging site is a piece of cake with InstaWP. First, let’s check out the benefits it offers to its users.
Benefits of creating a staging site
Why create a WordPress staging site? Besides testing new features and themes, there are also various other benefits one can enjoy when creating a staging site.
1. Test Website Performance
Adding new features and plugins to your WordPress website may impact the website’s performance. By conducting tests on new features, themes, and modules in the staging environment, one can efficiently assess the effects that they will have on the website’s performance.
This not only aids in optimizing your website’s functionality but also guarantees a smooth user experience for your regular visitors.
2. Team Collaboration
If you have a team of developers to work with and are looking forward to collaboratively working on a project, then working in an environment where you can easily test out new features without harming the live site is a great workflow improvement.
With a staging environment, various team members or developers can work on separate parts of the website without hindering one another’s progress. With collaborative feedback, the team may ensure an efficient workflow in advance of pushing them to the live site.
3. Makes Migration Easy
Using a staging environment can make migrating your website to a new hosting provider or domain simpler and less time-consuming for you if you are considering making the switch.
Ensure that all website components are functioning properly before making the move by employing a staging environment. This reduces the danger of any interruptions or loss of data during the migration process.
You can move your live WordPress website to a staging environment first and test out the changes, and then move the staging environment to a new hosting provider before pointing your domain name to the new hosting server. This process will help you avoid any downtime while migrating your website.
4. Staging Sites As Backups
Since staging sites are the cloned/copied versions of your WordPress website, you can use them as backups as well. If anything goes wrong on your live website, you can easily use your staging site to restore your live website.
InstaWP offers superior backup and restoration features. Users may reliably secure their website’s data and configuration throughout the staging process thanks to its advanced capabilities. Users can enjoy increased peace of mind and convenience by being able to go back to previous versions or settings.
5. Troubleshooting Bugs
Staging sites are a great way to resolve bugs, solve compatibility issues, and update your site. If you run a large website or a busy website with 100s of visitors, then the best way to troubleshoot any existing bugs is on a staging site rather than on a live site.
Once you have figured out the solutions, you can either replicate the solution on your live website or push the staging site to live.
With the InstaWP plugin, users can easily detect any bugs or issues in the website in the testing phase and resolve them as soon as they can. With our platform’s many testing options, users can quickly find and fix any possible conflicts or problems. This ensures that users have a consistent and uninterrupted experience when using live websites.
When Should You Create A WordPress Staging Site
Here are the instances when you should create a staging site for your WordPress site.
Making Significant Changes
When making significant changes to your WordPress website, such as switching themes, performing a complete design overhaul, or replacing major plugins with alternative WordPress plugins, it is highly recommended to utilize a staging environment. This allows you to safely test these major changes without affecting the live website.
A large website such as a WooCommerce store, LMS, or a membership site should not take risks and make changes directly on live sites. No matter how large or complex a WordPress website is, with the InstaWP Connect plugin, you can easily create an exact copy of your WordPress sites within minutes.
Quick Tests
The WordPress ecosystem is vast, with many plugins, themes, and tools on offer. That is why a test environment like a staging site is a good place to test all the new plugins and themes and get familiar with them.
Create Sites From Templates
Staging sites can also be used as a starter template. It means that you can preinstall and configure all your favorite plugins in one staging site, and whenever you onboard a new customer, you can quickly create a new site from the staging template site.
This way, you can significantly improve your development time and deliver projects faster to your clients. With InstaWP, you can create your own templates and use them to launch more sites and push them to live hosting.
Testing New Security Plugins and Policies
When it comes to implementing and integrating security measures into a website or performing new upgrades, it is critical to properly test these new modifications so that they do not affect the efficiency of a live website.
If you build a staging site, you can undertake a comprehensive review of the effects of installing security measures or updates on your staging site before implementing them on your main site. This reduces the possibility of encountering any potential obstacles, such as disruptions or weaknesses.
Preparing for a New Campaign
If you run an online store and want to try out a new product launch or see how well your promotional efforts will look, an easy way to test it is in a staging environment.
Optimizing the website for the user, which in turn improves the website’s overall performance, is best accomplished through testing these modifications before deploying them on a live website.
By simulating the conditions that actually exist, you can ensure that your e-commerce platform will continue to operate faultlessly and effectively even during peak shopping periods. Your business will continue to function without any hiccups as a result of this measure, which helps eliminate any potential disruptions.
How to create a WordPress staging environment with InstaWP
Now, we will take a deeper dive into InstaWP and explain various ways how to create a WordPress staging site.
Method #1: Creating a Staging Site from a Live WordPress Website
Okay. For this, to answer “how to set up a WordPress staging site,” we will use the InstaWP Connect plugin, which is completely free to use on unlimited websites.
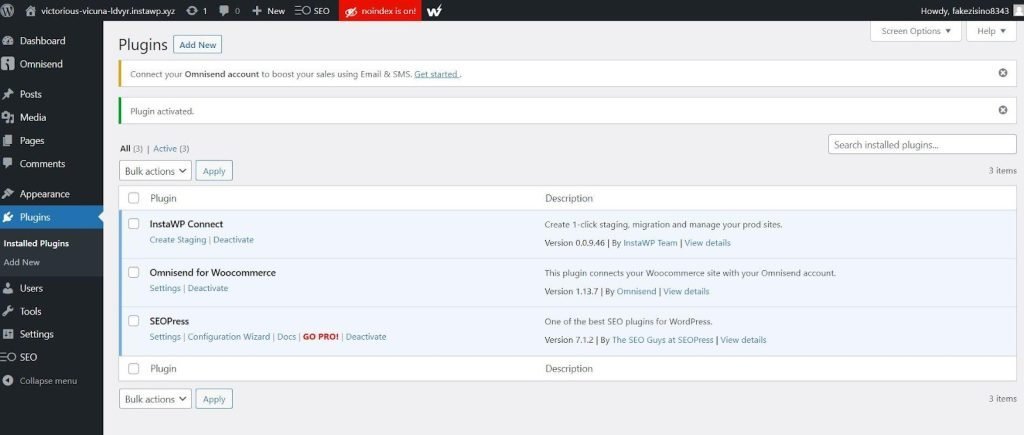
First, install the InstaWP Connect plugin on your live website where you wish to create a staging site.
In order to do this, login to your live website and navigate to Plugins > Add New Plugins, search for “InstaWP”, and then Install and Activate the InstaWP Connect Plugin.
Next, click on Create Staging to start the process.
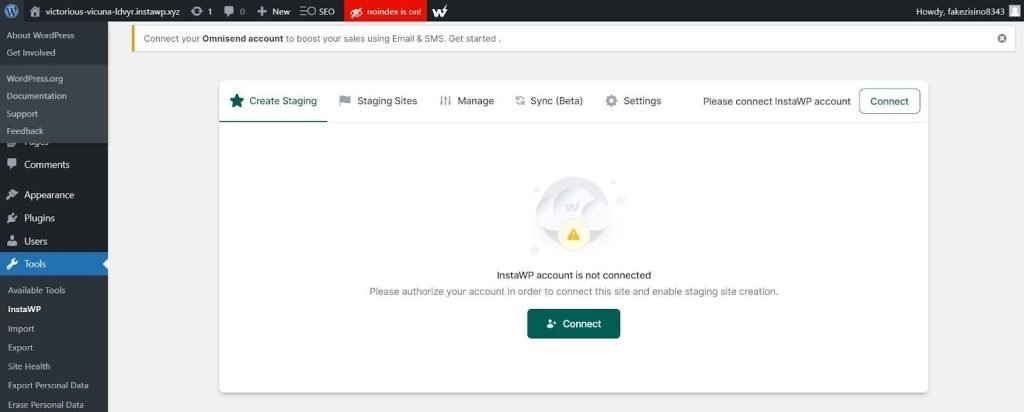
Click “Connect,” and you will be taken to the login page on Instawp.com. If you already have an account, you can sign in to that, or else, you can create an account to start using InstaWP.
After you have created the account, you will need to approve the request to connect your live WordPress website with the InstaWP dashboard.
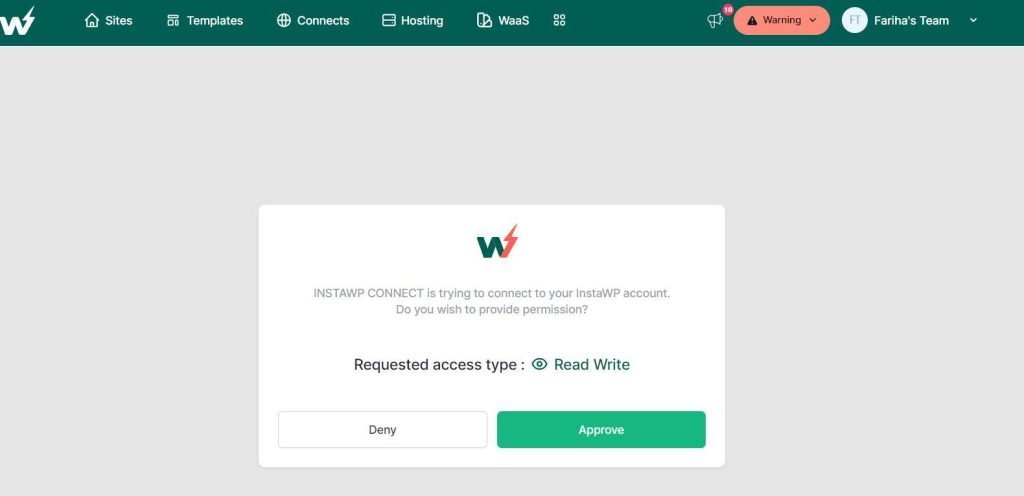
Once you click Approve, you will be taken back to your live WordPress dashboard, and then you will have the option to create “Quick,” “Full,” or “Custom Staging”. We will create Full Staging for this tutorial.
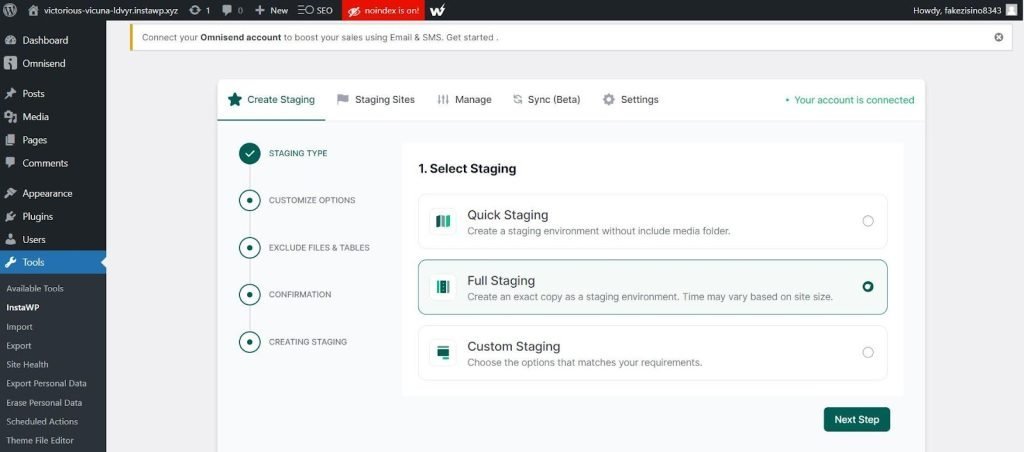
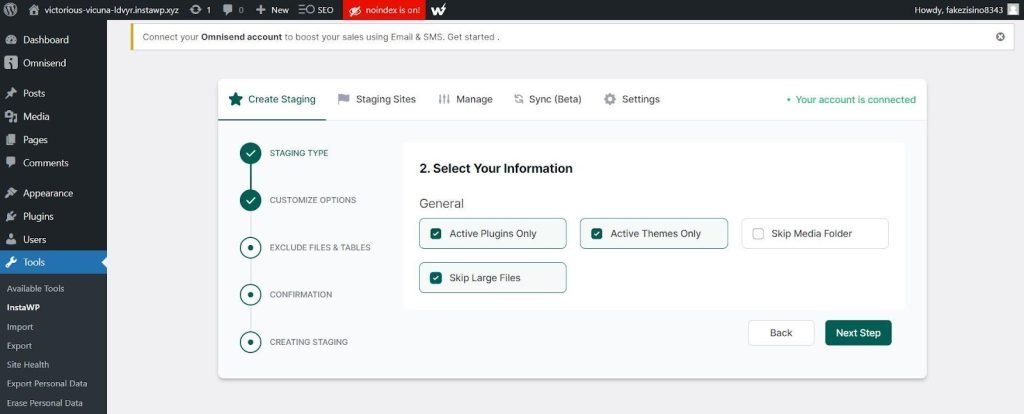
In the next step, you can select which files to include. Since we are making a full staging, we will include all themes, plugins and files.
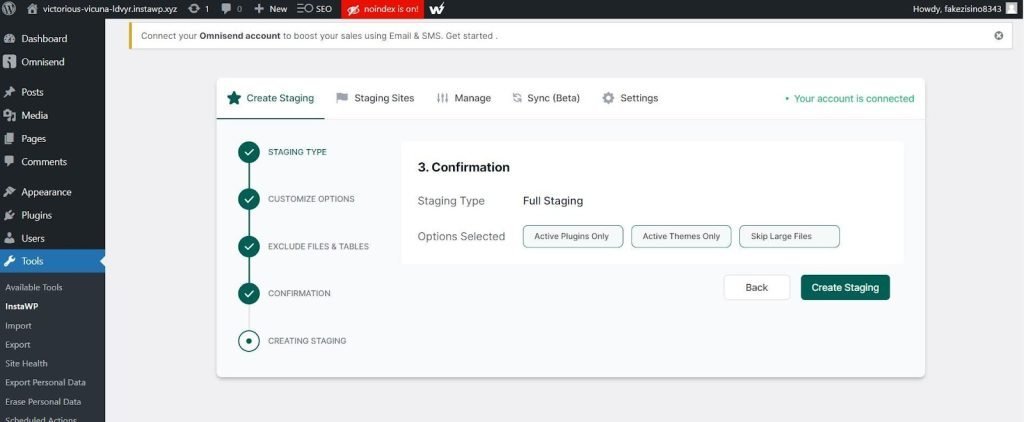
The final step is confirmation to create the staging site and also check your selected settings.
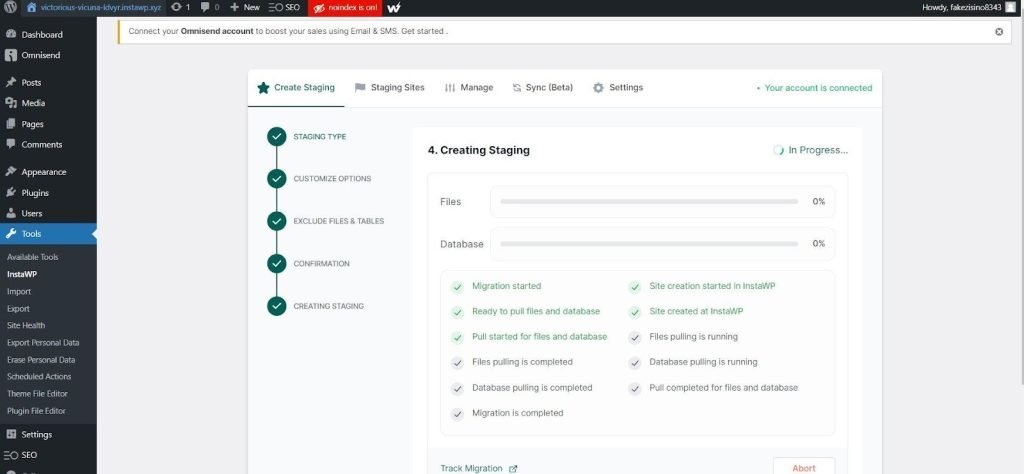
That’s it, a full staging site, that is the exact copy of your live website will be created inside the InstaWP dashboard.
Method #2: Creating Staging Sites From Templates
As mentioned before in the article, templates are great ways to create starter sites that have preconfigured plugins and themes with your desired settings.
To create a template, navigate to “Templates” from the top menu in the InstaWP dashboard and click “Add New.”
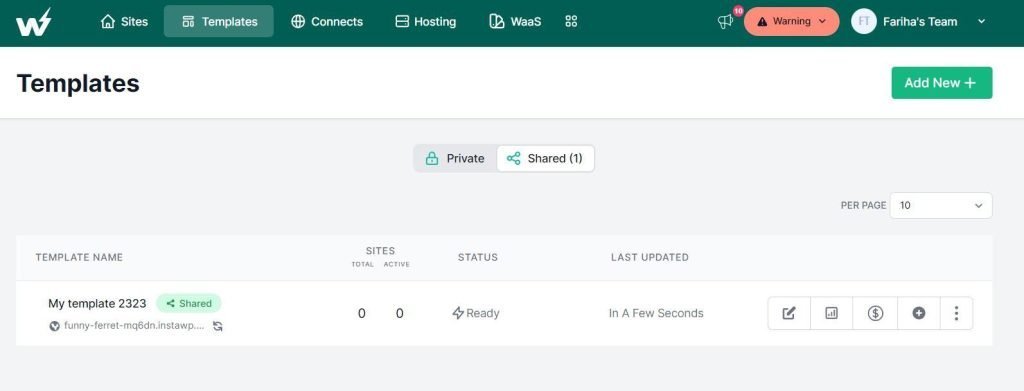
A popup will appear asking you which site to create the template of. Select the one you desire and continue to the next step.

In this step, you will need to name your template site to something that is easier to remember and recall.
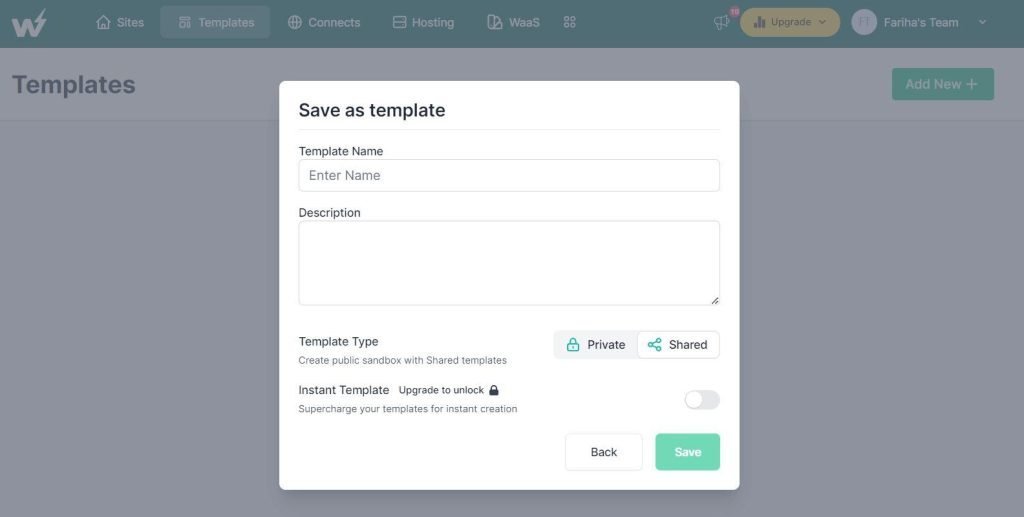
These template sites contain all the plugins and themes, and you can easily clone them to new sites or share these templates with your team members for quick access.
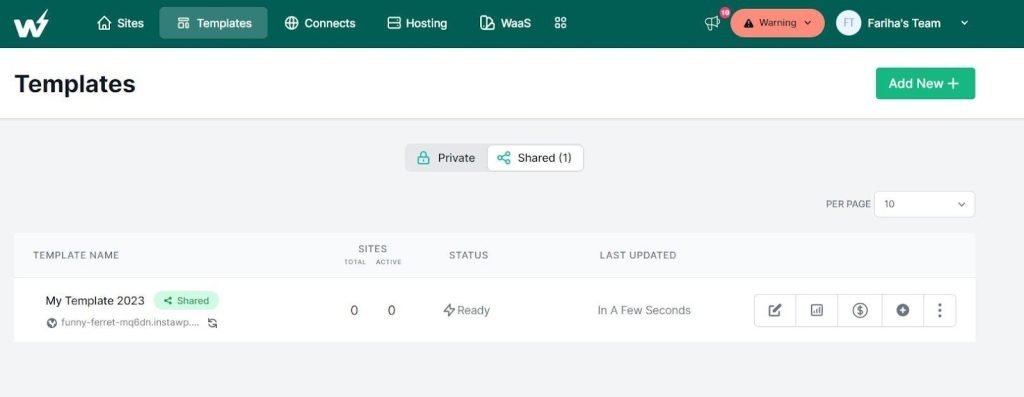
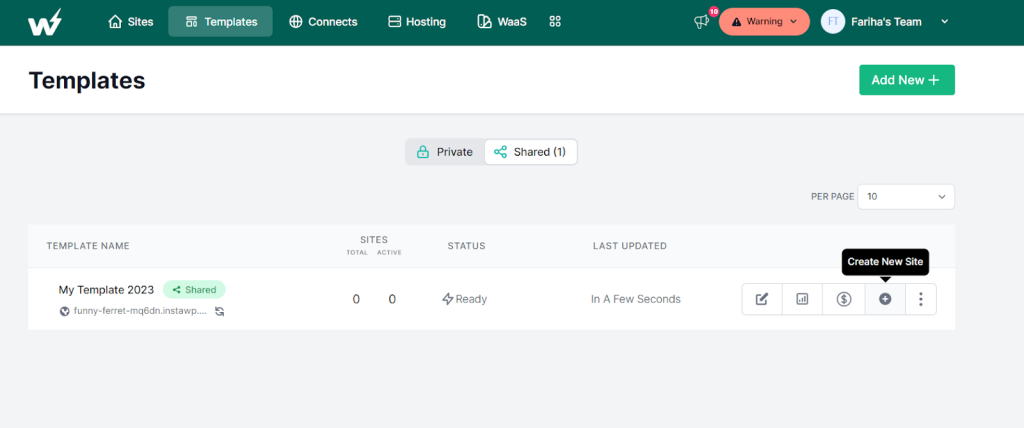
In order to create a staging site from templates, click on the “+” icon to start creating a staging site.
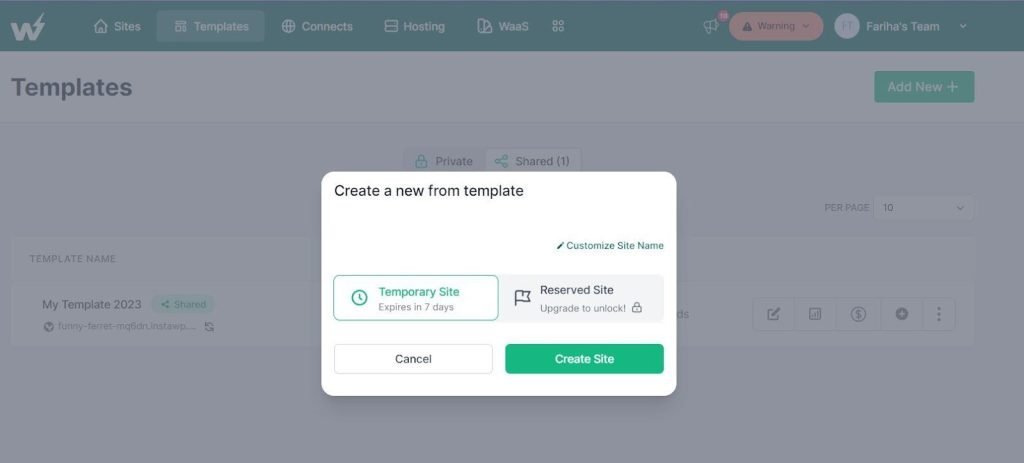
Now, just select whether you want a temporary site or a restricted site. Once you create the site a new staging site that is an exact replica of your template will be created in an instant.
Conclusion
InstaWP revolutionizes your workflow, offering multiple methods to create a staging website. The best part is that setting up new staging sites takes only minutes, so you can begin using them instantly.
Why not experience the benefits of InstaWP firsthand? Sign up today and aside from being able to instantly make a staging website for WordPress, unlock a plethora of features that enhance your development workflow. Discover how InstaWP can accelerate your work, providing you with streamlined processes and improved efficiency. Don’t miss out on the opportunity to optimize your development experience with InstaWP.
FAQs
What is a WordPress staging site?
A staging site is a clone of your live WordPress website where you can safely test changes, new features, and updates without affecting your live site.
Why should I use a staging site for my WordPress website?
Using a staging site allows you to experiment with changes, test performance, collaborate with team members, and troubleshoot bugs without risking your live website’s functionality.
How can I create a staging site with InstaWP?
You can create a staging site using InstaWP by installing the InstaWP Connect plugin on your live website and following the simple steps to create a full staging site.
Can I create staging sites from templates using InstaWP?
Yes, InstaWP allows you to create templates with preconfigured plugins and themes, which you can then use to quickly create new staging sites.
Is it easy to set up staging sites with InstaWP?
InstaWP makes it easy to set up staging sites, with the process taking only a few minutes. You can start using your staging site immediately after creation. When we say it takes only 1 click, we really mean it!


