Google Shopping is where most WooCommerce stores find their highest intent traffic, and the whole channel runs on one thing: a clean product feed. Get the feed right and your products appear with the correct price, image, and stock status. Get it wrong and Google Merchant Center rejects your items, often quietly, while you wonder why your campaigns are not spending.
This guide covers creating Google Shopping feeds for WooCommerce from scratch using CTX Feed Pro, and then how to optimize product feeds for Google Shopping so they keep getting approved. We will also handle the two situations that trip up growing stores: running multiple Google Shopping feeds, and building multilanguage Google Shopping feeds for international markets.
Table of Contents
Key Takeaways
- A Google Shopping feed is a structured file of your products that Google Merchant Center reads. WooCommerce does not generate one natively, so you need a feed plugin.
- CTX Feed Pro ships a ready made Google Merchant Center template, maps your WooCommerce categories to Google’s official taxonomy, and refreshes the feed on a schedule.
- Build and test the feed on a staging site first, because a malformed feed pushed live can get your entire Merchant Center account suspended.
- Optimization comes down to four things: product titles, unique identifiers, category mapping, and custom labels.
- Multiple feeds and multilanguage feeds are separate configurations, not separate plugins. One install can drive all of them.
Google Shopping Feeds Explained
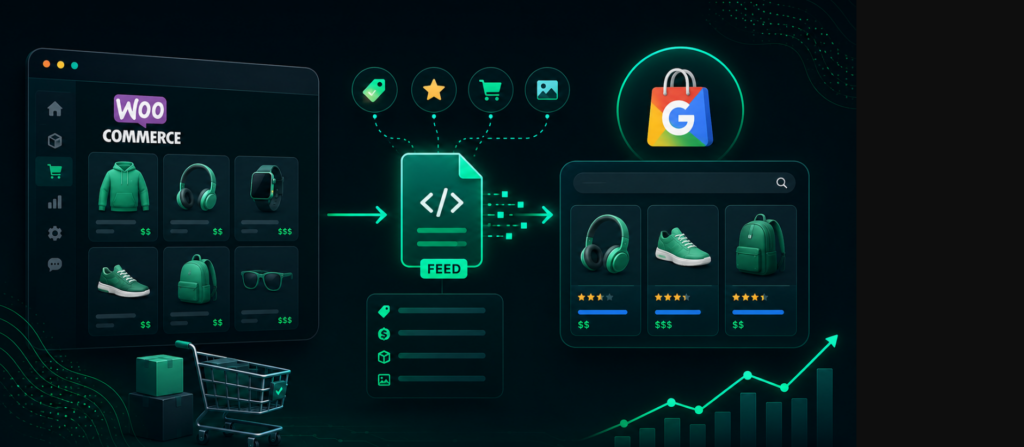
A Google Shopping feed is a structured file, usually XML or CSV, that lists every product you want to advertise along with the attributes Google needs to understand it. Google Merchant Center fetches that file on a schedule, validates it, and makes the approved products available to Shopping ads, free listings, and Google’s shopping surfaces.
How a Google Shopping feed flows
Everything you configure happens at step 2. Steps 3 and 4 then run on their own, which is why getting the mapping right once matters so much.
Every item in the feed has to carry a set of required attributes. At minimum Google expects:
- id, a unique and stable identifier for the product
- title and description
- link and image_link
- price and availability
- brand plus a unique identifier such as gtin or mpn
- condition and google_product_category
Here is what that actually looks like. Below is a single item from a dummy Google Shopping feed, showing the attributes CTX Feed Pro fills in for every product in your catalog:
<?xml version="1.0" encoding="UTF-8"?>
<rss version="2.0" xmlns:g="http://base.google.com/ns/1.0">
<channel>
<title>Example WooCommerce Store</title>
<link>https://example-store.com</link>
<item>
<g:id>WC-1042-BLK-09</g:id>
<g:title>Nike Air Zoom Pegasus 41 Running Shoes, Men's, Black, UK 9</g:title>
<g:description>Lightweight everyday running shoe with responsive Air Zoom cushioning and a breathable mesh upper.</g:description>
<g:link>https://example-store.com/product/air-zoom-pegasus-41/</g:link>
<g:image_link>https://example-store.com/wp-content/uploads/pegasus-41-black.jpg</g:image_link>
<g:price>129.99 GBP</g:price>
<g:sale_price>104.99 GBP</g:sale_price>
<g:availability>in_stock</g:availability>
<g:condition>new</g:condition>
<g:brand>Nike</g:brand>
<g:gtin>0195244598762</g:gtin>
<g:mpn>FD2722-001</g:mpn>
<g:google_product_category>Apparel & Accessories > Shoes</g:google_product_category>
<g:size>UK 9</g:size>
<g:color>Black</g:color>
<g:custom_label_0>bestseller</g:custom_label_0>
</item>
</channel>
</rss>Every one of those tags maps back to something that already exists in WooCommerce. Building a feed is really just deciding which WooCommerce field belongs in which tag, which is exactly what the steps below walk through.
WooCommerce stores this data, but it stores it in its own structure. It has no built in way to translate a WooCommerce product into Google’s expected format, handle variable products correctly, or keep the file refreshed as prices and stock change. That translation layer is exactly what a product feed plugin does.
That is the short version of Google Shopping feeds explained. Now let us build one.
How to Create Google Shopping Feeds for WooCommerce
Most store owners arrive at this task the same way. You have a WooCommerce catalog that is already selling, someone suggests Google Shopping, and then you discover that Google will not simply read your product pages. It wants a feed, in its own format, with its own required fields, refreshed on its own schedule.
The good news is that this is a configuration job rather than a development one. You are not writing code. You are choosing somewhere safe to work, installing a feed plugin, telling it which WooCommerce field maps to which Google attribute, and letting it publish a file that Google collects on its own.
Step 1: Start on Managed WordPress Hosting With Staging
Before you install anything, decide where you are going to do the work. This is the step most guides skip, and it is the one that saves you the most pain later.
Feed configuration is genuine development work. You will install a plugin, generate large files, run scheduled jobs, and iterate on attribute mapping several times before the output is correct. Doing that directly on a live store is risky for three concrete reasons:
- Generating a feed for a large catalog is resource heavy and can slow down or time out a busy store.
- A half configured feed that Google fetches mid edit produces a wave of disapprovals, and repeated policy violations can lead to a Merchant Center suspension.
- Feed plugins interact with caching, SEO, and multi currency plugins, so conflicts surface only once everything is running together.
The fix is to choose managed WordPress hosting that gives you a real staging environment, so you can do the setup work on a copy of your store and push it live only once it is verified.
InstaWP is built around exactly this workflow. It is a managed WordPress host where staging is not a bolt on extra, it is the default way you work:
- Spin up a staging copy in seconds. Clone your live WooCommerce store, products and all, without touching production.
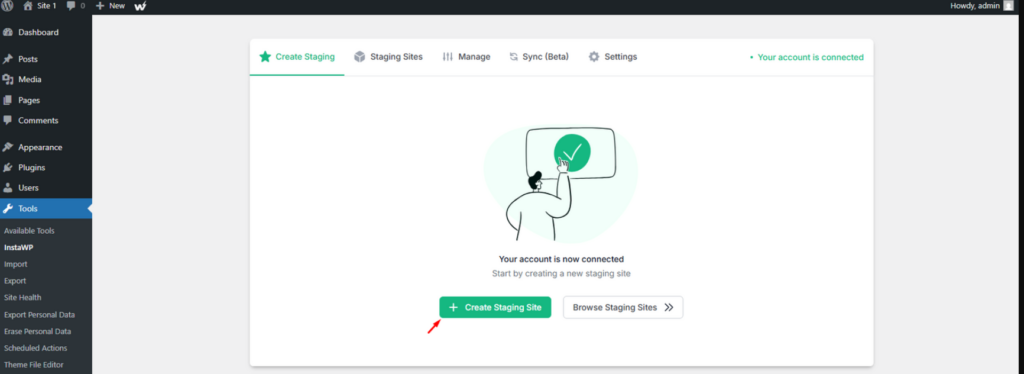
- Test the feed in isolation. Generate the file, break it, fix it, and regenerate it as often as you need. Nothing you do reaches your customers or Google.
- Share a preview link. Send the staging site to a client or a paid media consultant for sign off before anything ships.
- Push to live when it is right. Move the verified configuration across rather than repeating the setup by hand on production.
If you manage stores for clients, this matters even more. Feed setup is rarely a one time job, because catalogs, promotions, and Google’s own requirements keep changing. Having a disposable copy of every client store available on demand turns a nervous live edit into a routine, reversible change.
Set up your staging site now, and do every remaining step in this guide there first.
Must Watch:
Step 2: Install CTX Feed Pro
With your staging site ready, install the feed plugin. CTX Feed is the most widely used product feed manager for WooCommerce, with over 8.5 million downloads on WordPress.org and support for more than 220 shopping and social channels.
The free version handles a standard Google Shopping feed well. CTX Feed Pro is what you want once your catalog or your requirements grow, because it adds the pieces this guide relies on later:
- Advanced filtering, so you can include or exclude products by any condition
- Dynamic attribute creation, for building attributes your store does not already have
- Custom XML templates, for channels with unusual feed structures
- FTP and SFTP auto upload, to push feeds to channels automatically
- Google Content API integration, for pushing directly into Merchant Center instead of relying on scheduled fetches
- Multi vendor feeds, if you run a marketplace on Dokan, WCFM, or similar
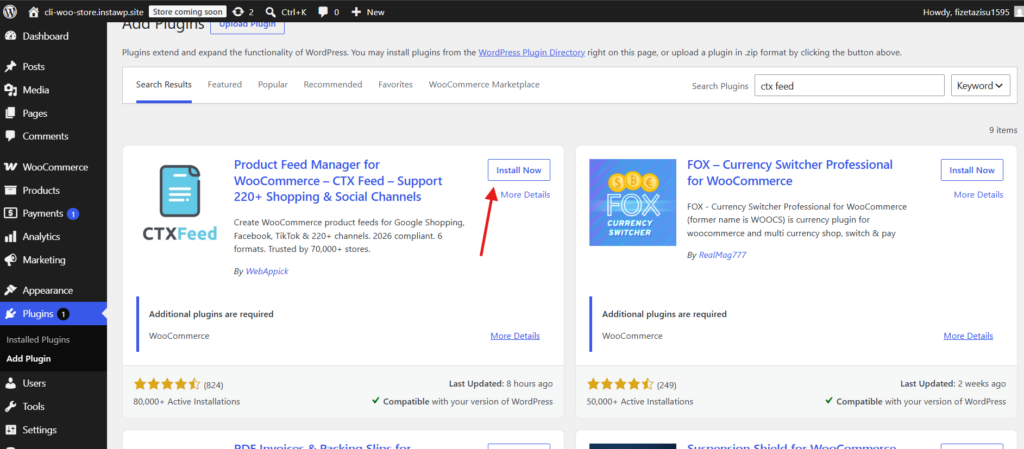
Install and activate it the usual way, from Plugins, Add New for the free build, or by uploading the Pro zip you received at purchase. Once active, a CTX Feed menu appears in your WordPress sidebar.
Step 3: Creating Google Shopping Feeds With CTX Feed Pro
This is the core of the process. Creating Google Shopping feeds with CTX Feed Pro takes four passes: choose the template, map your categories, confirm the attributes, then generate.
3.1 Choose the Google Merchant Center template
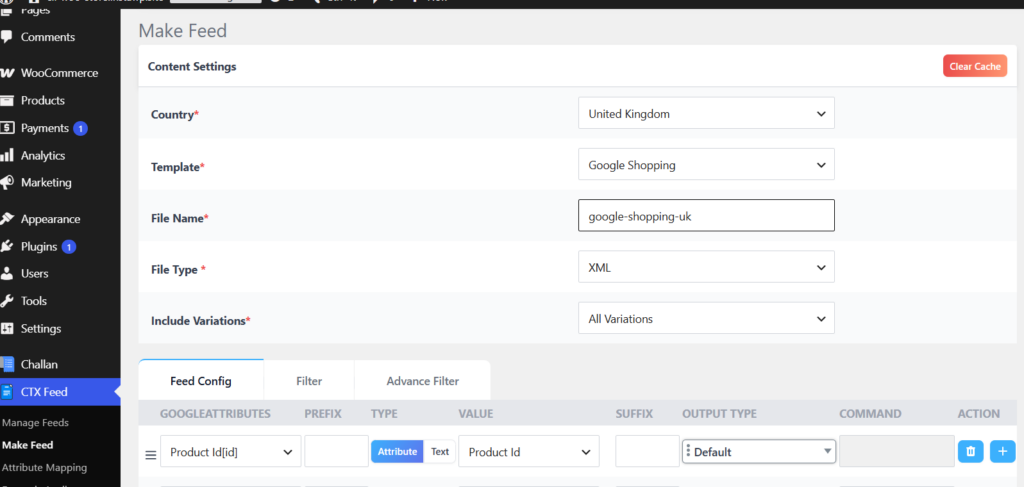
Go to CTX Feed, Make Feed. In the feed configuration panel, set:
- Template to Google Merchant Center (or Google Shopping, depending on your version). This pre loads every attribute Google requires, which is the single biggest reason to use a template rather than building a feed by hand.
- Feed name to something you will recognise later, such as google-shopping-uk. You will thank yourself once there are several feeds in the list.
- File type to XML for Google. CSV also works, but XML is the safer default for Merchant Center.
- Country and currency to match the Merchant Center target you are feeding.
3.2 Map your categories to Google’s taxonomy
Google maintains its own product taxonomy, and it does not know what your WooCommerce categories mean. Unmapped or badly mapped categories are one of the most common causes of disapproval.
CTX Feed includes a category mapping tool that lets you match each WooCommerce category to the official Google product category. Open CTX Feed, Category Mapping, work down your category list, and assign the closest Google equivalent to each one.
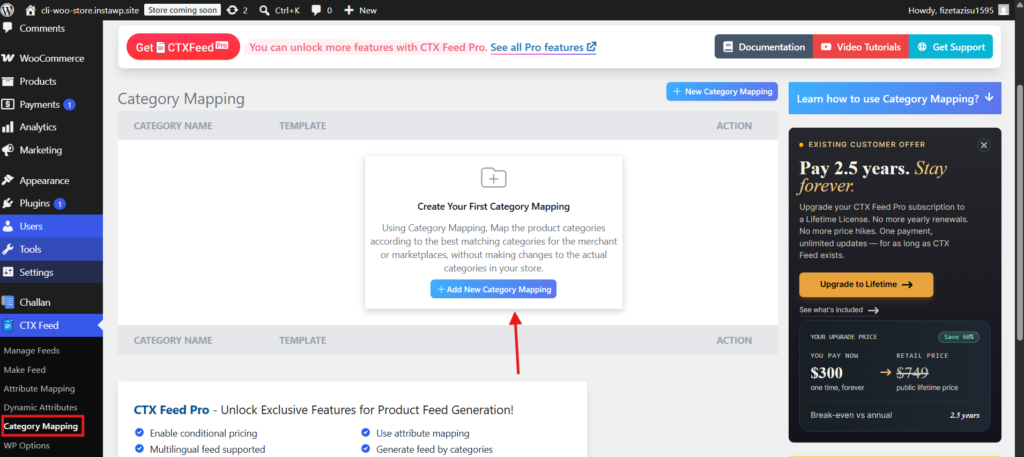
Be specific. Apparel and Accessories, Clothing, Shirts and Tops performs considerably better than a vague top level pick.
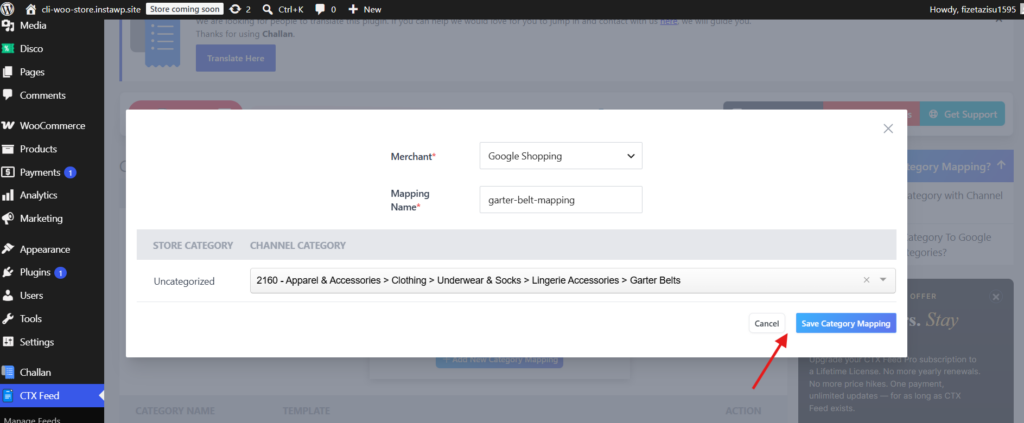
Do this once and every feed you build afterwards inherits the mapping.
3.3 Confirm the required attributes
The template gives you the right attribute rows. Your job is to make sure each one points at the correct source in your store. Work through the attribute table and check that:
- id uses a stable value such as SKU or product ID, never something that changes when you edit a product
- brand is mapped to a real brand field, whether that is a WooCommerce attribute, a brands plugin, or a custom field
- gtin or mpn is mapped wherever you hold it, since items without an identifier get limited reach
- description is set to strip HTML and shortcodes, so your feed does not carry page builder markup into Google
- availability reflects real WooCommerce stock status rather than a fixed value
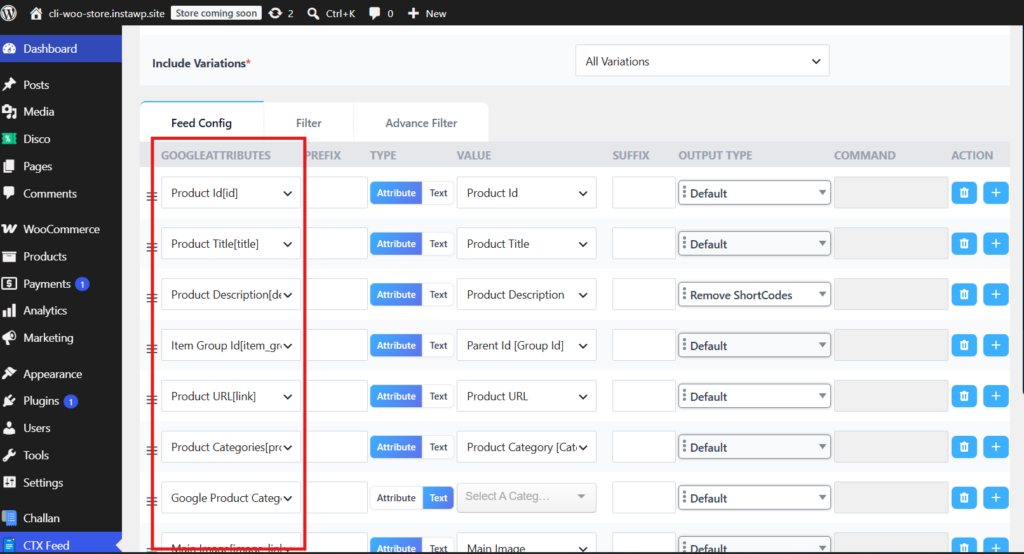
If your store sells variable products, confirm that variations are being output as individual items. Each size or colour a shopper can actually buy needs to be its own row in the feed.
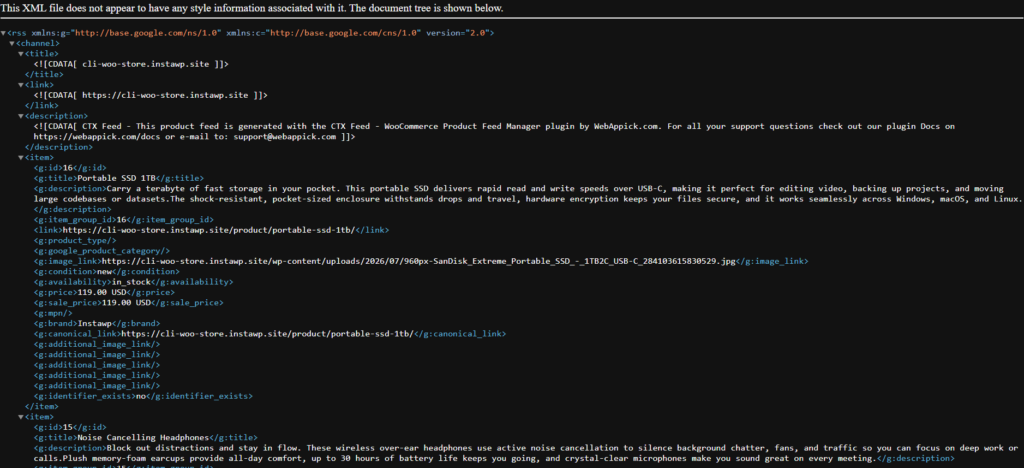
3.4 Generate the feed and actually read it
Click Update and Generate Feed. CTX Feed processes the catalog in batches, which is why it can handle stores with tens of thousands of products without exhausting memory or timing out.
Once all this information is ready, click on Update and Generate Feed.
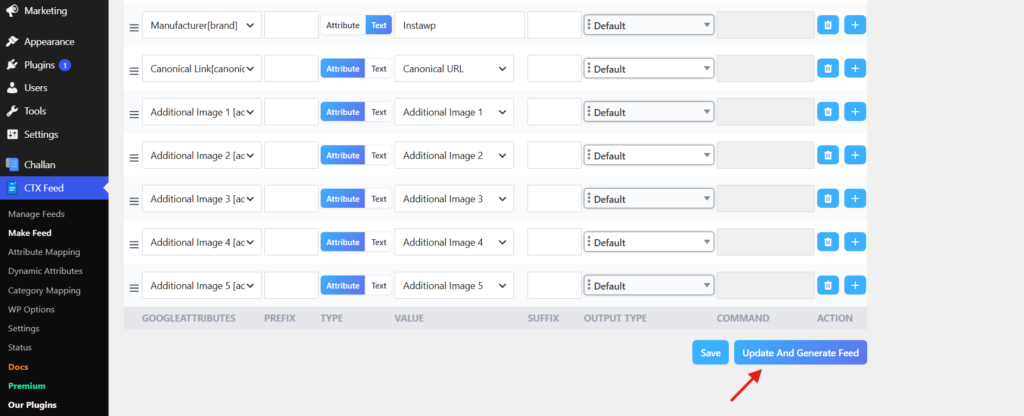
When it finishes you get a feed URL. Open it in a browser and read the first few items properly. You are checking for empty attribute values, prices that render without a currency, descriptions full of leftover HTML, and image links that do not resolve. Catching these on staging takes minutes. Catching them in Merchant Center takes days, because you are waiting on Google’s review cycle each time.
Step 4: Submit the Feed to Google Merchant Center
Once the output looks right, push the configuration to your live site and use the live feed URL from here on. Google needs to reach a publicly available file, and a staging URL is neither permanent nor meant to be crawled.
In Merchant Center:
- Verify and claim your store’s domain if you have not already.
- Go to Products, Feeds and add a primary feed.
- Choose Scheduled fetch and paste your live CTX Feed URL.
- Set the fetch frequency to match how often your prices and stock move. Daily is right for most stores.
- Fetch now, then review the diagnostics report.
Expect warnings on the first pass. That is normal. Diagnostics tells you precisely which attribute is missing on which item, and each one maps back to a row in your CTX Feed attribute table.
If you are on CTX Feed Pro, the Google Content API integration is worth setting up instead of scheduled fetch. It pushes product data to Merchant Center directly, so updates land faster and you are not dependent on Google getting round to fetching your file.
Step 5: Keep the Feed Fresh Automatically
A feed is only useful while it is accurate. If a product sells out and your feed still says it is in stock, you pay for clicks that land on an unavailable item, and Google eventually penalises the mismatch.
In CTX Feed, open your feed’s settings and enable scheduled regeneration. Align it with your Merchant Center fetch schedule so Google always collects a file that was rebuilt shortly before. For most stores, regenerating daily and fetching daily is enough. If you run frequent flash sales or your stock turns over quickly, increase both.
How to Optimize Google Shopping Feeds
Getting approved is the starting line, not the finish. Knowing how to optimize product feeds for Google Shopping is what separates a feed that technically works from one that earns impressions on the queries you care about. Here is where the return actually comes from.
Write titles the way shoppers search
Your product title is the strongest relevance signal in the whole feed. Google matches queries against it heavily, and most WooCommerce titles are written for a product page rather than for a search result.
A reliable pattern is Brand, Product Type, Key Attribute, Model. So “Nike Air Zoom Pegasus 41 Running Shoes, Men’s, Black, UK 9” rather than “Pegasus 41”. Front load the words people search for, because titles get truncated in the interface.
CTX Feed Pro lets you build the title attribute from a combination of fields rather than pulling the raw post title, so you can apply this pattern across a whole catalog without editing products one at a time.
Get your product identifiers right
GTIN, MPN, and brand together tell Google exactly which product you are selling. Supply them and your items become eligible for richer placements and comparison surfaces. Leave them out and Google restricts how widely it shows your products, which quietly caps your reach.
If you hold identifiers in a custom field or an ACF group, map that field in the attribute table. If you genuinely do not have them, because the products are handmade or own brand, set identifier_exists to false rather than leaving the fields blank.
Use custom labels to control bidding
Custom labels are the most underused attribute in Google Shopping. They do nothing for shoppers, but they let you segment your catalog inside Google Ads so you can bid differently on different kinds of product.
Useful segments to encode include margin band, seasonality, bestseller status, clearance stock, and price bracket. With CTX Feed Pro’s filtering and dynamic attributes you can generate these labels from existing product data instead of tagging thousands of products manually.
Keep images and availability honest
Use the highest quality primary image you have, on a plain background, with no promotional text or watermarks overlaid. Google rejects images with added marketing overlays. Map additional_image_link to your product gallery so shoppers get more than one angle.
For availability, always pull the live WooCommerce stock status. A hardcoded “in stock” value is one of the fastest ways to accumulate mismatch warnings.
Exclude what should not be advertised
Not every product deserves ad spend. Zero margin lines, out of stock items, spare parts, gift cards, and restricted categories are usually better kept out of the feed entirely.
CTX Feed Pro’s advanced filtering handles this with rules rather than manual exclusion lists, so you can filter by category, stock status, price range, tag, or any custom field, and the rule keeps applying as your catalog changes.
How to Run Multiple Google Shopping Feeds
Most growing stores end up needing more than one feed. Multiple Google Shopping feeds are useful when you:
- sell into several countries, each with its own currency and shipping setup
- want a separate high margin feed for aggressive bidding and a broad feed for coverage
- run Local Inventory Ads alongside standard online listings
- need distinct feeds per brand, per vendor, or per seasonal campaign
In CTX Feed each feed is its own configuration with its own template, filters, country, currency, and schedule. There is no limit on how many you create, and they all draw from the same WooCommerce catalog and the same category mapping, so you are not duplicating setup work.
Two things make this manageable at scale. Name feeds consistently, using something like channel-country-segment, and submit each one as a separate primary feed in Merchant Center rather than trying to merge them. Merged feeds are far harder to debug when a single segment starts failing.
This is also the point where staging earns its place again. Adding a fifth or sixth feed to a store that already generates several is exactly the moment you discover a scheduling or memory limit, and you would much rather discover it on a copy.
Multilanguage Google Shopping Feeds
If you sell across languages, you cannot submit one feed and hope Google works it out. Google expects the product data for each target market to be in that market’s language and currency. Multilanguage Google Shopping feeds mean one feed per language and country pair.
CTX Feed integrates with the translation and currency plugins WooCommerce stores actually use, including WPML, Polylang, TranslatePress, and Weglot for languages, and CURCY, Aelia Currency Switcher, and WooCommerce Multi Currency for pricing.
The setup pattern is straightforward once you see it:
- Create one feed per target market, for example German for Germany, French for France.
- Set that feed’s language so it pulls the translated titles and descriptions rather than the source language.
- Set the matching currency so prices are output in what the shopper will actually be charged.
- Confirm the product links point to the translated URLs, not the default language version. This is the step people miss, and it causes a landing page mismatch that Google flags.
- Submit each feed to the Merchant Center account and target country it belongs to.
Check translated output carefully before you submit. Partially translated catalogs are common, and a feed that silently falls back to English for untranslated products will underperform in local results without ever throwing an error.
Common Google Shopping Feed Errors and How to Fix Them
- Missing required attribute. Diagnostics names the attribute. Map it in the CTX Feed attribute table, regenerate, and refetch.
- Invalid or missing GTIN. Either the value is wrong, or the product has none. Correct the source data or set identifier_exists to false.
- Price mismatch between feed and landing page. Usually a currency or tax display difference. Check your feed’s currency setting and whether prices are output with or without tax.
- Image cannot be crawled. Often a hotlink protection, CDN, or firewall rule blocking Google’s crawler.
- Feed times out during fetch. Your file is being generated on demand rather than served as a static file. Enable scheduled generation so Google fetches a file that already exists.
- Generic image errors after a redesign. Check that image URLs were rewritten correctly, particularly after a migration.
For anything that involves changing plugin settings, theme code, or server configuration, reproduce it on your staging copy first. Merchant Center errors are frustrating enough without adding a broken store to the situation.
Conclusion
Creating Google Shopping feeds for WooCommerce comes down to a repeatable sequence: work on staging, use a template rather than hand building, map your categories to Google’s taxonomy, verify the output before Google sees it, then optimize the titles, identifiers, and labels that actually drive performance.
CTX Feed Pro handles the generation, filtering, scheduling, and multilanguage work so you are configuring a feed rather than maintaining a script. A managed WordPress host with instant staging, such as InstaWP, gives you somewhere safe to do that configuration, and somewhere to reproduce problems later without gambling with a live store or a Merchant Center account.
Set up the staging site, build the feed properly once, and the channel largely runs itself after that.
FAQs About Google Shopping Feeds for WooCommerce
Does WooCommerce create a Google Shopping feed by default?
No. WooCommerce stores product data but has no built in way to output it in the format Google Merchant Center expects. You need a product feed plugin such as CTX Feed to generate and maintain the file.
How often should a Google Shopping feed be updated?
Daily suits most stores. If your prices or stock levels change frequently, increase both the feed regeneration schedule and the Merchant Center fetch frequency so the two stay aligned.
Can I create multiple Google Shopping feeds from one WooCommerce store?
Yes. Each feed is a separate configuration with its own template, filters, country, currency, and schedule. Stores commonly run separate feeds per country, per margin segment, or per campaign, all from a single plugin install.
How do I build multilanguage Google Shopping feeds?
Create one feed per language and country pair, set the language and currency on each, and confirm the product links point at the translated URLs. CTX Feed works with WPML, Polylang, TranslatePress, and Weglot, along with the main multi currency plugins.
Why does Google keep disapproving my products?
The most common causes are missing required attributes, missing or invalid GTINs, a price mismatch between the feed and the landing page, and images Google cannot crawl. The Merchant Center diagnostics report names the specific attribute and item, which maps directly back to a row in your feed configuration.
Why build the feed on a staging site first?
Feed generation is resource heavy, feed plugins can conflict with caching and currency plugins, and a malformed feed fetched by Google produces disapprovals that are slow to clear. Building on a staging copy lets you iterate freely and push only a verified configuration to production.