If your WordPress site runs Google Ads or Google Analytics and gets any traffic from the EU, UK, or Switzerland, Google Consent Mode v2 is no longer optional. Without it, your conversion tracking goes dark, your remarketing audiences stop filling, and Google simply stops processing data from users in those regions.
The good news: you can be fully compliant in under 15 minutes using a Google-certified Consent Management Platform (CMP).
Table of Contents
What Is Google Consent Mode v2?
Google Consent Mode v2 is an API from Google that controls how Google tags behave based on whether a visitor has consented to cookies. Your CMP captures the consent choice on your cookie banner and passes it to Google as a set of signals. Google then either fires its tags normally or holds back, depending on what the user agreed to.
It works specifically with Google’s own services, including Google Ads, Google Analytics 4, Floodlight, and Conversion Linker. Version 2 added two new signals on top of the originals:
Quick Answer
What does Google Consent Mode v2 actually do?
Google Consent Mode v2 helps Google tags adjust how they behave based on a visitor’s consent choice. In WordPress, this usually means connecting a consent banner or CMP like Cookiebot with Google Tag Manager, GA4, and Google Ads.
What does Google Consent Mode v2 actually do?
Google Consent Mode v2 helps Google tags adjust how they behave based on a visitor’s consent choice. In WordPress, this usually means connecting a consent banner or CMP like Cookiebot with Google Tag Manager, GA4, and Google Ads.
Why It Matters (and What Breaks Without It)
Consent Mode v2 has been required since March 2024 for any advertiser targeting users in the European Economic Area. If you skip it, Google won’t process behavioral data from those users at all. In practical terms, this is what stops working:
- Conversion tracking goes blank for EEA traffic, so you can’t measure ad performance.
- Remarketing and personalized audiences stop refilling, shrinking your retargeting reach.
- Analytics data gets thin and inaccurate, which throws off every report you rely on.
- You risk regulatory exposure under GDPR and the Digital Markets Act.
How Google Consent Mode v2 Works
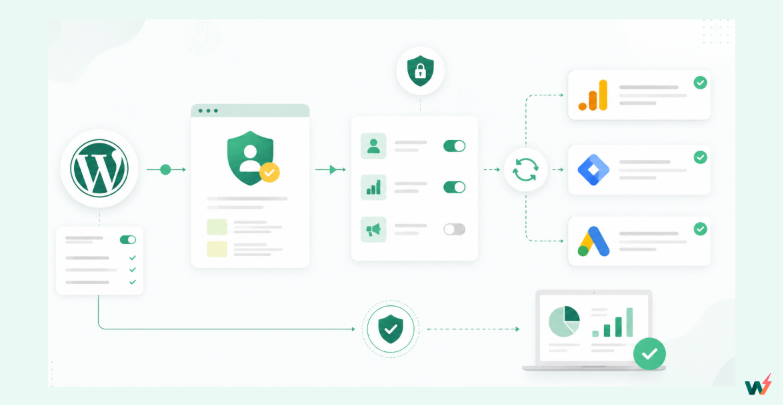
There are two ways to run Consent Mode, and Cookiebot supports both:
Basic Consent Mode blocks all Google tags from loading until the visitor makes a choice. If they ignore the banner, no data goes to Google at all. Simpler, more conservative, easier to set up.
Advanced Consent Mode loads Google tags immediately but in a restricted state. Before consent, tags send anonymous, cookieless “pings” so Google can model conversions using AI. Once the user consents, full data flows. This gives you far more accurate reporting and is what most advertisers should use.
The flow itself is simple:
- A visitor lands on your site and sees the Cookiebot banner.
- They Accept or Reject (or pick categories).
- Cookiebot passes the choice to Google’s Consent Mode API as the four signals.
- Google’s tags adjust their behavior automatically based on those signals.
3 Ways to Implement Google Consent Mode v2
There are three ways to get Consent Mode v2 onto a WordPress site. They differ a lot in difficulty, reliability, and how much code you have to touch. Here’s the honest breakdown, fastest and safest first.
Method 1: A Google-Certified CMP Plugin: Cookiebot (Recommended)
This is the method we walk through in full below, and it’s the one we recommend for the overwhelming majority of WordPress sites.
When it comes to set-up Google Consent Mode v2, the easiest method is to use a CMP plugin that handles the entire chain for you. Cookiebot by Usercentrics is the standout choice here. It’s a Google Gold-Tier certified CMP, supports IAB TCF 2.2, auto-scans and categorizes every cookie on your site, and keeps the consent logging you need for GDPR audits.
Because it’s certified, the signals it sends are validated to work correctly with Google Ads and GA4, so your conversion modeling actually kicks in.
And InstaWP users get an exclusive 50% off on Cookiebot for the fresh and existing WordPress sites, which makes this both the easiest and the most cost-effective path.
Here is the step-by-step guide.
Step 1: Set Up a Safe Staging Environment
Never test consent and tracking changes directly on your live production site. A misconfigured banner can silently block all your analytics or break a page, and you won’t know until your data dries up.
This is exactly where your hosting platform matters. InstaWP is a managed WordPress hosting provider built for this kind of workflow; production hosting with a global CDN, WAF security, and automated backups, plus one-click staging baked right in.
Instead of risking changes on the live site, you spin up a staging copy, configure Cookiebot there, verify it, and push it to production when you’re confident.
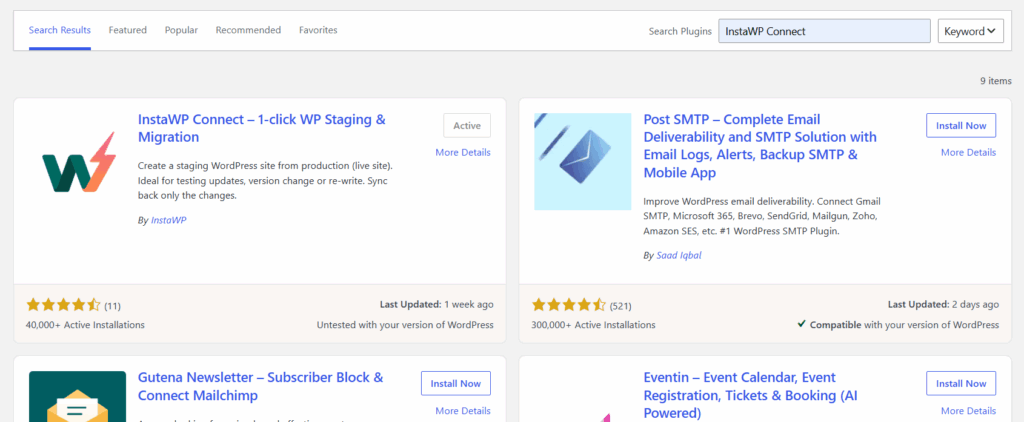
- In your live site’s wp-admin, go to Plugins → Add New and install the InstaWP Connect plugin from WordPress.org, then activate it.
- Connect your InstaWP dashboard.
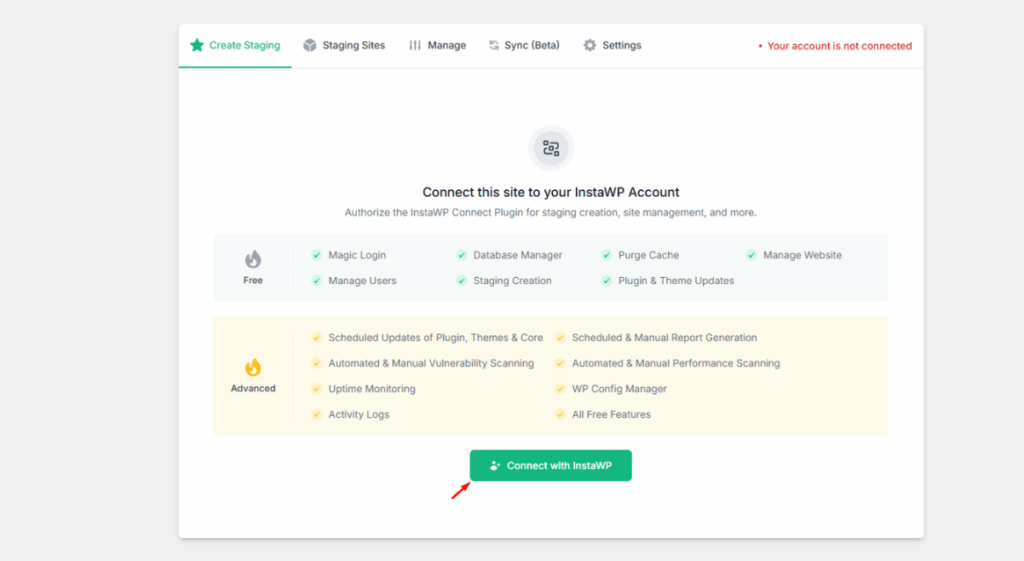
- Your production site now appears as a managed site inside InstaWP, ready for staging and sync.
Must Read: Create Staging Site
Step 2: Create a Staging Site and Enable 2-Way Sync
Now you’ll make a safe copy to build on, and link it to the live site so changes flow cleanly between them.
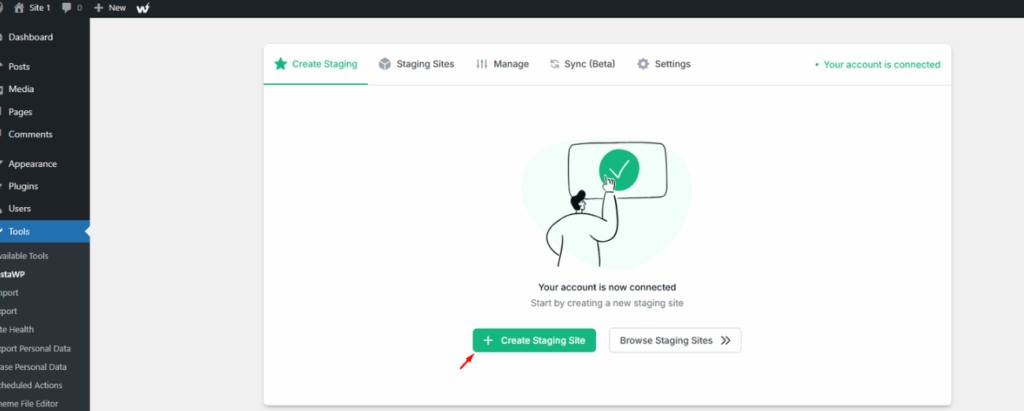
- From your managed site in the InstaWP dashboard, click to create a staging site. InstaWP spins up an exact, isolated copy of your production WordPress site in seconds.
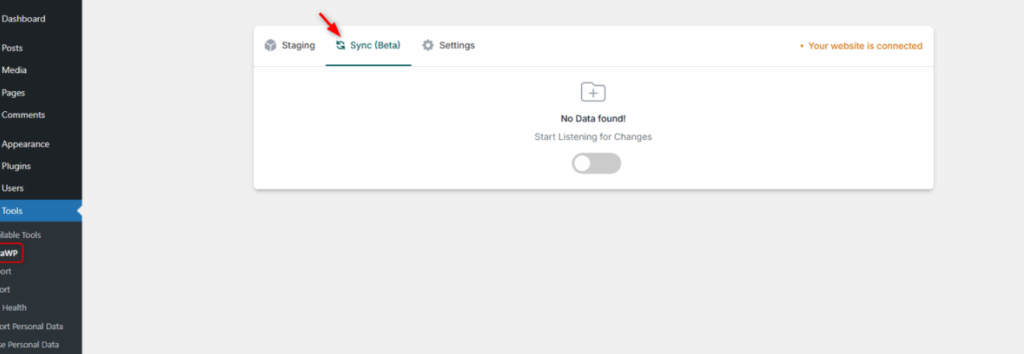
- Enable 2-Way Sync on both the staging site and the live site. This creates the link that lets you push changes from staging to production (and pull from production to staging) without manual file transfers or database exports.
Must Read: 2-Way Sync
- Confirm both environments show as connected and synced in your dashboard.
You now have a true staging environment that mirrors your live site exactly, so anything you verify on staging will behave identically when it goes live, with zero risk to live traffic or rankings.
Step 3: Create Your Cookiebot Account
Head to the Cookiebot signup page and create a free account.
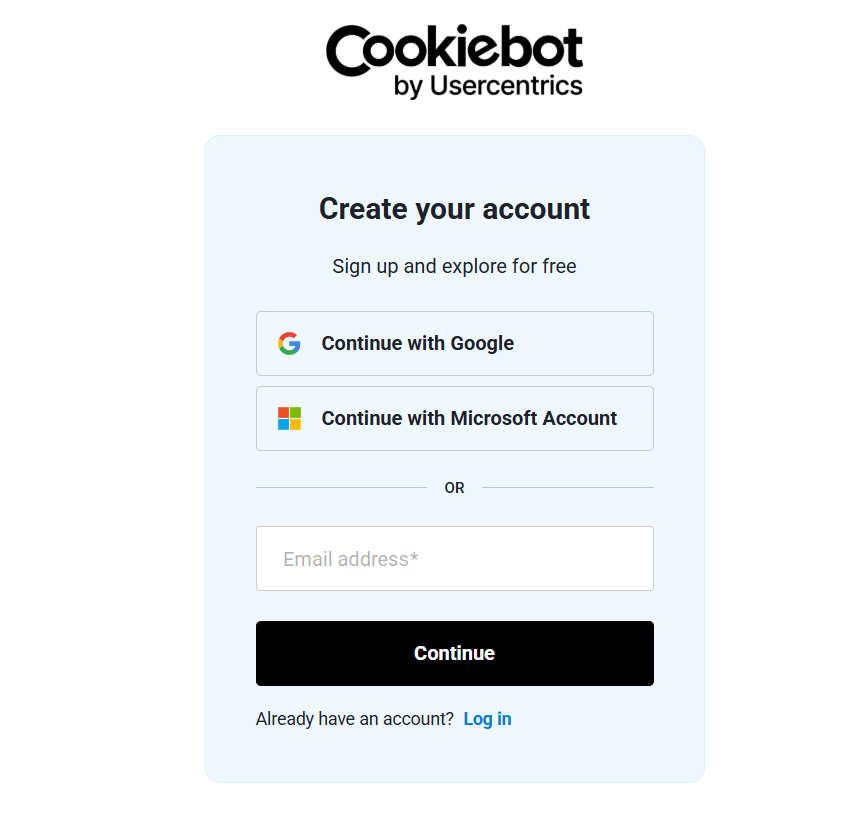
Cookiebot is a Google Gold-Tier certified CMP with TCF 2.2 support, so the consent signals it sends are validated to work correctly with Google Ads and GA4.
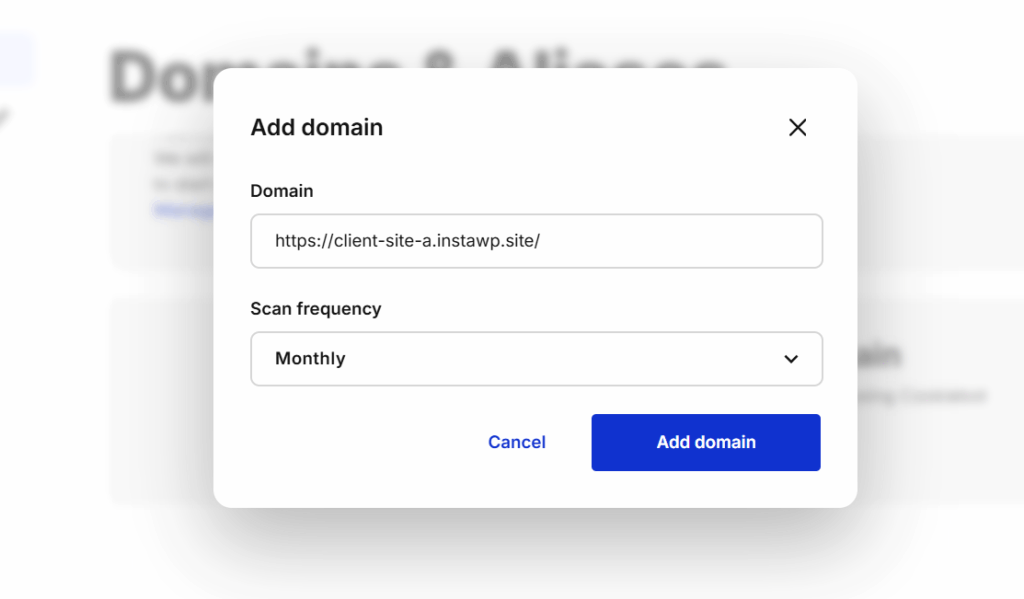
Add your website domain to create a domain group. Cookiebot generates a unique CBID (Domain Group ID) for it. You’ll need this in a moment.
Step 4: Install the Cookiebot Plugin on Your Staging Site
- In your staging site’s wp-admin, go to Plugins → Add New.
- Search for “Cookiebot CMP by Usercentrics.”
- Click Install Now, then Activate.
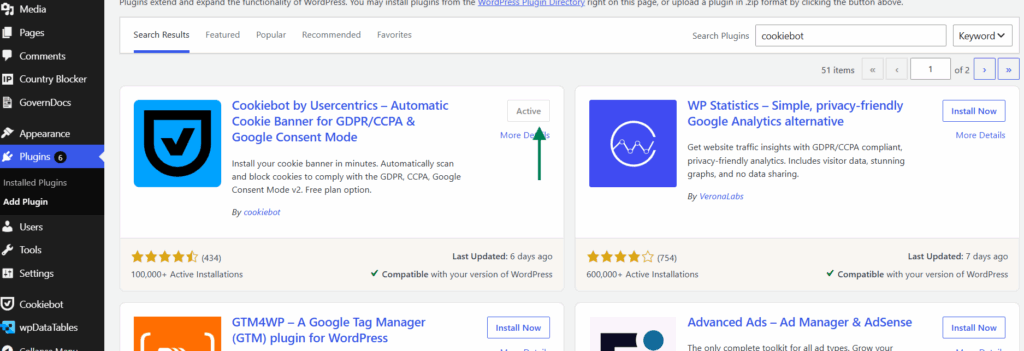
A new Cookiebot CMP menu item appears in your WordPress sidebar.
Why use Cookiebot for this setup?
Cookiebot keeps the WordPress setup practical. It handles the cookie banner, cookie scanning, consent storage, and Google Consent Mode v2 connection without forcing you to build a custom consent layer from scratch.
- Useful for WordPress sites running GA4, Google Ads, or GTM.
- Helps block cookies and trackers until consent is collected.
- Works well for agencies managing compliance workflows across client sites.
Step 5: Connect Cookiebot and Enable Consent Mode v2
- Open the Cookiebot CMP settings in wp-admin.
- Go to Setting to connect your account. Paste your CBID (Domain Group ID) into the configuration field and save.
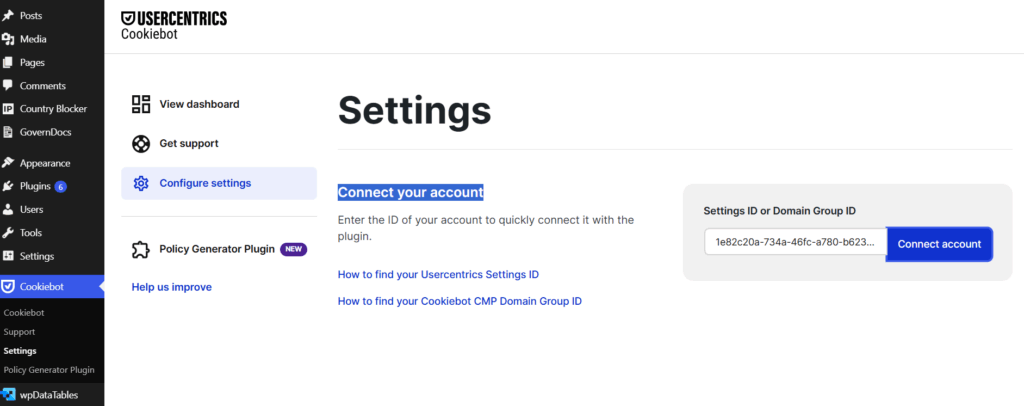
Must Read: Where you can find the Settings ID
- Find the Google Consent Mode setting and enable it.
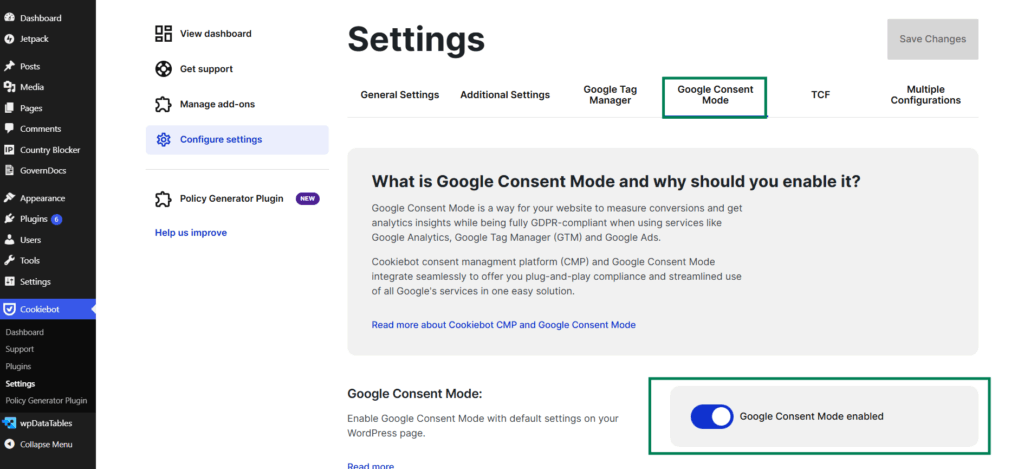
- Choose Advanced Consent Mode for the most accurate conversion data (or Basic if you want a stricter, no-data-before-consent setup).
That’s the core integration done. The plugin now injects the Cookiebot banner and wires up the four consent signals to Google automatically, no manual code editing required. Run a scan, verify the banner and signals on staging (we cover verification below), and you’re ready to ship.
Step 6: Verify Consent Mode v2 Is Working
Before pushing live, confirm the signals are firing:
- Install the Google Tag Assistant Chrome extension.
- Open your InstaWP sandbox URL in a new tab and enable Tag Assistant.
- Reload, interact with the cookie banner, and watch the tag behavior.
- Look for these consent signals updating to granted or denied: ad_user_data, ad_personalization, analytics_storage, and ad_storage.
If they appear and respond to your banner choices, Consent Mode v2 is live and working.
Step 7: Push the Changes Live
Once you’ve confirmed everything works on staging:
- Go back to your InstaWP dashboard.
- Use 2-Way Sync to push your staging changes to the live production site.
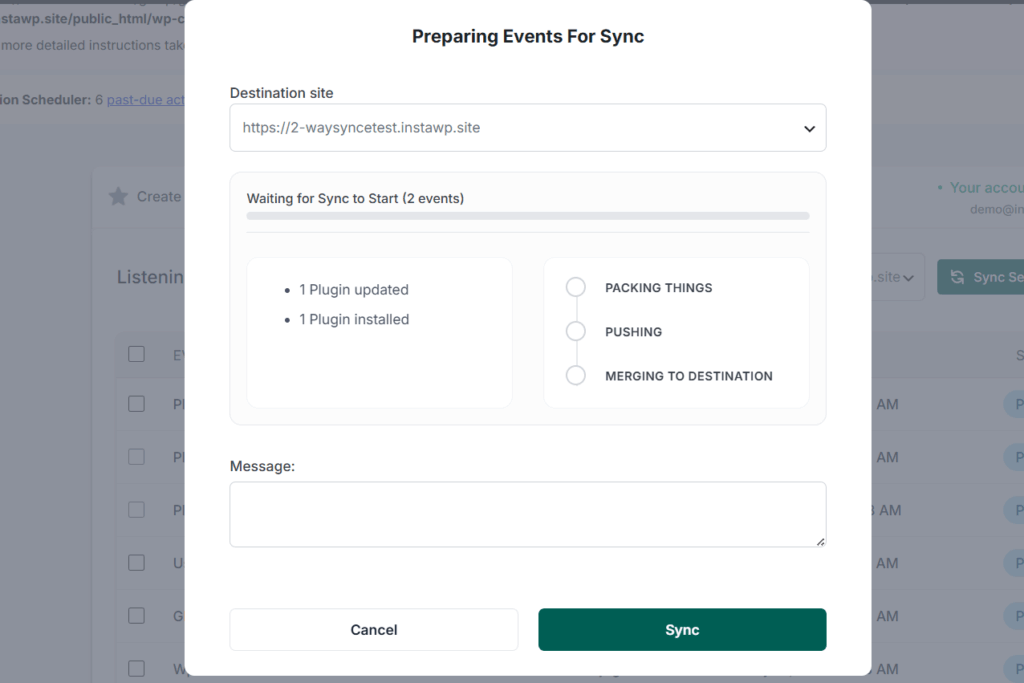
- InstaWP moves the Cookiebot plugin, your CBID connection, and the Consent Mode configuration over to live exactly as you tested them.
Your production site is now running a verified, compliant Google Consent Mode v2 setup, and you never had to gamble with your live analytics to get there.
Step 7: Scan, Categorize, and Style Your Banner
- In your Cookiebot dashboard, run a scan of your domain. Cookiebot crawls your site and auto-detects every cookie and tracker.
- Review the auto-categorized cookies (Necessary, Preferences, Statistics, Marketing) and adjust if needed.
- Customize the banner design, message, and buttons to match your brand.
- Save and let Cookiebot republish.
Because you’re on an InstaWP sandbox, you can run the scan and tweak the banner as many times as you like with zero risk to your live site.
Method 2: Google Tag Manager
If your site already runs everything through Google Tag Manager, you can implement Consent Mode inside GTM. It works well, but it requires solid GTM knowledge: a wrong trigger or a tag that fires too early will silently break your tracking. Test every step on an InstaWP staging site before touching production.
Step 1: Add a consent template from the Community Gallery
In your GTM container, go to Templates → Tag Templates → Search Gallery. Search for and add Simo Ahava’s “Consent Mode (Google tags)” template, the de facto standard for v2.
Step 2: Create the default consent tag
Go to Tags → New, choose the Consent Mode template you just added, and set all four signals to their default state of denied: ad_storage, analytics_storage, ad_user_data, and ad_personalization. Add region-specific overrides if you only want denial enforced for EEA/UK/Swiss traffic.
Step 3: Bind it to the Consent Initialization trigger
Set this tag’s trigger to Consent Initialization – All Pages. This is critical: this trigger fires before every other tag, ensuring defaults are set to denied before any Google tag loads. If you skip this, tags fire before consent is known and your data leaks.
Step 4: Capture your CMP’s consent state in variables
Create Data Layer Variables (or Custom JavaScript Variables) that read your consent banner’s output and return granted or denied for each of the four signals. This is the step that depends entirely on which CMP you use, and it’s where most setups go wrong, because every banner exposes its consent data differently.
Step 5: Create the consent update tag
Add a second tag that fires a consent update, mapping each signal to the variables from Step 4. Trigger it on the custom event your CMP fires when the visitor makes a choice (the event name varies by CMP).
Step 6: Test in Preview mode
Use GTM Preview mode plus Google Tag Assistant to confirm the default fires first, the update fires on banner interaction, and all four signals flip correctly.
The catch: GTM only reads consent, it doesn’t collect it. You still need a CMP banner feeding it. This is why most GTM users end up pairing it with Cookiebot anyway, and once Cookiebot is in place, its WordPress plugin handles the default and update calls for you, making most of the manual GTM wiring above unnecessary.
Method 3: Manual gtag.js Code
The fully manual route is for developers comfortable editing site code. It gives total control, but it’s the most error-prone and the most maintenance-heavy. Do all of this on an InstaWP staging site first; a single misplaced snippet here can wipe out your tracking site-wide.
Step 1: Add the default consent call, before everything else In your site’s <head>, above the Google tag (gtag.js) snippet, set every signal to denied by default. The order matters: this must run before gtag.js loads, or your first hits fire with no consent state.
<script>

  window.dataLayer = window.dataLayer || [];

  function gtag(){dataLayer.push(arguments);}

  gtag('consent', 'default', {

    ad_storage: 'denied',

    analytics_storage: 'denied',

    ad_user_data: 'denied',

    ad_personalization: 'denied',

    wait_for_update: 500

  });

</script>Step 2: Set wait_for_update
The wait_for_update: 500 line tells gtag to wait 500ms for a consent decision before firing. This buffer is essential for asynchronous consent banners; without it, tags may fire before the user’s choice is captured.
Step 3: Load your Google tag
Place your normal gtag.js / Google Analytics snippet after the default consent block.
Step 4: Fire a consent update on banner interaction
When the visitor accepts or rejects on your banner, run a matching consent update call that flips the relevant signals to granted:
<script>

  gtag('consent', 'update', {

    ad_storage: 'granted',

    analytics_storage: 'granted',

    ad_user_data: 'granted',

    ad_personalization: 'granted'

  });

</script>Step 5: Wire the update to your actual banner events
You’re responsible for attaching that update call to your banner’s accept/reject buttons (via event listeners) and for mapping each category to the right signal. There’s no automation here, it’s all hand-built.
Step 6: Verify with Tag Assistant
Load the staging site, interact with the banner, and confirm in Google Tag Assistant that the signals update correctly before pushing live.
The catch: every snippet, every event handler, and every future update is yours to maintain. Miss the load order or a single signal mapping and your tracking breaks silently. For nearly all site owners this is more risk than it’s worth.
Bottom line: GTM and manual gtag both can work, but they put the load order, signal mapping, and banner wiring on your shoulders, and any mistake fails silently. A Google-certified CMP plugin like Cookiebot does all of it automatically: banner, default call, update call, and all four signals, with nothing to hand-code. That’s the method we set up next, on a safe InstaWP staging site first.
Conclusion
Google Consent Mode v2 isn’t optional anymore. If you run Google Ads or Analytics and reach visitors in the EEA, UK, or Switzerland, it’s the difference between accurate conversion data and a reporting blackout.
You have three ways to set it up, but GTM and manual tag both put the load order, signal mapping, and banner wiring on you, and any mistake fails silently.
For most WordPress sites, a Google Gold-Tier certified CMP like Cookiebot is the smarter call: it shows the banner, captures consent, and fires all four v2 signals automatically, with nothing to hand-code. And with the exclusive 50% off for InstaWP users, it’s the most cost-effective route too.
Safer WordPress Testing
Test Google Consent Mode v2 before it reaches your live site
Use InstaWP to create a staging site, install Cookiebot, test consent signals, verify tracking, and only then push changes to production.
Frequently Asked Questions
u003cstrongu003eDo I really need Consent Mode v2?u003c/strongu003e
If you use Google Ads or Analytics and have any visitors from the EEA, UK, or Switzerland, yes. Google requires it to process behavioral data from those users, and without it your tracking and remarketing degrade significantly.
u003cstrongu003eIs Cookiebot free?u003c/strongu003e
Cookiebot has a free tier suitable for small sites and testing. Paid plans unlock more pages and domains, and InstaWP users get an exclusive 50% off those plans.
u003cstrongu003eWhat’s a CBID? u003c/strongu003e
The CBID (Domain Group ID) is the unique identifier Cookiebot generates for your domain. You paste it into the WordPress plugin to connect your site to your Cookiebot configuration.
u003cstrongu003eBasic or Advanced Consent Mode, which should I pick? u003c/strongu003e
Advanced is best for most advertisers because it preserves conversion modeling through cookieless pings, giving far more accurate data. Choose Basic only if you want zero data sent before consent.