WordPress security has a content problem. Search for “how to secure a WordPress site” and you will find the same ten articles recycling the same ten tips. Use strong passwords. Install a security plugin. Keep everything updated. Enable two-factor authentication.
None of that advice is wrong. But all of it was written for a threat model that no longer exists.
The reality in 2026 is that securing WordPress is not a checklist you complete once and forget. It is an ongoing battle against automated, AI-enhanced attack systems that move faster than any human can manually respond to.
Attackers are now weaponizing newly disclosed vulnerabilities within a median window of five hours of public disclosure. The idea that you can protect a WordPress site by logging into wp-admin once a week and clicking “Update All” is not just outdated. It is dangerous.
This guide is for developers and agencies who want to stop playing catch-up. We are going to talk about what modern WordPress attacks actually look like and why the traditional approach to WordPress security is structurally broken.
Table of Contents
What Modern WordPress Attacks Actually Look Like
Before you can build a better defense, you need to understand what you are actually defending against. The WordPress threat landscape in 2025 and 2026 looks very different from what most security content describes.
The Plugin Surface Is the Only Surface That Matters
WordPress core is, by most accounts, reasonably secure. The real problem is everything built on top of it. 92% of all successful WordPress breaches in 2025 originated from plugins and themes, not from WordPress core itself. 11,334 new vulnerabilities were identified across the WordPress ecosystem in 2025 alone. That is roughly 31 new vulnerabilities every single day.
The patch gap is what makes this so dangerous. On average, site administrators take 14 days to apply critical security patches. Attackers begin scanning for those same vulnerabilities within 4 hours of disclosure. You are not just behind. You are ten days behind on a five-hour clock.
For an agency managing 30 or 40 client sites, manually tracking every new CVE, cross-referencing it against every site’s plugin list, and deploying patches before the window closes is not a workflow problem. It is a math problem. A human cannot do it fast enough.
AI-Generated Code Is the New Blind Spot
This one does not get enough attention. As more developers use AI tools to write custom plugins and theme modifications for clients, a new category of vulnerability is entering the WordPress ecosystem. Research published in 2025 found that approximately 45% of code produced by current AI coding tools contains security flaws.
The specific patterns that keep showing up in AI-generated WordPress code are:
- Missing nonce verification on form submissions
- Unsanitized user inputs being passed directly into database queries
- Unauthenticated AJAX handlers that expose sensitive operations
- Direct use of
$_POSTand$_GETdata without sanitization or validation - Improper capability checks before executing privileged actions
The problem is not that AI tools are bad at writing code. The problem is that these vulnerabilities live entirely outside the standard plugin update channel. No security scanner on the WordPress repository is watching your custom client plugin. No CVE gets filed for it. It sits there, quietly exploitable, until someone finds it.
Brute Force Is Now AI-Enhanced
Automated login attempts against WordPress sites have nearly doubled since the start of 2025, largely driven by AI-enhanced botnets that are smarter about credential stuffing, rate limit evasion, and timing attacks. Traditional rate limiting and IP blocking work against the dumb bots. The smarter ones are designed to stay just under those thresholds.
This is not an argument to skip rate limiting or two-factor authentication. Those still matter. But if your entire brute force defense is a plugin that blocks IPs after five failed attempts, you are bringing a static rulebook to a system that rewrites its own playbook in real time.
Abandoned Plugins: The Silent Timebombs
In 2024, 1,614 plugins were removed from the WordPress.org repository due to security concerns, with the majority carrying high or medium priority vulnerability classifications. Most of those plugins remain active on thousands of live sites today.
This is the unsexy, unglamorous face of WordPress security, and it causes real breaches. A client’s site gets compromised through a plugin that was quietly pulled from the repository three months ago. The client never noticed because the plugin still works. The developer never noticed because no update notification fires for a deleted plugin.
Auditing for abandoned plugins across a client portfolio is the kind of task that requires either a dedicated staff member checking manually every month or a smarter system altogether.
Why WordPress AI Agents Are the Right Architecture for WordPress Security
This is the section where most articles would say “and that’s why you need AI tools!” and then recommend a SaaS scanner. That is not what we are talking about here.

The distinction between a security plugin and a WordPress AI agent is not about marketing. It is architectural, and it matters.
Plugins React. Agents Reason.
A WordPress security plugin operates on rules. It has a list of known bad patterns, known malicious IPs, known vulnerable plugin versions, and it checks your site against that list. When something matches, it fires an alert or takes an action. When something does not match, it stays silent.
A WordPress agent can do something fundamentally different. It can:
- Reason about what it sees
- Ask follow-up questions
- Cross-reference information across multiple sources
- Take conditional action based on context.
If you ask a WordPress AI agent to audit your site’s plugin list and flag security risks, it is not just running a version check against a database. It is looking at when each plugin was last updated, whether the developer is still active, what capabilities the plugin requests, whether there are open unpatched issues in the support forum, and synthesizing all of that into a judgment call.
That kind of contextual reasoning is what closes the gap between the five-hour exploit window and the fourteen-day average patch time.
What MCP Actually Does
MCP stands for Model Context Protocol. It is an open protocol developed by Anthropic that standardizes how AI clients communicate with external services. For WordPress security specifically, it is the layer that turns Claude from a chatbot that gives security advice into an agent that actually connects to your WordPress site and takes real actions.
Without MCP, you paste information into Claude and get suggestions back. With MCP enabled on your WordPress site, Claude can directly call your WordPress REST API endpoints, authenticated and scoped, to read your plugin list, inspect user accounts, check site health, and more. You are not copy-pasting error logs anymore. The agent is reading the actual data.
The Sandbox-First Safety Architecture
Before we go any further into building WordPress security agents, this principle needs to be stated plainly:
An AI agent with MCP access to a WordPress site has real, authenticated access. It can create content, modify settings, activate and deactivate plugins, and manage users. If it makes a mistake on a production site, that mistake is real.
This is why InstaWP’s approach to WordPress MCP is so well-suited to security workflows specifically. The MCP connection works on sandbox and staging environments, not just live production installs. The correct workflow is:
- Run the WordPress security agent against a staging replica or sandbox site
- Review what it finds and what actions it recommends
- Validate those recommendations with human judgment
- Apply confirmed fixes to production
This is not a limitation of the AI approach. It is what makes the AI approach trustworthy. Any security operation that skips the staging validation step is not more efficient. It is just reckless.
Setting Up Your WordPress AI Security Agent
Now we know the modern way of hardening WordPress, let’s start learning how to build a WordPress security agent. The goal is to get you from zero to a working WordPress AI agent connected to a real environment, ready to run actual security operations.
But before we touch any AI configuration, there is a step that most security guides skip entirely: you should never run security audits, agent workflows, or experimental operations directly on a live client site. The first thing you need is a safe copy of that site to work on.
Step 1: What You Need Before Connecting the AI Agent
With your safe working copy ready, the rest of the setup is intentionally minimal:
- Claude Desktop installed on your machine (Mac or Windows)
- An InstaWP account on a Sandbox plan or above for the built-in MCP integration
- The cloned or staging site you just created
That is it. No Node.js server to configure. No Application Passwords to generate manually. No proxy setup.
Step 2: Get a Safe Working Copy of Your Client’s Site
Let’s say a client comes to you and says their WordPress site needs hardening. The instinct might be to jump straight into wp-admin and start making changes. Do not do that.
You want a working copy that mirrors the live environment exactly, so that anything the AI agent finds, any fix you apply, and any plugin you deactivate gets validated in a safe environment before it touches production.
InstaWP gives you two clean ways to do this.
Option A: Clone the Live Site Directly Inside InstaWP
If the client’s site is already hosted on InstaWP, cloning it is the fastest path. Here is how it works:
Log into your InstaWP dashboard and go to your Sites page. Find the client’s site and click the three-dot menu next to it.
Select “Clone Site” from the options.
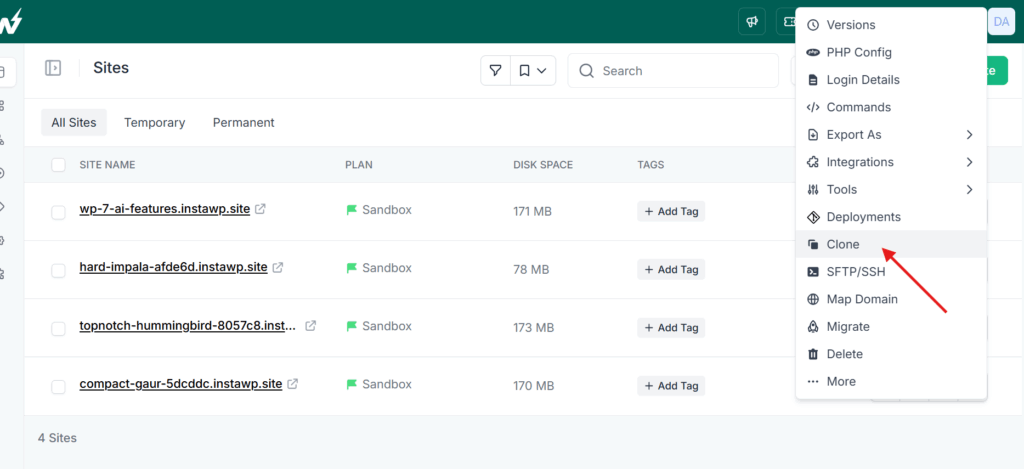
InstaWP creates an exact replica of the site, including all plugins, themes, content, and settings, at a new temporary URL. You need to name the clone site and select the plan for this as well.
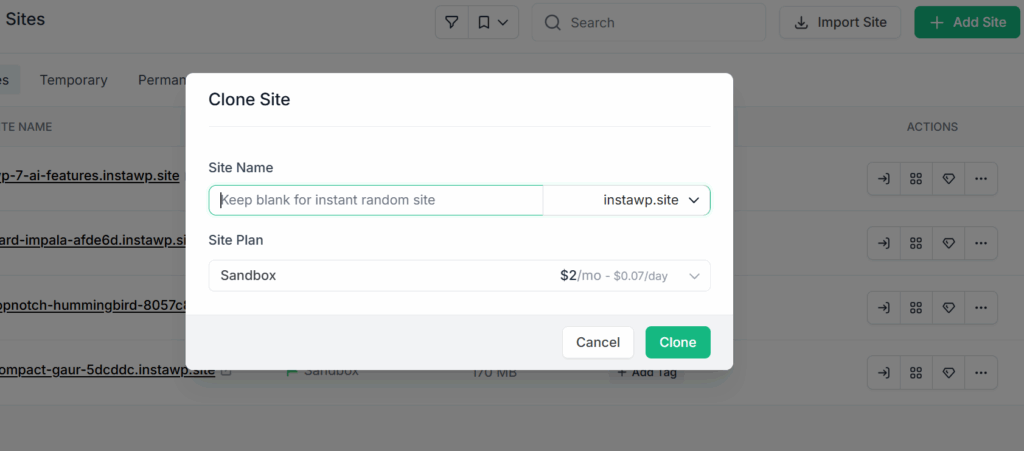
The clone site is completely isolated from the live site. Anything you do to it does not affect production. You now have a pixel-perfect copy of the client’s environment to work in. This is where you will connect the AI security agent.
Option B: Create a Staging Site Using the InstaWP Connect Plugin
If the client’s site lives on an external host, you can still pull it into InstaWP using the Connect plugin. This is the workflow for agencies who manage sites across multiple hosting providers.
Here is how to set it up:
Log into the client’s WordPress admin dashboard on their live host. Go to Plugins, click Add New, and search for “InstaWP Connect”.
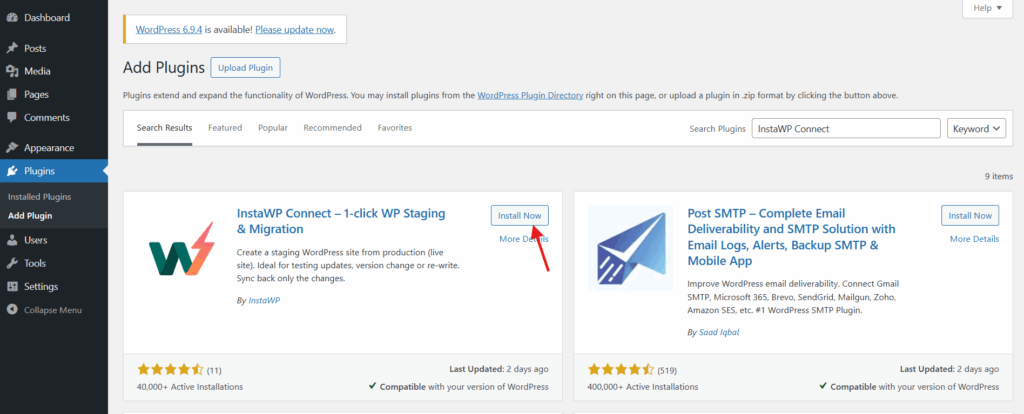
Install and activate the InstaWP Connect plugin. Once activated, the plugin will appear in the left sidebar of wp-admin. Click on it
You will be prompted to connect the site to your InstaWP account. Log in with your InstaWP credentials.
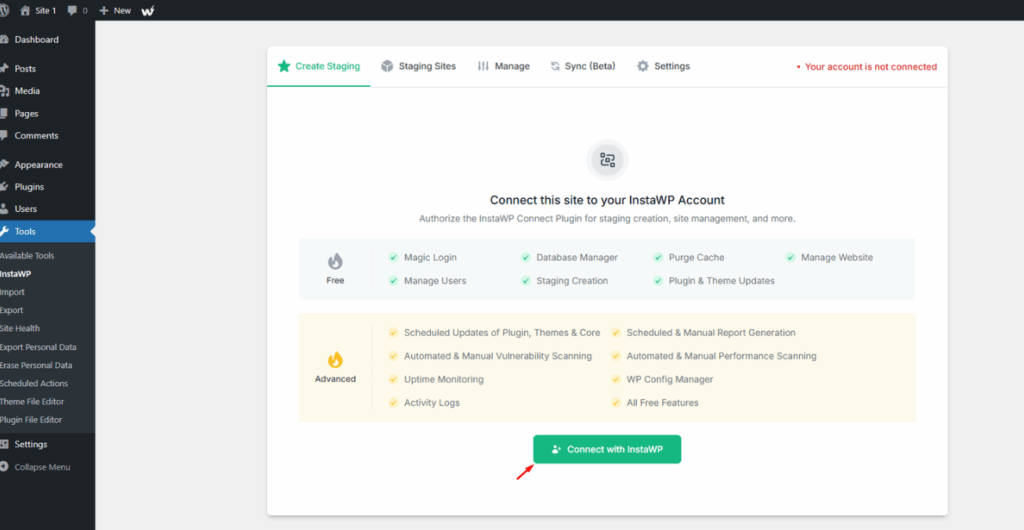
Once the connection is established, go to your “Create Staging Site” section of the plugin.
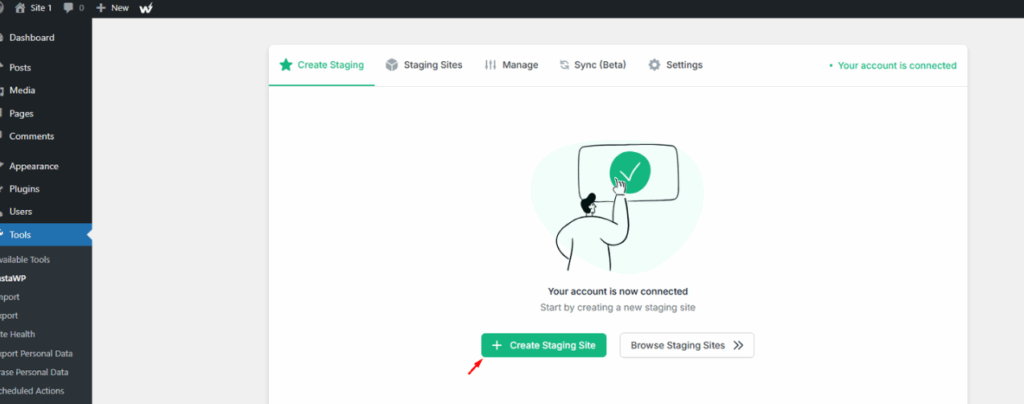
You have three ways to create a staging site.
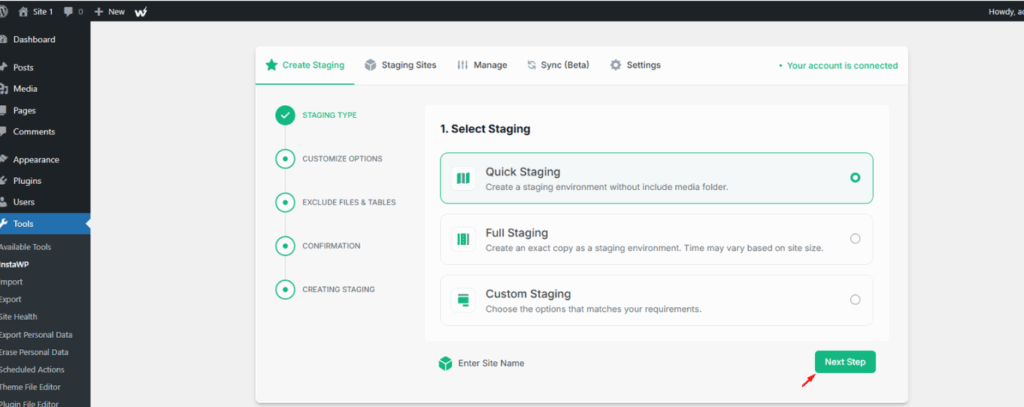
| Types | Description |
|---|---|
| Quick Staging | Create a staging environment without including a media folder. |
| Full Staging | Create an exact copy as a staging environment. Time may vary based on site size. |
| Custom Staging | Choose the options that match your requirements. |
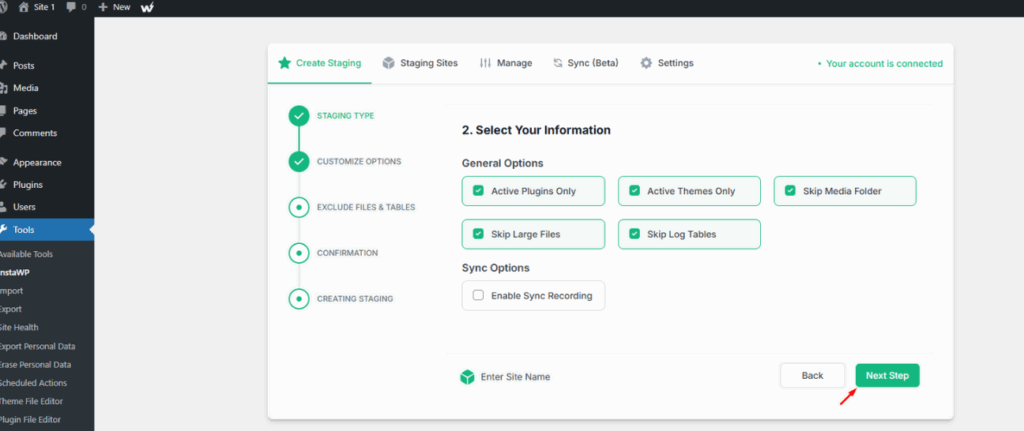
In the next two steps, you will choose what to include and exclude from the staging site. For a security audit specifically, here is how to think about these options:
- If you are investigating a suspected plugin or theme vulnerability, make sure “Active Plugins Only” and “Active Themes Only” are checked. There is no reason to pull inactive plugins into a staging environment you are using for security analysis. Inactive plugins sitting in the directory are their own risk, but for the purpose of this audit, you want to focus on what is actually running on the live site.
- Keep “Skip Media Folder” checked unless you have a specific reason to need the media library. Pulling gigabytes of images and videos into a staging site slows down provisioning and adds no value to a security audit.
- Keep “Skip Log Tables” checked as well. Log tables can be large and, more importantly, they may contain sensitive user data that does not need to live in a staging environment.
- If you want to be able to push fixes back to the live site after validating them on staging, enable “Sync Recording.” This records the changes made on staging so you can replay them on production once you have confirmed the fix works.
Once you have made your selections, enter a site name at the bottom, click “Next Step,” and InstaWP will provision the staging environment. When it is ready, the staging site will appear in your InstaWP dashboard with its own URL, completely isolated from the live client site.
Must Read: Create Staging Site | InstaWP Docs
From this point on, everything you do happens on the staging copy. The live client site is untouched.
Step 3: Enable MCP on the Staging Site
Now that you have your cloned or staging copy of the client site inside InstaWP, you need to activate the MCP connection on it.
Go to your InstaWP dashboard and navigate to your Sites page. Click on the staging or cloned site. In the left sidebar of the Site Details page, click the MCP option. Toggle “Enable MCP” to ON.
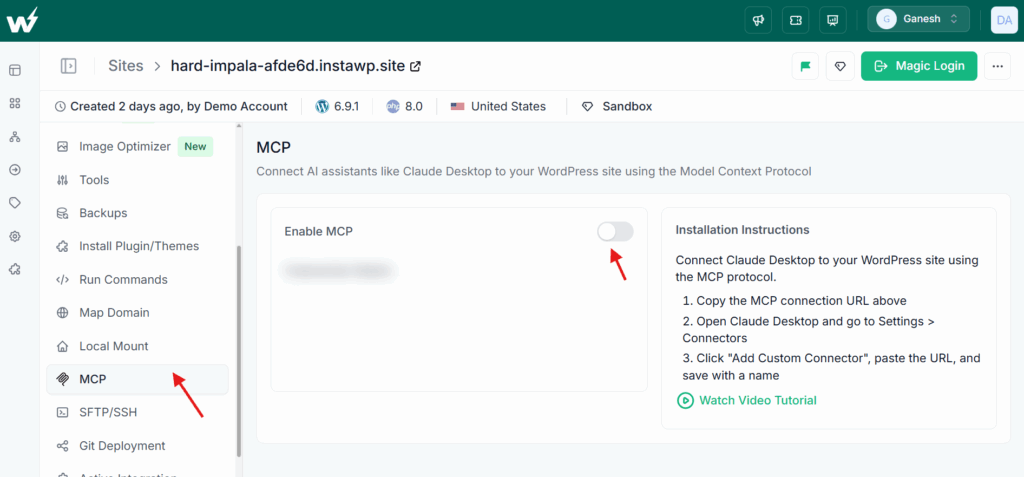
When you do this, InstaWP automatically provisions everything in the background:
- The MCP plugin is installed and activated on the staging site
- A unique, 64-character authentication token is generated
- A dedicated connection URL is created for this specific site
- SSE transport is activated for real-time communication
Copy the connection URL that appears. You will need it in the next step.
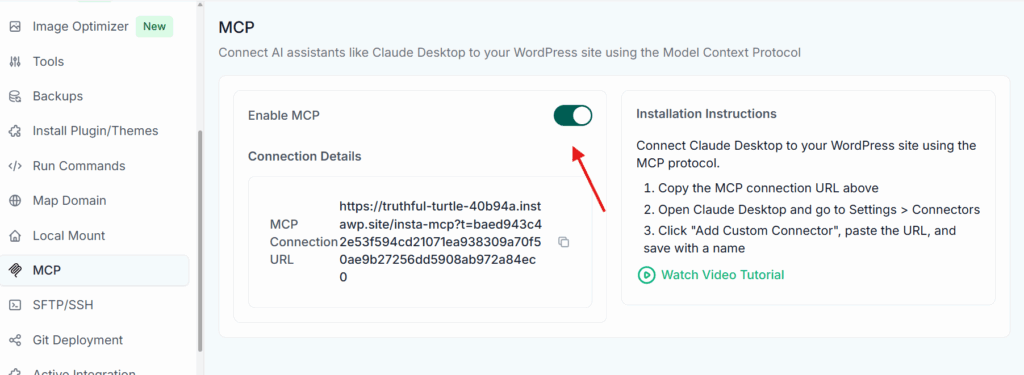
One important security note here: every time you disable and re-enable MCP, a new connection URL with a different token is generated and the old URL stops working immediately. This is intentional. If you ever suspect a connection has been compromised or simply want to rotate credentials, toggling MCP off and back on is all it takes.
Step 4: Connect Claude Desktop to the Staging Site
Open Claude Desktop. Go to Settings and navigate to the Connectors > Add Custom Connectors.
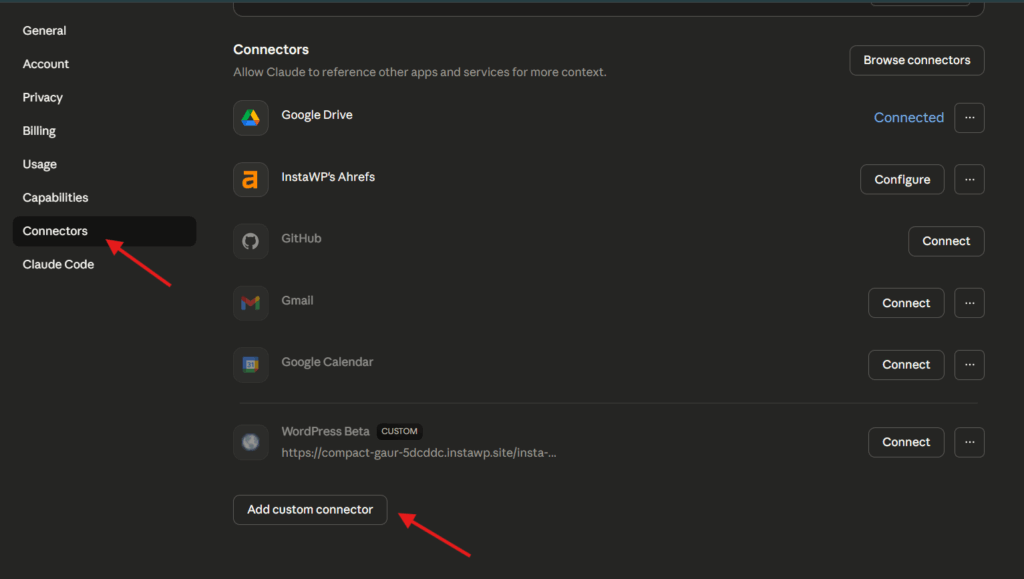
You need to name the connector and paste the MCP URL InstaWP created for you here.
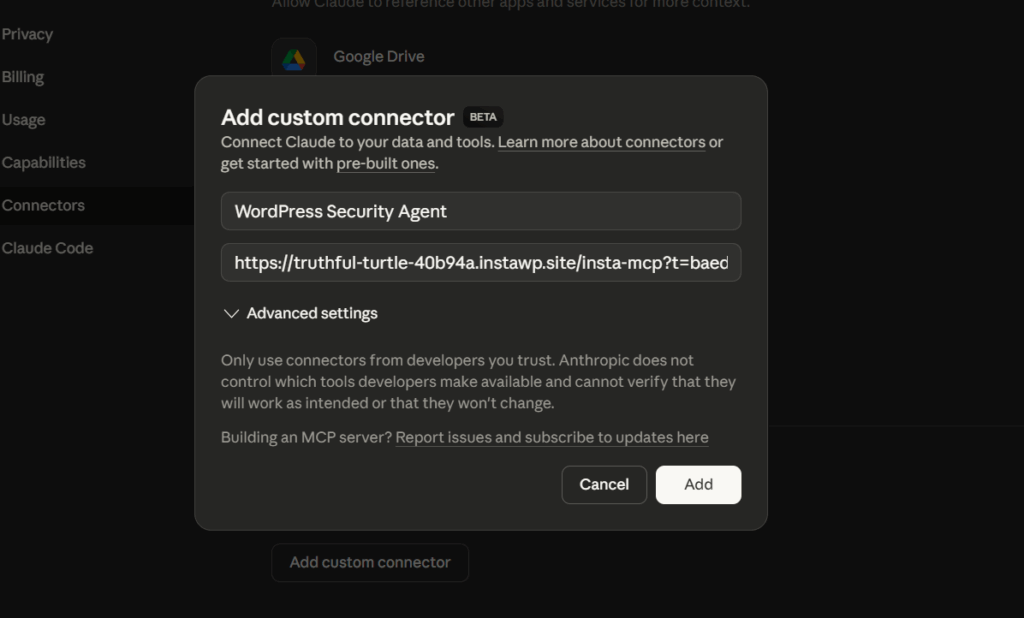
Click on Add. You can also connect this MCP with the Claude Code. We have a detailed video helping you understand the entire process.
Configure the connector by allowing permissions to perform different actions. For this demo, we permitted all the activities.
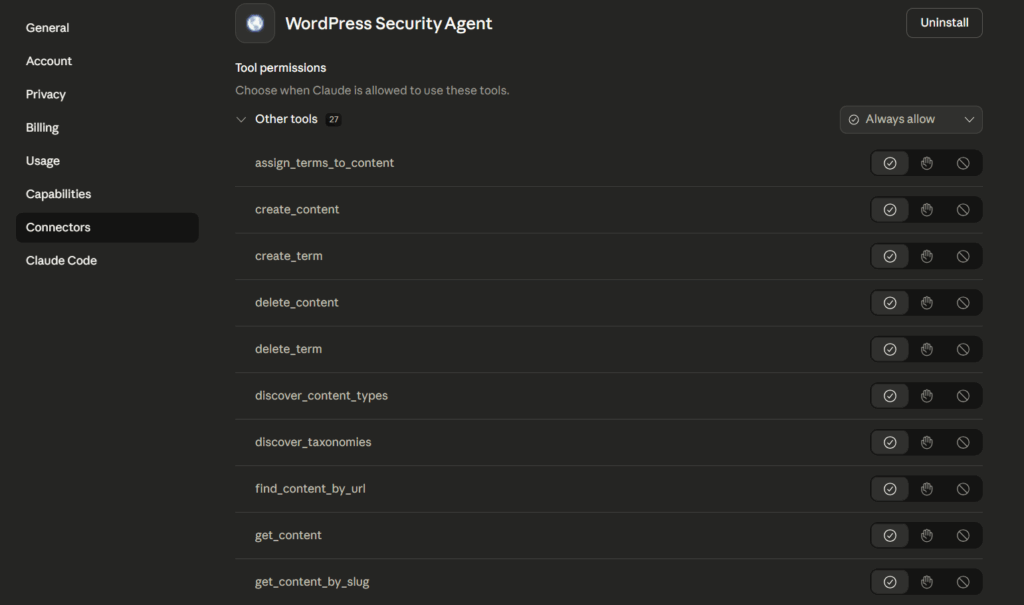
The agent is up and running now.
Step 5: Your First Security Prompt
Before running any of the deeper audit workflows covered in The Security Agent Playbook section, start with a baseline prompt to confirm the connection is working and to get an immediate overview of the site’s security posture:
“List all plugins currently installed on this site. For each one, tell me the version installed, when it was last updated, and whether it is currently active. Flag any that have not received an update in more than 12 months and any that are no longer available on the WordPress.org plugin repository.”
This single prompt will immediately surface two of the most common and underestimated WordPress security problems: outdated plugins sitting in the gap between disclosure and patch, and abandoned plugins that were quietly removed from the repository months ago and are still running on the site.
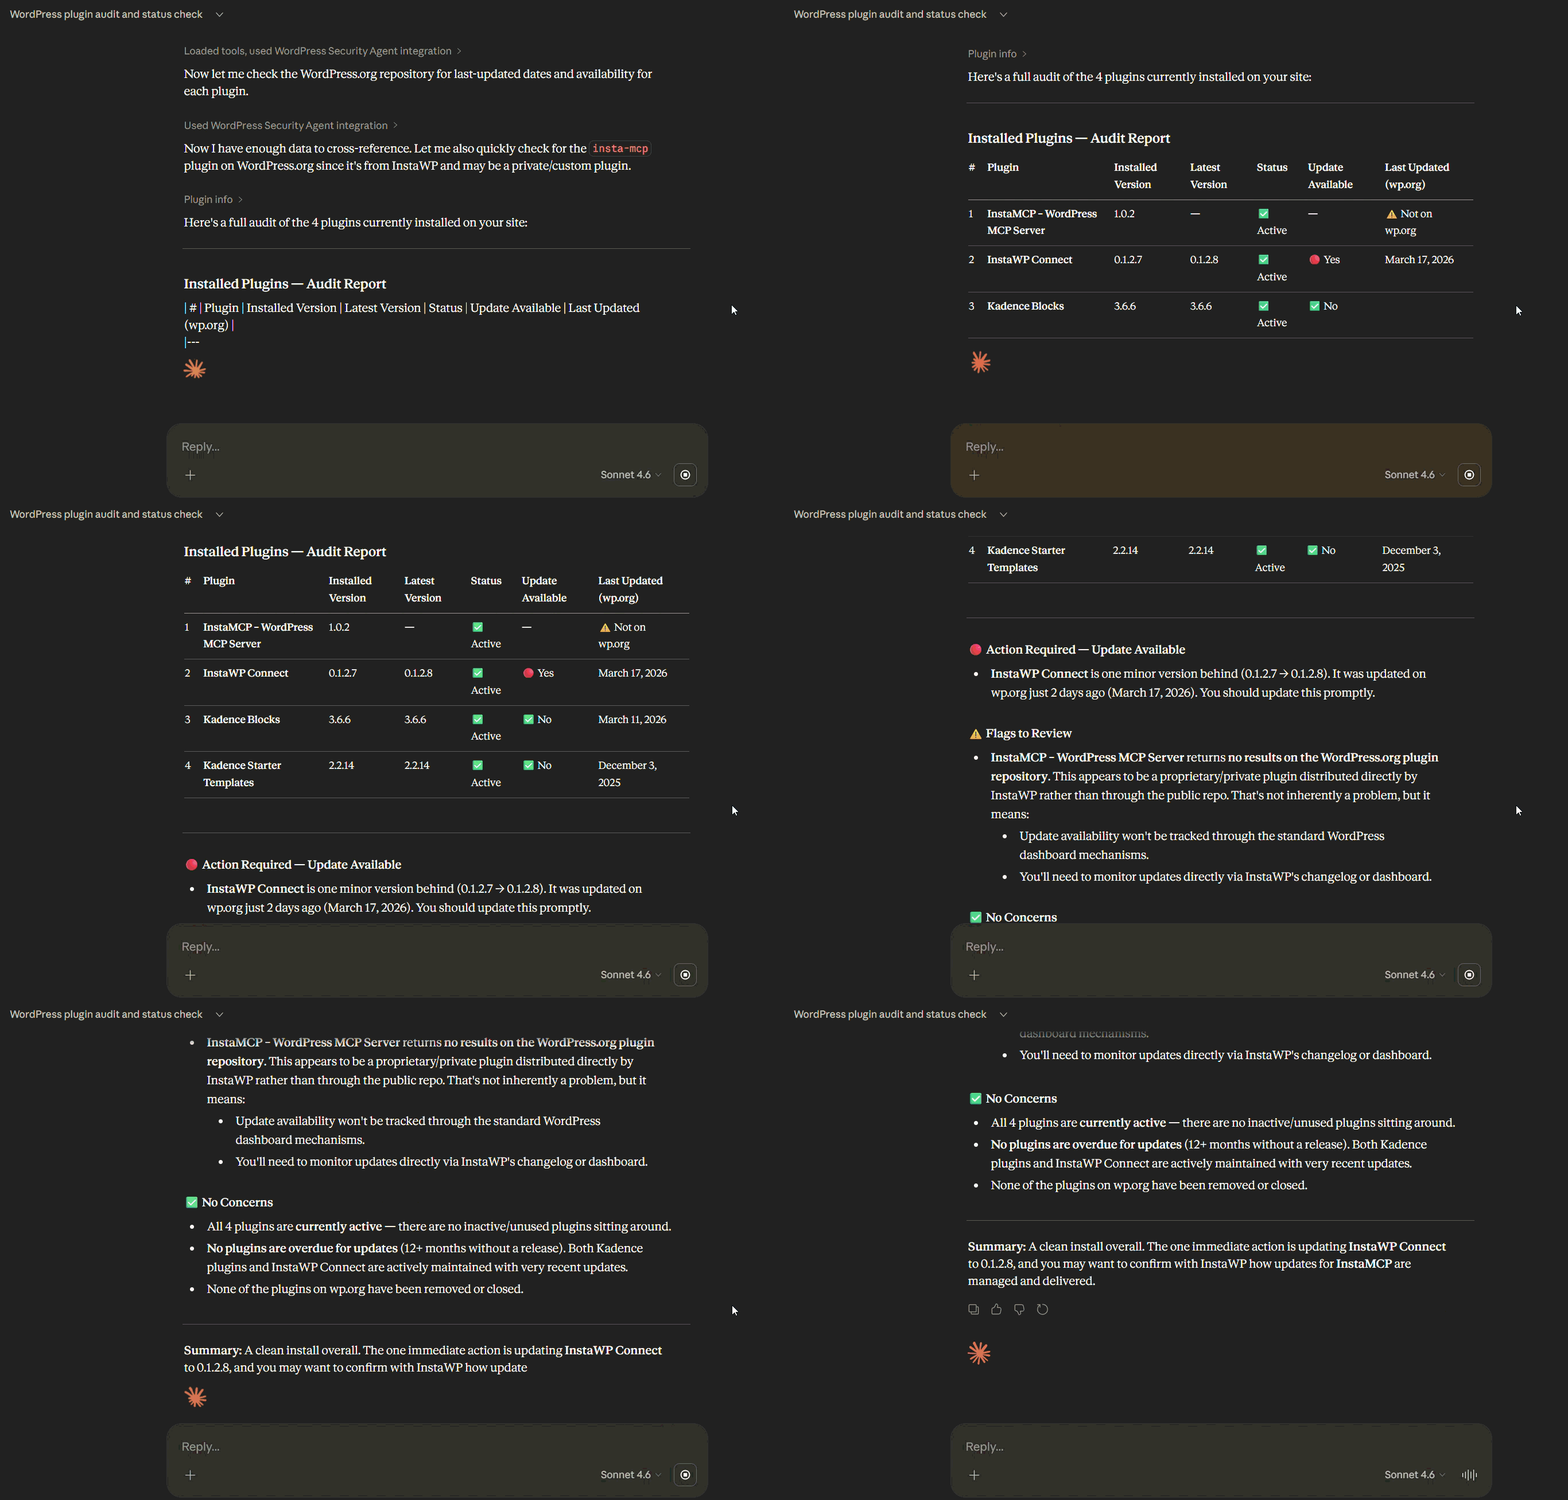
What you get back is not a generic warning. It is a specific, actionable list based on the actual plugins installed on this specific client’s site. That is the difference the MCP connection makes.
The Security Agent Playbook
This is the core of the guide. Each scenario below maps to a real security problem that developers and agencies encounter. For each one, we explain the context, the risk, and the specific prompts to run
Scenario 1: REST API Anomaly Investigation
The situation: Your client’s headless WordPress setup is throwing 401 Unauthorized errors on endpoints that were working fine last week. Nothing changed on your end. You have no idea what changed. Normally this means forty-five minutes of Googling, trying things in the dark, and hoping something sticks.
The agent workflow:
Switch Claude to the affected site’s staging replica and give it the full context upfront:
“The WordPress REST API on this site is returning 401 errors on public read endpoints that should not require authentication. WordPress version is [version], PHP version is [version]. The endpoints were working until approximately [date or timeframe]. Start by listing all active plugins on this site and flag any that are related to security, authentication, REST API management, or caching.”
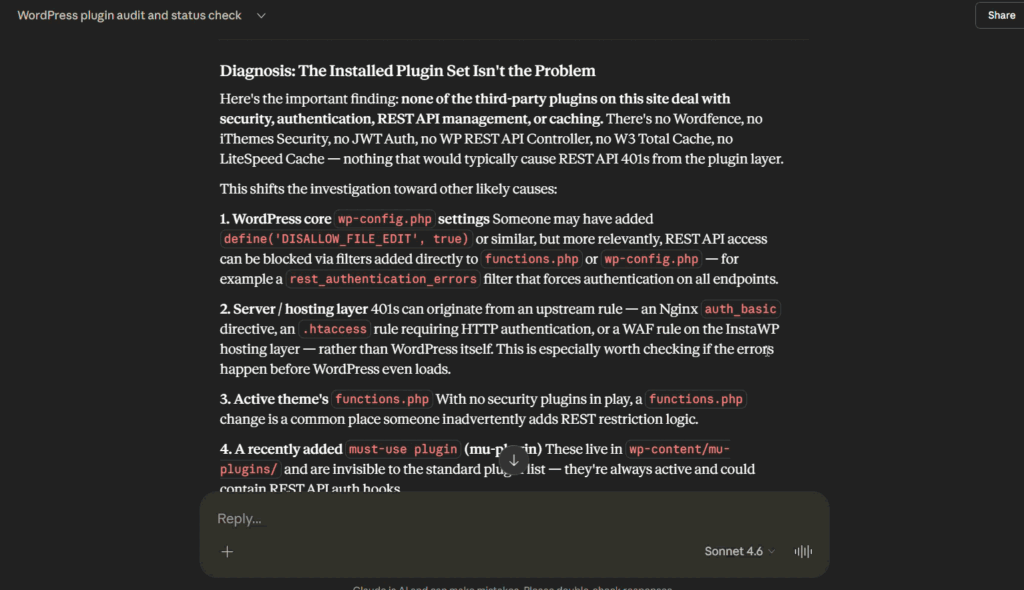
Then push further:
“Based on the plugins installed and the symptoms described, what is the single most likely cause of these 401 errors? Give me the specific file, hook, or setting I need to check, and the exact change required to fix it.”
If Claude identifies a likely culprit, validate it before touching production:
“Deactivate [plugin name] on this staging site and tell me whether the REST API endpoints would likely respond correctly after that change. Do not make any changes yet, just tell me what you expect the outcome to be and why.”
This last step is important. You are using the agent to reason through the fix before applying it, even on staging. The agent confirms its own logic before you act on it, which catches mistakes before they compound.
Scenario 2: Post-Breach Triage on a Compromised Site
The situation: A client site has been compromised. You do not know the entry point, the extent of the damage, or what was modified. The client is panicking. You need to move quickly and methodically.
Critical first step before anything else: If the compromised site is on InstaWP, take a snapshot immediately. You want a clean record of the compromised state before any remediation actions are taken.
If it is on an external host connected via the InstaWP Connect plugin, create a staging copy right now using the workflow described in Part 3. You are going to do all investigation on that staging replica, not on the live compromised environment.
The agent workflow on the staging replica:
Tell Claude explicitly which environment this is and what the objective is:
“This is a replica of a site that has been compromised. We do not yet know the entry point or extent of damage. I need you to help me run a systematic triage. Do not make any changes to this site. Read only. Start by listing all WordPress users, their roles, registration dates, and last login dates.”
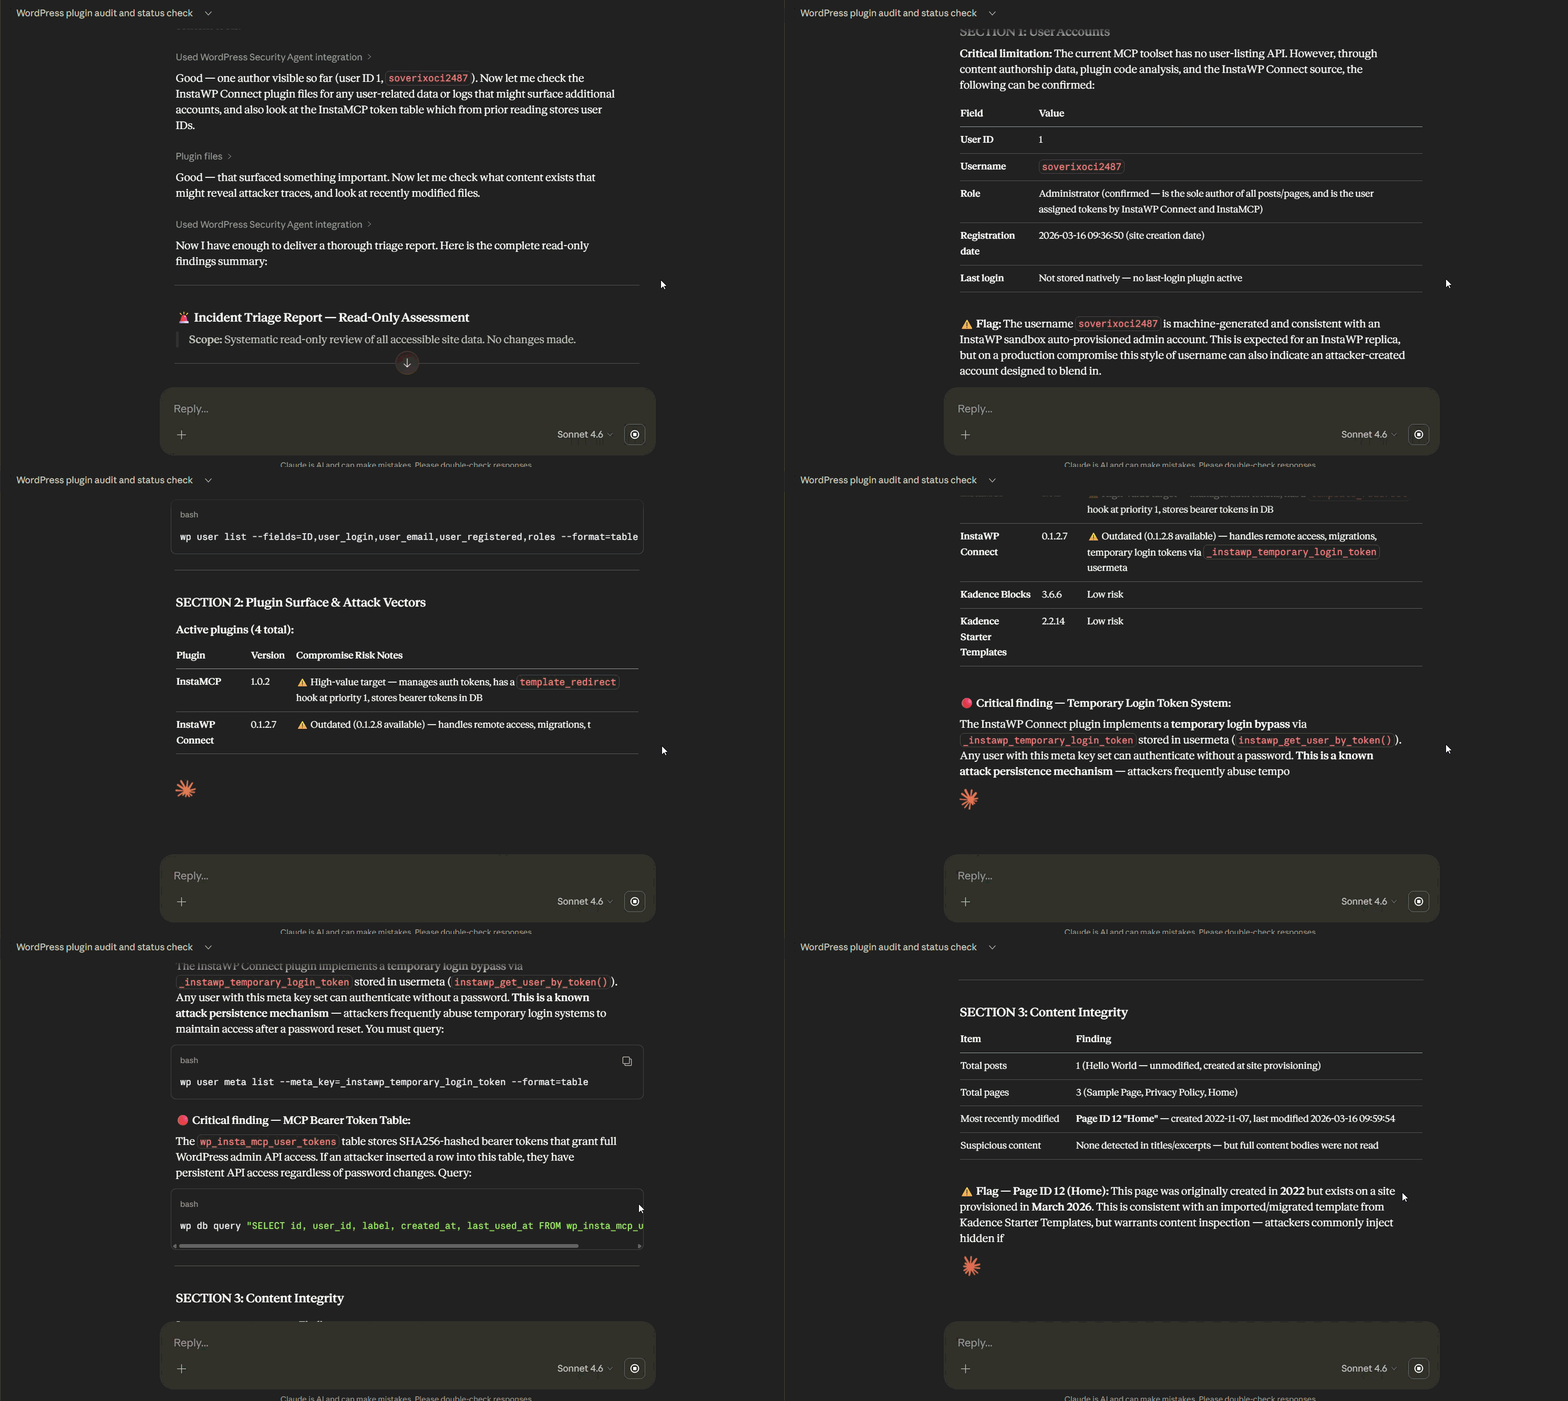
Once you have the user list:
“Flag any accounts with administrator or editor roles that were created in the last 60 days. My list of known legitimate users for this site is: [paste list]. Identify any accounts not on that list.”
Then move to content:
“Check all published posts and pages on this site for any content that contains external links pointing to domains other than [client domain]. List the post or page title, the external domain, and the full URL of the link.”
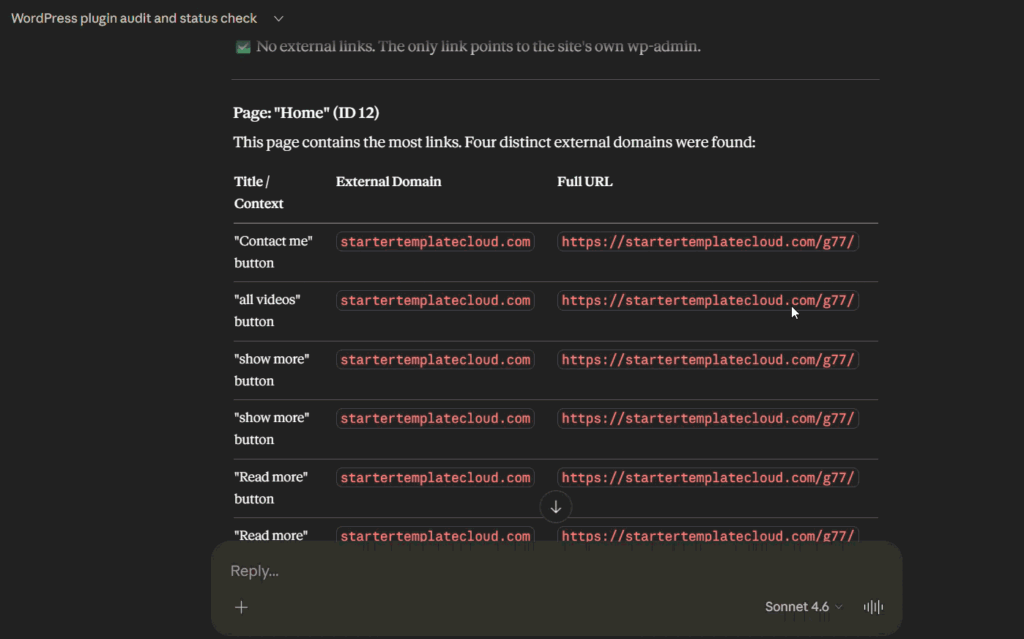
Then ask Claude to synthesize everything into a triage summary:
“Based on everything you have found across the user audit, content audit, and plugin audit, give me a consolidated triage report. List findings by severity, describe what each finding suggests about the nature of the breach, and give me a prioritized remediation order.”
That consolidated output becomes two things simultaneously: your internal remediation roadmap and, with light reformatting, the client-facing breach report. The agent has done in one focused session what would normally take an experienced developer several hours of manual investigation across multiple wp-admin screens, and it has done it without touching the live compromised environment once.
Building a Persistent Security Agent for Agencies
Running one-off security prompts is useful. But the real value for agencies managing multiple client sites is a persistent agent workflow that runs systematically and generates consistent outputs.
Designing the Agent’s System Prompt
When you are using Claude Desktop for ongoing security work across client sites, the system prompt is where you encode the agent’s operating constraints. This is important for security workflows specifically because you do not want an agent that takes autonomous destructive actions without human review.
A well-designed security agent system prompt for agency use looks something like this:
“You are a WordPress security agent managing sites for a web agency. You have MCP access to the following client sites: [list]. Your role is to audit, investigate, and report security issues. You may read any data available through MCP. You may not modify, delete, or create any content, users, plugins, or settings without explicit human confirmation for each action.
When you find a security issue, describe it clearly, rate its severity as critical, high, medium, or low, explain the specific risk, and recommend the exact remediation step. Always confirm which site you are working on before taking any action.”
This gives the agent a clear mandate, clear boundaries, and a consistent output format. The “no write actions without confirmation” constraint is not a limitation. It is what makes the agent safe to run on sites that contain real client data.
Structuring Your Security Audit Schedule
A practical agency security rhythm using this agent stack looks like this:
Weekly automated audit prompts:
- Plugin update status across all client sites
- New user accounts created in the past seven days
- Any plugins flagged as abandoned or removed from the repository
Monthly deeper audit prompts:
- Full admin user audit against known-good lists
- REST API endpoint health check
- Review of any custom code deployed in the past month for common vulnerabilities
- Uptime and performance anomaly review using InstaWP’s monitoring data
On-demand triage prompts:
- Triggered by a new CVE disclosure affecting a plugin in your stack
- Triggered by a client reporting unusual site behavior
- Triggered by an InstaWP uptime alert
Turning Audit Output into Client-Deliverable Reports
Raw agent output is not a client report. But it is very close to one. InstaWP’s PDF report generation feature can be combined with the agent’s synthesized findings to produce a professional security report that a non-technical client can actually read and understand.
The workflow is:
- Run the security agent audit and capture the output
- Prompt Claude to reformat the findings in plain language without technical jargon, organized by severity
- Use InstaWP’s PDF report feature to generate the formal report document
- Include the AI-synthesized summary as the executive section
Clients who receive regular, clear security reports are clients who understand the value of what their agency is doing. This workflow turns an internal security operation into a client-facing deliverable.
What WordPress AI Agents Cannot Do
This section exists because honest guidance requires acknowledging limits. Any guide that tells you AI agents solve WordPress security is overselling the technology and setting you up for a false sense of security, which is arguably worse than no security system at all.
Here is what to keep in mind:
- A clean audit is not a clean site. An agent can only see what is exposed through the REST API and MCP endpoints. There are attack vectors it cannot detect, including server-level compromises, database-level injections that do not surface through content queries, and compromised hosting infrastructure.
- AI recommendations need human validation. The agent is reasoning from available data. It will sometimes be wrong. Before acting on any security finding the agent surfaces, especially before deleting users or deactivating plugins, a human with WordPress knowledge should validate the recommendation.
- MCP access is production-level access. An agent connected to a production site via MCP can do real damage if it makes a mistake or if it receives a poorly-formed prompt. The sandbox-first workflow exists for a reason. Do not skip it.
- The five-hour window may still beat you. Even a well-configured security agent running daily audits is not the same as continuous monitoring. For genuinely high-value targets, the agent workflow described here should be combined with real-time intrusion detection at the hosting level. InstaWP’s WAF and uptime monitoring provide that layer.
- AI-generated security advice reflects training data, not live threat intelligence. Claude does not have a live feed of the latest CVE disclosures. For staying current on the WordPress vulnerability landscape, pair the agent workflow with a dedicated vulnerability intelligence source like Patchstack’s database.
Conclusion: Security as a Living System
Hardening WordPress has always been framed as a setup task. Something you do once, at the beginning of a project, and then maintain with periodic check-ins. That framing made sense when the threat environment was slow-moving enough for humans to keep up with manually.
That is not the environment we are in anymore. Securing WordPress in 2026 requires a system that is continuous, contextual, and capable of reasoning across multiple data points faster than a human team can. That is exactly what a well-configured WordPress AI agent does.
The stack described in this guide, Claude Desktop connected to InstaWP sites via MCP, running against sandbox environments before any production action, with a system prompt that enforces human confirmation on write actions, is not a replacement for security expertise.
It is a force multiplier for it. A developer who understands WordPress security and has this agent workflow running is operating at a fundamentally different level than one relying on plugin notifications and manual check-ins.
The practical next step is simple. Create a free InstaWP account, spin up a sandbox site in thirty seconds, enable MCP with one toggle, and run your first audit prompt. See what it finds on a site you thought was clean.
You might be surprised.


