Key Takeaways
- You sell hosting from your own WooCommerce store. The checkout, the branding and the prices are yours. InstaWP runs the servers underneath.
- Every order deploys a real WordPress site automatically. A snapshot you built becomes a live site for the customer within seconds of payment.
- Three plugins do the work: WooCommerce, WooCommerce Subscriptions, and the free InstaWP integration plugin that connects the two.
- You pay InstaWP a fixed plan cost per site and charge the customer whatever you want. The gap between the two is your margin.
- A product ties a snapshot to a plan. The snapshot is what deploys, the plan is what you pay for, and the customer never sees either.
- Instant snapshots make provisioning near-instant. Without them a site still deploys, it just takes a little longer.
- Customers get a magic login, live credentials and one-click domain mapping from their own account page, with no support ticket needed.
- You need no server, no reseller contract and no provisioning code. New InstaWP accounts start with $25 in credits, so you can build and test the whole flow before charging anyone.
To sell hosting with WooCommerce, you build the WordPress sites you want to offer, save each one as a snapshot on InstaWP, then set up a WooCommerce store with the WooCommerce Subscriptions and InstaWP integration plugins. You list each hosting plan as a subscription product that maps a snapshot to an InstaWP plan, and when a customer checks out, InstaWP provisions a fresh site for them in seconds. You pay a fixed plan cost and keep the difference.
That is the whole model in one paragraph. The reason it is worth understanding in full is that it quietly replaces an entire hosting business. Normally, selling WordPress hosting means renting servers, writing provisioning scripts, building a billing system and running a support desk. This approach hands the storefront to WooCommerce, which you already know, and hands the infrastructure to InstaWP, which is already built. What is left for you is the part you actually control: the brand, the plans and the price.
This is often called Website as a Service, or WaaS, and it is how agencies, freelancers and template sellers turn one-off builds into recurring revenue. This guide walks through the entire setup, in order, and explains what each piece does so you are not just copying steps.
What Selling Hosting With WooCommerce Actually Means
Selling hosting with WooCommerce means running the entire buying experience on a WooCommerce store you own, while the sites your customers receive are created and hosted on InstaWP infrastructure. The customer buys a subscription on your store. InstaWP does the provisioning in the background. To the buyer, it is one seamless purchase.
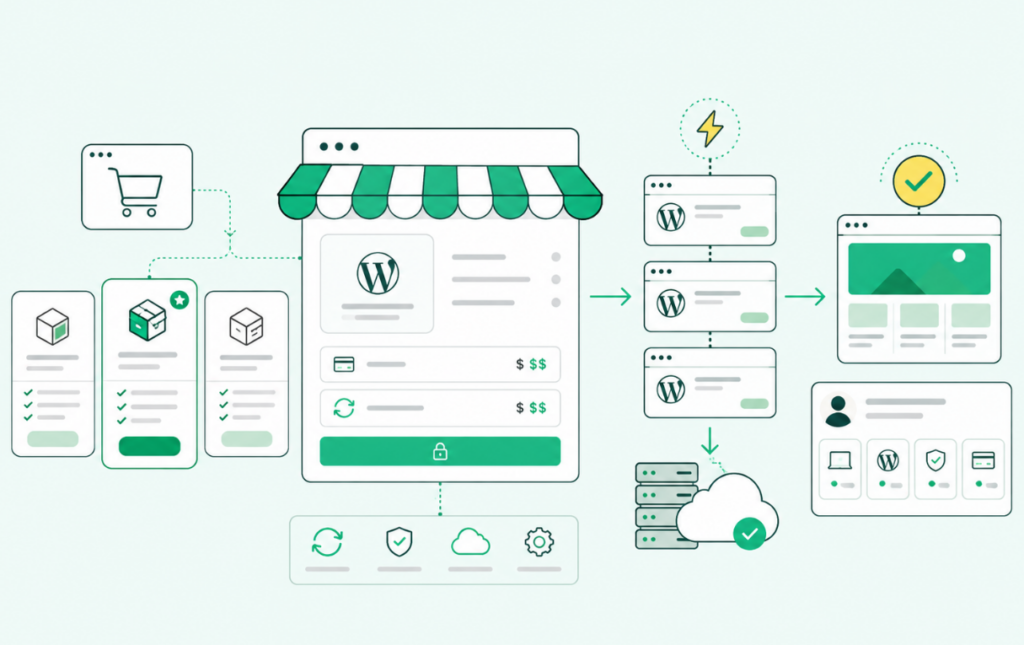
It helps to think of the setup as two layers that never mix. The top layer is your storefront: product pages, pricing, checkout, subscriptions and customer accounts, all standard WooCommerce. The bottom layer is the hosting: the servers, the site creation, the WordPress installs and the ongoing uptime, all handled by InstaWP. A single integration plugin is the bridge between them, listening for orders on the top layer and triggering site creation on the bottom.
The advantage of this split is control. Because the storefront is plain WooCommerce, you get every payment gateway, tax rule, coupon and upsell that the WooCommerce ecosystem already offers. And because the hosting is a fixed cost per plan, you set retail prices freely on top of it. You are not reselling someone else’s packages at their margins. You are packaging infrastructure into your own product.
How the WooCommerce WaaS Model Works
The model runs on one central idea: a snapshot. A snapshot is a saved image of a finished WordPress site, and it is what gets deployed on every order. You build a site once, snapshot it, and from then on every customer who buys that plan receives an exact copy, ready to use.
Here is the full path from click to live site:
| Stage | What happens | Who handles it |
|---|---|---|
| Customer checks out | Buys a subscription product from your WooCommerce store. | WooCommerce |
| Payment and billing | Processes the payment and starts the recurring billing cycle. | WooCommerce Subscriptions |
| Order handoff | Reads the order and identifies the mapped snapshot and hosting plan. | InstaWP integration plugin |
| Provisioning | Deploys the selected snapshot as a brand-new WordPress site on the chosen plan. | InstaWP |
| Delivery | Provides the customer with a live URL, Magic Login and domain-mapping options. | InstaWP integration plugin |
Nothing in that chain needs your attention once it is set up. The customer places an order and, a few seconds later, refreshes their account to find a working site. If the snapshot is an instant snapshot, that wait is barely noticeable. The entire pipeline is the product you are selling, and after the initial configuration it runs on its own.
Why WooCommerce Beats Reseller Hosting
Traditional reseller hosting asks you to sell inside someone else’s system. You inherit their control panel, their plan structure, their checkout and often their branding on the sites you deliver. Selling hosting with WooCommerce inverts every one of those constraints, because the storefront is software you own.
| What you control | Reseller hosting | WooCommerce + InstaWP |
|---|---|---|
| Checkout and payments | Their payment gateway and checkout flow | Use any WooCommerce-compatible payment gateway |
| Pricing | Fixed tiers based on the provider’s margins | Set any selling price on top of your fixed infrastructure cost |
| Plan names and packaging | Preset hosting packages | Create your own products, bundles and upsells |
| Site branding | Often uses the hosting provider’s subdomain | Use a white-label URL and your own branding |
| Customer relationship | Shared with or controlled by the hosting provider | You own the entire customer relationship |
| Provisioning speed | Varies by provider and package | Provision sites in seconds using instant snapshots |
The practical result is that you stop being a middleman and start being the vendor. Your customer signs up on your store, pays your price, and receives a site that carries your name. InstaWP stays invisible, doing the heavy lifting you would otherwise have to build and staff yourself.
What You Need Before You Start
Before you set anything up, you need two ingredients: the sites you plan to sell, and the plugins that turn a WooCommerce store into a hosting store. Both are quick to assemble.
The sites you want to sell
Each plan you sell is really a finished website. You can build these from scratch, or start from the InstaWP template library and customise a ready-made design. A common approach is to prepare a small range, for example an ecommerce store, a service-business site and a portfolio, so buyers can pick the one that fits them. These become your snapshots later.
The three plugins
| Plugin | What it does | Where it goes |
|---|---|---|
| WooCommerce | Runs the storefront, product pages, cart and checkout. | Your store |
| WooCommerce Subscriptions | Handles recurring payments, renewals and subscription management. | Your store |
| InstaWP integration plugin | Connects WooCommerce orders to automated WordPress site provisioning. | Your store |
All three install on the WooCommerce store, not on the sites you sell. The integration plugin is free and comes straight from InstaWP. Once these are in place, you are ready to connect the two layers.
How to Sell Hosting With WooCommerce, Step by Step
To sell hosting with WooCommerce, snapshot the sites you want to offer, spin up a WooCommerce store on InstaWP, install the WooCommerce Subscriptions and InstaWP integration plugins, connect them with an API token, then list each plan as a subscription product that maps a snapshot to an InstaWP plan. Finally, test the flow as a customer before you go live. The eight steps below cover the entire process.
Watch the full workflow in action:
Step 1: Build the Sites You Want to Sell
The first step to selling WordPress hosting with WooCommerce is to create a base site inside InstaWP. This site will act as the starting point for every website provisioned after a customer completes checkout.
From your InstaWP dashboard, go to Sites → Add New. Create a blank WordPress site or start with an existing template. Choose the WordPress version, PHP version, site plan and other required configurations, then click Create Site. InstaWP will provision the new WordPress installation in seconds.
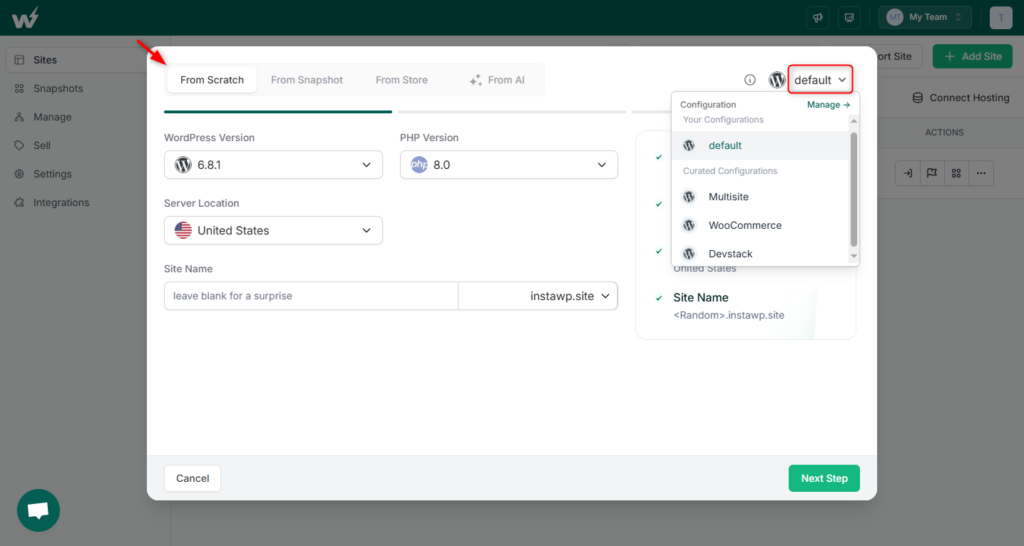
Once the site is ready, add the theme, plugins, pages, settings and starter content you want customers to receive. Test the complete setup carefully because this base site will later be saved as a snapshot and connected to your WooCommerce product.
Documentation references: Create a Site in InstaWP
Step 2: Create a Snapshot of Each Base Site
Once your base site is ready, save it as an InstaWP snapshot. The snapshot captures the site’s current files, database, themes, plugins, pages, content and settings. It becomes the reusable blueprint that InstaWP deploys whenever a customer purchases the corresponding WooCommerce product.
From your InstaWP dashboard, open Snapshots and click Add Snapshot. Select the base site you created, then enter a clear name such as Ecommerce 01 or Clinic 01. Use descriptive names so you can easily identify and map the correct snapshot when configuring your products.
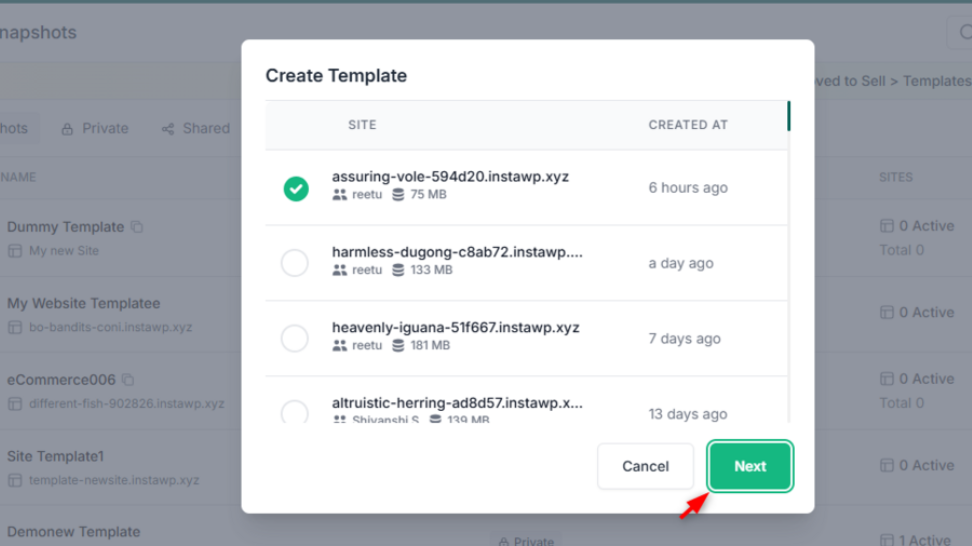
Choose the appropriate snapshot type and enable Instant Snapshot if it is available on your account. This places the snapshot in InstaWP’s warm-up pool, allowing new customer sites to be created in approximately five to seven seconds. The Instant Snapshot option is available on eligible premium accounts.
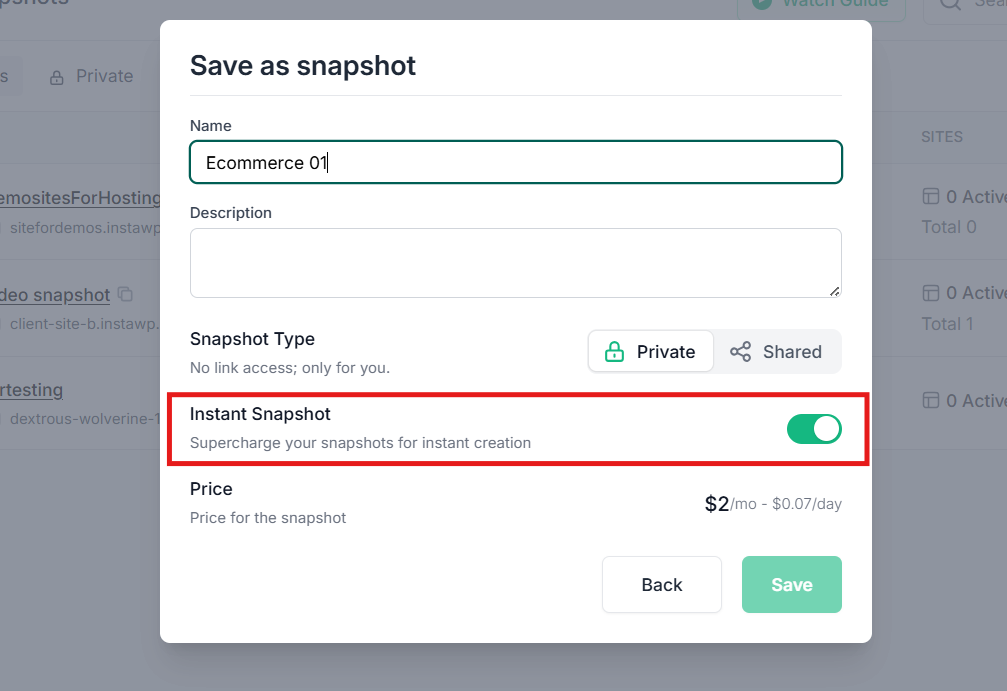
Click Save, then wait until the snapshot status changes from In Progress to Ready before connecting it to a product. Repeat this process for every base site or package you plan to sell.
Documentation: Create Snapshots in InstaWP
Step 3: Install Required Plugin
Next, prepare the WordPress site that will serve as your hosting storefront. This is where customers will view your plans, complete checkout, and manage their subscriptions.
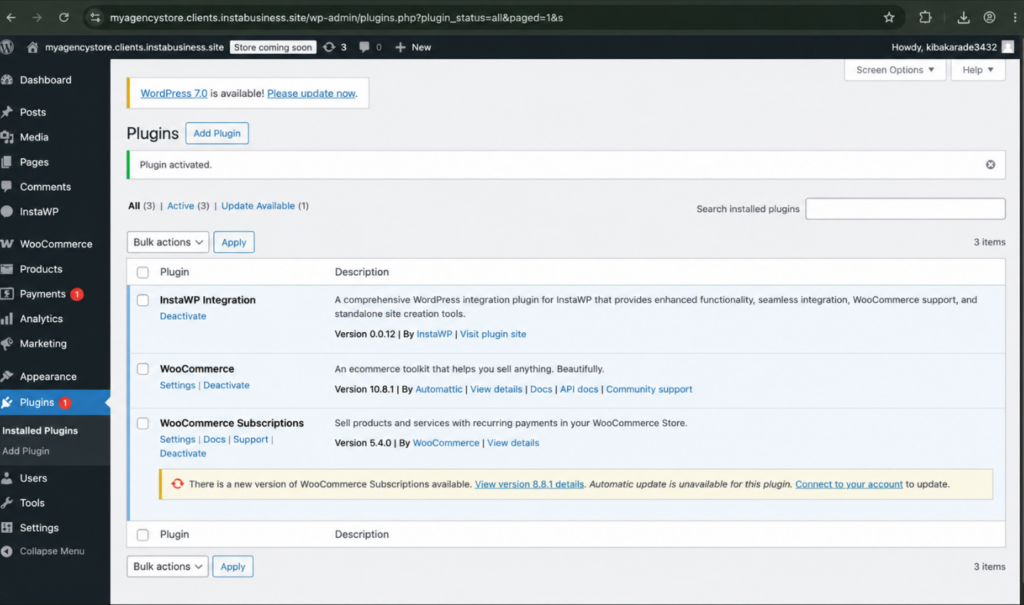
From the WordPress dashboard, go to Plugins → Add New and install and activate WooCommerce. Then upload and activate WooCommerce Subscriptions to handle recurring payments, renewals, and subscription management.
Finally, download the InstaWP integration plugin, upload it to the same WordPress site, and activate it. This plugin connects WooCommerce orders with InstaWP so a new site can be provisioned automatically after a successful purchase.
Must Read: Settingup InstaWP Integration Plugin
At this stage, your store should have three active plugins:
- WooCommerce for products, cart, and checkout
- WooCommerce Subscriptions for recurring billing
- InstaWP integration plugin for automated site provisioning
Step 4: Connect Your Store to InstaWP With an API Token
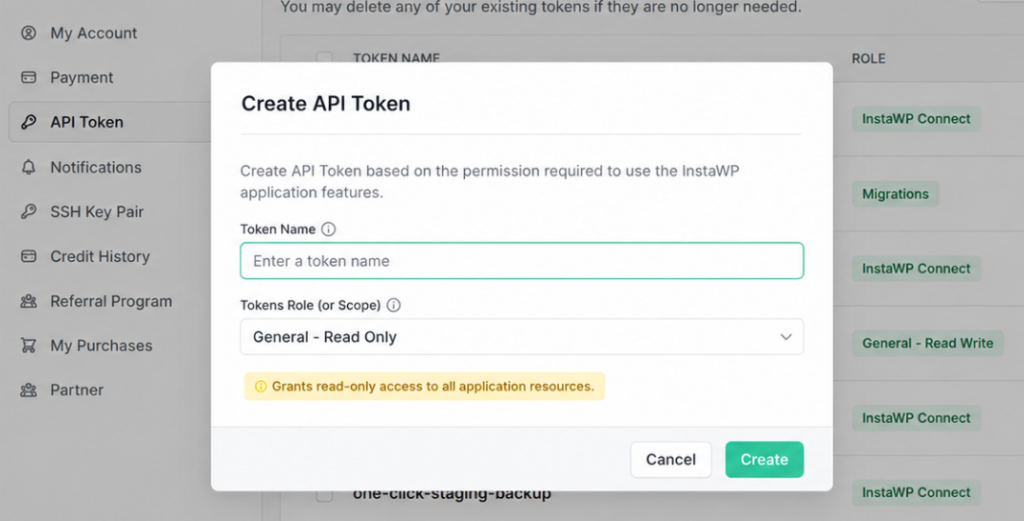
The integration plugin needs an API token to talk to your InstaWP account.
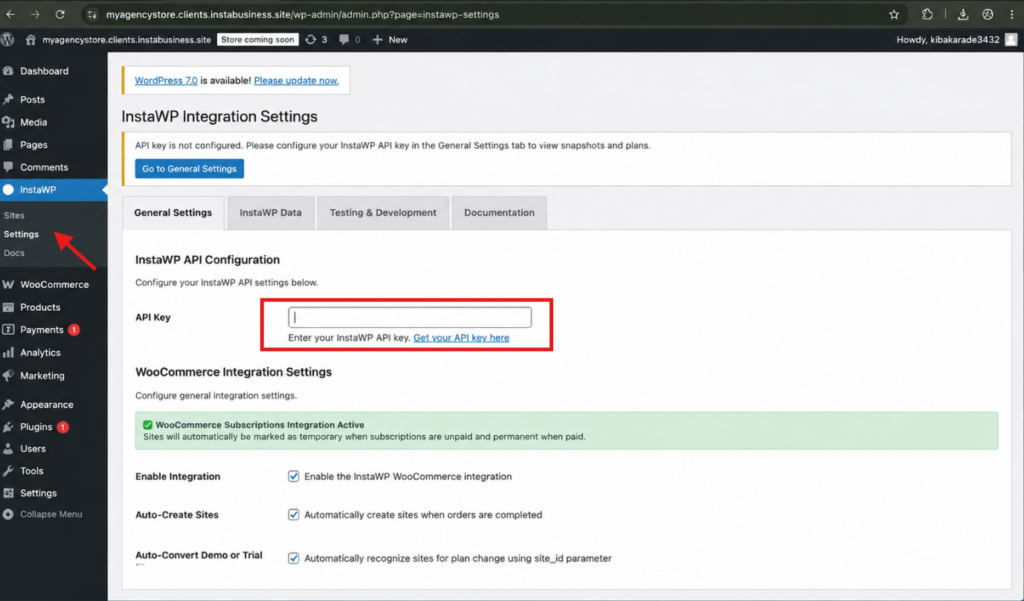
In your InstaWP dashboard, create a new API token with general read and write access, copy it, and paste it into InstaWP, Settings in your store. Save, and the connection is live.
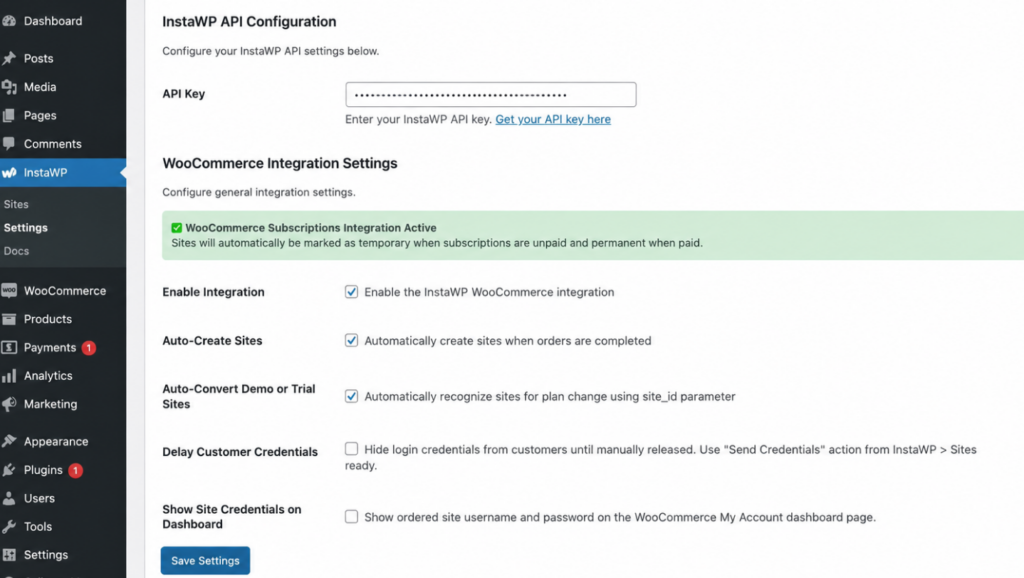
While you are in settings, switch on two options that make the whole experience smoother:
- Auto-create sites. Provisions a site automatically the moment an order is placed, so nothing is manual.
- Show site credentials on dashboard. Adds a card to the customer’s account page with their site details, a magic login and domain mapping.
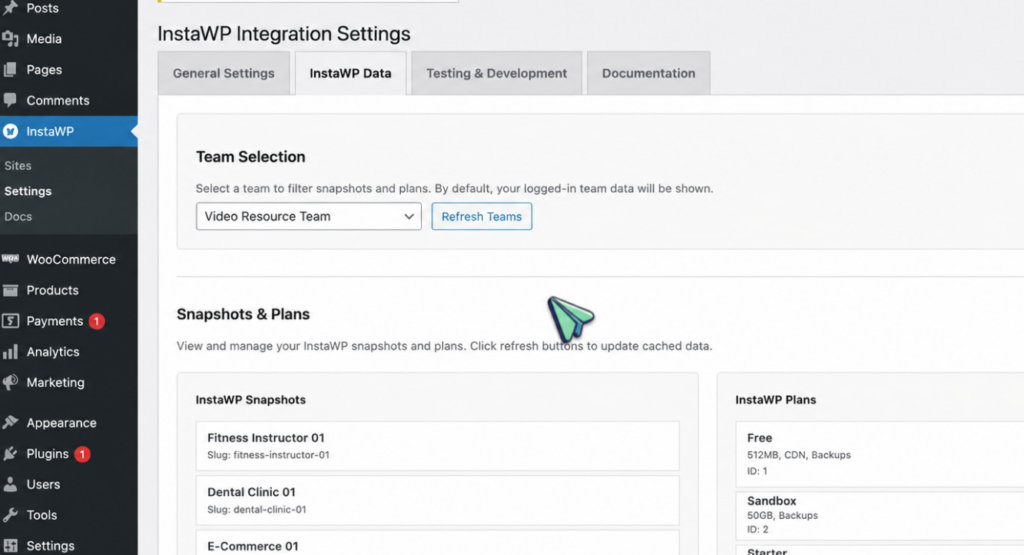
Then open the InstaWP tab and select the team your snapshots live in. Snapshots and sites belong to a team inside InstaWP, so if you run more than one, choose the right one here. Click Refresh, and the snapshots you created in Step 2 appear in the store, ready to attach to products. The available InstaWP plans show up alongside them.
Step 6: Create Your Hosting Plans as Subscription Products
This is where the money is made, so it is worth understanding exactly what each product ties together. A product joins two things: the snapshot that gets deployed, and the InstaWP plan that site runs on. The snapshot decides what the customer receives. The plan decides what you pay. The two are set independently, which is what gives you your margin.
In your store, go to Products, Add New and set it up like this:
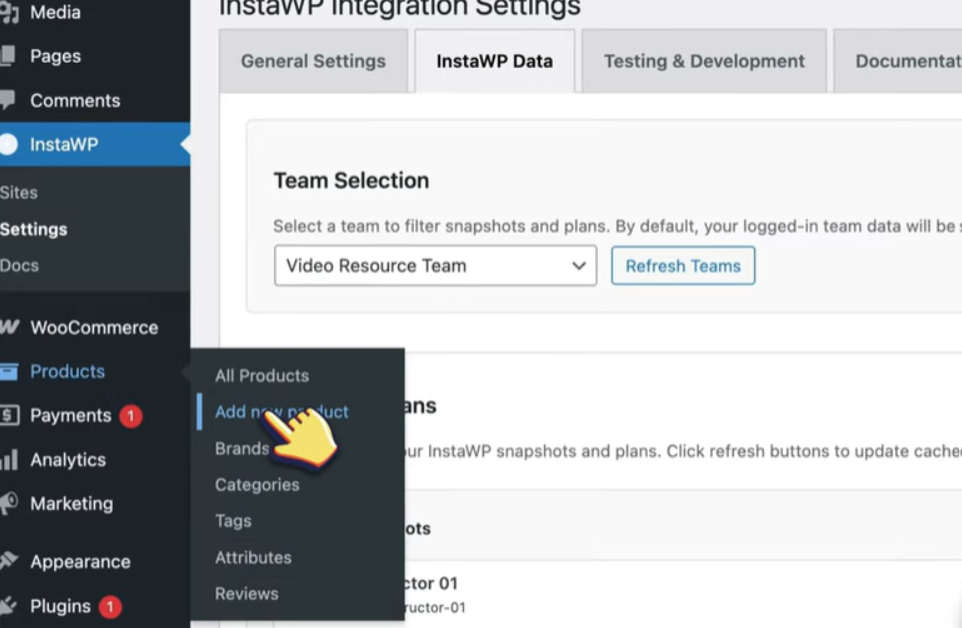
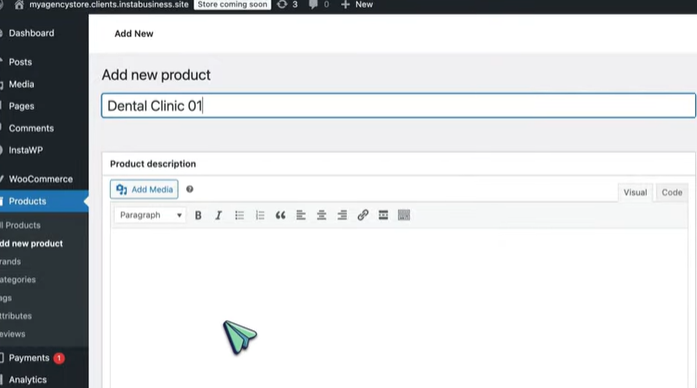
- Name the product after the site it delivers, for example Dental Clinic 01.
- Under product data, choose Simple subscription and set your retail price and billing cycle, such as $19 per month.
- In the InstaWP section, select the snapshot that should deploy when this product is bought.
- Choose the InstaWP plan the site will run on. This is your cost, and the customer never sees it.
- Set site expiry to permanent, since this is a real subscription site, not a temporary demo.
- Publish.
The product name and the snapshot name do not have to match, and you can run different products on different plans. A simple site might sit on a starter plan while an ecommerce store runs on a larger one. Repeat this for every plan you want to offer until your shop is stocked.
Step 7: Configure Your Store for Orders
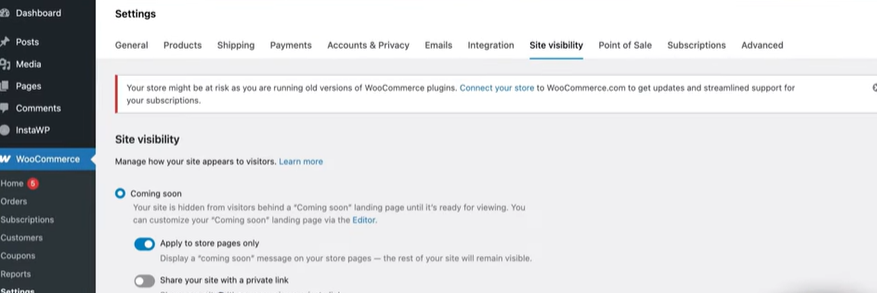
Before anyone can buy, set the store live and choose how it takes payment. Three settings matter:
- Store status. If your store shows a coming soon page, switch it to live.
- Payments. Connect the gateway you want customers to pay through. For a private test run you can temporarily enable cash on delivery, but a real launch needs an online gateway.
- Subscriptions. If you are testing with cash on delivery, enable manual renewal payments so the test order can complete. Remember to turn this off again before you go live with a real gateway.
The rest of the store, the theme, the shop layout and the design, is standard WooCommerce, so shape it however you like. That part is yours.
Step 8: Test the Whole Flow as a Customer
Never launch without buying from your own store first. Log out of the store, open your shop as a visitor, and buy one of your plans. Go through the real checkout, place the order, and watch the confirmation screen tell you the site is being created in the background.
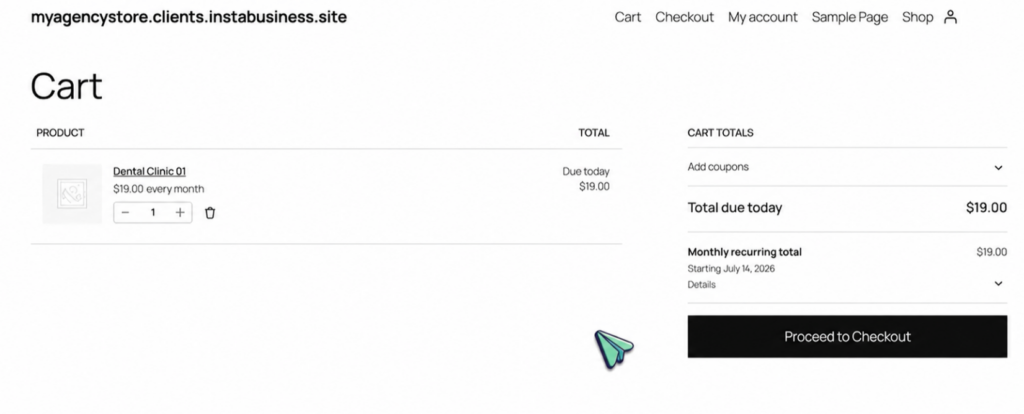
Refresh the account page after a few seconds and the new site is ready, with its own URL, a visit-site button, WordPress credentials and a magic login. Open it, map a domain from the same card, and confirm everything behaves exactly as a paying customer would experience it. Back in your InstaWP dashboard, the new site, the WooCommerce order and the subscription all appear together, linked to that customer, so you always know which site belongs to which order. Once this test passes, you are ready to sell.
The Pricing Math: Where Your Margin Comes From
Your margin is the gap between what you charge and what the plan costs you. Because you choose the retail price and the InstaWP plan separately, that gap is entirely in your hands. You pay InstaWP a fixed, predictable cost per site, and you are free to price your product above it.
| Product | You charge the customer | Runs on plan | You keep |
|---|---|---|---|
| Service-business site | $19 per month | Starter | The difference between your selling price and the hosting cost, every month |
| Portfolio site | $19 per month | Starter | The difference between your selling price and the hosting cost, every month |
| Ecommerce store | $29 per month | A higher-resource plan | The difference between your selling price and the hosting cost, every month |
The retail prices above are examples, not fixed rules. Because billing is recurring through WooCommerce Subscriptions, each active customer pays you every month while you pay one fixed plan cost, so the margin compounds as you add subscribers. You can check the exact cost of each InstaWP plan in your dashboard and set your prices with your real numbers in front of you.
Make Every Site Look Like Yours
A hosting business lives or dies on how professional it feels, and a generic subdomain gives the game away. InstaWP includes the pieces you need to keep your brand front and centre from checkout to the customer’s dashboard.
- White-label suffix. Replaces the default site URL with your own brand name, so every site you deliver carries your identity instead of a generic address. Set this up on your store early.
- Site credentials card and magic login. The setting you enabled in Step 5 gives every customer a clean card on their account page, where they can open their site with one click and view their details, all inside your store.
- Domain mapping. Customers can connect their own domain straight from that card, following the on-screen instructions, without ever contacting you.
Together these turn a raw provisioning system into a polished product. The customer buys from your brand, logs in through your brand, and points their own domain at a site that never mentions anyone else.
Offering Free Trial Sites
Free trials are one of the strongest ways to win hosting customers, because they let a buyer see a working site before they commit. The InstaWP integration plugin supports this: you can offer a trial site that a customer later upgrades to a paid plan, and the auto-convert setting handles the switch when they do.
This lowers the barrier to that first signup, then gives you a natural upgrade path once the customer is invested in the site they have started. The full trial configuration is worth setting up as a second phase, once your paid flow is running smoothly.
Before You Go Live: a Pre-Launch Checklist
Run through these before you take real orders. Each one is a small thing that causes a real problem if it is skipped.
- Switch to a real payment gateway and disable the cash on delivery method you used for testing.
- Turn off manual renewal payments in the subscriptions settings, so renewals bill automatically.
- Confirm every product is mapped to the correct snapshot and plan, and set to permanent.
- Check instant snapshots are enabled on every site you sell, so provisioning stays fast.
- Connect your own domain to the store and apply the white-label suffix.
- Place one final real test order through the live gateway to confirm the end-to-end flow.
Frequently Asked Questions
Do I need my own server to sell hosting with WooCommerce?
No. InstaWP provides the entire infrastructure. You only run the WooCommerce store, and even that can be hosted on InstaWP. There are no servers for you to manage, patch or scale.
Who handles provisioning when someone buys?
The InstaWP integration plugin does it automatically. When the order is placed, it deploys the snapshot mapped to that product on the plan you chose, then shows the customer their new site. No manual step is involved.
What do I actually pay InstaWP?
You pay for the InstaWP plan each site runs on, which is a fixed cost per site. What you charge the customer on your store is entirely separate and up to you, so your retail price sits on top of that cost.
Can customers use their own domain?
Yes. Every deployed site includes domain mapping from the customer’s account card, so they can point their own domain at their site by following the on-screen instructions, with no help from you.
How fast do the sites deploy?
With instant snapshots enabled, a site is usually ready within seconds of checkout. Without them the site still deploys automatically, it just takes a little longer to build.
Is this only for agencies?
No. Agencies, freelancers, template sellers and anyone who builds WordPress sites can use it to turn one-time projects into recurring revenue. If you can build a site and set a price, you can sell hosting with WooCommerce.
Start selling hosting today
You do not need a data centre, a reseller contract or a support team to sell WordPress hosting. You need a WooCommerce store and InstaWP behind it. Build your snapshots, list your plans, and let every order provision itself. New accounts start with $25 in credits, so you can build and test the entire flow before you charge a single customer.


