If you own a WordPress website or online store, you probably know how important email communication is. By default, WordPress uses PHP SMTP for sending emails, but many people encounter issues with email delivery. That’s where an SMTP plugin comes in handy.
At InstaWP, we have partnered up with the most reliable and powerful plugin, Post SMTP, to help you quickly install it on your WordPress site. This way, you can overcome email delivery challenges and improve your email communication.
Now let’s take a look at some Prominent features of the Post SMTP plugin, which makes it a top choice for any WordPress user ( individuals or agencies). Then, I will show you how easy it is to integrate it with your WordPress site.
Prominent Features Of SMTP
The free version offers several features, but for full potential and advanced options, their Pro version is ideal. Here are the top 5 features making it a go-to SMTP plugin for any WordPress user or agency:
1. Easy and Quick to Set Up
It offers an easy integration process and allows anyone to improve their WordPress site’s email delivery promptly. Whether you are an individual owner or agency handling numerous websites, you can set it up in minutes. No more wasting time on complex SMTP setups – now you can focus on what really counts: your business.
2. Notifications Alerts
Say goodbye to the email delivery issue! This plugin keeps a watchful eye on your emails and sends you instant notifications if anything goes wrong. You can choose email, Slack, Twilio, or Pushover notifications. No matter what you pick, you will be the first to know about any WordPress mail issues.
3. Email Reports
Curious how your emails are performing? This plugin gives you the insider info you need. See stats like how well your emails are doing overall and even a cool graph showing delivery success. Plus, you get to choose how often you want these reports (daily, weekly, or monthly) whatever works best for you.
4. Mobile App
In today’s world, our mobile devices are constantly by our side, whether we are on vacation or travelling. Recognizing the significance of WordPress email functionality, Post SMTP provides mobile apps for both iOS and Android. This means you can stay on top of your emails no matter where you are. If something does happen to go wrong, you can easily resend emails with just a tap on your screen.
5. Support on Priority
Quality support is indispensable, especially when facing challenges. Priority support, available with the Pro version, is your safety net in any worst-case scenario. While priority services always come at a cost, the benefits are invaluable.
With the Pro version, you will get immediate assistance from the expert WordPress team at Post SMTP. Plus, the Pro version doesn’t just stop at support; it also unlocks other powerful features that you can find here: Post SMTP Pro (PostMan SMTP).
If you are eager to learn more about the features and benefits, rest assured we have got you covered. You can find benefits and why we chose to partner with Post SMTP here: Empower Your WordPress Email Delivery with Post SMTP.
Now that you learned about its features, let’s delve into how you can seamlessly integrate it.
Setting Up WordPress Post SMTP Plugin
Thanks to our partnership, we have added the Post SMTP plugin to our utility plugin list for easy installation. Setting it up with InstaWP is a breeze. If you are configuring it on any WordPress site, you can follow these steps after installing the Post SMTP plugin directly from the WordPress repository.
Step 1: Install Post SMTP Plugin From InstaWP Quick Set Up
If you haven’t signed up on InstaWP yet, go ahead and register by filling out a simple signup form.
- Go to your InstaWP Dashboard and create a new site by clicking + Add New button.
- From the Utility plugins, you will find the Post SMTP plugin. Just select it and proceed to create a new site with the Create Site button.
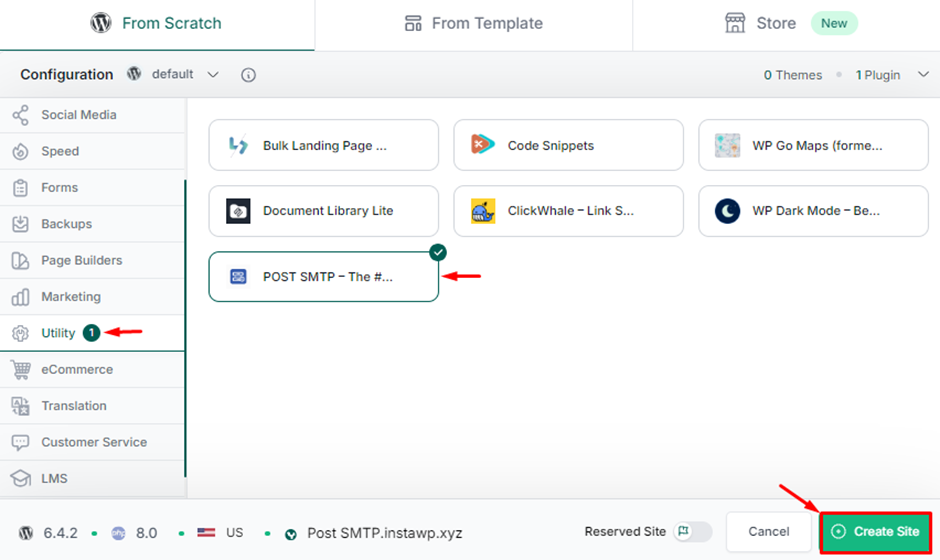
Your WordPress site with InstaWP and the Post SMTP plugin installed is now ready to go! Now open your WordPress dashboard, where you will see the Post SMTP menu.
Step 2: Choose Your SMTP Mailer
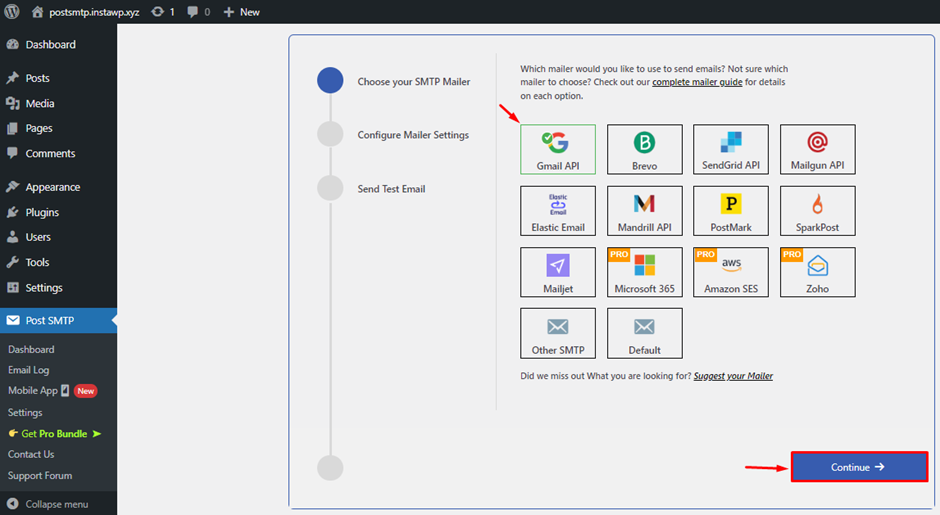
This is the first POST SMTP setup screen from where you can choose your preferred SMTP mailer and click Continue.
Here, I will configure the Gmail account that’s why I am selecting Gmail API as my SMTP mailer.
Step 3: Configure Your Mailer Setting and Address
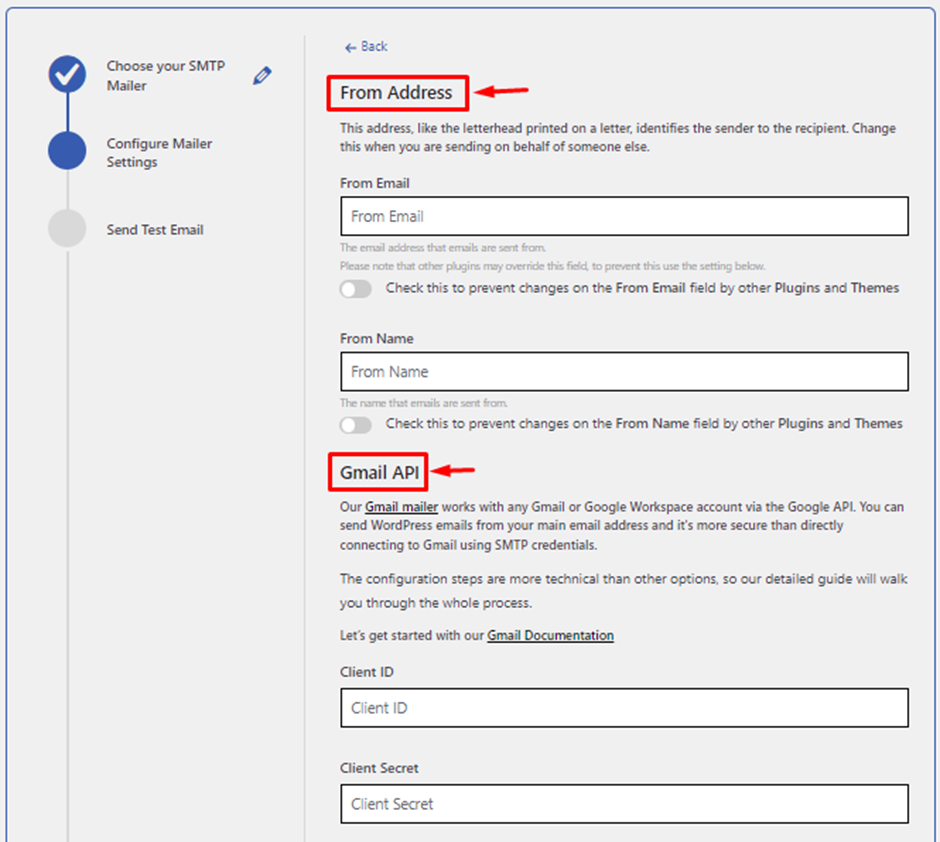
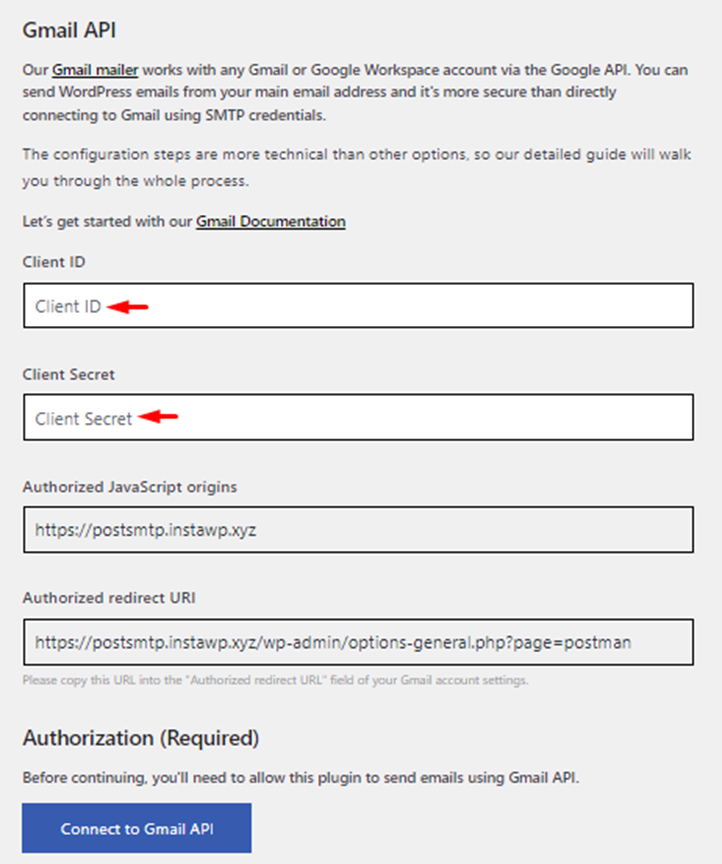
Next, you will need to connect your Gmail API to set it up for SMTP. Here, you will find two main sections: From Address and Gmail API.
Step 4: Enter Your Email Address & Name
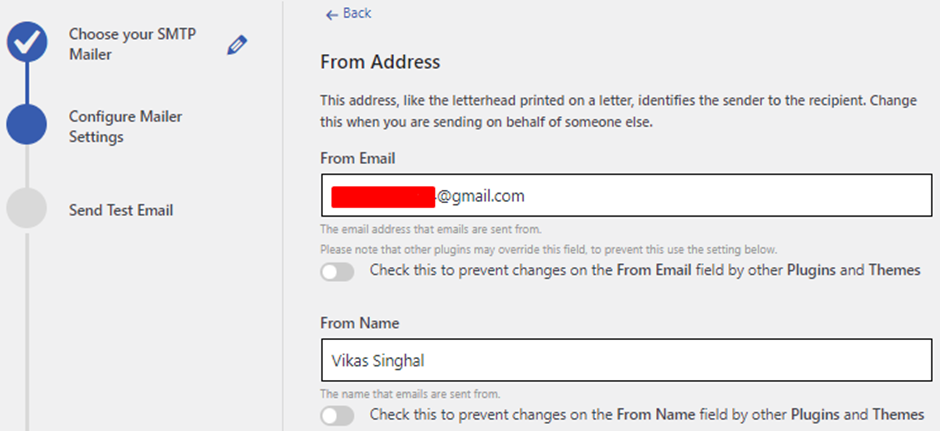
In the From Address section, enter your Gmail account that you will use for WordPress SMTP emails and your display Name for those emails.
Step 5: Create a New Project on Google Cloud Console
In the Gmail API section, you will need a Client ID and Client Secret information.
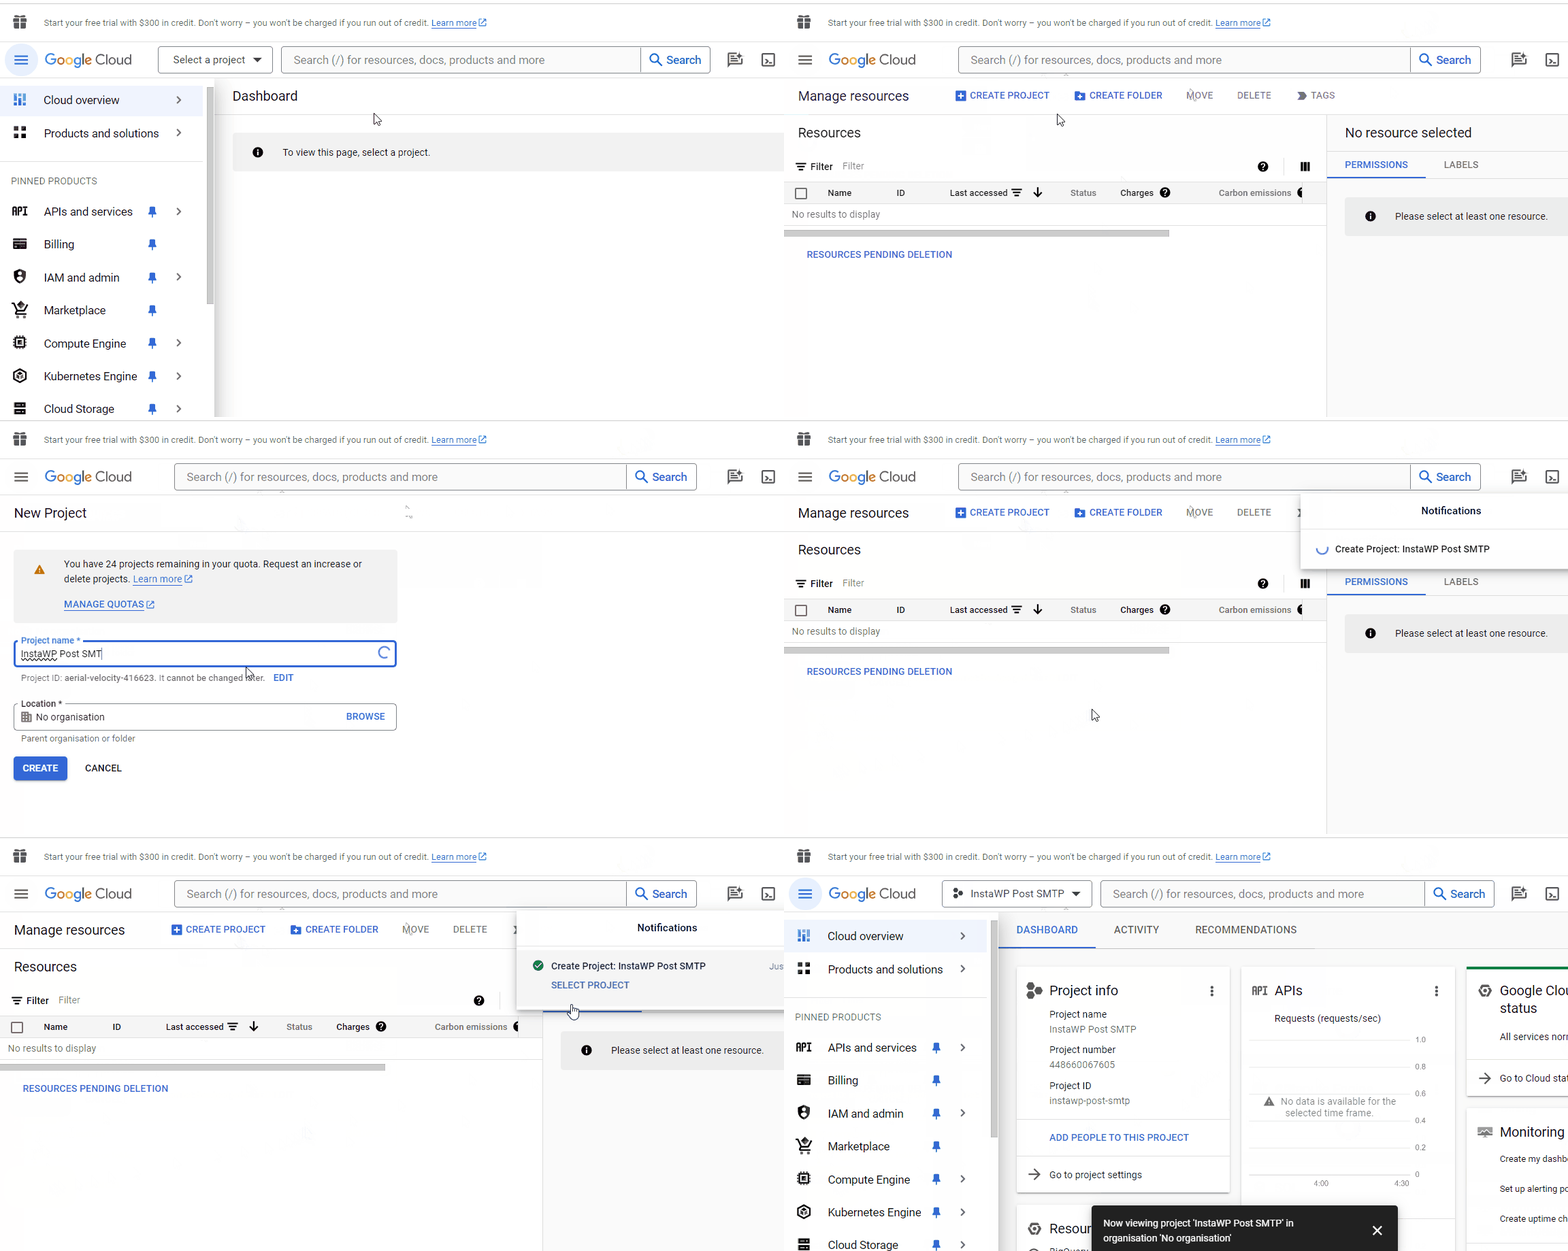
Here are the steps to create and extract this information for your Gmail account.
- Go to your Google Cloud Console, and Select a project.
- If you already have an existing project, simply select it. Otherwise, click on NEW PROJECT. Then, enter your Project name and the Location for your organisation.
- Next, click CREATE and it will take a few seconds for your new project.
Step 5: Enable Your Gmail API
Now, it’s time to enable your Gmail API. So, navigate to APIs and services and click on Library. Search for the Gmail API and enable it by clicking on the Enable button.

Step 6: Create Credentials – OAuth client ID
After enabling the Gmail API:
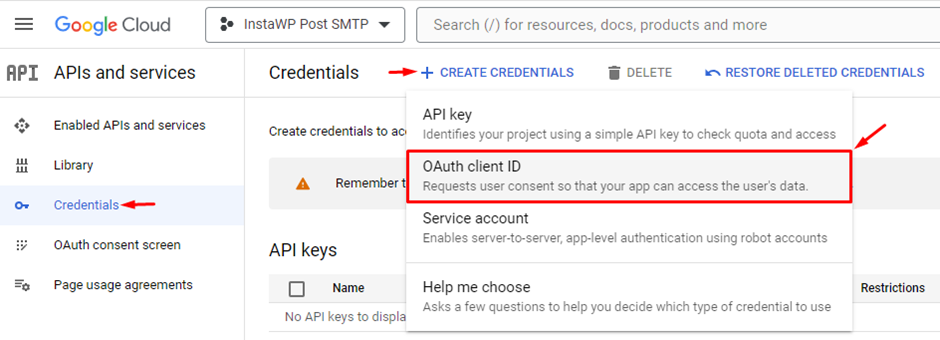
- Go to the Credentials section >> click on the + CREATE CREDENTIALS button >> select OAuth client ID.
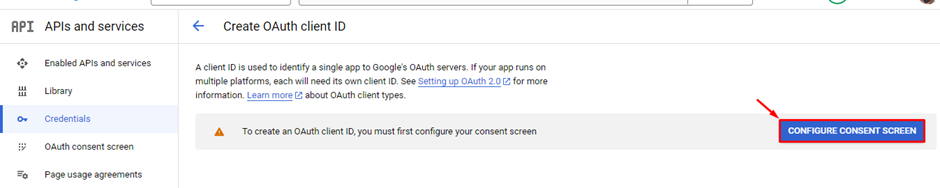
- Then, it will prompt you to confirm and provide your consent to create the OAuth client ID. Simply click on CONFIGURE CONSENT SCREEN.
- Select your External as a user type and click CREATE.
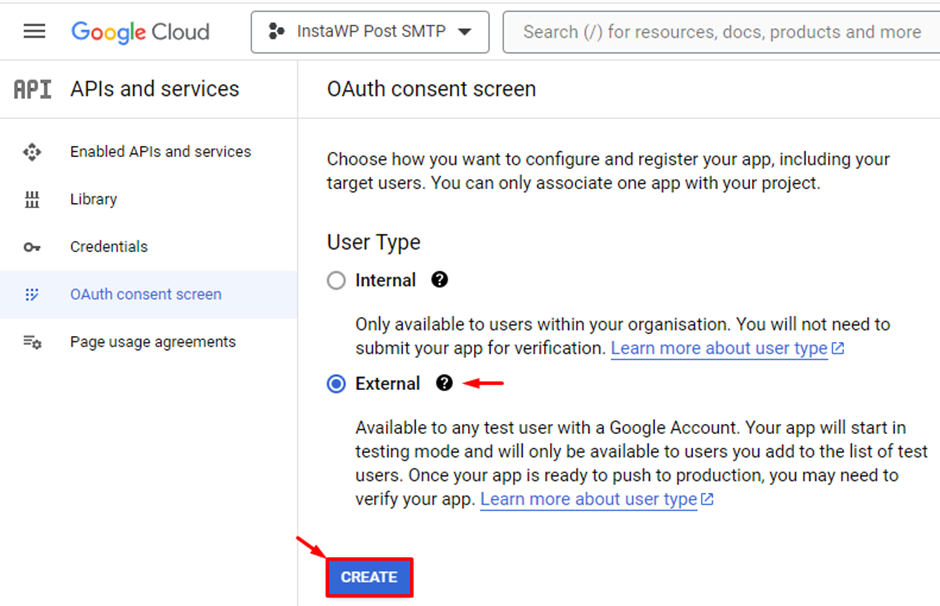
- Next, add your App name and User support email in the respective fields under App Information.
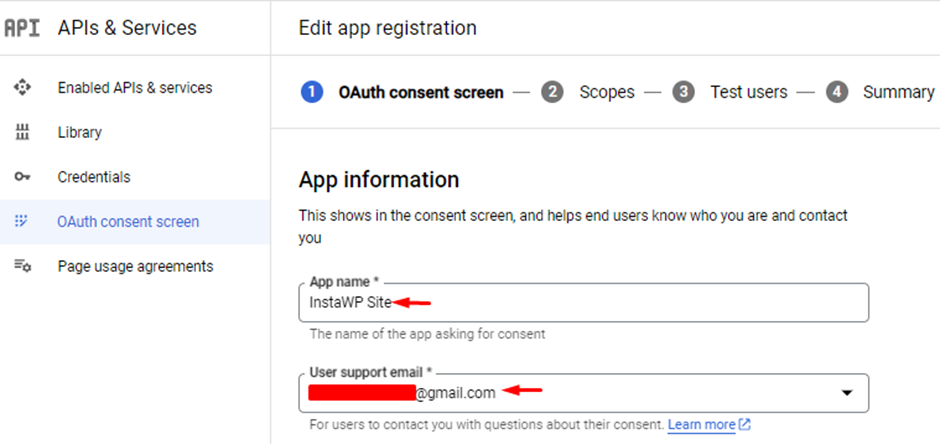
- Also, add your Developer contact information (email).
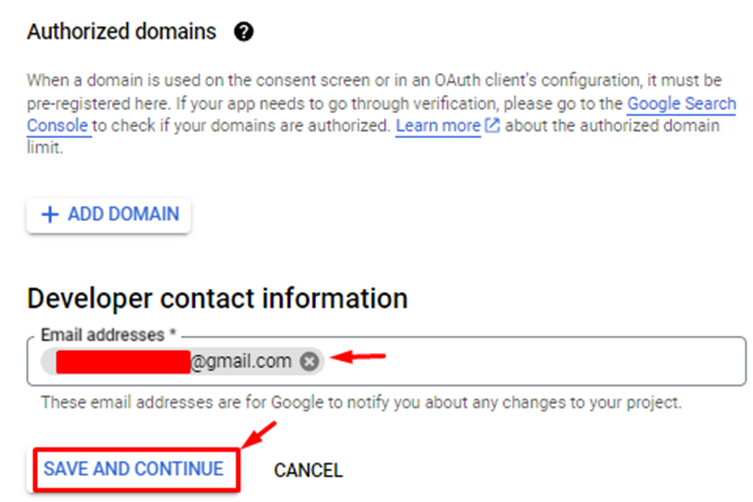
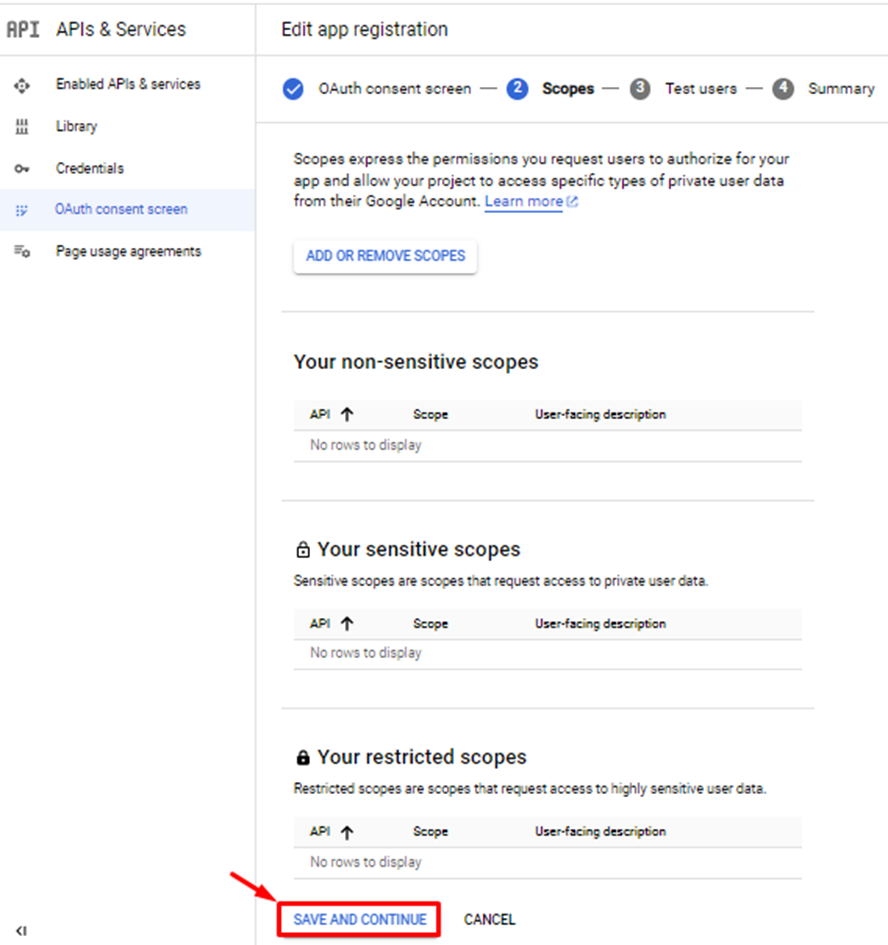
- After that, you can skip the Scope and Test Users sections by simply clicking on the SAVE AND CONTINUE button.
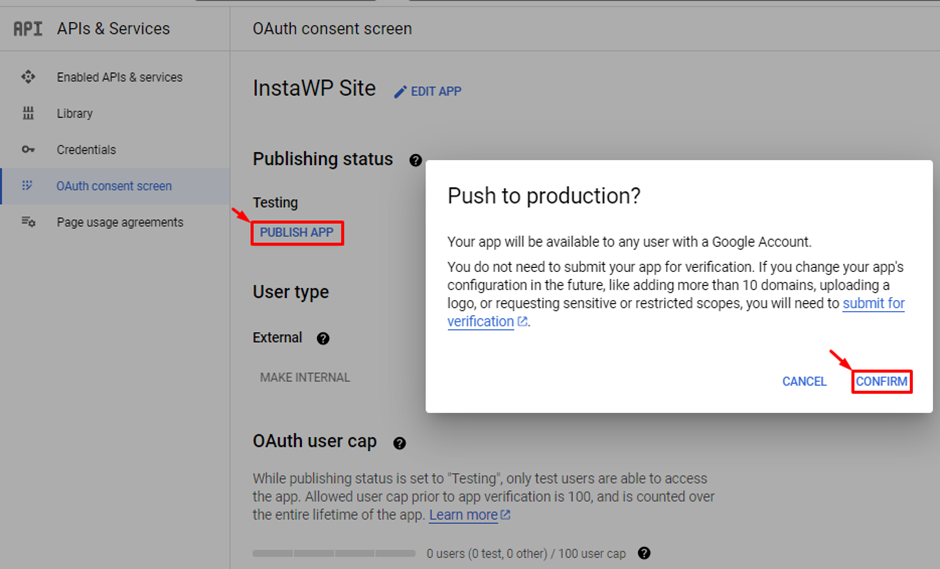
- Once you have run the steps, refresh your page and then click on PUBLISH APP and CONFIRM to push it to production.
Step 7: Create Client ID and Client Secret
Once it’s configured, it is time to create the Client ID and Client Secret. To do this:
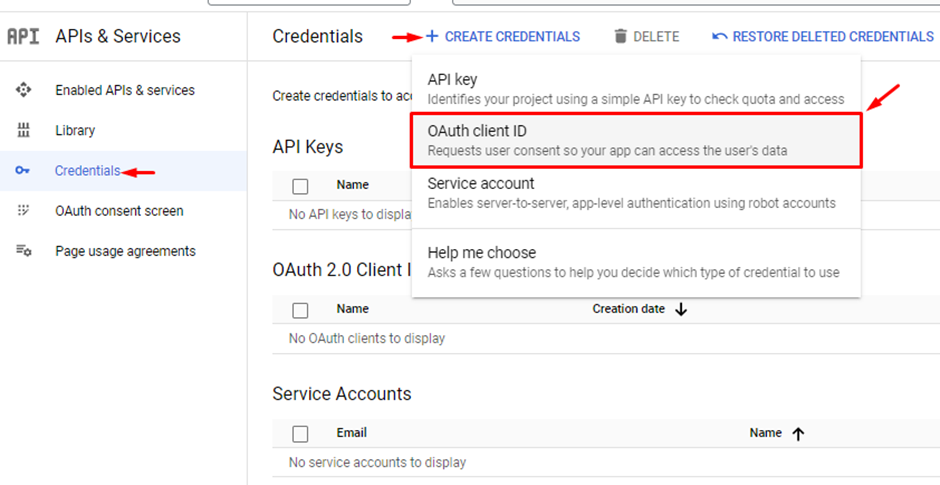
- Go back to the Credentials section and click on + CREATE CREDENTIALS again, then select OAuth client ID.
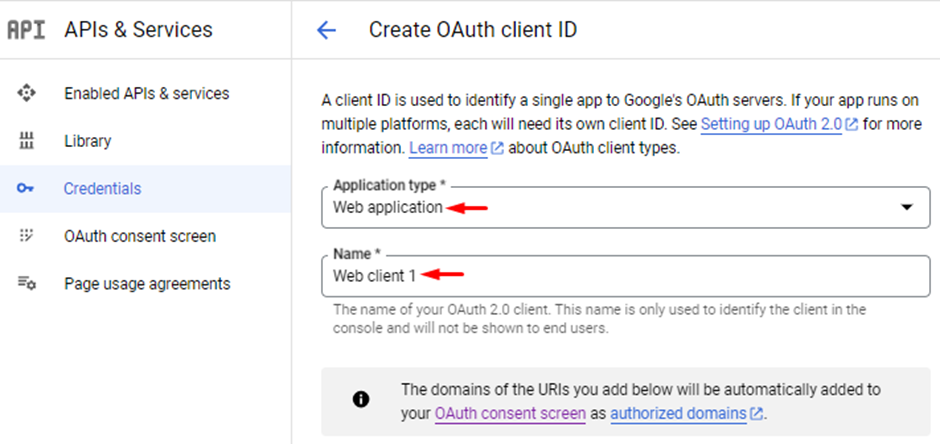
- After that, select the Application type i.e. Web application, and enter the Name.
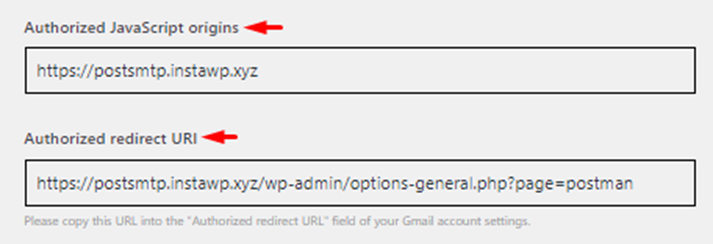
- Scroll down to enter the Post SMTP Authorized JavaScript origins and Authorized redirect URIs >> click CREATE.
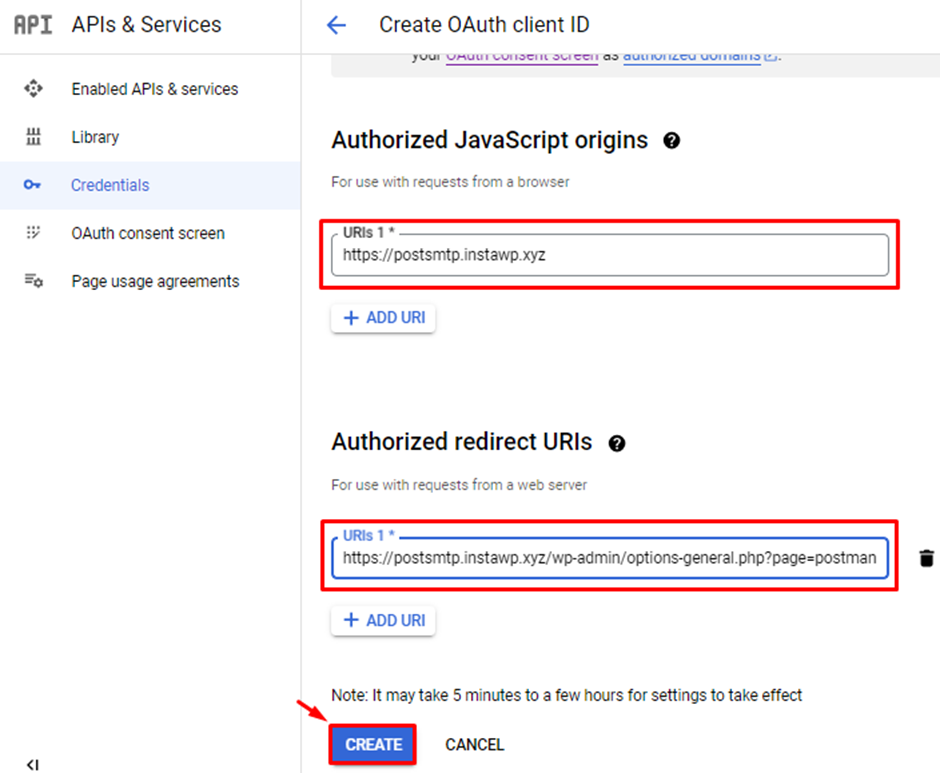
You can find them in your Configure Mailer Settings section.
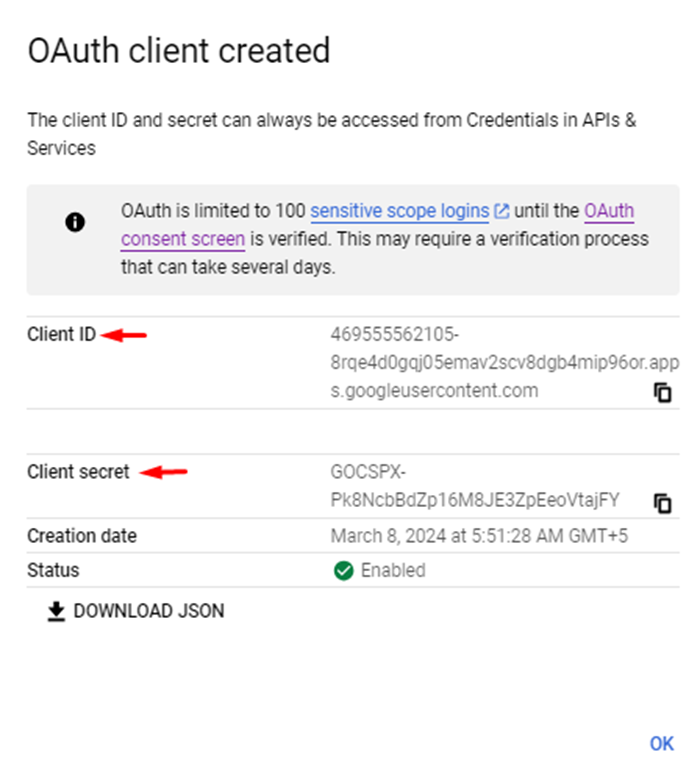
- After you have created them, a popup will appear on your screen displaying your Client ID and Client Secret.
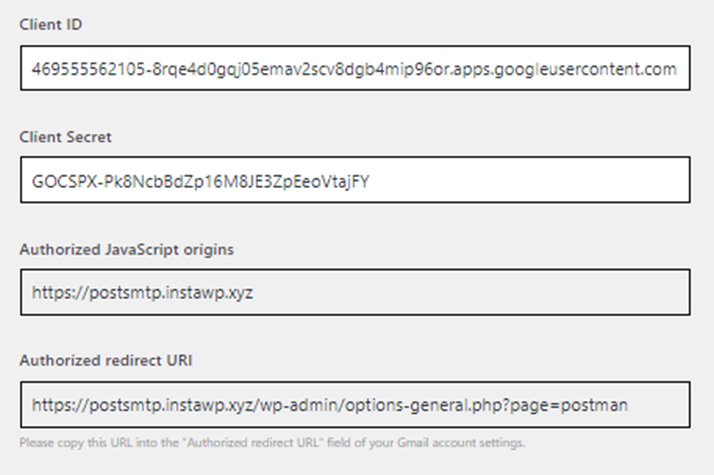
- Open your WordPress dashboard >> Post SMTP (Configure Mailer Settings) >> paste this information into the required fields. Then, click on Connect to Gmail API.
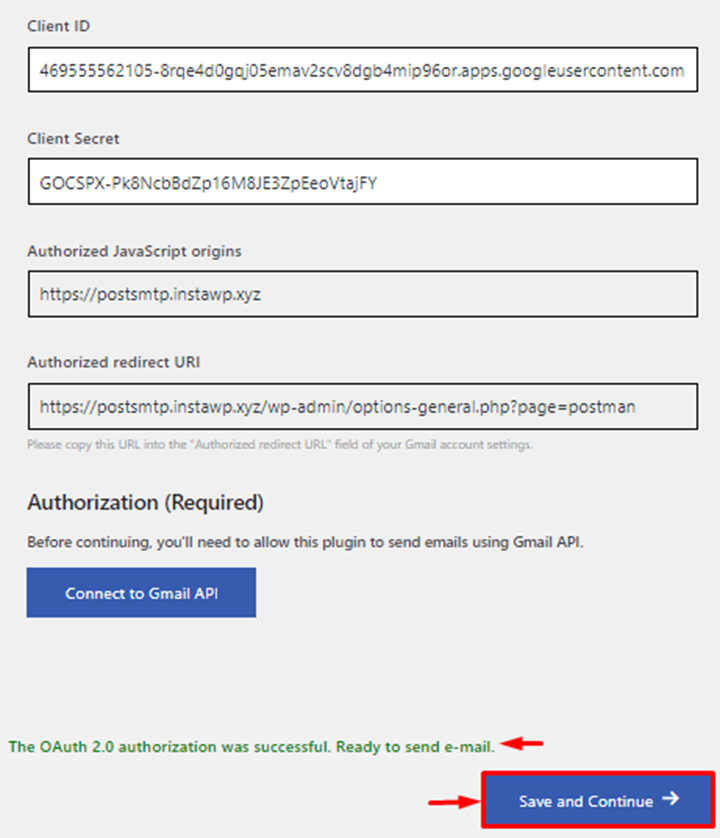
You will be prompted to allow access in order to connect to the Gmail API. Once your Gmail API is successfully connected, you will see a message in green: The OAuth 2.0 authorization was successful. Ready to send email.
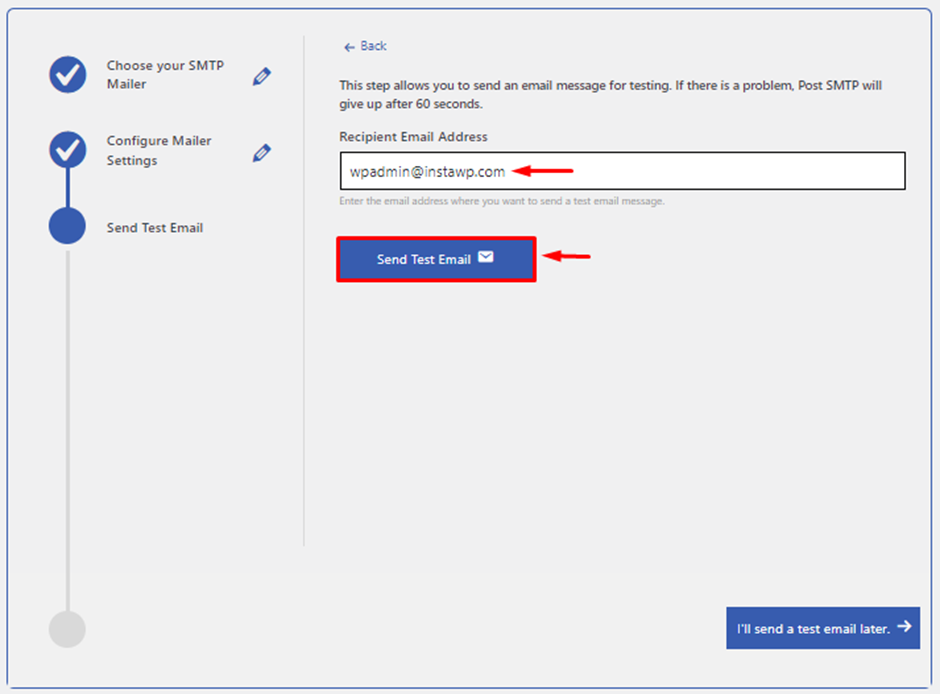
Step 8: Test Your WordPress SMTP Email Plugin
Finally, to ensure that your WordPress SMTP setup is working correctly, you will need to test it by sending an email. Simply enter the Recipient email address and click Send Test Email.
On the successful testing, you should get this email
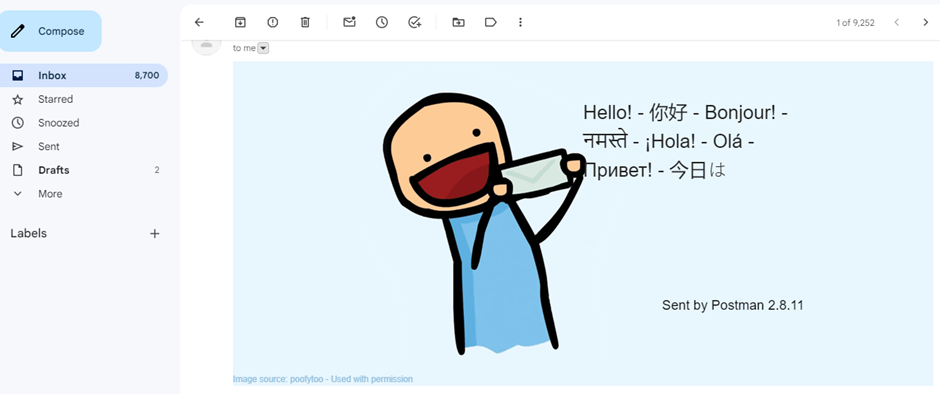
Tada! It’s done.
Wrapping It Up
In wrapping up, the Post SMTP plugin, in partnership with InstaWP, offers a strong solution to handle email communication for WordPress websites and online stores.
It comes packed with handy features like quick set up, Notifications and alerts, detailed email reports, mobile app, and top-notch customer service.
Setting up the plugin through InstaWP is a breeze and works smoothly with any WordPress sites. By using Post SMTP, you can tackle common email issues and make sure their email gets through reliably.
Its simple interface and advanced features make it a valuable tool for improving email deliverability. With Post SMTP, WordPress users can spend less time worrying about emails and more time focusing on their business growth.