Are you trying to figure out how to make major changes to your public (live) website without affecting it or your visitors? Like adding a new plugin, trying a new theme, or overhauling a new design. Either you want to build a temporary WordPress test site to test out the WordPress platform? Maybe just want to gain practical knowledge of WordPress features, plugins, themes, etc. This is where the WordPress test site comes in handy!
There are various ways to set up a WordPress test site, and each of them serves its own purpose. While some may only work with having an existing WordPress site, others don’t require a domain or hosting site to create a staging site. Right, you can test WordPress for your live site without messing up your live site.
In this guide, we have explained the easiest way to create WordPress test site. Brace yourself! In this guide, we will let you through why a WordPress test site is needed and how you can create one just as quickly as it came to your mind.
Let’s get started.
What is a WordPress Staging Site?
To put it simply, the staging site is a clone of your live website. It is an environment created to test and experiment with major changes, features, or anything that you plan to implement in a secure environment or live website. Developers typically use a WordPress test site before going live. They use it to test changes, plugins, or themes and fix bugs before going to production.
The WordPress live site and WordPress test site are intentionally identical – the same settings, widgets, plugins, and so on. The only difference, as you might know, is that the latter is not live. Instead, it exists in a kinda sandbox where you can see how your website would react to the scenarios you put it into. Moreover, how your public will view it will not impact your live website until you upload it to your live server.
Create a free WordPress Test Site with InstaWP.
Importance of Staging Site
Before learning how you can create a staging site, let’s discuss why creating a staging site environment is necessary to test WordPress.
- Reduce Risk: It is a risk-free way to do your website’s best practices without risking any unwanted surprises when it is published live. A staging environment is the best practice you can make any changes to it without failing to protect your new code and leading to more technical problems down the line.
- Private Blank Canvas: This is the most obvious and main benefit of having a WordPress test site. It is a great way to test plugins, new designs, and features. You can add, uninstall, or create new pages as a blank canvas without any effect on the live site.
- Increased Performance: By testing everything thoroughly and identifying errors at an earlier stage, your production server is likely to be protected from any issues. It may result in improved performance, better experience, and reduced risk of downtime.
- Ensuring Quality: Staging environments help to ensure quality under a production-like environment by performing an ultimate quality assurance check, and protecting your site from incompatible code.
- Protect Website’s SEO: Staging sites remove the threat of errors on your website that can degrade the site’s ranking due to error-ridden pages. By constant testing of everything before publishing live, your actual website will be working efficiently.
How to set up a WordPress test site?
There are different ways you can create a WordPress test site. One of the easy ways is to use a staging site tool. It typically requires a few clicks, which makes it easy for beginners. In this guide, we are going to tell you how to set up a WordPress test site through InstaWP.
InstaWP is a service that can handle all use cases and more. It is quite simple you can spin up quickly a fresh WordPress install just with one click. Besides, by using pre-set templates and configurations, you can save time. Further, it lets you share links with other people to let them spin up a site using your template and a lot more. InstaWP comes with notable features and advanced ones that I will explain after I’ve shown you how to create a blank WordPress site.
Let’s Start:
1. Creating a WordPress Test Site
Visit the InstaWP website if you want to create a quick site without registration.
Then, click on ‘Try WordPress Sandbox’ or here, set up your site, and launch it. (Remember, any site created without registration will be valid for 8 hours.)
Tip: To get all the free benefits and especially the increased limit for the sandbox of 48 hours, you must create a free account! If you are a non-register, you can register yourself directly from here ‘Register’.
Once you have registered yourself for an InstaWP account, you can then create a new site. Click on the “+ New Site” or “Add New” button in the dashboard. This will open up a popup where you can configure the basics of your test site:
- WordPress version – Up to the nightly version.
- PHP version – it’s up to 8.2
- Configuration – choose a configuration or create a new one.
- Site name – Helps you distinguish between sites in your InstaWP dashboard.
Or, you can also create your site from pre-setup templates. (We will discuss templates in the further section).
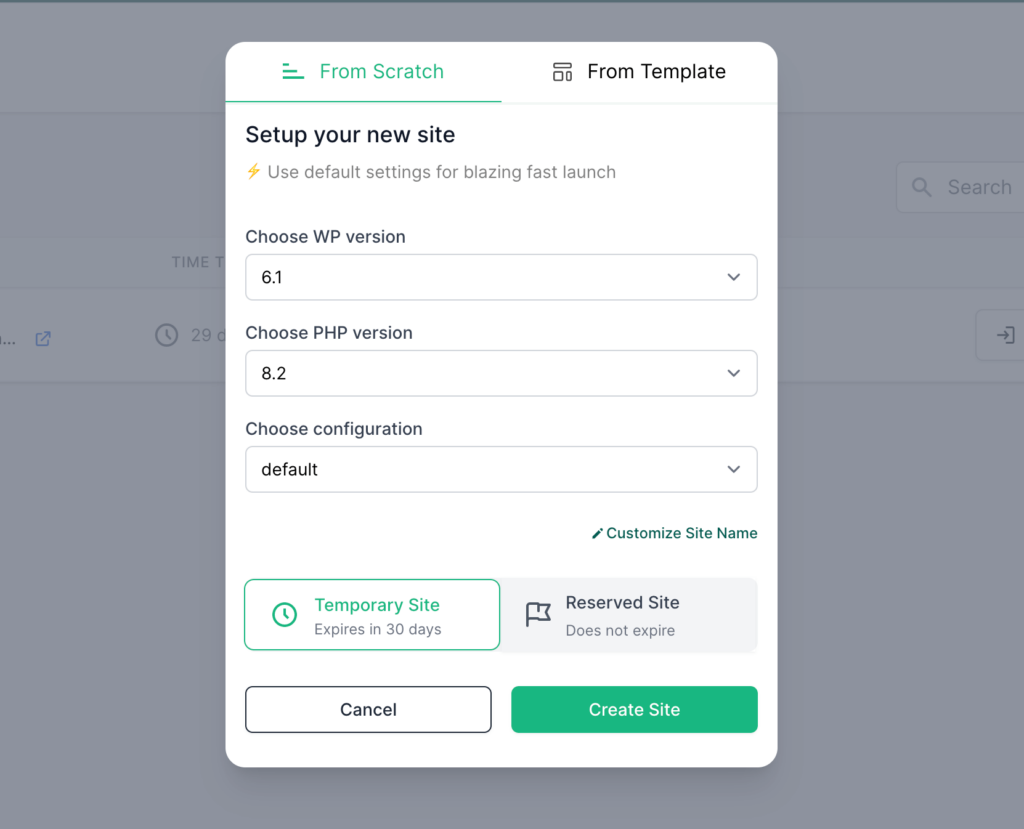
Click on ‘Create Site’ and within seconds your new WordPress test site will be ready with login credentials. You can log in using the ‘Access Now’ button or you can just click the Magic login button to automatically login to your WP admin.
Inside the WordPress dashboard, you will see it works exactly like any other self-hosted WordPress install. You can install or change the themes and plugins, adjust settings, users, and so on. There are different tools you can install for your WordPress site and as per your need, you can further configure settings. If you have created the test site with the latest WordPress version, then you can customize your entire site with blocks and patterns. Furthermore, you can add pages, posts, or categories. Basically, you can do everything that you’re thinking of implementing to your live website.
2. Manage Your Site Using Free Tools
In addition to accessing your WP admin area by clicking on ‘Auto-login’, InstaWP also provides several tools for accessing and managing your website, which you can use from the ‘Sites’ dashboard:
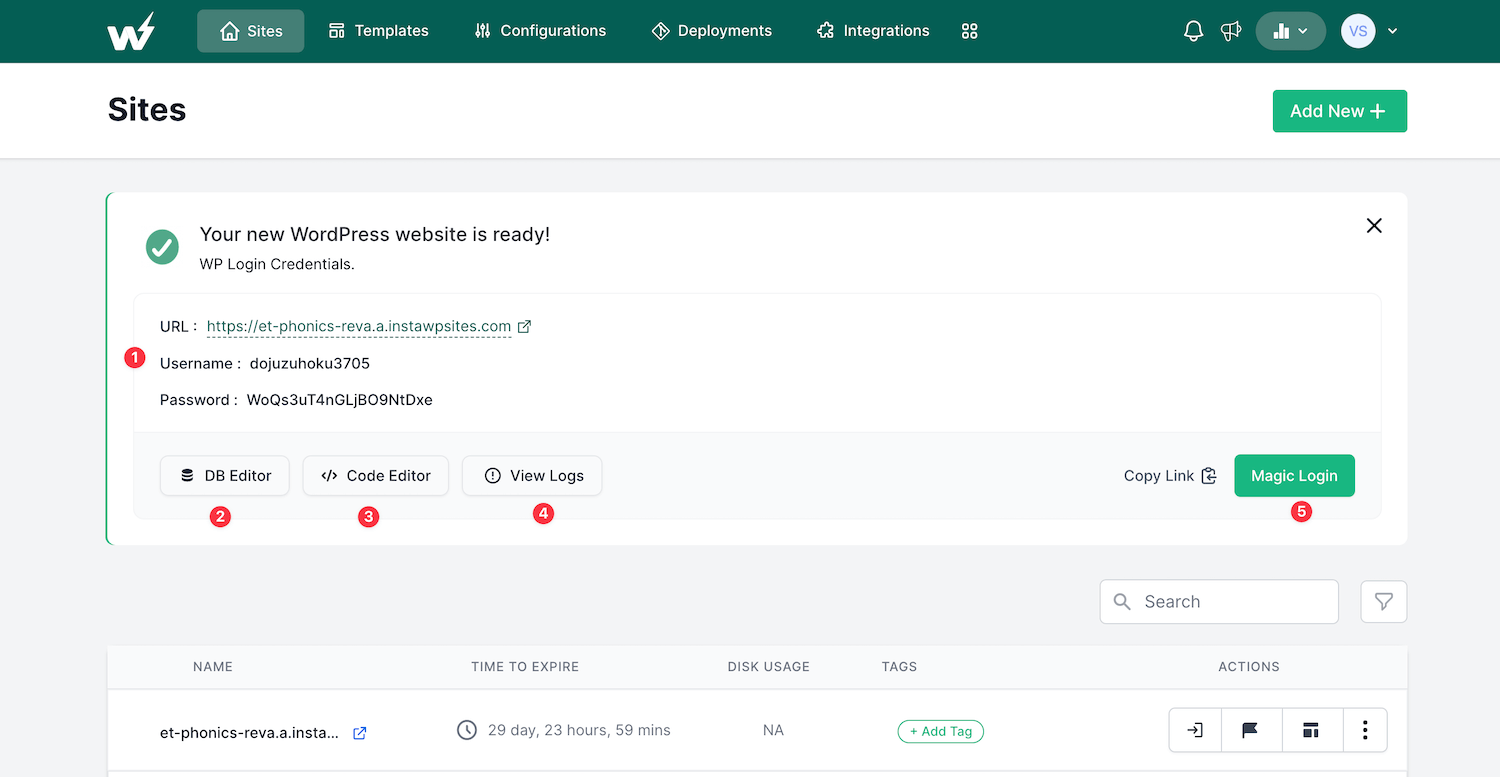
- URL, Username, and Password can be saved for future use or can be obtained from Sites > View Creds.
- The ‘DB Editor’ option lets you edit database of your site using Adminer (phpMyAdmin alternative).
- Next to ‘Open Database’ is ‘Code Editor’, which opens up an in-browser multi-tab enabled code editor where you can edit all the files, themes, and plugins. It is a quick way to make edits if you don’t want to use FTP (which, btw, you can do that too).
- The ‘View Logs’ button allows you to view the error logs and access logs.
In addition, you get a bunch of options when clicked on the dropdown:
- From the ‘View Creds’ option as well you can see the WP details.
- You can ‘Migrate’ the site to live hosting, click on the option, it helps you to migrate your WordPress to the available choice of host.
- From Export As, you can export the site as a zip file to use in LocalWP (local development).
- Save As Template: You can save your site as a template for future use. (I will explain this feature in the next section).
Then under Advanced options that are available in paid versions, you get:
- FTP/SSH – secure network and file transfer
- Map Domain – you can map a custom domain for the particular sandbox site.
- Reserve site – you can, through this tool, reserve your site so that it doesn’t expire at all.
3. Configure Templates & Configuration
InstaWP is not just instant in name but provides features as well. It helps you to save time with two presets:
- Templates
- Configurations
The templates feature gives you the option of saving your existing site as a template. You can further create new sites through the template and it will look exactly like the original one. In the free version, you can only create 1 template. However, you can create 5 template sites.
Configuration feature lets you create a preset for technical details like WordPress version, PHP configuration, WordPress configuration, and so on. You can also pre-install plugins and themes.
Templates
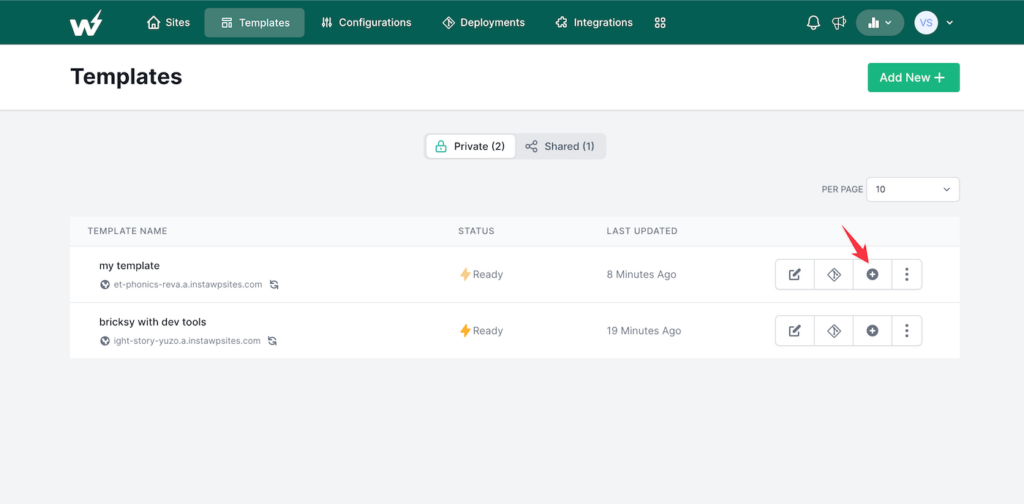
In templates, you can go beyond just pre-installing plugins and themes, it lets you configure and save your settings. To create a template, navigate to the drop-down of the active site that you want to save as a template and select the ‘Save As Template’ option.
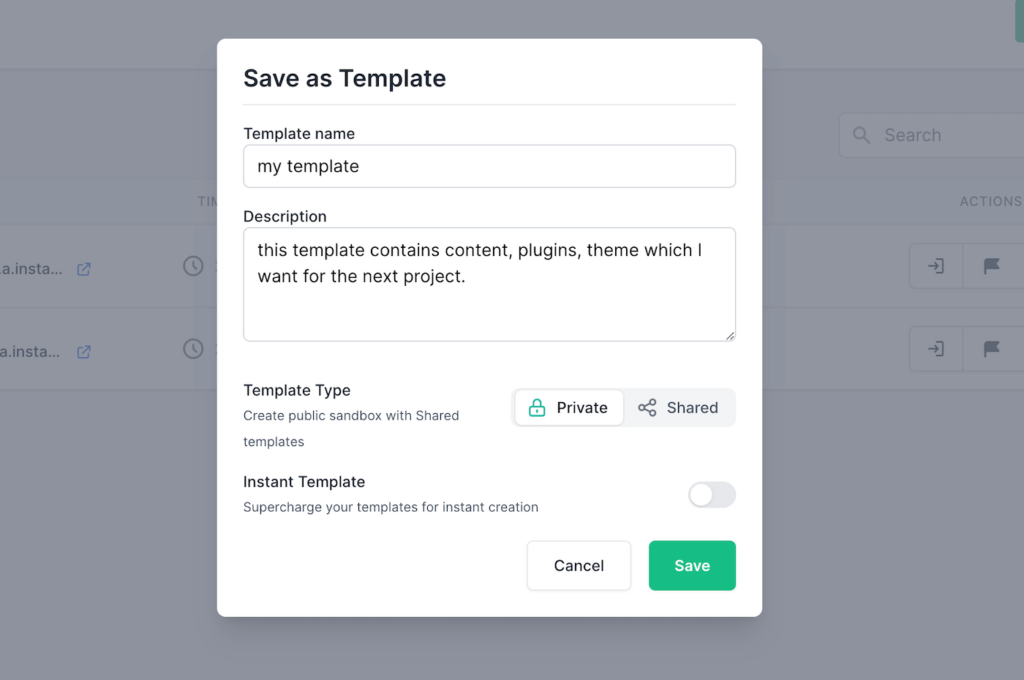
It will then open up to a slide-out from where you can configure settings like:
- Template Name & Description: this is where you have to fill in the basic information, like the name of the template and what it does.
- Enable Sharing: this lets other people create template sites by clicking on a link. If you’re a developer who wants to provide potential customers with WordPress sandbox sites, this is what you can use. The customers need to do is clicked the shared link, and they can create their site install.
- Instant template: it is a paid feature. If enabled, the site will be instantly created based on the template
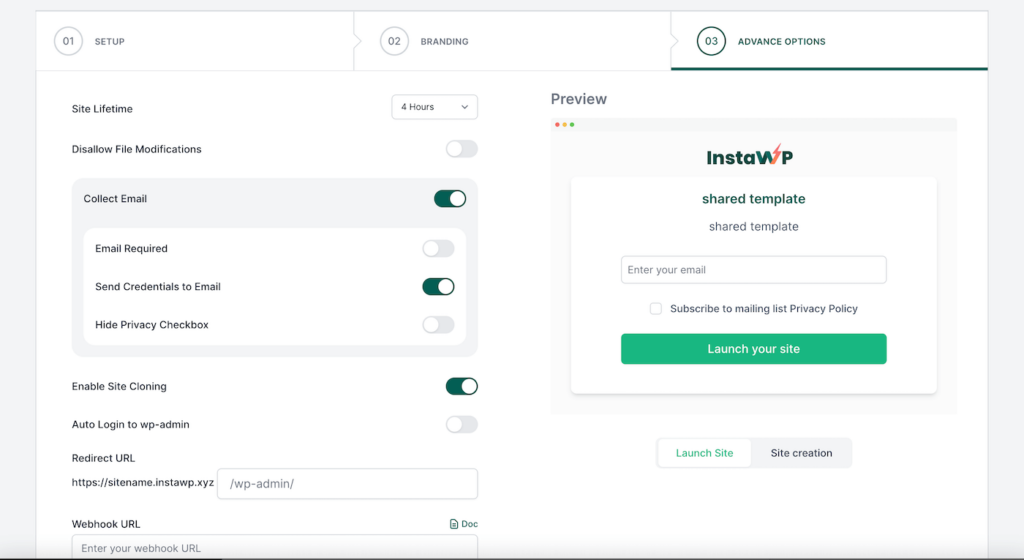
If you opt for ‘Sharing’, then advanced options will be opened to you (they are all in paid version). You get the ‘site lifetime’ option, and the ‘disallow file modification’ option if you don’t want others to modify sandbox. Further, you get a cool feature, where you have the option to collect and require people to enter emails. You can even customize the email that people receive and add a branding logo.
Once you are done with configuring, ‘Save’ and see the added template in the ‘Templates’ section. You can edit it if you want to edit the template. Besides, you can create a new site from the template by selecting this ⊕ symbol.
Configuration
Now moving forward to the ‘Configurations’ tab, you’ll find three tabs for each configuration:
- General: Here, you choose WordPress and PHP versions from the dropdown.
- PHP: Here, you can do PHP configuration settings such as memory limit, max. execution time, max. upload size, etc.
- WordPress: In this tab, you can install plugins and themes through wordpress.org or enter the direct URL for the same (it is in paid version). Further, you can enable multi-site installation.
Don’t forget to ‘Save’ or ‘Save As New’.
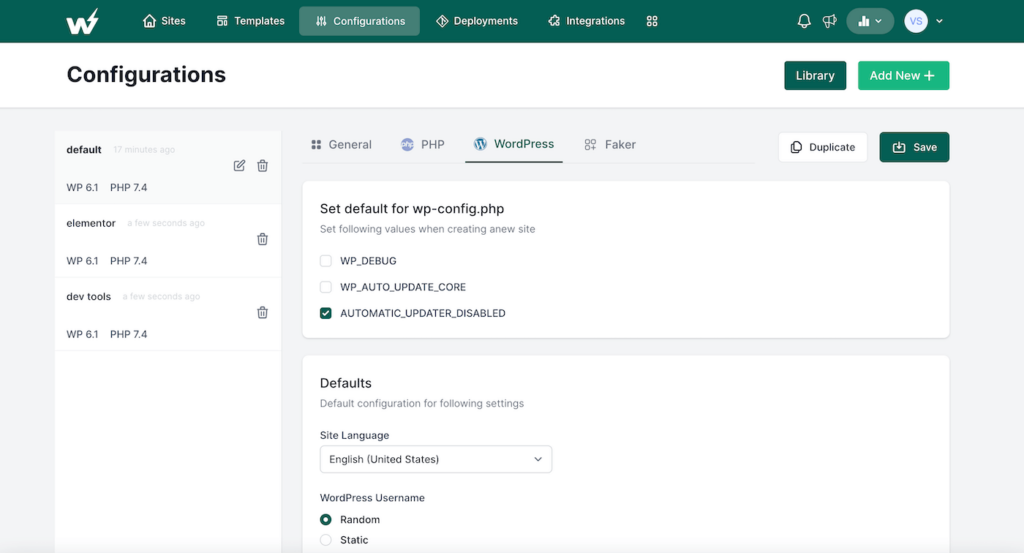
You can add as many configurations as needed, they will show in the sidebar interface. While you create a new WordPress test site, you can choose from any of the pre-built configurations.
4. WordPress Github Integration
InstaWP has come up with the latest new feature, which is the Deployments tab.
Here, you can easily connect your GitHub repository to this server. For that, go to the ‘Add New+” button and select the ‘Public’ repo type or ‘Private’ based on whichever repo you have. In the ‘Public’ repo:
In ‘Repo URL’, copy the ‘HTTPS’ link from your GitHub repository,
Then under ‘Branch‘, add the branch you want to deploy your site to, and further add the destination folder of your plugin.
Every time you create a new instance of a template, your GitHub repository will be pulled, and this folder content will be replaced with the contents of live Github code. Click on ‘Add’, and it will be added to your deployments tab.
As mentioned before, in the templates section, go to the ‘Enable Deployment’ option beside the edit option. You can then select the repository you want to deploy when a site is created using the specific template. Now, you can create a new site from that template.
If you have Private repo, then you must enter SSH Link, then add a branch and destination folder.
Along with that, generate SSH Key Pair that you can copy to your repository.
(To know in detail how you can add a GitHub repository with InstaWP, watch this video!)

Notable Features of InstaWP
- Site Tools: You get full access to the site with FTP, SSH, database editing, and more advanced tools.
- Slack Integration: InstaWP comes with Slack Integration, which means you can create WordPress disposable website and get the credentials. So, if you have teammates in Slack, then it’s easy to access through Slack.
- Chrome Integration: It also comes with Chrome integration, once you have added the Chrome extension, you can use it to add the ‘Launch’ button to WordPress.org plugins and themes. It lets you create a new site that pre-installs the extension – a great way for fast testing new themes/plugins.
- White Label custom /Suffix Domain: Another amazing feature of InstaWP is it lets you have your own custom domain for the sandbox sites. It’s great for agencies or if you’re offering testing for WordPress plugins.
- Team/Team Members: Another cool feature is adding a team or team members. You can create a team and add team members to it if you are working in a group.
- Deployment: The latest feature added in InstaWP is the ‘Deployment’ section. It is for deploying your site/project to GitHub repositories.
Conclusion
In the end, you might now know that making changes to the live website can be nerve-wracking, you never know how changes will impact your site. However, by creating a staging site, you can work on anything without the fear of destroying something. You will not risk creating a bad user experience or getting penalized for SEO.
A staging site is your playground, you can do anything you want to do there. As said before, there are several ways, but a WordPress sandbox tool like InstaWP is the easiest and perhaps safest way to go. InstaWP is one of the best tools that give you access to more useful features than other similar tools.


